Choosing Nutritious Ingredients for maximum Flavor and Health
Wholesome & fast: Your Guide to Quick Healthy Meals invites you into the vibrant world of nutrient-packed ingredients that bring life and flavor to your kitchen creations. Selecting fresh, colorful produce and high-quality proteins ensures every bite bursts with taste and delivers essential vitamins and minerals. I still remember the first time I discovered the magic of toasted quinoa paired with bright, crunchy vegetables-it transformed a quick lunch into an unforgettable experience. Incorporating nutrient-dense ingredients like leafy greens, seasonal fruits, and heart-healthy fats elevates any recipe, making your meals both satisfying and nourishing.
Prep and Cook Time
- Planning: 10 minutes
- Cooking: 15 minutes
- Total Time: 25 minutes
Yield
serves 4
Difficulty Level
Easy
Ingredients
- 1 cup quinoa,rinsed and drained
- 2 cups vegetable broth (low sodium)
- 1 tbsp extra virgin olive oil
- 1 red bell pepper,diced
- 1 medium zucchini,diced
- 1 cup cherry tomatoes,halved
- 2 cups fresh baby spinach,roughly chopped
- 1/4 cup red onion,finely chopped
- 2 cloves garlic,minced
- 1/4 cup fresh parsley,chopped
- Juice of 1 lemon
- Salt and black pepper,to taste
- Optional: 1/3 cup crumbled feta cheese
instructions
- Toast the quinoa: In a medium saucepan over medium heat,warm 1 tbsp of olive oil. Add the rinsed quinoa and toast for about 3 minutes, stirring frequently enough to prevent burning. This step enhances the nutty flavor and aroma.
- Add broth and cook quinoa: Pour in the vegetable broth, bring to a boil, then reduce heat to low and cover. Simmer until the quinoa is tender and liquid is absorbed, about 15 minutes.
- Prepare the vegetables: While the quinoa cooks, heat a non-stick pan over medium heat. Add a splash of olive oil,then sauté the garlic and red onion until fragrant and translucent,about 2 minutes.
- Add bell pepper and zucchini: Sauté for 5 minutes, stirring occasionally until vegetables are crisp-tender and slightly caramelized.
- Combine ingredients: In a large bowl,fluff the cooked quinoa with a fork. Gently fold in the sautéed vegetables, cherry tomatoes, baby spinach, and chopped parsley. The residual heat will lightly wilt the spinach.
- Season and garnish: Squeeze fresh lemon juice over the mixture,season with salt and black pepper to taste. Add crumbled feta cheese if desired for creamy tanginess.
- Serve warm or chilled: This dish works beautifully as a hearty side or a light main course, perfect for any busy weekday or relaxed weekend meal.
tips for success
- for added protein and texture, toss in roasted chickpeas or grilled chicken slices.
- Substitute quinoa with couscous or bulgur wheat for a different grain profile without sacrificing speed.
- Make-ahead pleasant: Prepare the quinoa and vegetables separately then combine just before serving to preserve freshness and texture.
- Use fresh lemon juice at the end to brighten flavors without overpowering the dish.
- Keep raw cherry tomatoes handy for extra juicy bursts that bring natural sweetness.
Serving Suggestions
Serve this vibrant quinoa salad atop a bed of baby arugula or alongside grilled fish for a balanced meal. Garnish with extra parsley leaves and a drizzle of high-quality olive oil for a glossy finish. Pair with crusty whole grain bread or warm pita for a comforting contrast. This recipe also shines when packed as a colorful lunchbox meal or chilled for summer picnics.

| Nutrient | Per Serving |
|---|---|
| Calories | 320 kcal |
| Protein | 9 g |
| Carbohydrates | 45 g |
| Fat | 8 g |
Time-Saving Cooking techniques That Preserve Nutrients
Steaming vegetables or using a quick sauté with minimal oil are excellent ways to retain natural vitamins and textures without sacrificing speed. Toasting quinoa before cooking not only boosts flavor but also shortens cooking time by releasing natural oils. When possible, prepare ingredients in batches during weekends or evenings to streamline weekday meals. Using airtight containers keeps prepped components fresh and ready to combine,letting you whip up wholesome dishes with ease.
Flavorful Meal Prep Ideas for Busy Weekdays
Batch-cooked grains like quinoa, brown rice, or farro form the perfect base for meal-prep bowls packed with roasted veggies, lean proteins, and tangy dressings. Layer flavors by marinating tofu or chicken in zesty citrus and herb blends overnight. Assemble colorful salads with a mix of raw and cooked components to maintain texture and nutritional balance. Having flavorful dressings on hand-such as tahini lemon or balsamic vinaigrette-makes transforming basic ingredients into satisfying meals effortless and exciting.
Quick and Healthy Recipes You Can Make in Under 30 Minutes
This wholesome quinoa vegetable salad exemplifies “Wholesome & Fast: Your Guide to Quick Healthy Meals” principles with fresh ingredients, simple prep, and vibrant flavors, all ready in under 30 minutes. Whether you’re craving a warm, comforting bowl or a refreshing salad, quick recipes based on fresh produce and whole grains lend themselves to endless customization. Keep nutrient-rich staples stocked and embrace quick-cooking methods for flavorful dinners or energizing lunches that nurture your body and satisfy your palate.
For more inspiration on quick and nourishing meals, explore our Quick Healthy Dinners collection and discover additional fast recipes designed for busy lifestyles.
Learn more about the nutritional benefits of quinoa and its role in a balanced diet at Healthline’s comprehensive guide.
Q&A
Q&A: Wholesome & Fast – your Guide to Quick healthy Meals
Q1: Can healthy meals really be quick to make?
Absolutely! Wholesome doesn’t have to mean complicated.With a little planning and the right ingredients, you can whip up nutritious dishes in 20 minutes or less. Think vibrant salads, one-pan sautés, or nutrient-packed grain bowls-simple, speedy, and satisfying.
Q2: What are some pantry staples that help keep meals fast and healthy?
Keep your kitchen stocked with versatile ingredients like canned beans, quinoa, brown rice, frozen veggies, nuts, and seeds.These items store well, cook quickly, and add fiber, protein, and flavor with minimal effort.
Q3: How can I save time without compromising nutrition?
Batch prepping is your best friend. Chop veggies, cook grains, and portion proteins ahead of time. When hunger strikes, just assemble or reheat! Also, embrace one-pot or sheet-pan recipes-less cleanup, more time saved.
Q4: Are there quick meal ideas that work for picky eaters or kids?
Yes! sneak in veggies by adding finely grated carrots or spinach to pasta sauces, smoothies, or homemade muffins. Customize build-your-own tacos or wraps with colorful, fresh toppings, letting everyone pick what they like.
Q5: What’s a simple, go-to recipe for busy weeknights?
Try a Mediterranean chickpea bowl: toss canned chickpeas with cherry tomatoes, cucumber, olives, feta, lemon juice, and olive oil. Serve over mixed greens or quick-cooked couscous for a balance of protein, fiber, and flavor-all in under 15 minutes.
Q6: How do I keep motivation high for cooking healthy meals fast?
Remember, quick and wholesome meals nourish both body and soul. Celebrate small wins,experiment with colorful spices and herbs,and view cooking as a creative break rather than a chore.When food feels good, it’s easier to stick with.
Q7: Can smoothies be a healthy quick meal?
Definitely! Blend leafy greens, a frozen fruit medley, a scoop of protein powder or yogurt, and some nut butter for a balanced, portable meal. Smoothies are perfect when time’s tight but nutrition can’t be sacrificed.
Q8: Any tips for eating healthy on the go?
Prepare grab-and-go snacks like energy balls, roasted chickpeas, or veggie sticks with hummus. Portable containers with layered salads or mason jar meals also make nutritious meals accessible outside your kitchen.
Eating wholesome food fast is all about smart choices, simple ingredients, and a splash of creativity. With these insights,you’re ready to fuel your day without missing a beat!
Closing Remarks
With these quick and wholesome meal ideas in your culinary toolkit,healthy eating no longer has to be a slow,complicated affair. Whipping up nourishing dishes that fuel your body and delight your taste buds can be both effortless and enjoyable-proof that speed and wellness truly can go hand in hand. So next time time is tight but your appetite for goodness is strong, remember: a nutritious, satisfying meal is just minutes away. here’s to savoring every bite of health, without missing a beat.
One-Pot Chicken Wonders bring incredible ease and flavor to your busy weeknights, transforming simple chicken cuts into mouthwatering meals that satisfy the whole family. Whether you’re craving tender thighs,juicy drumsticks,or succulent breast meat,the journey to a perfect one-pot dish begins with choosing the right chicken cuts. Drawing inspiration from classic rustic cooking techniques and modern kitchen shortcuts, these dishes emphasize rich, layered flavors built effortlessly in a single pot. Let’s dive into essential tips and recipes that make weeknight dinners not only manageable but truly memorable.
Prep and Cook Time
- Readiness: 15 minutes
- Cooking: 35-45 minutes
- Total Time: 50-60 minutes
Yield
Serves 4 hungry adults
Difficulty Level
Easy – Perfect for weeknight cooks with limited time but a desire for big flavor
choosing the Perfect Chicken Cuts for Flavorful One-Pot Dishes
When aiming to create mouthwatering one-pot chicken wonders,the cut of chicken you select profoundly influences the depth and texture of your dish. Bone-in, skin-on cuts like chicken thighs and drumsticks provide a juicy, tender bite with deep flavor due to slow rendering fats and marrow release. These cuts remain moist through simmering or oven cooking,resulting in a luscious finish.
On the other hand,boneless,skinless breasts cook faster and work best in recipes where a lighter protein highlight is desired,such as in a tomato-based one-pot stew or a lemon-herb rice dish. Mixing cuts can provide balance: thighs add richness, breasts keep it lean. Always ensure even-sized pieces for cooking uniformity, and for extra flavor, briefly sear the chicken skin-side down before adding liquids to your pot.
Essential Pantry Staples to elevate Your One-Pot Creations
stock your kitchen with a handful of versatile essentials that elevate each one-pot chicken wonders recipe. Aromatics like garlic, onions, and shallots build a savory foundation. Dried herbs such as thyme, rosemary, and smoked paprika add warmth and complexity. For body and texture,keep chicken broth or stock,canned tomatoes, and rice or small pasta varieties handy. Don’t forget acid elements like lemon juice, vinegar, or even white wine to brighten the finished dish. A splash of heavy cream or coconut milk can soften and enrich the sauce, adding a luxurious touch to humble ingredients.
Step-by-Step Techniques for Effortless One-pot Cooking
- Sear Your chicken: Heat oil in a heavy-bottomed pot over medium-high heat. place chicken pieces skin-side down and sauté until golden brown, about 5 minutes, stirring occasionally to prevent sticking. This seals in juices and creates flavor through caramelization.
- Sauté Aromatics: Remove the chicken, then add minced onions, garlic, and any other desired aromatics to the pot.Cook until fragrant and translucent, roughly 3-4 minutes, stirring frequently.
- Deglaze the Pot: Pour in a splash of broth, wine, or even water, scraping up any browned bits from the bottom. These bits infuse a deep, roasted flavor base.
- Add Remaining Ingredients: Stir in herbs, spices, rice (or pasta), and vegetables. Nestle back the chicken pieces,cover with broth or sauce,and bring to a gentle simmer.
- Simmer with Lid: Reduce heat to low, cover, and cook until chicken is tender and grains are cooked through-typically 20-30 minutes depending on the starch used.
- Finish and Rest: Remove from heat, let sit covered for 5 minutes to thicken and meld flavors before serving.
Appetizing One-Pot Chicken Recipes Tailored for Busy Weeknights
Try the classic One-Pot Lemon Herb Chicken with Rice, where zesty lemon brightens tender dark meat slow-cooked with fragrant thyme and garlic. Or opt for a cozy Chicken and tomato Orzo Stew with sweet chunks of ripe tomatoes, smoky paprika, and silky orzo pasta that soaks up all the flavors.
Ingredients
- 4 bone-in, skin-on chicken thighs
- 1 tablespoon olive oil
- 1 large onion, finely chopped
- 3 cloves garlic, minced
- 1 ½ cups long-grain white rice, rinsed
- 3 cups low-sodium chicken broth
- 1 lemon, zested and juiced
- 1 teaspoon dried thyme
- ½ teaspoon smoked paprika
- Salt and freshly ground black pepper, to taste
- Fresh parsley, chopped, for garnish
Instructions
- Prepare the chicken: Pat chicken thighs dry with paper towels and season generously with salt, pepper, thyme, and smoked paprika.
- Sear chicken: Heat olive oil in a large Dutch oven over medium-high heat.Place chicken skin-side down and sear until golden brown, about 5 minutes. Flip and cook another 3 minutes. remove chicken and set aside.
- Sauté aromatics: Add onion to the pot and cook until soft and translucent, about 4 minutes. Stir in garlic and cook for 1 minute.
- Add rice and lemon zest: stir the rice into onions and garlic,letting it toast slightly,about 2 minutes.
- Combine liquids and chicken: Pour chicken broth and lemon juice into the pot.Stir well, scraping any browned bits off the bottom. Nestle chicken thighs on top.
- Simmer: Bring to a gentle boil, reduce heat to low, cover, and cook for 25 minutes or until rice is tender and chicken is cooked through.
- Rest and garnish: Remove from heat and let sit covered for 5 minutes. Garnish with freshly chopped parsley before serving.
Tips for Success
- For crispier skin, briefly broil the chicken uncovered for 2-3 minutes before resting.
- Swap rice for quinoa or couscous for different textures but adjust liquid accordingly.
- Add vegetables such as diced bell peppers or peas halfway through cooking for a colorful boost.
- To make this dish gluten-free, ensure your broth and seasonings contain no wheat ingredients.
- Make-ahead: Prepare through step 5, refrigerate overnight, then cook when ready.
Serving Suggestions
Serve directly from the pot for a rustic family-style feel. Pair with a crisp green salad or roasted seasonal vegetables. A wedge of fresh lemon on the side adds a delightful burst of freshness. Garnishing with chopped parsley or cilantro elevates the presentation and adds a vibrant herbaceous note.

| Nutrient | Per Serving |
|---|---|
| calories | 450 kcal |
| Protein | 38 g |
| Carbohydrates | 35 g |
| Fat | 15 g |
For further inspiration, explore our One-Pot Dinners Collection. For tips on selecting high-quality chicken, check out the USDA guidelines at USDA Poultry Selection Tips.
Q&A
Q&A: One-Pot Chicken Wonders – Easy Meals for Busy Weeknights
Q1: What makes one-pot chicken meals ideal for busy weeknights?
A: One-pot chicken meals combine simplicity and flavor in a single dish, minimizing prep time, cooking steps, and cleanup. Perfect for hectic evenings, they deliver hearty nutrition without the stress of juggling multiple pots and pans.
Q2: Can I really make a flavorful dinner using just one pot?
A: Absolutely! The magic lies in layering ingredients and cooking techniques.By sautéing, simmering, and roasting all in one vessel, flavors meld beautifully, resulting in meals that taste rich and complex despite their easy preparation.
Q3: What types of chicken cuts work best for one-pot recipes?
A: Versatility is key here. Boneless thighs cook quickly and stay juicy, while bone-in pieces add depth of flavor and tenderness. Even shredded or diced chicken breast can work if you adjust cooking times accordingly.
Q4: Are one-pot chicken dishes healthy?
A: Yes! These recipes often incorporate vegetables, whole grains, and lean protein, making them balanced and nutritious. Plus, controlling the ingredients means you can easily customize for dietary preferences or restrictions.
Q5: How can I keep my one-pot chicken meals from becoming bland?
A: Spices, herbs, and layering are your best friends. Experiment with garlic, paprika, cumin, fresh herbs, or zesty citrus to elevate flavors. Don’t forget to season at each cooking stage for depth.
Q6: Can I prepare these meals ahead of time?
A: Definitely! Many one-pot chicken dishes taste even better the next day as flavors deepen.Cook in advance, store properly, and simply reheat for a quick, satisfying meal.
Q7: What are some quick tips for perfect one-pot chicken meals?
A: Brown your chicken first to lock in juices and develop a flavorful crust. Add vegetables in stages to maintain their texture. Use homemade or quality broth to boost taste. And keep your pot covered during simmering to trap steam and tenderize ingredients evenly.
Q8: Any standout one-pot chicken recipes to try on a tight schedule?
A: Yes! Think creamy chicken and mushroom skillet, vibrant chicken jambalaya, or a comforting Mediterranean chicken and rice bake. Each delivers bold flavors with minimal fuss.
Q9: How adaptable are one-pot chicken recipes?
A: Very adaptable! Swap veggies based on seasonality, adjust spices to your palate, or turn a weeknight meal into next-day leftovers by adding fresh greens or a squeeze of lemon. The possibilities are endless.
Q10: What kitchen equipment do I need to get started?
A: A sturdy, heavy-bottomed pot or deep skillet with a lid is essential. An enameled Dutch oven,cast-iron skillet,or even a large sauté pan works wonders for creating your one-pot chicken wonders.
Embrace the ease and magic of one-pot chicken meals - your weeknight dinners just found their new best friend!
Future Outlook
As the dinner bell rings on those hectic weeknights, one-pot chicken wonders prove that simplicity doesn’t meen sacrificing flavor. With minimal prep and maximum taste, these recipes transform your kitchen into a sanctuary of ease and nourishment. So next time time is tight and hunger is high, remember: a handful of ingredients, one trusty pot, and a dash of creativity are all you need to turn dinner into a quick, delicious triumph. Here’s to savoring every bite without the overwhelm-because busy nights deserve meals that work just as hard as you do.
15-Minute Chicken Taco Chili: Quick,Flavorful Dinner Idea
The 15-Minute Chicken Taco Chili is a vibrant fusion of comforting chili warmth and punchy taco spices,making it the ultimate weeknight dinner choice. Born from the need for fast, hearty meals that don’t compromise on flavor, this dish effortlessly brings the zest of Mexican cuisine right into your kitchen in under half an hour. Its bold, balanced flavors and swift preparation time have made it a personal favorite for hectic evenings when you crave something both satisfying and exciting.
Why Chicken taco Chili is the Ultimate Weeknight Dinner Choice
Busy evenings demand meals that are speedy yet satisfying, and this chicken taco chili checks every box. Loaded with lean protein, fiber-rich beans, and vibrant spices, it delivers robust nutrition and bold flavor in just minutes. The one-pot recipe means minimal cleanup, freeing you to relax after a long day. Whether you’re feeding a family or meal prepping for the week, this chili is a versatile, crowd-pleasing solution that stays delicious reheated.
Prep and Cook Time
- Prep Time: 5 minutes
- Cook Time: 10 minutes
- Total Time: 15 minutes
Yield
Serves 4 hearty portions
Difficulty Level
easy – perfect for beginner cooks and busy home chefs alike
essential Ingredients for Building Bold and Balanced Flavors
- 1 lb boneless, skinless chicken breasts, diced
- 1 tbsp olive oil
- 1 medium yellow onion, finely chopped
- 3 cloves garlic, minced
- 1 can (15 oz) black beans, drained and rinsed
- 1 can (15 oz) fire-roasted diced tomatoes
- 1 cup low-sodium chicken broth
- 2 tbsp taco seasoning (homemade or store-bought)
- 1 tsp ground cumin
- 1/2 tsp smoked paprika
- 1/4 tsp cayenne pepper (optional, for heat)
- salt and black pepper to taste
- Fresh cilantro for garnish
- 1/2 cup shredded sharp cheddar cheese (optional)
- 1 avocado, diced (for topping)
Step by Step Guide to Preparing Your Chili in Just 15 Minutes
- Heat the olive oil in a large skillet or deep saucepan over medium-high heat.
- Add the diced chicken, seasoning with salt and pepper. Sauté until golden brown and cooked thru, about 5 minutes. Stir occasionally to ensure even cooking.
- remove the chicken from the pan and set aside. In the same pan, add the chopped onion and sauté until soft and translucent, about 2 minutes.
- Stir in the minced garlic, cooking for an additional 30 seconds until fragrant.
- Add the taco seasoning,cumin,smoked paprika,and cayenne pepper to the onion and garlic mixture. Stir to coat and bloom the spices, about 1 minute.
- Return the cooked chicken to the pan, then stir in the black beans, fire-roasted tomatoes, and chicken broth.
- Bring the mixture to a simmer, reduce heat to medium-low, and cook for 5 minutes, allowing flavors to meld and the liquid to slightly reduce.
- Adjust seasoning with salt and pepper according to your taste.
- Serve hot, garnished with fresh cilantro, shredded cheddar, and diced avocado for a burst of color and creamy texture.
Tips for Customizing Your Chili to Suit Every Taste and Dietary Need
- Make it vegetarian: Swap chicken for extra beans, lentils, or diced sweet potatoes for a hearty plant-based version.
- Spice level adjustment: Increase cayenne or add chopped jalapeños for more kick, or omit for a milder flavor.
- Gluten-free option: Double-check your taco seasoning or make your own blend to ensure no gluten-containing additives.
- For creamier chili: Stir in a dollop of sour cream, Greek yogurt, or coconut milk just before serving.
- make ahead: This chili stores beautifully in the fridge for up to 4 days and freezes well for up to 3 months – perfect for meal prep.
Serving Suggestions
This chicken taco chili shines served with a variety of vibrant garnishes and sides.Try it atop warm corn tortillas for a hearty taco twist or alongside fluffy cilantro-lime rice for a complete meal. Fresh lime wedges, chopped green onions, and crispy tortilla strips add fantastic texture and brightness. For a low-carb option, serve it over cauliflower rice or spooned into baked sweet potatoes. The visual contrast of shining red tomatoes, green cilantro, and creamy avocado makes for an irresistibly colorful bowl that calls out to be enjoyed.

| Nutrient | Per Serving |
|---|---|
| Calories | 340 |
| Protein | 35 g |
| Carbohydrates | 28 g |
| Fat | 8 g |
For more hearty and quick dinner recipes, check out our Quick Weeknight dinners collection. To explore the nutritional benefits of chicken and its role in a balanced diet, visit the Medical News Today overview on chicken nutrition.
Q&A
Q&A: 15-Minute Chicken Taco Chili – Quick, Flavorful Dinner Idea
Q1: What makes 15-Minute Chicken Taco Chili different from traditional chili recipes?
A1: Unlike traditional chili that simmers for hours, this recipe is designed for speed without sacrificing flavor. It combines tender chicken, bold taco spices, and a handful of pantry staples to whip up a hearty, satisfying meal in just 15 minutes.It’s the perfect balance of convenience and zest that fits busy weeknights.Q2: can I use other proteins instead of chicken?
A2: absolutely! Ground turkey,lean beef,or even a plant-based meat substitute can seamlessly replace chicken in this chili. Just make sure to adjust cooking times accordingly-ground meats usually cook fast, so you’ll still stay within the 15-minute mark.
Q3: What are the key spices that give this chili its ”taco” flavor?
A3: The magic lies in the combination of cumin, chili powder, smoked paprika, garlic powder, and a pinch of oregano. These spices evoke the vibrant flavors of classic tacos, making each spoonful burst with that beloved Mexican flair.
Q4: Is this recipe kid-friendly?
A4: Yes! The spice level can be easily adjusted to suit younger palates-simply reduce the chili powder or omit any extra heat. Plus, the mild sweetness of corn and the familiar taste of chicken make it a hit with kids and adults alike.
Q5: What’s the best way to serve 15-Minute Chicken Taco chili?
A5: Get creative! Serve it over warm tortillas for a taco bowl effect, with a dollop of sour cream and shredded cheese. Or spoon it over rice or crispy tortilla chips for a cozy, crunchy twist. Garnish with fresh cilantro,avocado slices,or a squeeze of lime to elevate flavors even more.
Q6: Can I make this recipe ahead of time or freeze leftovers?
A6: definitely! This chili freezes beautifully, making it an ideal make-ahead meal. store leftovers in an airtight container for up to three months. When reheating, add a splash of broth or water to keep it nice and saucy.
Q7: How can I make this recipe even healthier?
A7: To boost nutrition, swap regular beans for black beans or pinto beans packed with fiber, use low-sodium broth, and incorporate extra veggies like bell peppers or zucchini.Adding a handful of fresh spinach at the end also gives it a vibrant nutrient punch without extra cooking time.
Q8: What sides pair best with this chicken taco chili?
A8: Complement this dish with a crisp green salad, a side of cilantro-lime rice, or classic Mexican street corn (elote) for a complete and satisfying meal that dances with flavors and textures.
With these answers, you’re ready to bring a whirlwind of flavor to your dinner table in just 15 minutes. Quick, easy, and utterly delicious-this Chicken Taco Chili is your new weeknight hero!
Closing Remarks
Ready to dive into a bowl of bold flavors without spending hours in the kitchen? This 15-Minute Chicken Taco Chili proves that speedy meals can be just as satisfying and vibrant as slow-cooked classics. Whether it’s a weeknight dinner rescue or a last-minute gathering, this recipe brings together convenience and zest in every spoonful.So next time you crave something cozy, spicy, and effortlessly delicious, remember: great taste doesn’t have to wait. Grab your ingredients, stir up this chili, and let the flavor fiesta begin!
Whip Up a Delicious Chia Pudding Bowl in Just 15 Minutes
Whip up a delicious chia pudding bowl in just 15 minutes and unlock a world of vibrant flavors, creamy textures, and nourishing goodness that feels like a wholesome treat every single time. This quick and satisfying dish blends the humble chia seed’s nutritional powerhouse with the silkiness of your favorite plant milks, crowned by a colorful medley of fresh fruits and superfoods for an energizing start to your day or a guilt-free snack.
Prep and Cook Time
- Prep Time: 10 minutes
- Chilling Time: 5 minutes (or overnight for thicker pudding)
- Total Time: 15 minutes
Yield
Serves 2 generous bowls
Difficulty Level
Easy
Ingredients
- 3 tbsp chia seeds (black or white)
- 1 cup unsweetened almond milk (or oat/coconut milk)
- 1 tbsp maple syrup or honey (optional)
- ½ tsp pure vanilla extract
- 1 medium banana, sliced
- ½ cup fresh mixed berries (blueberries, raspberries, strawberries)
- 1 tbsp shredded coconut (unsweetened)
- 1 tsp hemp seeds or flaxseeds
- 1 tbsp chopped nuts (almonds, walnuts, or pistachios)
- Optional superfoods: goji berries, cacao nibs, or a sprinkle of spirulina powder
Instructions
- Combine the chia seeds and plant milk. In a medium bowl or jar, whisk together chia seeds, almond milk, maple syrup, and vanilla extract until combined and slightly thickened. Let it sit for 2 minutes, then whisk again to prevent clumping.
- Chill briefly to activate the gel. Place the mixture in the refrigerator for at least 5 minutes or,for best results,overnight. this allows the chia seeds to absorb the liquid and create a luscious pudding texture.
- Prepare fresh toppings. While the pudding sets, slice your banana and wash the mixed berries. Toast the shredded coconut lightly in a dry pan until golden and fragrant (about 2 minutes).
- Assemble your pudding bowls. Stir the chia pudding once chilled and divide it evenly between two serving bowls. Artfully arrange banana slices, berries, toasted coconut, hemp seeds, nuts, and your chosen superfoods on top.
- Serve immediately or store. Enjoy right away for a cooling, creamy delight or keep covered in the fridge for up to 3 days.Stir before serving if stored.
Tips for Success
- choosing chia seeds: Opt for organic, non-GMO black or white chia seeds with a nutty aroma. White chia seeds tend to create a lighter-colored pudding for a more elegant presentation.
- Crafting the creamiest base: Use rich plant milks like oat or coconut for extra creaminess. For a protein boost, try soy milk or add a spoonful of nut butter before chilling.
- Flavor layering: Customize sweetness with natural syrups or mashed ripe bananas. Add spices like cinnamon or cardamom for warm notes.
- Make-ahead tips: Prepare your chia pudding the night before for a ready-to-eat breakfast.Store toppings separately to preserve freshness and texture.
- Texture tricks: If the pudding is too thick after chilling,stir in a splash of plant milk to loosen it gently.
Serving Suggestions
For a vibrant presentation, serve your chia pudding bowl in clear glass jars or wide bowls, allowing the layers and colors to shine. Garnish with a sprig of fresh mint or edible flowers to elevate the look. Pair it with homemade gluten-free granola or crisp seed crackers for contrasting crunch. this pudding is perfect as a refreshing breakfast, an energizing snack, or even a light dessert paired with herbal tea or a frothy turmeric latte.

| Nutrient | Per Serving |
|---|---|
| Calories | 220 |
| Protein | 6g |
| Carbohydrates | 24g |
| Fat | 9g |
For more wholesome breakfast ideas, visit our Healthy Breakfast Recipes collection. To dive deeper into the science behind chia seeds’ superfood status, check out this thorough guide from Healthline.
Q&A
Q&A: Whip Up a Delicious Chia Pudding Bowl in Just 15 Minutes
Q1: What makes chia pudding a great choice for breakfast or snack?
A1: Chia pudding is like a tiny superfood powerhouse! Packed with fiber, omega-3s, and protein, it fuels your body while keeping you feeling full and energized.Plus,its creamy texture and versatility make it a delightful treat any time of day.
Q2: How can I prepare a chia pudding bowl in just 15 minutes? Isn’t it supposed to soak longer?
A2: Traditionally, chia seeds soak for several hours or overnight to achieve that perfect gel-like consistency. but with a little trick-stirring vigorously and using slightly warm milk or milk option-you can speed up the process. Within 10-15 minutes, your pudding will be ready to spoon into a bowl and top with delicious extras!
Q3: what ingredients do I need to make a basic chia pudding bowl?
A3: The basics are simple: chia seeds, your choice of milk (almond, coconut, dairy, oat – anything works!), and a natural sweetener like honey, maple syrup, or agave. from there, you can get creative with toppings-fresh fruit, nuts, granola, coconut flakes-the sky’s the limit!
Q4: Can I customize the flavors of my chia pudding?
A4: Absolutely! Vanilla extract, cocoa powder, matcha, or even a hint of cinnamon can transform your pudding into a flavor adventure. Mix in blends or layer toppings to create your own signature bowl.
Q5: How do I store leftover chia pudding?
A5: Store it in an airtight container in the refrigerator for up to 3-4 days. Give it a quick stir before serving,as the seeds tend to settle or thicken over time. It makes for a quick grab-and-go snack or breakfast when you’re in a rush.
Q6: Is chia pudding suitable for people with dietary restrictions?
A6: Definitely! It’s naturally gluten-free and vegan-amiable (if you use plant-based milk).It’s also dairy-free, nut-free options are possible with oat or rice milk, making it accessible for many dietary needs.
Q7: Any tips for making the perfect pudding texture?
A7: Use a ratio of about 3 tablespoons of chia seeds to 1 cup of liquid for a creamy,spoonable texture. Stir thoroughly right after mixing to prevent clumps. For an extra silky feel, blend the pudding after soaking, then add toppings and enjoy.
Whip up your own nutritious and delectable chia pudding bowl in just 15 minutes-no fuss, no wait, just wholesome yum!
in Conclusion
With just a handful of simple ingredients and a sprinkle of creativity, your 15-minute chia pudding bowl transforms from a quick fix into a delightful, nourishing treat. Whether you’re fueling up for a busy day or craving a wholesome snack, this versatile recipe invites you to customize, experiment, and savor each spoonful.So next time hunger calls, remember: a vibrant, creamy chia pudding is just minutes away from turning your kitchen into a haven of healthful indulgence. Whip it up, dig in, and let your taste buds thank you!
One-pot coconut miso salmon curry invites you on a sensory journey, combining creamy coconut richness with the deep, savory allure of miso. This dish embodies a harmonious balance of flavors that awaken the palate and comfort the soul, perfect for weeknight dinners or effortless entertaining. Whether you’re exploring Japanese-inspired tastes or craving a cozy, luxurious curry, this recipe delivers a stunning fusion in every bite.
Prep and Cook time
Preparation: 15 minutes
Cooking: 25 minutes
Total: 40 minutes
Yield
Serves 4 hearty portions
Difficulty Level
Easy – perfect for beginners and busy home cooks
Ingredients
- 1 lb (450g)
- 1 tbsp
- 1 medium
- 3 cloves
- 1 tbsp
- 2 tbsp
- 1 can (13.5 oz)
- 1 tbsp
- 1 tbsp
- 1 tsp
- 1 tsp
- 1/2 tsp
- Fresh cilantro
- Cooked jasmine rice
- Salt and freshly ground black pepper, to taste
Instructions
- Prepare the salmon: Pat the salmon pieces dry with paper towels, then season lightly with salt and pepper to enhance tenderness and flavor.
- Build the aromatic base: Heat vegetable oil in a deep skillet or pot over medium heat. Add chopped onions and sauté until translucent and golden, about 6 minutes. Stir in minced garlic and grated ginger, cooking for 1 minute until fragrant.
- Add spices and miso: Sprinkle turmeric, coriander, and chili flakes over the aromatics. Stir well to toast the spices gently. Next, whisk in the miso paste until fully dissolved-this step creates the umami backbone of your curry.
- Stir in coconut milk and soy sauce: Pour the creamy coconut milk steadily while stirring to combine. Bring the mixture to a gentle simmer to marry the rich creaminess with the savory miso notes, thickening slightly.
- Introduce the salmon: Gently nestle the salmon fillet pieces into the simmering sauce. Cover and cook for 8-10 minutes, or until the salmon is just opaque and tender-avoid overcooking for maximum softness.
- Finish with lime juice and seasoning: Stir in fresh lime juice to brighten the flavor layers. Adjust salt and pepper to taste,keeping the curry vibrant and balanced.
- Serve promptly: Ladle your coconut miso salmon curry over fluffy jasmine rice or arranged alongside steamed vegetables. Garnish with fresh cilantro leaves for a pop of color and herbaceous aroma.
Tips for Success
- Choosing Salmon: opt for wild-caught, thick salmon fillets with skin on to retain moisture and add a subtle crispness if desired. Skin acts as a protective barrier for tender flesh during simmering.
- Miso Variations: White miso offers a mild, sweet umami. For deeper flavor,combine white and red miso or substitute with chickpea miso for a unique twist.
- Control Spice: Adjust chili flakes according to your heat preference. For a smoky complexity, consider a pinch of smoked paprika.
- make-Ahead Tip: Prepare the aromatic base and coconut-miso sauce a day ahead. Refrigerate separately from salmon and reheat gently before adding the fish to prevent overcooking.
- Visual Appeal: Slice the salmon against the grain when serving to showcase its tender, flaky texture and vibrant rosy hue.
Serving Suggestions and Pairings
elevate your curry experience by plating it with a side of fluffy jasmine rice or pearl couscous, which soak up the luscious sauce beautifully. For contrast, add simple steamed greens like bok choy or kale, drizzled with toasted sesame oil for extra nuttiness. garnishing with finely sliced red chilies or a sprinkle of toasted sesame seeds invites texture and visual intrigue.
Completing your meal with a crisp, chilled glass of Sauvignon blanc or a subtle, floral jasmine tea will refresh the palate and complement the curry’s layers.

| Nutrient | Per Serving |
|---|---|
| Calories | 420 |
| Protein | 35g |
| Carbohydrates | 12g |
| Fat | 25g |
For more inspiring coconut curry recipes, dive into our curated collection. Enhance your flavor knowledge with this detailed miso foundation guide to unlock new savory depths for your cooking.
Q&A
Q&A: One-Pot Coconut Miso Salmon Curry – Flavorful & Easy Feast
Q1: What makes this One-Pot Coconut Miso Salmon Curry so special?
A1: This dish is a harmonious blend of rich, creamy coconut milk and the umami-packed depth of miso paste, all simmered with tender salmon in one pot. It’s a flavor explosion that’s both exotic and comforting, making it a standout meal without the fuss of multiple dirty dishes.
Q2: Is this recipe beginner-friendly?
A2: Absolutely! The beauty of this curry lies in its simplicity. With just one pot, minimal prep, and straightforward ingredients, even kitchen novices can whip up a gourmet-worthy dinner in under 30 minutes.
Q3: Why combine coconut and miso? Isn’t that an unusual pairing?
A3: While at first glance they hail from different culinary traditions, coconut milk’s natural sweetness perfectly balances miso’s salty, savory punch. This fusion creates a velvety sauce bursting with complex layers that elevate simple salmon into a feast for the senses.
Q4: Can I customize the curry to my dietary preferences?
A4: Definitely! Swap salmon for tofu or shrimp to keep it vegetarian or pescatarian. you can also add your favorite vegetables-think spinach, bell peppers, or snap peas-to boost color, texture, and nutrients.
Q5: How do I ensure the salmon stays tender and flaky?
A5: Gently simmer the salmon in the curry sauce and avoid overcooking. Just a few minutes in the simmering broth are enough to let the fish absorb the flavors while staying moist and flaky.
Q6: What should I serve alongside this curry?
A6: Steamed jasmine rice or fluffy basmati are perfect for soaking up the luscious sauce. For an extra touch, garnish with fresh cilantro, a squeeze of lime, or a sprinkle of toasted sesame seeds to awaken your taste buds.Q7: Is this curry freezer-friendly?
A7: While the sauce freezes well, salmon’s delicate texture can change once thawed. For best results, prepare the sauce in advance and add freshly cooked salmon when ready to serve.
Q8: Any pro tips to elevate this dish?
A8: use white or yellow miso for a mild, sweet flavor or experiment with red miso for a stronger, earthier kick. toasting your spices before adding the liquid also boosts aroma and depth, turning this easy dish into a truly memorable meal.
Ready to indulge in a soul-warming, effortlessly elegant curry? This One-Pot Coconut Miso Salmon Curry is your new go-to recipe for weeknight magic and special occasion flair alike!
Future Outlook
As the fragrant aroma of coconut and miso melds effortlessly in this one-pot salmon curry, you’ve discovered more than just a meal-you’ve unlocked a simple yet sophisticated way to bring comfort and excitement to your dinner table.This flavorful feast proves that culinary magic doesn’t need to be elaborate; with just a handful of ingredients and one pot,you can create a dish that is as nourishing as it is memorable.So next time you crave something vibrant and satisfying, let this coconut miso salmon curry be your go-to recipe-easy to make, delightful to share, and amazing to savor.
Quick and flavorful ingredients transform these lettuce wraps into a vibrant explosion of freshness and texture that’s perfect for any mealtime. Using crisp, bright iceberg or butter lettuce leaves as a natural vessel, combined with bold seasonings and cleverly chosen proteins, these wraps pack punch without weighing you down. Whether you crave something spicy, savory, or tangy, the beauty lies in thier simplicity and adaptability-turning humble leaves into an irresistible, handheld delight in just 15 minutes.
Prep and Cook Time
- Planning: 10 minutes
- Cooking: 5 minutes
- Total Time: 15 minutes
Yield
Serves 4 generous lettuce wraps (about 2 wraps per person)
Difficulty Level
Easy – perfect for weeknight dinners or quick lunches
Ingredients
- 1 head of butter lettuce or iceberg, leaves separated, washed, and patted dry
- 12 oz ground chicken (or turkey, tofu, or seitan for variations)
- 1 tablespoon sesame oil
- 1 small onion, finely chopped
- 2 cloves garlic, minced
- 1 tablespoon fresh ginger, grated
- 1/3 cup hoisin sauce
- 1 tablespoon soy sauce (use tamari for gluten-free)
- 1 teaspoon sriracha (optional, for heat)
- 1/2 cup shredded carrots
- 1/4 cup chopped water chestnuts, for crunch
- 2 green onions, thinly sliced
- 1/4 cup chopped fresh cilantro
- 1 tablespoon toasted sesame seeds, for garnish
Instructions
- Prep your lettuce: Carefully peel whole leaves from the head, choosing the largest and freshest. Gently wash and dry on paper towels. Keep chilled to maintain crispness.
- Cook the aromatics: Heat sesame oil in a large skillet over medium heat. Add the chopped onion, garlic, and ginger. Sauté until fragrant and translucent, about 2 minutes.
- Add the protein: Crumble in the ground chicken (or substitute). Cook, stirring and breaking apart, until browned and cooked through, about 5 minutes. Be sure to stir occasionally to prevent sticking.
- Flavor boost: Stir in hoisin sauce, soy sauce, and sriracha (if using). Mix in shredded carrots and chopped water chestnuts for texture.Cook another 2 minutes to meld flavors.
- Assemble fresh wraps: Spoon the warm filling into each lettuce leaf.Generously sprinkle with green onions, cilantro, and toasted sesame seeds.
- Serve promptly: For optimum freshness and crunch, enjoy your 15-minute lettuce wraps as soon as assembled. Optionally, serve with extra hoisin or a tangy dipping sauce.
Chef’s Notes & Tips for Success
- Crunch factor: To keep wraps perfectly crisp, always pat dry lettuce leaves thoroughly before filling.
- Protein swaps: Try finely diced mushrooms or lentils for a vegetarian/vegan twist that still delivers hearty umami flavors.
- Make-ahead hack: Prepare the filling a day in advance and refrigerate. Warm gently before filling leaves to maintain texture.
- Spicing it up: Add fresh chili or a splash of lime juice for extra brightness and zing.
- For gluten-free: Ensure all sauces used (hoisin,soy) are gluten-free labeled or use coconut aminos as a substitute.
Serving Suggestions
Present your 15-minute lettuce wraps on a wide,shallow platter with small bowls of extra sauce and chili oil for dipping.Garnish with vibrantly sliced cucumbers, pickled radishes, or a crisp cucumber salad to complement the textures. A sprinkle of crushed peanuts adds a delightful crunch and nutty aroma. For a party, stack wraps alongside steamed jasmine rice or a fresh mango salad for refreshing contrast.

| Nutrient | Per Serving |
|---|---|
| Calories | 270 kcal |
| Protein | 22 g |
| Carbohydrates | 12 g |
| fat | 14 g |
For more inspired fast recipes that complement this dish, check out our Quick Asian-Inspired Recipes page. Learn about the rich history of Asian flavors on Britannica.
Q&A
Q&A: 15-Minute Lettuce Wraps – Quick & Fresh Recipe Ideas
Q1: What makes lettuce wraps a great choice for a quick meal?
A1: Lettuce wraps are incredibly versatile and require minimal cooking time, making them perfect for busy days. using crisp lettuce leaves as edible “bowls” eliminates the need for bread or tortillas, cutting down prep time and adding a refreshing crunch.Plus, they’re naturally low-carb and packed with nutrients!
Q2: Which types of lettuce work best for wraps?
A2: Look for sturdy, yet pliable leaves that can hold fillings without tearing. Romaine, butter lettuce, iceberg, and bibb lettuce are top contenders. Butter lettuce is tender and slightly sweet, while romaine adds a satisfying crunch-both make excellent wrap bases.
Q3: How do I make sure my lettuce wraps don’t get soggy?
A3: To keep things crisp, pat the lettuce leaves dry after rinsing to remove excess moisture.Also, try to serve the fillings warm rather than hot, as extreme temperatures can wilt the lettuce quickly. Assemble just before eating to maintain freshness.
Q4: What are some quick and tasty filling ideas for 15-minute lettuce wraps?
A4: the options are endless! Try sautéed ground turkey or chicken with garlic, ginger, and soy sauce for an Asian-inspired twist.Or go Mediterranean with hummus, chopped cucumbers, tomatoes, olives, and feta cheese.For a vegetarian boost, mix black beans, corn, avocado, and salsa. Fresh herbs like cilantro or mint can add a vibrant punch.
Q5: How can I add more flavor without extra cooking time?
A5: Use pre-made sauces like teriyaki, peanut sauce, or tzatziki, which can be drizzled over the fillings. Toss in chopped nuts or seeds for texture, and squeeze a bit of lime or lemon juice for a bright finish. Fresh garlic, ginger, or chili flakes sprinkled in can elevate the dish in minutes.
Q6: Are lettuce wraps suitable for meal prep?
A6: Yes, but keep lettuce and fillings separate until mealtime to avoid sogginess.Store your cooked fillings in airtight containers in the fridge and wash and dry your lettuce leaves thoroughly.When ready, simply assemble your wraps for a quick grab-and-go meal.
Q7: Can kids enjoy lettuce wraps too?
A7: Absolutely! Lettuce wraps can be customized with kid-friendly ingredients like shredded chicken, cheese, mild salsa, or even turkey and avocado.Their fun, handheld format makes them appealing for picky eaters and perfect for packing in lunchboxes.
Q8: What’s the best way to serve these wraps for a crowd?
A8: Prepare an assortment of fillings and lettuce leaves, then let everyone build their own wraps. This “DIY” style is interactive and allows guests to tailor flavors and textures to their liking. It’s a fresh and lively alternative to more traditional finger foods.
Q9: How do I keep the wraps balanced nutritionally?
A9: Aim for a good mix of protein, healthy fats, fiber, and veggies in your fillings. Lean meats, tofu, or beans provide protein; avocado or nuts add healthy fats; and fresh vegetables bring fiber and antioxidants.This combo keeps you full and energized in under 15 minutes.
Q10: Any final tips for making the most of quick lettuce wraps?
A10: Embrace simplicity and bold flavors. Focus on fresh ingredients, don’t overstuff your wraps, and get creative with herbs and sauces. With a bit of prep and imagination, 15-minute lettuce wraps can become your go-to meal for freshness and speed!
Concluding Remarks
In just 15 minutes, these vibrant lettuce wraps transform simple ingredients into a fresh, flavorful feast that’s as quick to make as it is satisfying to eat. Whether you’re craving a light lunch, a speedy dinner, or a crowd-pleasing appetizer, these wraps offer endless versatility without compromising on taste or nutrition. Next time you need a fuss-free meal that doesn’t skimp on freshness, reach for crisp lettuce leaves and let your creativity run wild-becuase tasty, wholesome eating shouldn’t take all day. Ready, wrap, and enjoy!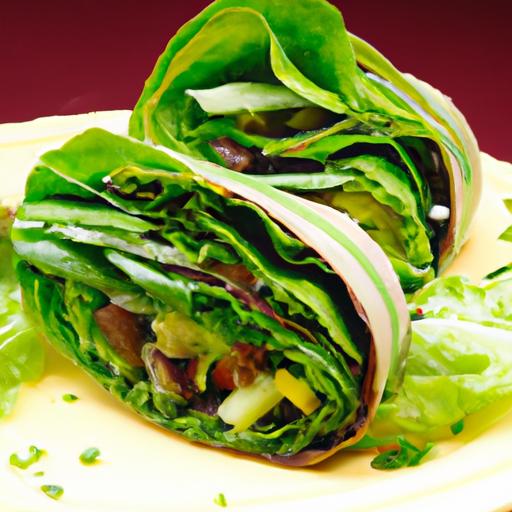
Effortless one-pot noodle recipes for busy weeknights unlock the secret to meals that satisfy both your palate and your hectic schedule. These dishes balance convenience and vibrant flavors, turning simple pantry staples into an unforgettable dinner experience. Whether you’re craving silky asian-inspired broths or creamy Italian comfort in a bowl, mastering these flavor combos and time-saving techniques will elevate your weeknight cooking to new heights.
Prep and Cook Time
- Prep Time: 10 minutes
- Cook time: 15 minutes
- Total Time: 25 minutes
Yield
Serves 4 generous portions
difficulty Level
Easy
Ingredients
- 8 oz dry noodles (ramen,linguine,or rice noodles)
- 3 cups vegetable or chicken broth
- 1 cup sliced mushrooms (shiitake or cremini)
- 1 cup chopped bok choy or spinach
- 1/2 cup shredded carrots
- 2 cloves garlic,minced
- 1 tbsp fresh ginger,grated
- 2 tbsp soy sauce (or tamari for gluten-free)
- 1 tbsp toasted sesame oil
- 1 tsp chili flakes (optional)
- Green onions,thinly sliced for garnish
- 1 tbsp sesame seeds for garnish
Instructions
- Heat a large,deep skillet or pot over medium heat. Add the toasted sesame oil and sauté the minced garlic and grated ginger until fragrant, about 1 minute.
- Add sliced mushrooms and cook until they release their juices and turn tender, roughly 5 minutes. Stir occasionally to prevent sticking.
- Pour in the broth and bring it to a boil. Once boiling, add the noodles, breaking them up if needed so they fit comfortably.
- Cook the noodles according to package instructions in the broth (generally 5-7 minutes), stirring occasionally to avoid clumping.
- Add shredded carrots and chopped greens about 2 minutes before the noodles are done, allowing them to soften slightly but retain their color and crunch.
- Stir in soy sauce and chili flakes (if using),then taste and adjust seasoning. If a deeper umami flavor is desired, add a splash more soy sauce.
- Turn off the heat and let the noodles rest for a minute to soak up the flavors.
- serve hot, garnished with sliced green onions and a sprinkle of sesame seeds for a fresh, nutty finish.
tips for Success
- Swap noodles freely: Rice noodles offer a gluten-free option, while whole wheat or soba noodles bring a heartier texture.
- Protein boost: Add pre-cooked shredded chicken, tofu cubes, or a soft-boiled egg for extra sustenance.
- Make it ahead: Prep the broth with aromatics in advance; store separately and combine with fresh noodles when ready to serve.
- Broth richness: For a creamier version, stir in a splash of coconut milk or a spoonful of peanut butter during the last step.
- Flavor layering: Toast your spices-like star anise or coriander seeds-briefly in oil before adding liquids to awaken their essence.
Serving Suggestions
Present your effortless one-pot noodles in deep bowls to showcase their vibrant colors and steaming goodness.Complement with a side of crisp cucumber salad or a dollop of spicy kimchi for contrasting textures. Garnishing with fresh herbs like cilantro or Thai basil elevates the freshness, while lime wedges add a zesty brightness that brightens every bite.

| Nutrient | Per Serving |
|---|---|
| Calories | 320 kcal |
| Protein | 12 g |
| Carbohydrates | 45 g |
| Fat | 8 g |
Discover even more speedy and nourishing meal inspirations in our 15-Minute One-Pot Pasta Recipes. For deepening your culinary knowledge about Asian noodle broths,the Serious Eats guide on broth basics is an excellent resource.
Q&A
Q&A: Effortless One-Pot Noodle Recipes for Busy Weeknights
Q1: What makes one-pot noodle recipes perfect for busy weeknights?
A1: One-pot noodle recipes are the superheroes of hectic evenings-they combine minimal prep, fewer dishes, and speedy cooking all in a single vessel. Just toss your ingredients into one pot, let the flavors meld, and voilà! Dinner is served without the kitchen chaos.
Q2: can these recipes be healthy despite their simplicity?
A2: Absolutely! One-pot noodles can be a nutritious powerhouse by incorporating lean proteins, fresh veggies, and whole grain or alternative noodles. The beauty lies in customization-you control the ingredients to keep it wholesome and delicious.
Q3: do I need special cooking skills to make one-pot noodle dishes?
A3: Not at all! one-pot noodle recipes are designed for ease, making them accessible to beginners and seasoned cooks alike. They often involve straightforward steps: sauté, add broth and noodles, simmer, and stir-no fancy techniques required.Q4: How can I add variety so I don’t get bored of eating noodles all week?
A4: Variety is the spice of one-pot life! Experiment with different broths-think miso,coconut curry,or classic tomato. Swap noodles: try soba, rice noodles, or whole wheat spaghetti. Mix up proteins and veggies based on what’s in your fridge or seasonally fresh.
Q5: What are some time-saving tips for prepping these meals?
A5: Prep like a pro by chopping veggies and portioning proteins ahead of time, maybe the night before. Using pre-cooked or canned beans, frozen vegetables, or rapid-cooking noodles can also speed things up. A good-quality broth or stock shortcut adds flavor without extra effort.
Q6: Can one-pot noodle recipes cater to dietary restrictions?
A6: Definitely! Whether you’re vegan, gluten-free, or allergic to certain ingredients, one-pot noodle recipes are easily adaptable. Use gluten-free noodles, plant-based proteins, or tailor the seasoning to suit your preferences-all without losing taste or simplicity.
Q7: What’s a foolproof crowd-pleaser one-pot noodle recipe to try first?
A7: A classic that never disappoints: Spicy Peanut Noodles with tofu and snap peas. It’s vibrant, creamy, and packs a punch-all cooked in one pot, perfect for busy nights that crave comfort without hassle.
Q8: How do I prevent noodles from getting mushy in one-pot recipes?
A8: Timing is key! Add noodles closer to the end of cooking to avoid overcooking. Stir gently, and keep an eye on liquid levels-sometimes a little extra broth or water is needed to maintain the perfect texture.
With these answers in your culinary toolkit, busy weeknights just got tastier and simpler. Ready,set,one-pot!
In Retrospect
With just one pot and a handful of ingredients,weeknight meals can transform from chaotic to carefree. These effortless one-pot noodle recipes aren’t just quick fixes-they’re your new culinary allies, blending convenience with comforting flavors to fuel your busy evenings. So next time the clock’s ticking and the hunger’s calling, remember: a delicious, wholesome dinner is just one pot away. Dive in, savor the simplicity, and let mealtime magic happen without the mess.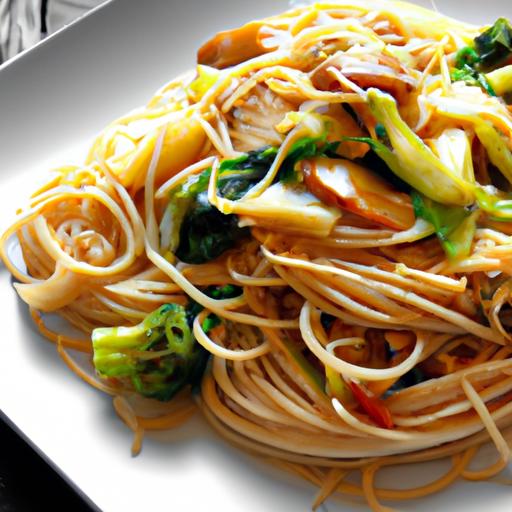
Effortless Flavor: One Pan Baked fish Made simple
Effortless flavor begins with the perfect balance of fresh fish, bright aromatics, and a hands-off cooking method that brings out the best in every ingredient. This one pan baked fish recipe is a party of simplicity and taste-a dish that transforms weeknight dinners into an elegant, wholesome experience without the fuss. Whether you’re a seasoned cook or just stepping into the world of seafood, mastering this technique will become your new favorite go-to.
Prep and Cook Time
- Planning: 15 minutes
- Cooking: 20-25 minutes
- Total Time: 35-40 minutes
Yield
Serves 4 people
Difficulty Level
Easy – Perfect for beginners and busy home cooks
Ingredients
- 4 fillets of firm white fish (such as cod, halibut, or sea bass), skin-on or off, about 6 ounces each
- 3 tablespoons olive oil
- 2 cloves garlic, finely minced
- 1 lemon, zested and juiced
- 1 teaspoon smoked paprika
- ½ teaspoon sea salt
- ¼ teaspoon freshly ground black pepper
- 1 teaspoon dried oregano or 1 tablespoon fresh, chopped
- 1 cup cherry tomatoes, halved
- ½ cup thinly sliced red onion
- 1 cup baby spinach or kale
- Fresh parsley, chopped for garnish
- optional: ¼ cup white wine or vegetable broth for extra moisture
instructions
- Preheat your oven to 400°F (200°C). Line a large rimmed baking sheet or ovenproof skillet with parchment paper for effortless cleanup and to keep flavors bright.
- Prepare the marinade: In a small bowl, whisk together olive oil, minced garlic, lemon zest, lemon juice, smoked paprika, salt, pepper, and oregano until smooth and fragrant.
- Place fish fillets on the baking sheet. Brush both sides generously with the marinade,letting the citrus and paprika seep in. For deeper flavor, let the fish marinate at room temperature for 10 minutes.
- Add the vegetables: Scatter the cherry tomatoes and red onion slices around the fish. Drizzle any remaining marinade over them. If using, splash the white wine or broth over the vegetables for extra moisture during baking.
- Bake uncovered for 20-25 minutes, or until the fish is opaque and flakes easily with a fork. The tomatoes will soften and release their juices, creating a natural sauce that melds beautifully with the fish.
- Five minutes before removing from the oven, scatter baby spinach or kale over the pan. The residual heat will gently wilt the greens without overcooking.
- Remove from oven, garnish with fresh parsley, and serve promptly. The colors should be vibrant, with golden fish edges and a fresh lemony aroma.
Tips for Success
- For the best results, select fresh, firm-fleshed fish known for holding together well during baking such as cod, halibut, or sea bass. These varieties absorb marinades beautifully and keep a tender texture.
- Don’t skip the lemon zest in the marinade-it adds brightness and depth that enhances the natural flavor of the fish without overpowering it.
- Use parchment paper or a silicone baking mat to prevent sticking and simplify cleanup,especially when cooking delicate fish.
- If you prefer a crusted top, broil for the last 2 minutes but watch carefully to avoid drying out the fish.
- Marinate fish only briefly (10-15 minutes max) to avoid breaking down the texture caused by citrus acids.
- For a gluten-free or paleo variation, all ingredients used here are naturally compliant-check seasoning blends for additives if purchased pre-made.
- Make-ahead: Prepare the marinade and chop vegetables the day before. store separately and assemble just prior to baking.
serving Suggestions
Serve your one pan baked fish alongside vibrant,fluffy couscous or a light quinoa pilaf to soak up the lemon-tomato juices. A side of crisp, roasted potatoes or a fresh green salad with a zesty vinaigrette perfectly balances the richness. For an extra flair, garnish with thin lemon wedges and a sprinkle of toasted pine nuts or sliced almonds for texture contrast. Pair with a chilled glass of Sauvignon Blanc or a crisp sparkling water with a lemon twist to round out this effortless,flavor-packed meal.

| Nutrient | Per Serving |
|---|---|
| Calories | 320 kcal |
| Protein | 34 g |
| Carbohydrates | 8 g |
| Fat | 14 g |
Mastering Marinades and Seasonings for Effortless Flavor
Unlocking effortless flavor is all about balancing seasoning that announces the fish’s natural taste without masking it. The gentle heat of smoked paprika marries with the vibrant acid of lemon juice to soften any fishy notes while adding a smoky depth. Fresh herbs like oregano or thyme bring an earthy layer that cooks into the fish and vegetables together.Marinating fish in olive oil not only tenderizes but creates a barrier that helps the fillets stay juicy during baking.
Essential Tools and Techniques for Easy Cleanup and Perfect Cooking
A heavy-bottomed ovenproof skillet or a rimmed baking tray lined with parchment paper is your best friend here. These tools reduce sticking, promote even cooking, and shorten cleanup time dramatically. Using a silicone brush to apply marinade ensures every inch of the fish is coated for maximum flavor absorption. let the oven’s dry heat work its magic-avoid overcrowding the pan to ensure the fish cooks evenly and vegetables roast rather than steam.
Creative Side pairings to Complement Your One Pan Baked Fish
Effortless flavor can be enhanced with thoughtfully paired sides. Consider a bright and crunchy cucumber-fennel slaw with a dill yogurt dressing to contrast the warm, tender fish. A roasted vegetable medley-brussels sprouts, sweet potatoes, and fennel-brings texture and complexity. Alternatively, serve creamy mashed cauliflower with a hint of garlic for a low-carb complement. To elevate your meal’s nutrition and flavor profile, explore [this guide on healthy seafood sides](https://www.eatthis.com/healthy-seafood-sides-strategies/) from a trusted source.
For more ways to bring effortless flavor to your table, check out our quick Seafood Dinners collection for inspiration and culinary confidence.
Q&A
Q&A: Effortless Flavor – One Pan Baked Fish Made Simple
Q: What makes one pan baked fish such a great cooking method?
A: One pan baked fish is the epitome of simplicity and flavor harmony. Cooking everything together on a single sheet means your fish soaks up aromatic herbs, spices, and even the essence of vegetables roasting alongside it. Plus, less cleanup means more time to savor your delicious creation!
Q: Can this method work with any type of fish?
A: Absolutely! Whether you choose flaky cod, tender salmon, or mild tilapia, one pan baking adapts beautifully. The gentle oven heat ensures even cooking, preserving moisture and delivering a perfectly tender fillet every time.Q: How do I ensure my fish doesn’t dry out in the oven?
A: The secret lies in timing and layering. Keep your fish skin-on if possible to lock in juices, and don’t overbake-usually 12-15 minutes at 400°F is spot on. Adding a drizzle of olive oil or a pat of butter atop the fish creates a natural basting, sealing in moistness and flavor.Q: What kind of vegetables pair best with baked fish in one pan?
A: Think colorful, quick-roasting veggies like cherry tomatoes, zucchini, bell peppers, or asparagus. Their natural sugars caramelize alongside the fish,adding vibrant texture and taste. plus,the veggie juices mingle with the fish,creating a tantalizing flavor medley.
Q: Are there any easy flavor combos to try for beginners?
A: Definitely! Lemon and dill are classic fish companions,offering bright,fresh notes. Garlic, paprika, and a sprinkle of parsley bring warmth and earthiness. For a Mediterranean twist, add olives, cherry tomatoes, and a splash of white wine or lemon juice.Q: how can I elevate this simple one pan meal without complicating things?
A: A sprinkle of toasted nuts like pine nuts or almonds adds crunch and depth. A final drizzle of herb-infused oil or a dollop of Greek yogurt or tzatziki on the side elevates the dish effortlessly. A squeeze of fresh lemon juice right before serving also brightens every bite.Q: Is one pan baked fish healthy?
A: Without a doubt! This method relies on minimal oil and uses fresh ingredients, preserving nutrients while reducing fat. Baking fish retains its omega-3 fatty acids, essential for heart and brain health, making it both delicious and guilt-free.
Q: Can I meal prep using this one pan baked fish method?
A: Yes! Bake a batch of fish and veggies, portion into containers, and refrigerate up to three days. Reheat gently to keep the fish tender, and enjoy quick, wholesome meals throughout the week. perfect for busy schedules craving effortless flavor.
Q: Any tips for beginners who’ve never baked fish before?
A: Start with a forgiving fish like salmon or tilapia, keep an eye on the cooking time, and don’t be afraid to experiment with herbs and spices. Remember, the oven is your trusty sous-chef-set it and let it work its magic! With practise, you’ll be serving up restaurant-quality fish with zero fuss.Q: What’s the biggest advantage of one pan baked fish?
A: Beyond the undeniable flavor and nutrition, it’s the simplicity-uncomplicated prep, minimal dishes, and a beautifully balanced meal all baked to perfection in one go. Effortless flavor truly is just one pan away!
Final Thoughts
With just a handful of ingredients and a single trusty pan, mastering the art of perfectly baked fish has never been easier-or more satisfying. This effortless approach not only saves you time and cleanup but also lets the natural flavors shine through, creating a meal that’s as wholesome as it is delicious. So next time you’re craving something light yet full of zest, remember: simplicity is the secret ingredient. One pan, fresh fish, and a few easy steps are all you need to bring effortless flavor to your table. Happy baking!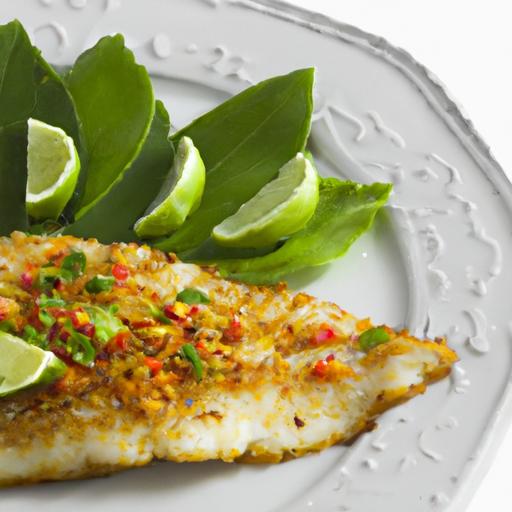
Effortless One-Pan Baked Salmon & Asparagus delight
Effortless one-pan baked salmon & asparagus delight is an inviting, nutrient-packed dish that blends coastal freshness with garden crispness in every bite. The beauty of this recipe lies in its simplicity, marrying the rich, buttery texture of salmon with tender yet crisp asparagus, all baked together in one pan for minimum cleanup and maximum flavor.
Prep and Cook Time
- Prep Time: 10 minutes
- Cook Time: 18-20 minutes
- Total Time: 30 minutes
Yield
Serves 4 generous portions
Difficulty Level
Easy – Perfect for weeknight dinners or casual entertaining
Ingredients
- 4 salmon fillets (6 oz each, skin-on for crispiness)
- 1 lb fresh asparagus, trimmed
- 3 tbsp olive oil, divided
- 1 lemon, zested and sliced
- 2 garlic cloves, minced
- 1 tsp smoked paprika
- 1 tsp dried dill
- ½ tsp ground black pepper
- 1 tsp sea salt
- ¼ tsp crushed red pepper flakes (optional for a mild kick)
Instructions
- Preheat your oven to 400°F (200°C). Line a large rimmed baking sheet with parchment paper or lightly grease with olive oil for easy clean-up and to prevent sticking.
- Prepare the salmon fillets by patting them dry with paper towels. This step is crucial to ensure the skin crisps nicely during baking.
- In a small bowl, whisk together 2 tablespoons of olive oil, lemon zest, garlic, smoked paprika, dried dill, black pepper, sea salt, and red pepper flakes. This vibrant seasoning blend will enhance both salmon and asparagus.
- Place salmon fillets skin-side down on one side of the baking sheet. Brush generously with the seasoning mixture, ensuring each fillet is well-coated but not swimming in oil.
- Arrange asparagus spears on the opposite side of the pan. Drizzle the remaining 1 tablespoon of olive oil, then sprinkle a light pinch of salt and freshly ground black pepper over the asparagus. Toss lightly to coat evenly.
- Arrange lemon slices over both salmon and asparagus for a subtle citrus aroma during baking.
- Bake in the preheated oven for 18-20 minutes or until the salmon flakes easily with a fork and the asparagus is tender yet crisp-avoid overcooking to maintain vibrant texture and flavor.
- remove from oven and let rest for 2 minutes. Serve with an extra squeeze of fresh lemon juice for a zesty finish.
Choosing the Perfect Salmon Cut for Maximum Flavor and Texture
Go for skin-on salmon fillets when aiming for a texture that delivers both a crispy crust and silky interior. Wild-caught, fresh salmon brings a richer flavor compared to farmed varieties. When you select cut, check the flesh colour: a shining, translucent orange to deep pink signals freshness and optimal flavor. Thick cuts around 1 to 1.5 inches ensure even cooking without drying out, which helps retain that melt-in-your-mouth appeal.
Selecting Fresh Asparagus Tips for Crisp and Tender Results
Choose asparagus stalks that are firm and vibrant green,with tightly closed tips. Thicker stalks roast beautifully alongside salmon, providing a lovely contrast in texture. Avoid asparagus with wrinkled or woody ends, which indicate age. To prep,trim the bottom inch where the stalk becomes tough,and a quick rinse under cold water removes any grit while preserving freshness. Baking asparagus at a moderate temperature locks in its natural sweetness and maintains a pleasant snap.
Crafting the Ideal Seasoning blend to Elevate Your One-Pan meal
Simple yet potent – a blend featuring smoked paprika adds a whisper of smoky warmth while fresh lemon zest injects brightness. Garlic offers an aromatic base and dried dill complements salmon’s natural richness with a subtle herbaceous touch. Balancing salt and freshly cracked black pepper with a hint of crushed red pepper flakes ensures the dish wakes up your palate without overwhelming the delicate seafood and vegetable balance. This seasoning mix is versatile and invites customization-try fresh herbs like thyme or parsley to tailor the flavor further.
Baking Techniques That Guarantee Even Cooking and stunning Presentation
To achieve the best results, position salmon skin-side down to preserve moisture and encourage a crispy edge. Spacing the fillets and asparagus so air circulates freely around each ingredient prevents steaming and promotes gentle roasting for vibrant, caramelized surfaces. use a rimmed baking sheet lined with parchment or foil for easy cleanup and an appealing presentation. Baking at 400°F provides just the right heat to cook through the salmon perfectly while roasting the asparagus to tender-crisp perfection. Always rest your salmon briefly before serving to lock in juices and enhance texture.
Tips for Success
- Make it ahead: Season the salmon and asparagus up to 4 hours before cooking and refrigerate, then bake just before dinner.
- Substitutions: Swap asparagus for broccolini or green beans for a seasonal twist.
- Cooking check: Use a fork to test salmon-it shoudl flake easily but remain moist.
- Enhance crispness: if you prefer more crispy skin, broil for the last 2 minutes watching carefully to avoid burning.
Serving Suggestions
Plate the flaky salmon fillets beside vibrant roasted asparagus, then add a sprinkle of fresh chopped parsley or dill for a pop of herbal color. A wedge of lemon on the side invites diners to add brightness as desired.For a heartier meal, serve with garlic Parmesan roasted potatoes or a fluffy quinoa salad. Pair with a crisp white wine like Sauvignon Blanc to complement the citrusy notes and silky texture of the fish.
| nutrient | Per Serving |
|---|---|
| calories | 350 kcal |
| Protein | 34 g |
| Carbohydrates | 7 g |
| Fat | 20 g |

For more expert guidance on cooking fish perfectly every time, visit FishWatch – your go-to source for sustainable seafood and cooking tips.
Q&A
Q&A: Effortless One-Pan Baked Salmon & Asparagus Delight
Q1: What makes this one-pan baked salmon and asparagus recipe “effortless”?
A1: The magic lies in its simplicity-everything cooks together on a single sheet pan. No juggling pots and pans, no complex steps. Just season,arrange,and bake.This minimal prep and cleanup recipe is perfect for busy weeknights or when you want a nutritious meal without the fuss.
Q2: Can I customize the flavors in this dish?
A2: absolutely! This recipe serves as a versatile canvas. Try swapping the lemon zest for orange or lime for a citrus twist. Add a sprinkle of smoked paprika for smokiness, or a drizzle of honey and soy for a sweet-savory punch. Fresh herbs like dill, parsley, or thyme can also elevate the flavors.
Q3: How do I ensure the salmon and asparagus cook perfectly at the same time?
A3: Start by placing the salmon fillets skin-side down on the sheet pan. Arrange the thicker asparagus spears around them so everything bakes evenly. The salmon typically needs about 12-15 minutes at 400°F (200°C), the same time it takes to roast asparagus to tender-crisp perfection. Keep an eye towards the end to avoid overcooking.
Q4: Is this recipe healthy?
A4: Yes! Salmon is loaded with heart-healthy omega-3 fatty acids and high-quality protein. Asparagus adds vitamins, fiber, and antioxidants, making this dish a power-packed, nutrient-dense meal that supports both taste and wellness.
Q5: Can I make this dish ahead of time?
A5: While it’s best served fresh from the oven, you can prep the ingredients in advance by seasoning the salmon and trimming the asparagus. Store them separately in the fridge and assemble before baking. Leftovers keep well for up to 2 days and reheat nicely for a quick lunch.
Q6: What sides pair well with one-pan baked salmon and asparagus?
A6: This dish is flexible! Serve it over a bed of fluffy quinoa,wild rice,or creamy mashed potatoes. A fresh green salad or garlic bread also complements the meal beautifully,balancing out textures and flavors without stealing the spotlight.
Q7: Can I use frozen salmon or asparagus for this recipe?
A7: Fresh is best for even cooking and texture, but you can use frozen salmon-just make sure to thaw it fully and pat dry to avoid sogginess. Frozen asparagus isn’t ideal since it tends to become mushy when roasted; fresh or even blanched asparagus will give better results.
Future Outlook
With its vibrant combination of tender salmon and crisp asparagus,this effortless one-pan baked delight proves that wholesome,flavorful meals don’t have to demand hours in the kitchen. By simply layering fresh ingredients and letting the oven do the work, you unlock a symphony of tastes and textures that nourish both body and soul. Whether you’re a busy weeknight cook or a culinary novice seeking simplicity without compromise, this recipe stands as a shining example of how appetizing minimalism can be. So next time you crave a healthy, satisfying dinner, remember: sometimes the best dishes are the ones you barely have to fuss over.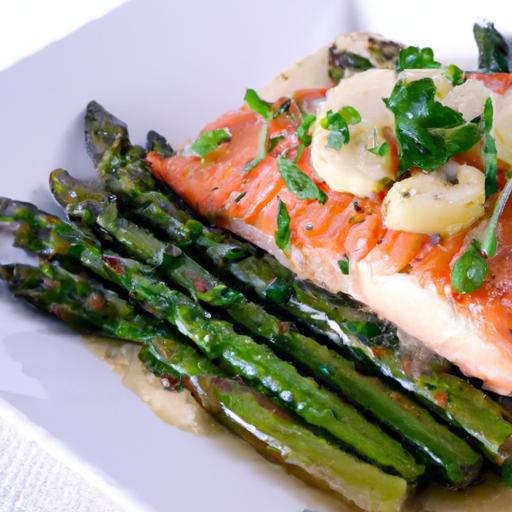
15-minute Stir Fry meals are a party of vibrant colors,crispy textures,and bold flavors that come together in just moments on your stove. This dish, rooted in traditional Asian cooking techniques, has evolved into an effortless weekday favorite worldwide. It’s magic lies in the perfect harmony of fresh ingredients, sizzling heat, and dynamic sauces-making every bite a delightful experience. Whether you’re pressed for time or want to impress with minimal fuss, mastering these essentials will elevate your stir-fry game to new heights.
Prep and Cook Time
- Planning: 10 minutes
- Cooking: 5 minutes
- Total Time: 15 minutes
Yield
- Serves 3-4 hungry adults
Difficulty Level
- easy – perfect for beginners and seasoned cooks alike
Ingredients
- 2 tablespoons vegetable or peanut oil
- 1 lb (450g) boneless chicken breast or firm tofu, thinly sliced
- 1 cup broccoli florets
- 1 cup julienned bell peppers (red and yellow for color)
- ½ cup thinly sliced carrots
- 3 cloves garlic, minced
- 1 teaspoon fresh ginger, grated
- ½ cup snap peas or green beans
- 3 green onions, sliced (white and green parts separated)
- ¼ cup low-sodium soy sauce
- 1 tablespoon oyster sauce (or vegetarian mushroom sauce)
- 1 tablespoon hoisin sauce
- 1 teaspoon toasted sesame oil
- 1 teaspoon cornstarch mixed with 2 tablespoons water (optional, for thicker sauce)
- Freshly ground black pepper, to taste
- Sesame seeds and fresh cilantro for garnish
Instructions
- Prep all your ingredients first – slice, mince, and measure everything for a smooth workflow. Stir fry moves fast, and having everything ready is key.
- Heat 2 tablespoons of oil in a large wok or heavy-bottomed skillet over high heat. You want the pan to be smoking hot for that authentic stir-fry sear.
- Add the chicken or tofu slices in a single layer, letting them sear without crowding. Cook for 2-3 minutes per side or until beautifully golden and cooked through. Remove and set aside.
- Add garlic, ginger, and the white parts of green onions to the hot pan. Sauté for about 30 seconds until fragrant-be careful not to burn the garlic.
- Toss in your broccoli, bell peppers, carrots, and snap peas. Stir constantly, letting the veggies char lightly but remain crisp-tender, about 3 minutes.
- Return the chicken or tofu to the pan, pouring in soy sauce, oyster sauce, and hoisin sauce.Stir vigorously,ensuring every piece is coated,about 1 minute.
- If you prefer a thicker sauce, stir the cornstarch slurry and add it now. Cook for another minute until sauce thickens and glazes the ingredients.
- Finish with toasted sesame oil and freshly ground pepper, giving a final toss before removing from heat.
- Garnish with sesame seeds and chopped cilantro, plus the green parts of the onions for a fresh bite and gorgeous presentation.
Tips for Success
- Choosing the Perfect Ingredients: Seek out the freshest vegetables with bright colors and firm textures. Crisp-tender vegetables bring vibrancy to your stir fry, while fresh aromatics like garlic and ginger infuse depth of flavor.
- Mastering High Heat: Use a sturdy wok or large skillet that holds heat well. Avoid overcrowding to encourage caramelization instead of steaming your ingredients.
- Sauces and Seasonings: Balance salty, sweet, and umami with soy, oyster, and hoisin sauces. Adjust according to taste, and experiment with chili garlic sauce for a kick.
- Time-Saving Tools: A sharp knife and a mandoline slicer radically speed up chopping. Prep veggies ahead and store them refrigerated in airtight containers for an easy weeknight.
- Substitutions: Swap chicken for shrimp or beef strips, and try kale, baby corn, or mushrooms depending on mood and season.
Serving Suggestions
Serve your stir fry over steaming bowls of jasmine rice or fluffy noodles. for extra crunch, sprinkle with toasted cashews or crushed peanuts. A wedge of lime adds a bright burst of acidity, while a drizzle of chili oil ups the heat for adventurous palates.

| Nutrient | Per Serving |
|---|---|
| Calories | 340 |
| Protein | 32g |
| Carbohydrates | 18g |
| Fat | 12g |
For more tips on quick and healthy cooking, explore our Healthy Quick Meals collection. Curious about the science behind stir-frying? Check out this Serious Eats guide to stir-frying for expert insights.
Q&A
Q&A: 15-Minute Stir Fry – Quick, Flavorful meals in a Flash
Q1: What makes stir fry such a popular quick meal option?
A1: stir fry’s magic lies in its speedy cooking time and vibrant flavors. Using high heat and bite-sized ingredients means everything cooks fast and keeps its crunch and color – perfect for when you want a fresh, satisfying meal without the wait.
Q2: Can you really whip up a delicious stir fry in just 15 minutes?
A2: Absolutely! With a bit of prep and the right recipe, a stir fry moves from stove to table in a flash. The key is having your veggies chopped, protein ready, and sauces mixed before you fire up the pan – then it’s a quick sizzle and toss before dinner is served.Q3: What are the essential ingredients for a 15-minute stir fry?
A3: Start with fresh, firm veggies like bell peppers, snap peas, broccoli, or carrots, paired with quick-cooking proteins such as thinly sliced chicken, tofu, or shrimp.Add a simple sauce made from soy sauce, garlic, ginger, and a touch of sweetness. Don’t forget a splash of oil for that perfect sear!
Q4: How can I make my stir fry more flavorful without adding a lot of time?
A4: Layering flavor is key. Use aromatics like fresh garlic and ginger right at the start. A drizzle of toasted sesame oil, a pinch of chili flakes, or a squirt of fresh lime juice at the end adds a punch of brightness. Pre-made sauces or a quick mix of soy sauce and honey can amp up taste in seconds.
Q5: What’s the secret to keeping vegetables crisp-tender?
A5: High heat and quick cooking are your best friends here. Don’t overcrowd the pan – stir fry in batches if needed to maintain sizzling heat. adding vegetables in the right order based on their cooking time also helps: start with denser veggies like carrots or broccoli,then toss in quicker cooks like snap peas or bell peppers near the end.
Q6: Can a stir fry be healthy and balanced?
A6: Definitely! The beauty of stir fry is its versatility. By choosing lean proteins, packing in colorful veggies, and controlling your sauce sugar and salt levels, you’re creating a nutritious, well-rounded meal that satisfies both appetite and health goals.
Q7: Any tips for customizing stir fry for different tastes or dietary needs?
A7: Stir fry is truly a blank canvas.Prefer vegetarian? Swap tofu or tempeh for meat. gluten-free? Use tamari rather of soy sauce. Want it spicy? Add chili paste or fresh sliced peppers. Feel free to experiment with herbs, nuts, or different oils to keep your quick meals fresh and exciting.Q8: What sides or meals pair well with a 15-minute stir fry?
A8: Keep it simple and speedy – steamed jasmine rice, quinoa, or quick-cooking noodles complement stir fry perfectly. For a lighter option, serve it over a bed of fresh greens or zoodles for a low-carb twist.
Q9: How do you avoid common stir fry pitfalls like soggy veggies or dry meat?
A9: Avoid overcooking by prepping and cooking efficiently at high heat. Don’t overcrowd your pan, and keep the protein moving once it hits the heat to prevent drying out. Lastly, add sauces towards the end to coat everything without steaming it.
Q10: Why should busy cooks add a 15-minute stir fry to their recipe arsenal?
A10: It’s the ultimate weeknight hero - fast, flexible, and bursting with flavor. A 15-minute stir fry helps you skip the “what’s for dinner?” stress while still putting a fresh, home-cooked meal on the table. Plus, it’s a brilliant way to use up whatever’s in your fridge, turning everyday ingredients into a delicious feast!
In Retrospect
In the whirlwind of today’s busy lives, the 15-minute stir fry stands out as a culinary superhero-swift, vibrant, and bursting with flavor. Whether you’re a kitchen novice or a seasoned cook, this lightning-fast method transforms humble ingredients into a satisfying meal that never compromises on taste. So next time the clock is ticking and hunger is calling, remember: with a sizzling wok and a handful of fresh ingredients, a delicious, nutritious dinner is always just minutes away. Stir fry your way to quick, flavorful meals that fit seamlessly into your fast-paced world.