Decadent chocolate dessert recipes to satisfy your cravings invite us on a journey where timeless favorites meet contemporary flair, transforming every bite into an experience of velvety indulgence.From my earliest memories of savoring rich chocolate in my grandmother’s kitchen to experimenting with unexpected yet harmonious ingredients like espresso powder and smoked sea salt, these reinvented classics bring a new depth of flavor and texture that will captivate both chocolate purists and adventurous palates alike.
Prep and Cook Time
- Preparation: 20 minutes
- Cook Time: 30 minutes
- Total Time: 50 minutes
Yield
- 8 generous servings
Difficulty Level
- Medium – perfect for home bakers ready to elevate their chocolate game
Ingredients
- 1 cup unsweetened cocoa powder, sifted
- 1 ½ cups all-purpose flour, sifted
- 1 tsp baking powder
- ½ tsp fine sea salt
- 1 cup unsalted butter, melted and cooled
- 1 ¼ cups granulated sugar
- 3 large free-range eggs, room temperature
- 2 tsp pure vanilla extract
- ½ cup strong brewed espresso, cooled
- ½ cup dark chocolate chunks (70% cacao or higher)
- 1 tbsp smoked sea salt flakes (optional, for finishing)
Instructions
- Preheat your oven to 350°F (175°C).Grease and line an 8-inch square baking pan with parchment paper.
- In a medium bowl, whisk together the sifted cocoa powder, sifted flour, baking powder, and fine sea salt until evenly combined.
- In a large mixing bowl, combine the melted butter and granulated sugar. Use a hand mixer on medium speed to beat until smooth and glossy, about 2 minutes.
- Add the eggs, one at a time, mixing thoroughly after each addition, then stir in the vanilla extract.
- Slowly fold in the espresso, wich intensifies the chocolate without overpowering the profile.
- Gradually incorporate the dry ingredients into the wet mixture, folding gently to maintain the batter’s airy texture.
- Fold in the dark chocolate chunks, ensuring even distribution for pockets of melty goodness.
- Pour the batter into the prepared pan, smoothing the top with a spatula. Bake for 28-30 minutes, or until a toothpick inserted near the center comes out with moist crumbs.
- Remove from oven and let cool fully in the pan on a wire rack.
- Sprinkle the surface with smoked sea salt flakes just before serving to highlight the complex flavors.
Tips for Success
- For extra moistness, substitute half the butter with refined coconut oil, which enhances richness without altering the chocolate’s purity.
- Ensure eggs are at room temperature to help create a smooth, even batter.
- If your cocoa powder is especially bitter, balance the flavor by adding a tablespoon of honey or maple syrup into the wet ingredients.
- Make these decadent chocolate dessert recipes to satisfy your cravings even easier by prepping the batter a day ahead and refrigerating it overnight. Allow it to come to room temperature before baking.
- to add a nutty crunch, sprinkle chopped toasted pecans or hazelnuts on top before baking.
Serving Suggestions
Serve warm squares of these luscious brownies alongside a scoop of vanilla bean ice cream, drizzled with salted caramel sauce for a decadent contrast. Garnish with fresh raspberries or edible gold leaf for that extra wow factor.For an elevated presentation, plate with a dusting of cocoa powder or a swirl of homemade chocolate ganache infused with a hint of chili for subtle kick.

| Nutrient | Per Serving (1 piece) |
|---|---|
| Calories | 320 kcal |
| Protein | 5 g |
| Carbohydrates | 38 g |
| Fat | 18 g |
For more inspiration on chocolate-centric creations, check our Ultimate Chocolate Mousse Guide. Also, learn about the science of chocolate flavor at Cocoa & Chocolate Science.
Q&A
Q&A: decadent Chocolate Dessert Recipes to Satisfy Your Cravings
Q1: What makes a chocolate dessert truly decadent?
A: Decadence in chocolate desserts is all about richness and indulgence. It means using high-quality chocolate with a deep, intense flavor, combining creamy textures with the perfect balance of sweetness, and often adding luxurious elements like ganache, espresso, or a hint of sea salt. The result is a dessert that feels like a sumptuous treat every bite.
Q2: Can you recommend a simple yet decadent chocolate dessert recipe for beginners?
A: Absolutely! A classic molten lava cake is both notable and surprisingly easy. With just a few ingredients-dark chocolate, butter, sugar, eggs, and flour-you can create a gooey-centered cake that oozes rich chocolate as soon as you cut in. Serve warm with vanilla ice cream for instant magic.Q3: How can I elevate everyday brownies into a decadent dessert?
A: Elevate brownies by incorporating mix-ins like chunks of dark chocolate or toasted nuts, swirling in salted caramel, or topping with a glossy ganache finish. for a gourmet touch, sprinkle with flaky sea salt or pair with a dollop of whipped cream infused with a hint of coffee or liqueur.
Q4: Are there any no-bake chocolate desserts that still feel indulgent?
A: Yes! Chocolate mousse is the quintessential no-bake luxury dessert. Whipping up heavy cream and folding it into melted dark chocolate creates an airy yet rich experience. You can also try chocolate truffles rolled in cocoa powder or crushed nuts-simple to make but incredibly indulgent.Q5: How do I ensure my chocolate desserts aren’t overly sweet?
A: Balance is key.Use bittersweet or dark chocolate with at least 60-70% cocoa content to avoid excessive sweetness. Incorporate natural bitterness by adding espresso powder or a pinch of sea salt. Fresh fruits like raspberries or a tart berry coulis can also offset sweetness with their luminous acidity.
Q6: What are some unique flavor pairings to enhance chocolate desserts?
A: Chocolate pairs beautifully with unexpected flavors like chili for a spicy kick, orange zest for brightness, or lavender for floral notes. Nuts like hazelnuts and pistachios offer texture and nuttiness, while ingredients like caramel, coffee, or even a splash of bourbon deepen the complexity of the dessert.
Q7: Any tips for presenting chocolate desserts in a way that wows guests?
A: Presentation is part of the decadence! Use elegant plating techniques: drizzle sauces artistically, garnish with fresh mint, edible gold leaf, or berries, and serve desserts in clear glass jars or sleek ramekins. Don’t forget texture-adding a sprinkle of crushed nuts or a dusting of cocoa powder can heighten the sensory experience.
Q8: How can I customize chocolate desserts for dietary restrictions without losing the decadence?
A: Great question! Use dairy-free chocolate and coconut cream to create luscious vegan mousses or cakes. For gluten-free, almond flour or oat flour are excellent substitutes in brownies or tarts. Natural sweeteners like maple syrup or coconut sugar can replace refined sugar while keeping the flavor rich and satisfying.
Q9: What’s the secret to perfect chocolate ganache?
A: It’s all about ratios and temperature! typically, equal parts by weight chocolate and heavy cream create a versatile ganache with a silky texture. Heat the cream just until steaming, pour over chopped chocolate, let it sit for a minute, then gently stir until smooth. avoid overheating to prevent graininess.
Q10: Where can I find inspiration for creating my own decadent chocolate dessert recipes?
A: Inspiration is everywhere-from classic French patisserie to modern artisan chocolatiers. Food blogs, cooking shows, and dessert books offer endless ideas.Experiment with seasonal ingredients, cultural twists, and unexpected textures to put your unique spin on chocolate indulgence.
Indulging in decadent chocolate desserts doesn’t mean complexity-sometimes the richest joy comes from the simplest combinations of high-quality ingredients and a little creative flair. Ready to satisfy your cravings? Let your sweet adventure begin!
In Conclusion
Whether you’re a seasoned chocolatier or a curious beginner, these decadent chocolate dessert recipes are your passport to a world of rich flavors and irresistible textures. From velvety mousses to fudgy brownies and beyond, each creation promises to satisfy your deepest cravings and elevate your dessert game.So next time the chocolate urge strikes, remember these luscious recipes are just a whisk away-ready to transform ordinary moments into remarkable indulgences. Your sweet adventure awaits!
Fresh & Fruity delights begin with a thoughtful selection of quality ingredients, and this fruit tart is no exception. From the vibrant juiciness of ripe berries to the subtle crispness of orchard-fresh apples, every element harmonizes beautifully when the perfect fruits meet a buttery crust and silky custard. It’s a celebration of textures and colors that awaken your senses and make every bite unforgettable.
Choosing the Perfect Fruits for Vibrant Flavors and Textures
When selecting fruits, aim for a balance of sweetness, tartness, and texture that creates a lively flavor profile. Opt for a mix of berries such as blueberries,raspberries,and strawberries-each bringing radiant colors and juicy bursts. Add firmness with sliced kiwis, peaches, or apricots for tender yet slightly crisp contrast. A well-chosen variety not only enhances taste but also adds an artful mosaic of shapes and hues that make your tart irresistibly photogenic.
Mastering the Ideal Tart Crust for a Flaky and Buttery Base
The foundation of any extraordinary fruit tart is a crust that’s impressively flaky yet tender with a rich buttery flavor. Use cold,unsalted butter cut into the flour until pea-sized crumbs form,ensuring the crust doesn’t become tough. Press the dough gently into the pan and chill before blind baking. This definitive step guarantees a golden, crisp shell that holds the custard perfectly without sogginess. This crust gives your tart that coveted ‘fresh & fruity’ character that guests rave about.
Crafting a Silky Smooth Custard Filling to Elevate Your Tart
A luscious custard filling ties the fresh fruit and crust together with creamy elegance. Whisk together egg yolks, sugar, vanilla, and a touch of cream over gentle heat to develop a velvety texture without breaking. Let it cool before layering in the tart shell, creating a luscious base that accentuates each fruit’s natural sweetness. This custard layer acts as the silent hero, elevating every bite and enhancing flavors without overwhelming them.
Expert Tips for Artful Fruit Arrangement and Stunning Presentation
Presentation is your chance to wow before the first bite. arrange fruits in concentric circles or a free-form mosaic to create visual rhythm. Layer different heights and textures-whole berries nestled between thinly sliced stone fruits produce dimension. Use edible flowers or fresh mint leaves for a pop of color and freshness. A gentle glaze of warmed apricot jam adds a glistening finish, sealing the fruit and adding subtle shine that invites admiration and appetite alike.
Prep and Cook time
- Prep Time: 30 minutes
- Cook Time: 25 minutes (plus cooling time)
- Total Time: 1 hour 10 minutes
Yield
Serves 8 delicious slices
Difficulty Level
Medium - approachable with attention to detail in assembly
Ingredients
- For the Tart Crust:
- 1 ¼ cups all-purpose flour, sifted
- ½ cup unsalted butter, frozen and cut into cubes
- ¼ cup powdered sugar
- 1 large egg yolk
- 1-2 tbsp ice-cold water
- Pinch of salt
- For the Custard Filling:
- 2 large egg yolks
- ¼ cup granulated sugar
- 1 cup whole milk
- 1 tsp vanilla extract
- 1 tbsp cornstarch
- 2 tbsp heavy cream (optional, for extra silkiness)
- For the fruit Topping:
- ½ cup strawberries, hulled and sliced
- ½ cup blueberries
- ½ cup raspberries
- 1 kiwi, peeled and thinly sliced
- 1 peach or nectarine, thinly sliced
- 2 tbsp apricot jam, warmed (for glazing)
- Fresh mint leaves or edible flowers for garnish
- Prepare the crust: in a food processor, pulse the flour, powdered sugar, and salt until combined. Add cold butter cubes and pulse until mixture resembles coarse crumbs.
- Add egg yolk: Stir in the egg yolk and water, one tablespoon at a time, until dough comes together. Avoid overmixing for a tender result.
- Chill and blind bake: Press dough evenly into a 9-inch tart pan with removable bottom. Chill in the freezer for 15 minutes.Line with parchment and fill with pie weights or dry beans.
- bake the crust: bake at 375°F (190°C) for 15 minutes until edges turn golden. Remove weights and parchment; bake 8-10 minutes more to dry the base. Cool completely.
- Make custard filling: Whisk egg yolks, sugar, and cornstarch in a bowl until pale. Heat milk and vanilla in a saucepan until just simmering. Slowly whisk hot milk into yolk mixture to temper. Return mixture to pan and cook on low heat, stirring constantly until custard thickens, about 5 minutes.
- Cool custard: Transfer custard to a bowl, cover with plastic wrap directly on the surface to prevent skin.Chill until set but still spreadable, about 30 minutes. Whisk in cream for extra richness if desired.
- Assemble the tart: Spread chilled custard evenly over the crust.Arrange fruits artistically on top, starting from the outer edges and working inward.
- Glaze the fruit: Lightly brush warmed apricot jam over the fruit to add shine and keep fruits moist.
- Finish and serve: Garnish with fresh mint or edible flowers. Chill until ready to serve for optimal freshness.
- Use room-cold butter and avoid warming your hands too much to keep the crust flaky.
- Blind baking the shell prevents sogginess from the custard filling.
- For a dairy-free custard, substitute coconut milk and use cornstarch as a thickener.
- Make custard a day in advance; the flavor deepens and it becomes easier to spread.
- Glazing fruits not only enhances appearance but also extends the tart’s shelf life by sealing moisture in.
Instructions
Tips for Success
Serving Suggestions
Serve chilled slices alongside lightly whipped cream or a scoop of vanilla bean ice cream for an indulgent finish. Pair with a crisp glass of sparkling wine or fruity iced tea for afternoon gatherings. Simply plating with a sprig of mint or edible flowers on each slice elevates the experience for guests.
| Nutritional Info (per serving) | Calories | Protein | Carbs | Fat |
|---|---|---|---|---|
| Fresh & Fruity Tart | 320 kcal | 5g | 45g | 12g |
Discover more delightful baking tips and recipes on our Dessert recipes page. For an in-depth look at fruit nutrition and seasonal picks, visit the Fruits & Veggies Nutrition Hub.

Q&A
Q&A: Fresh & Fruity – Your Ultimate Easy Fruit Tart Recipe Guide
Q1: What makes a fruit tart the perfect dessert?
A1: A fruit tart is the perfect dessert as it marries a buttery, crispy crust with luscious cream and vibrant, juicy fruits. It’s a feast for both the eyes and the palate-a balance of textures and flavors that feels fresh,light,and indulgent all at once.
Q2: Do I need to be an expert baker to make this fruit tart?
A2: Absolutely not! This guide is designed for all skill levels. With simple, step-by-step instructions, you’ll learn easy techniques to craft a stunning tart that looks like it came from a patisserie-no experience required.
Q3: What kind of crust is best for a fruit tart?
A3: A classic sweet pastry crust, known as pâte sucrée, is ideal.It’s tender yet sturdy enough to hold the filling without sogginess. Plus, it has a subtle sweetness that perfectly complements fresh fruit.
Q4: Can I use any fruits I like?
A4: Yes! One of the joys of a fruit tart is its versatility. Seasonal produce like berries, stone fruits, kiwis, or tropical fruits can all shine. Mix and match to create your own colorful masterpiece.
Q5: How do I keep the fruit looking fresh and glossy?
A5: A light glaze seals in moisture and adds a beautiful shine. You can use warmed apricot jam, honey, or a simple syrup brushed gently over the fruit just before serving.Q6: Is there a shortcut to making the cream filling?
A6: For sure! Instead of laboring over pastry cream, you can use mascarpone mixed with a bit of powdered sugar and vanilla for a luscious, no-cook filling that’s equally decadent and simpler to prepare.Q7: can I make the tart in advance?
A7: Definately. Bake the crust and prepare the cream beforehand. Assemble and glaze the tart shortly before serving to keep the fruit fresh and vibrant.
Q8: What’s your top tip for creating a show-stopping fruit tart?
A8: Play with color, texture, and arrangement. start from the outer edge and work your way inwards, layering fruits in contrasting colors and shapes. A visually stunning tart is as satisfying as one that tastes divine!
Q9: How do I store leftover fruit tart?
A9: Cover loosely with plastic wrap and refrigerate. It’s best enjoyed within 1-2 days to keep the crust crisp and the fruits fresh.
Q10: Where can I find inspiration for fruit combinations?
A10: The seasons are your best guide! Spring strawberries and rhubarb, summer berries and peaches, autumn figs and apples, winter citrus-all bring unique flair. Feel free to experiment and let your creativity shine.
Dive into your kitchen with confidence and create a fruit tart that’s fresh, fruity, and fabulously easy!
To Conclude
As you embark on your fruit tart adventures, remember that the beauty of this delightful dessert lies not only in its vibrant colors and luscious flavors but also in its effortless charm. Whether you’re a seasoned baker or a kitchen newbie,our easy fruit tart recipe guide empowers you to create stunning,fresh-and most importantly-delicious treats that brighten any table. So gather your favorite fruits, roll up your sleeves, and let your creativity blossom in every buttery crust and juicy bite. With “Fresh & Fruity” by your side, the perfect tart is always just a whisk away!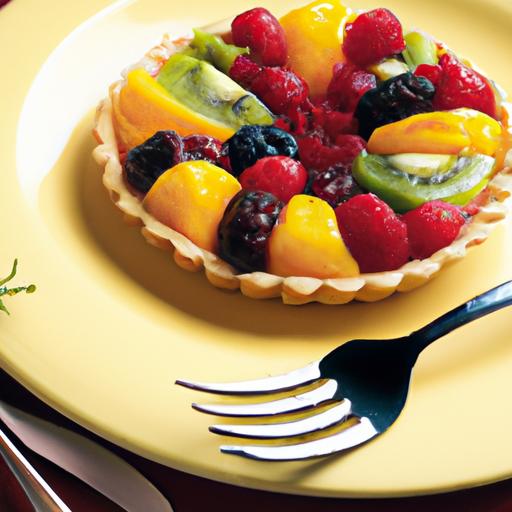
Crisp & Sweet almond florentines are a timeless confection that masterfully balance the delicate crunch of toasted almonds with a buttery, caramelized lace of golden syrup and honey. originating from Italy and popularized in France, these elegant cookies occupy a cherished spot in any dessert repertoire. Their irresistibly thin, crispy texture combined with the sweet nutty flavor creates an unforgettable indulgence perfect for elevating teatime or enchanting guests.
Prep and Cook Time
- Planning: 15 minutes
- Cooking: 12-15 minutes
- Cooling: 10 minutes
- Total Time: Approximately 40 minutes
Yield
About 24 delicate almond florentines, perfect for sharing or gifting.
Difficulty Level
Medium – patience and precision will reward you with bakery-worthy results.
Ingredients
- 1 cup sliced almonds (lightly toasted for depth of flavor)
- ½ cup granulated sugar
- 3 tablespoons unsalted butter, melted and slightly cooled
- 2 tablespoons honey (preferably mild-flavored, such as acacia)
- 2 tablespoons heavy cream (adds richness and helps caramelize)
- 1 tablespoon all-purpose flour, sifted
- ½ teaspoon pure vanilla extract
- Pinch of fine sea salt
- Optional: 3 ounces dark chocolate, melted (for drizzling or dipping)
Step by Step Guide to Achieving the Ideal Crisp and Golden Finish
- Preheat your oven to 350°F (175°C). Line two baking sheets with parchment paper or silicone mats for easy release.
- Lightly toast the sliced almonds in a dry skillet over medium heat for 3-4 minutes,stirring frequently until golden and fragrant. This step unlocks the nutty depth essential for crisp & sweet almond florentines.
- In a medium bowl,combine the sugar,melted butter,honey,and heavy cream. Whisk gently until fully integrated.
- Sift the flour over the wet mixture. Add the vanilla extract and salt, then gently fold in the toasted almonds, making sure every slice is coated.
- Spoon small dollops (about 1 tablespoon) onto the prepared trays, spaced at least 3 inches apart. Use the back of the spoon to gently spread each dollop into thin rounds, about 3 inches in diameter. Thinness is key to that perfect lace-like crispness.
- Bake for 12-15 minutes or until the florentines turn a deep golden amber and develop a glossy, bubbling surface.Watch closely after the 10-minute mark to avoid burning.
- Remove from oven. Let the cookies cool on the baking sheet for 5 minutes – this allows them to set before transferring.
- Using a thin spatula, gently lift and transfer the florentines onto wire racks to cool entirely. They will crisp further as they cool.
- If desired, drizzle or dip the underside in melted dark chocolate. Place on parchment paper and let the chocolate set before serving.
Expert Tips and Variations to Customize Your Almond Florentines
- For extra crunch: Mix in finely chopped pistachios or hazelnuts alongside almonds for a vibrant, multi-textured twist.
- Flavor play: Infuse the honey mixture with a splash of orange zest or a pinch of cinnamon for subtle aromatic complexity.
- Make-ahead magic: Florentines keep excellently in an airtight tin for up to a week. chocolate-dipped versions are best enjoyed within 3 days.
- Watch your oven carefully: Because florentines are thin, their thin edges can turn too dark quickly. Baking one test cookie first is a good measure.
- Gluten-free option: Replace all-purpose flour with almond flour and reduce the amount to 1 teaspoon; this yields a naturally nutty and crisp cookie.
- Presentation tip: Align cookies on delicate doilies or stack tied in parchment paper bundles for a charming gift.
Serving Suggestions
Serve almond florentines alongside a robust cup of black tea or an espresso for a harmonious counterpoint to their sweetness. Their thin,crisp texture pairs wonderfully with creamy desserts such as panna cotta or vanilla bean ice cream,adding a delightful crunch and nutty accent. garnish plates with fresh berries or edible flowers for an elegant touch that dazzles guests visually and palate-wise.
| Nutrient | Per Serving (1 Florentine) |
|---|---|
| Calories | 95 kcal |
| Protein | 2 g |
| Carbohydrates | 9 g |
| Fat | 6 g |
Explore more exquisite nutty cookies and almond cookie recipes on our site to expand your baking repertoire. For a fascinating dive into florentine history and variations, check out this detailed entry on Britannica.

Q&A
Q&A: Crisp & Sweet – the Ultimate Almond Florentine Recipe Revealed
Q1: What exactly is an Almond Florentine?
A: An Almond Florentine is a delicate, lacy cookie known for its crisp texture and sweet, caramelized almond flavor. Thin as a whisper, these golden beauties are frequently enough studded with toasted almond slices and finished with a drizzle or coating of rich chocolate. Think of them as edible works of art-light, nutty, and irresistibly crunchy.Q2: What makes this Almond Florentine recipe “ultimate”?
A: This recipe strikes the perfect balance between crispness and sweetness by using the right combination of butter, sugar, and almonds, baked just so. The result? Florentines that snap with a satisfying crunch but melt gently upon tasting.Plus, we share insider tips for avoiding common pitfalls like spreading or sogginess, ensuring bakery-quality treats every time.
Q3: Can I customize the recipe?
A: Absolutely! While classic Florentines feature sliced almonds, you can experiment with other nuts like pistachios or hazelnuts. For added depth, try mixing in a pinch of sea salt or a hint of orange zest. Chocolate lovers can get creative by using dark, milk, or white chocolate for coating or drizzling.
Q4: How do I achieve that perfect thin, lacy texture?
A: The secret lies in careful ingredient ratios and baking technique. The sugar caramelizes during baking, causing the batter to spread thinly and crisply. Using melted butter helps with even spreading, and spacing spoonfuls apart on the sheet prevents overlapping. Keep an eye on them as they bake, pulling them out once edges turn a delicate amber.
Q5: What’s the best way to store Almond Florentines?
A: to keep their crispness intact, store Florentines in an airtight container at room temperature. Placing a slice of bread inside the container helps absorb excess moisture and preserves that crisp bite. They’re best enjoyed within a week but can also be frozen for longer storage-just thaw gently before serving.
Q6: Are Almond Florentines difficult to make for beginners?
A: Not at all! The recipe is straightforward and forgiving, making it an excellent choice for bakers new and seasoned alike.With clear instructions and helpful tips, even first-timers can achieve stunning results that rival anything from a patisserie.
Q7: When is the perfect occasion to serve almond Florentines?
A: These elegant cookies are perfect for tea parties, festive holidays, or as a delicate accompaniment to coffee after dinner. Their refined sweetness and crunchy texture also make them wonderful gifts or stunning additions to dessert platters.
Q8: Any pro tips for enhancing flavor and presentation?
A: Toast your almonds lightly before mixing-they’ll bring out a nutty aroma that deepens the overall flavor. For a stunning finish, drizzle with melted dark chocolate or dip one edge for contrast. If you’re feeling fancy,sprinkle a tiny pinch of flaky sea salt over the chocolate before it sets-this sweet and salty combo is pure magic.
to sum up
As the delicate crunch of each almond florentine melts on your tongue, you’ll understand why this timeless treat continues to captivate taste buds around the world. With its perfect harmony of crisp,buttery layers and sweet almond essence,this recipe invites you to rediscover a classic with every bite.Whether enjoyed with afternoon tea or as a charming conclusion to a gourmet meal, these florentines are a testament to the art of simple ingredients transformed into unusual indulgence. So, gather your ingredients, embrace the process, and soon, the ultimate almond florentine will be yours to savor-crisp, sweet, and utterly unforgettable.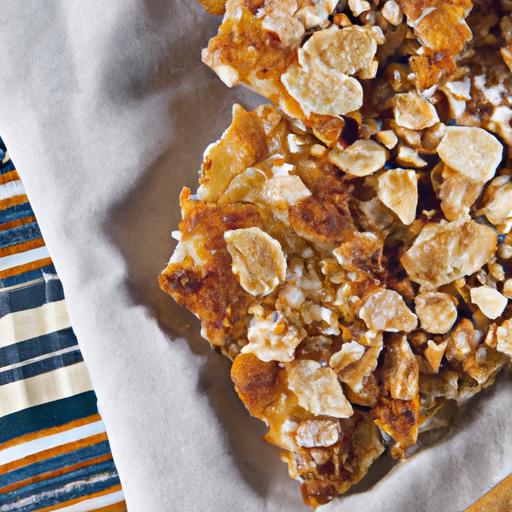
Bake perfect scones from scratch brings the timeless comfort of freshly baked, golden-topped treats right to your kitchen. Rooted in British teatime tradition, scones are delicate by nature-fluffy inside and tender to the bite, crowned with a crisp, buttery crust. My love affair with scones began on a misty morning in the English countryside, where each bite paired with clotted cream and jam felt like a warm hug. This recipe post unlocks the secrets behind achieving that flawless texture and invites you to experiment with creative flavor twists that transform humble scones into memorable delights.
prep and Cook Time
- Preparation: 15 minutes
- Resting: 10 minutes
- Baking: 12-15 minutes
- Total: 40 minutes
Yield
Yields 8 medium-sized scones-perfect for sharing or savoring over a few days.
Difficulty Level
Easy. Ideal for beginners, with simple steps that guarantee impressive results.
Ingredients
- 2 cups all-purpose flour, sifted for a light, airy crumb
- 1/4 cup granulated sugar, to add subtle sweetness
- 1 tablespoon baking powder, for that essential lift
- 1/2 teaspoon fine sea salt, to enhance flavor balance
- 6 tablespoons unsalted butter, cold and cubed for flakiness
- 3/4 cup whole milk, chilled to bind the dough gently
- 1 large egg, for richness and color
- Optional: 1 teaspoon vanilla extract or zest of 1 lemon for floral brightness
Instructions
- Preheat your oven to 400°F (200°C) and line a baking sheet with parchment paper or a silicone mat.
- Combine the dry ingredients: In a large mixing bowl,whisk together the flour,sugar,baking powder,and salt,ensuring even distribution for consistent rise.
- Cut in the butter: Using a pastry cutter or your fingertips, quickly work the cold butter into the dry mix until the mixture resembles coarse crumbs dotted with pea-sized butter pieces. Keep everything chilled to maintain flakiness.
- Mix wet ingredients: In a small bowl, beat the egg with milk and optional vanilla or citrus zest.
- Form the dough: Pour the wet mixture into the dry ingredients and stir gently with a fork or spatula until just combined. The dough should be slightly sticky but hold together-avoid over-mixing to preserve tenderness.
- Knead lightly: Turn the dough out onto a lightly floured surface and fold it over itself 3 to 4 times. This brief kneading develops the structure without toughening the scones.
- Shape and cut: Pat the dough into a 1-inch thick circle. Using a floured round cutter,cut out scones and place them on the prepared baking sheet,spacing them about 2 inches apart.
- Brush tops: Lightly brush each scone with a bit of milk or beaten egg for a luminous golden crust.
- Bake: Bake until risen and golden brown,about 12-15 minutes. Rotate the tray halfway through for even color.
- Cool briefly: Let scones rest for 5 minutes on a wire rack before serving to lock in softness.
Tips for Success
- Butter temperature: Use cold butter straight from the fridge to ensure flaky layers instead of dense dough.
- Avoid overworking: Handle dough as little as possible to keep scones tender and crumbly rather than tough.
- Resting time: Allowing the dough to rest for 10 minutes before cutting encourages better rise and flakiness.
- Milk substitutes: Whole milk offers richness, but you can use buttermilk for tang or dairy-free alternatives for dietary needs.
- Flavor variations: Add mix-ins like dried fruits, chopped nuts, or grated cheese to complement your sweet or savory preferences.
- Make ahead: Freeze unbaked scones on a tray, then transfer to a freezer bag.Bake them frozen, adding a few extra minutes to the bake time.
Serving Suggestions
Warm scones fresh from the oven and serve with a generous spoonful of clotted cream and fruit preserves, such as strawberry or raspberry jam. For a modern twist, spread goat cheese and honey or serve alongside a cup of Earl Gray tea or freshly brewed coffee. Garnish with a few edible flowers or a dusting of powdered sugar to elevate presentation for special occasions.

| Nutrient | Per Scone (approx.) |
|---|---|
| Calories | 190 |
| Protein | 4g |
| Carbohydrates | 26g |
| Fat | 7g |
For even more delightful baked treats,discover our Ultimate Batched Butter Biscuits recipe. For expert culinary science behind baking powders and dough aeration, visit King Arthur Baking’s official guide.
Q&A
Q&A: Bake Perfect Scones from Scratch – Easy Recipes Inside
Q: What’s the secret to baking perfect scones from scratch?
A: The secret lies in using cold ingredients, working quickly, and not overmixing the dough. Cold butter creates those flaky, tender layers, while minimal mixing keeps the scone light and crumbly instead of dense and tough. Think of it as a gentle dance with your dough!
Q: Can I customize the flavors in my scones?
A: Absolutely! Scones are a blank canvas waiting for your creativity. Classic add-ins include dried fruits like currants or cranberries, fresh berries, citrus zest, or even savory ingredients like cheese, herbs, or bacon bits. Just fold them in gently before shaping.
Q: Should I use baking powder or baking soda in my scones?
A: Baking powder is your best friend here because it provides a reliable rise in slightly acidic doughs. Baking soda needs an acidic ingredient to activate properly-so unless your recipe has buttermilk or yogurt, stick to baking powder for fluffier scones.
Q: How do I know when my scones are properly baked?
A: Golden brown tops and a skewer inserted into the center coming out clean are your go-to signals. They should feel firm but yield softly under gentle pressure. Don’t overbake - you want moist, tender insides with a lightly crisp crust.
Q: Can I make scones ahead of time?
A: Yes! You can prepare the dough, cut the scones, and freeze them on a baking sheet. Once frozen, transfer to a zip-top bag. Bake straight from frozen, adding a few extra minutes to the baking time. This way, fresh scones are always just minutes away.Q: What’s the ideal accompaniment for homemade scones?
A: Traditionalists love a dollop of clotted cream and a spoonful of jam. But don’t stop there-try honey, lemon curd, or even a smear of your favorite nut butter. Pair with a steaming cup of tea or freshly brewed coffee for the ultimate cozy experiance.
Q: Any tips for shaping scones without a cutter?
A: Certainly! You can shape the dough into a circle about one inch thick, then slice it like a pie into wedges. Alternatively, pat the dough into a rectangle and cut into squares or rectangles with a knife. Just be sure to handle the dough gently to keep those flaky edges intact.
Q: How do I avoid dry scones?
A: Overbaking is frequently enough the culprit. Keep an eye on your oven and remove scones as soon as they turn golden. also, ensure your dough isn’t too dry-if it feels crumbly before baking, a splash of milk or cream can bring it together perfectly.
Baking perfect scones isn’t just science; it’s a joyful ritual. With these tips and easy recipes at your fingertips, your homemade scones will be the star of every teatime!
Insights and Conclusions
Whether you’re a seasoned baker or just starting your culinary journey, mastering the art of perfect scones from scratch is a rewarding adventure that fills your kitchen with irresistible aromas and your table with warm, flaky delights. With these easy recipes in hand,you’re well-equipped to experiment,customize,and create scones that suit every taste-from classic buttery bites to adventurous berry-studded treats.So preheat your oven, gather your ingredients, and let each batch be a delicious reminder that homemade goodness is always just a whisk away. Happy baking!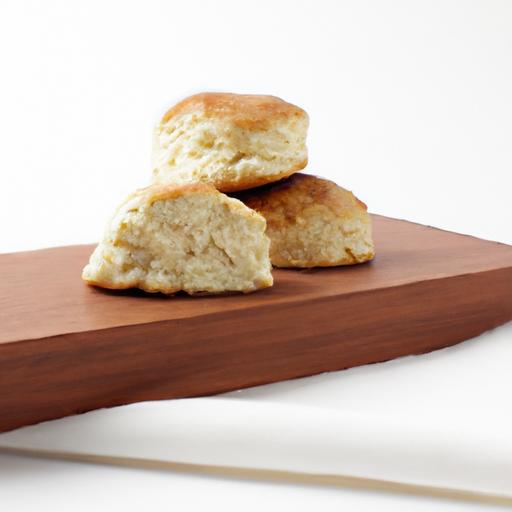
cozy oats & cinnamon desserts craft a magical symphony of warmth and comfort in every bite, drawing from centuries of traditional baking and wholesome ingredients. This delightful pairing is more than just flavor-it’s the perfect marriage of texture and spice that transforms simple oats into crave-worthy desserts perfect for chilly evenings or anytime you need a little soul-soothing sweetness.
Prep and cook Time
Preparation: 10 minutes
cooking: 25 minutes
Total Time: 35 minutes
Yield
Serves 6-8 delicious portions
Difficulty Level
Easy to Medium – perfect for both novice bakers and cozy dessert enthusiasts
Ingredients
- 1 ½ cups rolled oats (old-fashioned for best texture)
- ½ cup all-purpose flour, sifted
- 1 tsp baking powder
- 1 ½ tsp ground cinnamon (plus extra for garnish)
- ½ tsp kosher salt
- ½ cup brown sugar (light or dark, for richer depth)
- ¼ cup unsalted butter, melted and cooled
- 1 large egg, beaten
- 1 cup whole milk (or your preferred milk choice)
- 1 tsp pure vanilla extract
- ½ cup chopped toasted nuts (optional; walnuts or pecans are ideal)
- ½ cup raisins or chopped dried apples (optional)
Instructions
- Preheat your oven to 350°F (175°C). Lightly grease an 8-inch square baking dish or line it with parchment paper to prevent sticking.
- In a medium bowl, whisk together the rolled oats, sifted flour, baking powder, cinnamon, salt, and brown sugar. This dry mix is the flavor foundation.
- In a separate bowl, combine melted butter, beaten egg, milk, and vanilla extract. Whisk gently until fully incorporated.
- Pour wet ingredients into dry mixture and stir just until everything is moistened. Avoid overmixing to keep the texture tender and moist.
- fold in toasted nuts and dried fruit if using, evenly distributing these cozy additions throughout.
- Transfer batter to your prepared dish and smooth the top with a spatula. Sprinkle a light dusting of cinnamon on the surface for an enticing aroma as it bakes.
- Bake in the preheated oven for 20-25 minutes, or until the edges are golden brown and a toothpick inserted in the center comes out clean or with moist crumbs. This ensures a soft, cake-like texture with a crusty top.
- Remove from oven and let sit for 10 minutes before serving-this rest time helps the flavors meld and improves slicing.
Tips for Success
- Texture Harmony: Rolled oats provide chewiness, but for a softer feel, substitute ½ cup with quick oats.
- Flavor Boost: Toast oats lightly in a dry pan before mixing to deepen their nuttiness and complexity.
- Sweetness Control: Adjust the brown sugar quantity or swap half with honey or maple syrup for a natural twist.
- Make-ahead Magic: This dessert tastes even better the next day-store covered in the refrigerator and reheat gently to revive warmth.
- Dietary Swaps: For gluten-free needs, substitute all-purpose flour with a 1:1 gluten-free blend.
Serving Suggestions
Serve warm slices topped with a scoop of creamy vanilla ice cream or a generous dollop of whipped cream for indulgent decadence. A drizzle of honey or warm caramel sauce adds luscious sweetness enhanced by a sprinkle of cinnamon or a few toasted nuts for a satisfying crunch. For a healthy balance, pair with fresh berries or sliced ripe bananas. These warm oat-based treats also pair beautifully with a cozy cup of chai tea or spiced latte, amplifying the comforting cinnamon notes.

| Nutrient | Per Serving |
|---|---|
| Calories | 320 kcal |
| Protein | 6 g |
| Carbohydrates | 48 g |
| Fat | 10 g |
For more creative ways to incorporate oats and cinnamon into your desserts, explore our Healthy Cinnamon Baked Oat Bars. To deepen your knowledge about the nutritional benefits of oats, you can visit The British Nutrition Foundation.
Q&A
Q&A: Cozy Oats & Cinnamon Desserts – Warm Treats to Savor
Q1: What makes oats and cinnamon such a perfect pairing for cozy desserts?
A1: Oats bring a hearty, comforting texture and a subtle nuttiness, while cinnamon offers warmth, spice, and a touch of sweetness. Together, they evoke the nostalgic feeling of homey kitchens and crisp autumn days, making desserts both satisfying and soul-soothing.
Q2: Are oats a good ingredient for desserts beyond just oatmeal cookies?
A2: Absolutely! oats are incredibly versatile. They can be used in crumbles, crisps, muffins, puddings, and even as a crunchy topping. Their natural fibers and mild flavor absorb spices and sweetness beautifully, enhancing the overall depth of desserts.
Q3: How does cinnamon enhance the flavor of oat-based treats?
A3: Cinnamon’s aromatic spice adds a fragrant warmth that lifts oats from plain to enchanting. It balances the grainy texture with a hint of sweetness and earthiness, making every bite memorable and inviting.
Q4: Can these oats and cinnamon desserts be enjoyed year-round, or are they mainly winter treats?
A4: While they’re frequently enough associated with fall and winter due to their cozy appeal, these desserts can truly be savored anytime. Imagine a chilled oat and cinnamon parfait in summer or a warm baked oatmeal in early spring-it’s comfort with seasonal adaptability.
Q5: Are oats and cinnamon desserts generally healthy options?
A5: When made thoughtfully, yes! Oats provide fiber, vitamins, and minerals, promoting fullness and digestion. Cinnamon has antioxidants and anti-inflammatory properties.using natural sweeteners and wholesome add-ins can transform indulgent treats into nourishing delights.
Q6: What’s a simple starter recipe for someone new to cozy oats and cinnamon desserts?
A6: A warm cinnamon baked oatmeal is a foolproof go-to. Combine oats, milk, a touch of maple syrup, a sprinkle of cinnamon, and perhaps some chopped apples or raisins. Bake until golden and fragrant, then enjoy a comforting bowl that’s both easy and satisfying.
Q7: Any creative twists to elevate classic oats and cinnamon desserts?
A7: definitely! Try adding toasted nuts or seeds for crunch, swirl in a smear of nut butter, or sprinkle with a pinch of chili powder for a surprising kick. Monk fruit or coconut sugar can boost sweetness while keeping flavors balanced. The possibilities are endless-just follow your cozy cravings!
Q8: Where can one find inspiration for more oats and cinnamon dessert ideas?
A8: Food blogs, seasonal cookbooks, and social media platforms are treasure troves for cozy dessert recipes. Look for creators who focus on wholesome ingredients and rustic flavors-you’ll find inspiring ways to turn simple oats and cinnamon into warm, delightful treats worth savoring.
The Way Forward
whether savored on a chilly morning or enjoyed as a comforting evening indulgence, cozy oats and cinnamon desserts invite us to slow down and embrace the simple warmth of wholesome flavors. These treats, rich with nostalgia and spiced with a touch of sweetness, transform everyday ingredients into moments of pure delight. So next time you crave a cozy escape, remember that the gentle warmth of oats and the fragrant kiss of cinnamon await-ready to turn your kitchen into a haven of comfort and joy.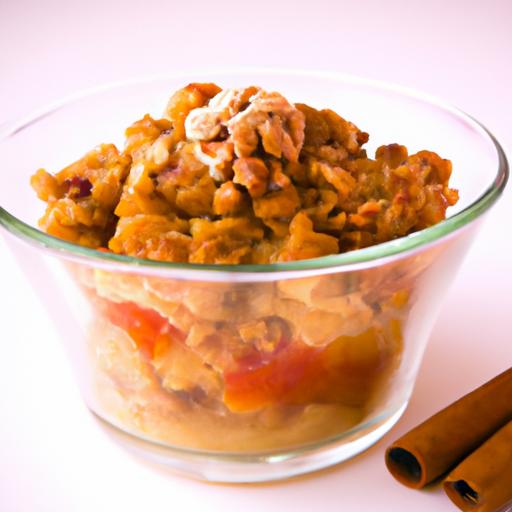
Honey Pear Galette Delight is an invitation to savor simplicity and rustic charm in every flaky bite. This timeless dessert, rooted deeply in French provincial kitchens, marries the luscious sweetness of ripe pears with the floral warmth of pure honey, encased in a golden, buttery crust that crunches delightfully with each forkful. As a Culinary Content Creator and Food stylist, I’ve found that this humble galette becomes a centerpiece not only for its flavor harmony but also for the captivating textures and inviting aromas that fill your kitchen.
Prep and Cook Time
- Planning: 30 minutes
- Cooking: 40 minutes
- Total Time: 1 hour 10 minutes
Yield
Serves 6 generous slices
Difficulty Level
Medium – perfect for home bakers seeking a balance of rustic technique and elegant flavor
Ingredients
- For the crust:
- 1 ½ cups all-purpose flour, sifted
- ¼ teaspoon fine sea salt
- 10 tablespoons unsalted butter, chilled and cubed
- 3 tablespoons ice-cold water (plus extra if needed)
- 1 tablespoon granulated sugar (optional, for subtle sweetness)
- For the filling:
- 3 large ripe pears (Bosc or Anjou work beautifully), peeled, cored, and thinly sliced
- 2 tablespoons pure honey, plus extra for drizzling
- 1 teaspoon fresh lemon juice
- 1 teaspoon ground cinnamon
- 1 tablespoon all-purpose flour (to absorb pear juices)
- ¼ teaspoon freshly grated nutmeg
- 1 egg yolk (for egg wash)
- 1 tablespoon turbinado sugar (for sprinkling)
Instructions
- Make the crust: Combine the sifted flour, salt, and sugar in a large bowl. Add the chilled butter cubes and, using a pastry cutter or your fingertips, gently toss to coat the pieces in flour. Work quickly to pinch the butter and flour together until the mixture resembles coarse crumbs with some pea-sized bits remaining.
- Add ice water: Drizzle in the 3 tablespoons of ice-cold water one tablespoon at a time, gently mixing with a fork until the dough just holds together. Avoid overworking to maintain a tender, flaky texture.
- Shape and chill dough: Gather the dough into a disk, wrap it tightly in plastic wrap, and refrigerate for at least 30 minutes to rest and chill the butter-this is crucial for flakiness.
- Prepare pear filling: In a bowl, toss the sliced pears gently with lemon juice, honey, cinnamon, nutmeg, and flour. This blend balances sweetness and aroma while absorbing excess juices during baking,keeping the filling juicy yet cohesive.
- Roll out the dough: On a floured surface, roll chilled dough into a roughly 12-inch circle, about ⅛-inch thick. Transfer to a parchment-lined baking sheet.
- Assemble the galette: Pile pear slices in the centre of the dough,leaving a 2-inch border. Fold the edges over the fruit, creating folds to form a rustic crust that hugs the filling.
- Apply egg wash and sugar: Beat the egg yolk with 1 teaspoon water and brush it lightly over the crust edges for a golden finish. Sprinkle turbinado sugar on top for a sparkling,caramelized crust.
- Bake: Preheat oven to 400°F (200°C). Bake galette for 35-40 minutes until the crust is deeply golden and crisp, and the pear filling bubbles enticingly. Rotate halfway for even baking.
- Cool and serve: Allow the galette to cool on the baking sheet for at least 15 minutes. Drizzle additional honey atop just before serving to enhance the floral notes.
Tips for Success with Your Honey Pear Galette
- Chilling the dough: Never skip the refrigeration-cold butter leads to the flaky, layered crust everyone loves.
- Choosing pears: Opt for pears that hold their shape when baked, such as Bosc or Anjou, to avoid a mushy texture.
- Honey varieties: Use a mild, high-quality honey (like wildflower or clover) to complement, not overpower the pears.
- Make ahead: Assemble the galette up to step 7, then refrigerate uncovered for up to 4 hours before baking-this step enhances the melding of flavors.
- Variations: Add a handful of chopped toasted pecans or a sprinkle of crumbled blue cheese beneath the pears for extra depth.
- Troubleshooting: If the bottom crust seems soggy, slide the galette onto a preheated baking stone or tray in the oven’s lower rack for extra crispness.
Serving suggestions
This honey pear galette shines when served warm,accompanied by a scoop of vanilla bean ice cream or a dollop of freshly whipped cream. Garnish with a sprig of fresh thyme or a light dusting of powdered sugar for a visually striking, aromatic finish. Pair with a cup of rich Earl Gray tea or a glass of chilled Riesling to elevate the sweet and rustic experience.
| Nutrient | Per Serving |
|---|---|
| Calories | 320 |
| Protein | 3g |
| Carbohydrates | 45g |
| Fat | 13g |

Explore more rustic dessert ideas in our rustic Fruit Dessert Collection and learn why local honey is prized in baking at National Honey Board.
Q&A
Q&A: Sweet & Rustic – How to Make a Honey Pear Galette Delight
Q1: What exactly is a honey pear galette?
A1: Imagine the charm of a flaky, buttery crust wrapped around tender slices of ripe pears kissed with golden honey-this is a honey pear galette. It’s a rustic, open-faced tart that’s as simple to make as it is indeed stunning to serve, offering a perfect balance between sweet and earthy flavors.Q2: Why choose a galette over a customary pie?
A2: Galettes embrace imperfection beautifully. Unlike pies, they require no pie plates or intricate crimping. The dough is rolled out, fruit arranged in the center, and the edges folded up casually. This creates a homely, artisanal look that’s both inviting and effortlessly elegant-perfect for a cozy gathering or a spontaneous treat.
Q3: What kind of pears work best in this galette?
A3: Opt for firmer pears like bosc or anjou, which hold their shape well during baking. These varieties offer a subtle sweetness and a smooth texture that pairs wonderfully with the honey’s floral notes, creating a delightful contrast in every bite.
Q4: How does honey enhance the flavor of the pears?
A4: Honey doesn’t just sweeten-it adds layers of complexity. Depending on the variety, honey can introduce hints of lavender, wildflowers, or caramel, enriching the pears’ natural juiciness with a warm, aromatic depth that elevates the galette from simple dessert to a flavor experience.
Q5: Can I add other ingredients to customize my galette?
A5: Absolutely! A sprinkle of cinnamon or nutmeg brings cozy warmth, while a handful of chopped nuts adds crunch.For a savory twist, a touch of fresh thyme or rosemary complements the pear’s sweetness brilliantly. Don’t be afraid to experiment and make the galette your own rustic masterpiece.
Q6: What’s the secret to a perfectly flaky crust?
A6: Cold ingredients and minimal handling are key. Use chilled butter cut into small pieces, cold water to bind the dough, and resist the urge to overwork it. This gentle approach creates layers that puff and flake beautifully in the oven, forming the croissant-like texture that makes every bite pure bliss.
Q7: How long should I bake the galette?
A7: Typically, 35 to 40 minutes at 375°F (190°C) until the crust is golden and the pears are tender. Keep an eye on it-the edges should be crisp and inviting, while the fruit filling should bubble lightly, signaling that it’s time to savor the sweet aroma and delectable taste.
Q8: What’s the best way to serve a honey pear galette?
A8: Serve warm, straight from the oven, with a generous scoop of vanilla ice cream or a dollop of whipped cream to mellow the honeyed sweetness. A dusting of powdered sugar or a drizzle of extra honey can add a final touch of rustic elegance.Q9: Is this recipe suitable for beginners?
A9: Definitely! The galette’s forgiving nature makes it a fantastic project for novice bakers. The open-faced design means minor imperfections only add to its charm. Plus, the few simple steps and flexible ingredients invite creativity without stress.
Q10: Any tips for storing leftovers?
A10: If you’re lucky enough to have leftovers, store the galette covered at room temperature for up to two days, or in the fridge for about three.To revive the crust’s crispness,pop it briefly into a warm oven before serving again.
Embark on your baking adventure with this honey pear galette and taste the sweet simplicity of rustic elegance!
The Conclusion
As the golden crust crisps and the honey-kissed pears glisten on your plate, your homemade galette becomes more than just a dessert-it’s a party of simple, rustic elegance. Whether savored warm with a scoop of vanilla ice cream or enjoyed at room temperature alongside a cup of tea,this honey pear galette offers a sweet embrace that’s both comforting and refined. So next time you’re craving a treat that’s effortlessly charming yet richly satisfying, remember that the heart of rustic baking lies in moments like these-where humble ingredients come together to create something truly delightful.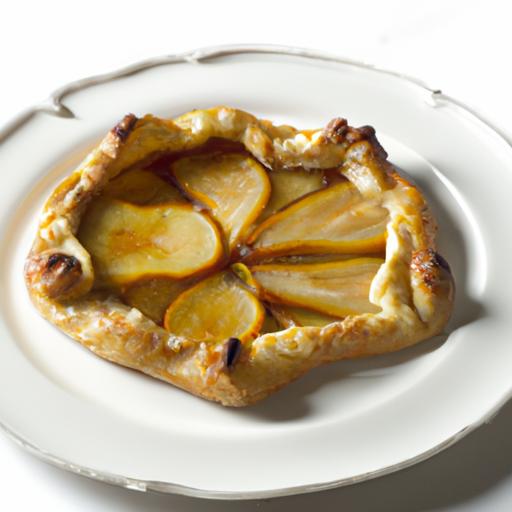
Slice of Heaven: Irresistible Fruit Pie Recipes to Try Today
Slice of Heaven: Irresistible Fruit Pie recipes to Try Today invites you to discover the timeless joy of perfectly flaky pie crusts paired with boldly adventurous fruit combinations. Whether you’re a novice or an experienced baker, learning the delicate balance of sweetness and tartness in your fillings, alongside savvy baking practices, transforms every bite into an exquisite experience. Let’s dive into the mastery behind each element so your pies truly become the centerpiece of every gathering.
Prep and cook Time
- Preparation: 30 minutes
- Chilling the Dough: 1 hour
- Baking: 45-55 minutes
- Total Time: Approximately 2 hours 30 minutes
Yield
Serves 8 generous slices
Difficulty Level
Medium - a rewarding challenge for passionate home bakers
Ingredients
- For the Pie Crust:
- 2 ½ cups all-purpose flour, sifted
- 1 tsp fine sea salt
- 1 tbsp granulated sugar
- 1 cup unsalted butter, chilled and cubed
- ¼ to ½ cup ice water
- 1 tsp apple cider vinegar (for tenderness)
- For the Exotic Fruit Filling:
- 2 cups fresh mango, diced
- 1 ½ cups blackberries, rinsed and dried
- 1 cup pineapple, finely chopped
- ¾ cup granulated sugar (adjust per ripeness)
- 2 tbsp cornstarch
- 1 tbsp fresh lemon juice
- 1 tsp fresh grated ginger
- ½ tsp ground cardamom
- 1 tbsp unsalted butter, cut into small pieces (for dotting)
Instructions
- Make the pie crust: In a large bowl, whisk together the sifted flour, salt, and sugar. Add the chilled butter cubes and use a pastry blender or fingertips to incorporate until the mixture resembles coarse crumbs with pea-sized bits of butter visible.
- Slowly drizzle ice water mixed with apple cider vinegar over the flour mixture, tossing gently with a fork until the dough begins to clump. Be careful not to overwork.
- Gather dough into two discs, wrap in plastic, and refrigerate for at least 1 hour to allow gluten relaxation and maximum flakiness.
- Prepare the filling: In a large bowl, combine mango, blackberries, pineapple, sugar, cornstarch, lemon juice, ginger, and cardamom.Toss gently to coat the fruit evenly. The cornstarch will swell during baking and thicken the juices for the perfect filling consistency.
- Roll out one dough disc on a lightly floured surface to about 12 inches in diameter. Carefully transfer it to a 9-inch pie pan, easing it to fit without stretching.
- Fill the crust with the prepared fruit mixture, dotting with butter pieces atop the filling for an enriched flavor and glossy finish.
- Roll out the second dough disc and cut into strips for a lattice top,or place fully over the filling and cut slits to vent.
- Seal edges by pressing with fingers or a fork, and brush the crust lightly with an egg wash (1 egg beaten with 1 tbsp water) for golden, shiny perfection.
- Bake in a preheated 375°F (190°C) oven for 45-55 minutes. Watch for bubbling juices and a deeply golden crust-this indicates your pie is ready. If crust edges brown too quickly, shield them with foil halfway through baking.
- Cool the pie on a wire rack for at least 2 hours to let the filling set before slicing for gorgeous, clean servings.
Tips for Success
- Always keep ingredients cold-especially the butter and ice water-to achieve that delicate, flaky crust.
- Chilling the dough allows the gluten to relax,preventing shrinkage and toughening during baking.
- Adjust sweetness according to your fruit’s ripeness; exotic fruits like mango and pineapple vary widely in sugar content.
- For extra layers of aroma, add a splash of orange zest or a pinch of ground cinnamon into your filling mix.
- Try swapping the lattice top for a rustic crumb topping if you wont an effortless finish.
- Make ahead: Pie dough can be frozen for up to a month; thaw in the refrigerator before rolling.
Serving Suggestions
Slice your pie warm or at room temperature, topped with a scoop of rich vanilla bean ice cream or a dollop of freshly whipped cream infused with honey and mint. Garnish with fresh blackberries and a light dusting of powdered sugar for an elegant presentation. pair with a fragrant cup of herbal tea or a glass of chilled Riesling to complement the vibrant, tropical fruit notes.
| nutritional Info (per serving) | Calories | Protein | Carbs | Fat |
|---|---|---|---|---|
| Slice of heaven Exotic Fruit Pie | 350 | 3g | 58g | 13g |
For more inspiration on baking with fresh seasonal fruits, check out our Fresh Fruit Cobbler Recipes.To deepen your understanding of fruit ripeness and selection, visit Fruits & Veggies – More Matters.

Q&A
Q&A: Slice of Heaven – Irresistible fruit Pie Recipes to Try Today
Q: What makes a fruit pie truly irresistible?
A: It’s all about the perfect harmony between a flaky, buttery crust and a bursting-with-flavor fruit filling.The crust should be golden and tender, providing a delicate crunch that contrasts beautifully with the juicy, often slightly spiced sweetness of the fruit inside. The magic happens when fresh, ripe fruits meet just the right balance of sugar, spices, and a hint of citrus or zest.
Q: Which fruits work best for making pies that feel like a “slice of heaven”?
A: Classic choices like apples, cherries, peaches, and blueberries always shine, but don’t shy away from experimenting with pears, plums, or even a medley of berries. Each fruit brings its own unique texture and aroma, transforming a simple pie into a comforting yet exciting dessert.
Q: Are there any secret ingredients that can elevate a fruit pie?
A: Absolutely! A dash of cinnamon or nutmeg adds warmth; a splash of vanilla extract enhances depth; and a pinch of salt brings out the natural sweetness. Some bakers swear by a spoonful of almond extract or a sprinkle of fresh herbs like rosemary for a subtle twist. Don’t forget a brush of egg wash on the crust for that irresistible golden sheen.
Q: How can I make my pie filling extra juicy and luscious without making the crust soggy?
A: The trick lies in thickening the juices with natural thickeners like tapioca starch,cornstarch,or arrowroot powder. These bind excess liquid while keeping the filling glossy and succulent. Pre-cooking the filling slightly can also help release and control moisture before it meets the crust.
Q: Can these fruit pie recipes be adapted for dietary preferences like gluten-free or vegan?
A: Definitely! For gluten-free lovers, opt for almond flour or gluten-free all-purpose flour blends to create a tender crust. Vegan pies can be achieved by substituting butter with plant-based margarine or coconut oil, and using flax or chia seeds mixed with water as egg replacers for binding. The fruit fillings remain naturally vegan, making these pies versatile for any diet.
Q: What’s the best way to serve fruit pie to maximize its “heavenly” experience?
A: Serve warm, ideally fresh from the oven or gently reheated, with a scoop of vanilla ice cream or a dollop of whipped cream. The contrast between warm pie and cold, creamy topping elevates every bite into pure bliss. Pair with a cup of strong coffee or fragrant tea for an unforgettable dessert moment.
Q: Where can beginners start if they want to try their hand at making fruit pies?
A: Start simple! A classic apple pie or a mixed berry pie with a store-bought crust can be an excellent introduction. Focus on mastering the filling’s flavor and consistency, and then gradually experiment with different crust recipes and fruit combinations. baking is as much about joy and creativity as it is about precision.Q: Why are fruit pies considered timeless comfort food?
A: Becuase they evoke nostalgia, warmth, and the simple pleasures of harvesting nature’s sweetest gifts. Each slice carries stories of family gatherings, seasonal celebrations, and the art of home baking passed down through generations. Fruit pies are a delicious way to connect with tradition while savoring the moment-truly a slice of heaven on a plate.
Wrapping Up
As the final crumb disappears and the sweet aroma lingers in your kitchen, it’s clear: fruit pies are more than just desserts-they’re little slices of heaven that bring comfort, joy, and a touch of magic to any table. Whether you’re drawn to the classic charm of apple and cinnamon or craving the bold zest of mixed berries, these irresistible fruit pie recipes invite you to explore, experiment, and savor every bite. So, tie on your apron, gather your favorite fruits, and let your oven transform humble ingredients into unforgettable moments. Because sometimes, the perfect slice is all it takes to turn an ordinary day into something truly exceptional.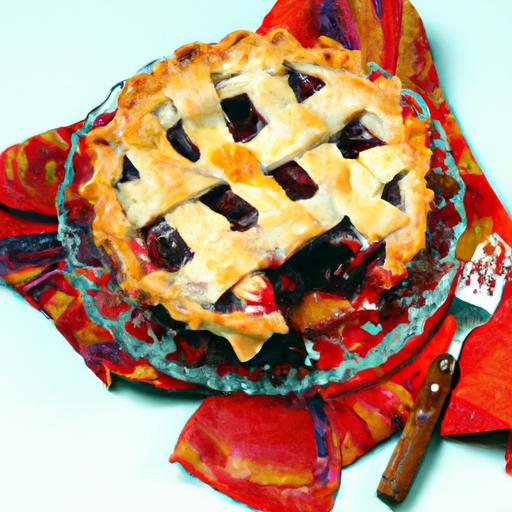
How to Make Starbucks’ Famous Pumpkin Scone at Home!
Nothing says cozy fall mornings like the warm aroma and perfectly spiced bite of a pumpkin scone. How to Make Starbucks’ Famous Pumpkin Scone at Home! unlocks the secret to enjoying this classic treat right from your own oven. This recipe captures the authentic pumpkin spice flavor that transforms simple ingredients into a flaky, moist, and comforting delight-perfect for pairing with your morning coffee or as an afternoon treat.
Prep and Cook Time
- Planning: 20 minutes
- Chilling Time: 1 hour
- Baking: 18-22 minutes
- Total: Approximately 1 hour 45 minutes
Yield
Makes 8 generous pumpkin scones
Difficulty Level
Medium - Perfect for enthusiastic home bakers with basic pastry skills
Ingredients that Capture the Authentic Pumpkin Spice Flavor
- 2 cups all-purpose flour, sifted
- 1 tablespoon pumpkin pie spice (blend of cinnamon, nutmeg, ginger, cloves)
- 1/2 teaspoon ground cinnamon
- 1/4 teaspoon freshly grated nutmeg
- 1/2 teaspoon kosher salt
- 1/4 cup granulated sugar
- 1/4 cup packed light brown sugar
- 1/2 cup cold unsalted butter, cubed
- 1/2 cup canned pumpkin puree (not pumpkin pie filling!)
- 1 large egg
- 1 teaspoon vanilla extract
- 1 teaspoon baking powder
- 1/4 teaspoon baking soda
- 1/4 cup heavy cream, plus extra for brushing
Tips for Achieving the Classic Starbucks Glaze and Presentation
- 1 cup powdered sugar
- 2 tablespoons heavy cream
- 1/2 teaspoon vanilla extract
- 1/2 teaspoon pumpkin pie spice for dusting
Step-by-Step Guide to Perfectly Flaky and Moist Pumpkin Scones
- Mix dry ingredients: In a large bowl, whisk together flour, pumpkin pie spice, cinnamon, nutmeg, baking powder, baking soda, salt, granulated sugar, and brown sugar until evenly combined.
- Cut in the butter: Using a pastry cutter or your fingers,blend the cold butter cubes into the dry mixture until it resembles coarse crumbs,with some pea-sized pieces remaining. This step is crucial for flaky layers.
- Whisk wet ingredients: in a smaller bowl, combine pumpkin puree, egg, vanilla extract, and heavy cream until smooth.
- Combine wet and dry: Pour the wet mixture into the flour and butter blend.Use a rubber spatula to fold the dough gently until it just comes together. avoid overmixing to keep your scones tender.
- Form the dough: Turn the dough out onto a floured surface and pat it into a 9-inch circle about 3/4-inch thick.
- Chill: Wrap the dough circle in plastic wrap and refrigerate for at least 1 hour. This rests the dough for easier cutting and helps maintain flaky texture during baking.
- Preheat the oven: Set your oven to 400°F (205°C) and line a baking sheet with parchment paper.
- Cut and bake: Remove the dough from the fridge, unwrap, and cut into 8 equal wedges. Place wedges on the prepared sheet, spacing slightly apart. Brush the tops lightly with heavy cream.
- Bake: Bake for 18-22 minutes, or until golden brown and firm to touch. Rotate the pan halfway through baking for even browning.
- Cool: Transfer scones to a wire rack to cool entirely before glazing.
Tips for Achieving the Classic Starbucks glaze and Presentation
- In a bowl, whisk together powdered sugar, heavy cream, and vanilla extract until smooth and thick enough to drizzle.
- Once scones are cool, use a spoon or piping bag to drizzle the glaze generously over each scone.
- Lightly sprinkle pumpkin pie spice on top immediately after glazing for that inviting fall aroma and signature look.
- Set scones on a wire rack for 30 minutes to allow the glaze to set fully before serving.
Creative Variations to Customize Your Pumpkin Scone Experience
- Chocolate Chip Pumpkin: Fold 1/2 cup mini chocolate chips into the dough for a chocolatey twist on the classic flavor.
- Pecan Crunch: Add 1/2 cup chopped toasted pecans to the dough or sprinkle on top before baking for a delightful crunch.
- maple Glaze: Replace vanilla in the glaze with 1 teaspoon pure maple syrup for a deeper, sweeter finish.
- Dairy-Free Option: Substitute vegan butter and coconut cream for a dairy-free version without sacrificing richness.
- Spiced Drizzle: Mix a pinch of cayenne or ground cardamom into your glaze for a subtle warming heat that surprises and delights.
Chef’s Notes
- Butter Temperature: Keep butter chilled and handle the dough quickly to avoid melting it. This is the key to flaky scones.
- Resting Time: Don’t skip chilling the dough. It firms up the butter and relaxes the gluten for perfect texture.
- Measuring Flour: Spoon and level your flour into measuring cups; avoid scooping directly to prevent dense scones.
- Overmixing: combine ingredients until they just hold together-overworking the dough leads to tough scones.
- glaze Thickness: If glaze is to thin, add powdered sugar 1 tablespoon at a time to thicken; too thick, add cream gradually.
Serving Suggestions
Serve these pumpkin scones warm or at room temperature with a pat of butter or a light spread of cream cheese. Pair alongside a hot chai latte or your favorite pumpkin spice coffee to amplify autumn vibes. For an elegant touch, garnish your serving tray with cinnamon sticks, star anise pods, or a cinnamon-dusted linen napkin. These scones also make a delightful gift-wrap them in parchment with twine and a sprinkle of cinnamon sugar.

| Nutrient | Per Scone |
|---|---|
| Calories | 290 kcal |
| Protein | 4 g |
| Carbohydrates | 38 g |
| Fat | 13 g |
Feeling inspired? Learn more about the art of baking flaky pastries in our Ultimate Guide to Baking Pastries or explore the flavorful history of pumpkin here at the History Channel.
Q&A
Q&A: How to Make Starbucks’ Famous Pumpkin Scone at Home!
Q1: What makes Starbucks’ pumpkin scone so irresistible?
A1: It’s all about the perfect balance of moist, tender crumb infused with warm pumpkin spice flavors, crowned with a crisp sugary glaze. The subtle pumpkin taste paired with cinnamon, nutmeg, and clove creates that cozy autumn hug in every bite!
Q2: Can I really recreate that exact Starbucks scone flavor at home?
A2: Absolutely! With the right ingredients and technique, you can capture that signature pumpkin spice magic and buttery texture in your own kitchen – no barista training required.
Q3: what are the essential ingredients to nail the Starbucks pumpkin scone?
A3: You’ll need pumpkin puree (not pumpkin pie filling), all-purpose flour, brown sugar, cold butter, baking powder, baking soda, salt, and the pumpkin spice blend. don’t forget the heavy cream for richness and a simple glaze made of powdered sugar, vanilla, and a splash of milk!
Q4: How do I achieve the perfect flaky, tender texture?
A4: The secret lies in keeping your butter cold and cutting it into the dry ingredients until the mixture resembles coarse crumbs. Overmixing can cause tough scones, so gently fold in the wet ingredients and pumpkin puree to keep it light and flaky.
Q5: Can I customize the scones to be dairy-free or vegan?
A5: Of course! Substitute the butter with a vegan alternative and use a plant-based milk to create the glaze. For the cream, coconut cream or almond milk thickened with a bit of cornstarch works grate. Just expect a slight variation in texture – flavorful nonetheless!
Q6: How should I shape and bake the scones for that iconic look?
A6: After mixing the dough, pat it into a round disk, about 1-inch thick, then cut into 8 equal wedges (like slicing a pizza). Place them on a baking sheet lined with parchment paper, leaving space to rise. Bake until golden and firm to the touch, usually around 18-22 minutes at 400°F (200°C).
Q7: What’s the best way to store homemade pumpkin scones?
A7: Let them cool completely, then store in an airtight container at room temperature for up to 2 days.For longer storage, freeze wrapped scones and reheat gently in the oven before serving to revive that fresh-baked warmth.
Q8: Any tips for making the glaze as good as Starbucks’?
A8: Keep it simple but flavorful – powdered sugar mixed with a dash of vanilla extract and milk (or cream) until silky smooth. Drizzle generously or dip the scone tops for that satisfying sweet crunch. For an extra touch, sprinkle a bit of pumpkin spice on top before the glaze dries.
Q9: Can I add mix-ins like nuts or chocolate chips?
A9: Yes! Chopped pecans or walnuts add a lovely crunch,while bittersweet chocolate chips offer a delightful twist. Just fold them gently into the dough before shaping to keep an even distribution.
Q10: How do I serve these pumpkin scones for the ultimate cozy experience?
A10: Serve warm with a pat of butter or cream cheese, alongside a cup of spiced latte or hot apple cider. Perfect for a crisp morning,a comforting afternoon break,or whenever you crave a taste of fall at home!
In Summary
And there you have it-a cozy,crumbly,pumpkin-spiced treat that rivals even Starbucks’ beloved scone,fresh from your very own kitchen! With a few simple ingredients and a sprinkle of autumn magic,you’ve unlocked the secret to bringing that warm,inviting café experience home. So next time the craving strikes, you won’t need to wait in line or brave the chilly weather-just bake, savor, and bask in the sweet satisfaction of your homemade pumpkin masterpiece. Happy baking, and may your kitchen always smell like fall!
Decadent & nutritious: The Secret to Healthy Black Bean Brownies
Decadent & nutritious: the secret to healthy black bean brownies lies within the perfect harmony of indulgence and wellness. This unexpected twist on traditional brownies harnesses the nutritional power of black beans, creating a dessert that’s rich, moist, and surprisingly guilt-free. Originating from the creative kitchens of health-conscious bakers, this recipe transforms humble legumes into the base of a luscious treat that satisfies both your sweet tooth and your body.
From the moment you take your first bite,you’ll discover an irresistible fudgy texture and a deep chocolate flavor that doesn’t compromise on health benefits. Black beans not only lend protein and fiber but also enhance the moisture, eliminating the need for excess oils or butter. By blending them seamlessly with wholesome ingredients, you unlock a complex flavor fusion sure to impress any dessert lover.
Prep and Cook Time
- Preparation: 15 minutes
- Cooking: 25 minutes
- Total: 40 minutes
Yield
Serves 12 rich and satisfying brownies
Difficulty Level
Easy – Perfect for beginners and seasoned bakers alike
Ingredients
- 1 can (15 oz) black beans, rinsed and drained
- 3 large eggs, room temperature
- 1/2 cup cocoa powder, unsweetened
- 1/3 cup pure maple syrup or honey
- 1/4 cup melted coconut oil
- 1 tsp pure vanilla extract
- 1/2 tsp baking powder
- 1/4 tsp fine sea salt
- 1/3 cup dark chocolate chips (70% cacao or higher)
Instructions
- Preheat your oven to 350°F (175°C). Lightly grease or line an 8×8-inch square baking pan with parchment paper for easy removal.
- Blend the beans. In a high-speed blender or food processor, combine the rinsed black beans, eggs, cocoa powder, maple syrup, melted coconut oil, and vanilla extract.Process until completely smooth and creamy, about 1 minute.
- Mix dry ingredients. In a medium bowl,whisk together baking powder and sea salt. Gently fold this mixture into the bean batter until just incorporated.
- Fold in chocolate chips. Add 1/3 cup of dark chocolate chips to the batter, stirring gently to disperse evenly.
- pour batter. Transfer the batter into the prepared pan, smoothing the top with a spatula for even thickness.
- Bake. Place in the oven and bake for 22-25 minutes. Check doneness by inserting a toothpick in the center; it should come out with a few moist crumbs but not wet batter.
- Cool completely. Allow brownies to cool in the pan on a wire rack for at least 20 minutes before slicing. This sharpening step intensifies flavors and sets the fudgy texture.
Tips for Success
- Beans selection: Use canned black beans for convenience, but always rinse thoroughly to remove excess sodium and any “beany” flavor.
- Sweetener swaps: Maple syrup offers depth; substitute with agave or coconut sugar if preferred, adjusting amounts for sweetness.
- Texture tweaks: For chewier brownies, stir in walnuts or pecans just before baking.
- Make-ahead magic: Store cooled brownies in an airtight container at room temperature for up to 3 days or freeze up to 1 month.
- Flavor boosts: Sprinkle a pinch of espresso powder into the batter to amplify chocolate richness without bitterness.
Serving Suggestions
Present these black bean brownies warm or chilled, paired beautifully with:
- A dollop of coconut whipped cream or Greek yogurt
- Fresh raspberries or sliced strawberries for tart contrast
- A sprinkle of flaky sea salt on top to highlight sweetness
- A drizzle of almond butter or homemade fruit compote
For a sophisticated touch, serve with a side of rich espresso or a chilled glass of almond milk to balance the intense, fudgy flavor.
Nutritional Information
| Nutrient | Per Serving (1 Brownie) |
|---|---|
| Calories | 150 kcal |
| Protein | 5 g |
| Carbohydrates | 22 g |
| Fat | 6 g |
| Fiber | 5 g |
| Antioxidants (ORAC) | High |

Discover more creative ways to incorporate beans into your desserts by visiting our Healthy Baking with Beans article. For additional scientific insights on black beans’ nutritional benefits, check studies from NCCIH.
Q&A
Q&A: Decadent & Nutritious – The Secret to Healthy Black Bean Brownies
Q1: What makes black bean brownies different from traditional brownies?
A1: unlike traditional brownies that rely heavily on flour and butter, black bean brownies sneak in nutrient-rich black beans as the star ingredient. This swap not only amps up the protein and fiber content but also creates a fudgy texture that’s decadently satisfying without the guilt.
Q2: How can black beans taste good in a sweet dessert? Won’t they affect the flavor?
A2: It’s a common misconception that beans have to taste like beans in desserts.When pureed and paired with chocolate, black beans become nearly undetectable, lending moisture and a velvety crumb without overpowering the rich cocoa flavor. The magic lies in balancing natural bitterness with sweeteners and vanilla.
Q3: Are these brownies realy healthier, or is it just a marketing gimmick?
A3: there’s real substance behind the hype! Black beans are packed with antioxidants, iron, and fiber, which promote digestion and steady blood sugar levels. By replacing refined flour with beans,you reduce empty carbs and add plant-based protein – making these brownies a smarter choice that still feels indulgent.
Q4: Can black bean brownies satisfy a chocolate craving as well as classic brownies?
A4: Absolutely! Their texture is often denser and fudgier than traditional brownies, hitting all the right chocolate notes while leaving you feeling nourished, not weighed down. Plus, their richness surprises many first-timers who expect a “healthier” treat to be bland.
Q5: How easy is it to make black bean brownies at home?
A5: Surprisingly simple! Many recipes call for minimal ingredients – canned black beans, cocoa powder, natural sweeteners, a touch of oil, and eggs or flaxseed for binding. The beans just need a speedy blitz in a blender or food processor before mixing in your other ingredients.
Q6: Can black bean brownies accommodate special diets?
A6: They’re incredibly versatile! Recipes can be tweaked to be gluten-free, vegan, or low-sugar. by swapping eggs with flaxseed and using maple syrup or dates rather of refined sugar,you can customize them to fit your nutritional needs without sacrificing indulgence.
Q7: What’s the secret tip for making the best black bean brownies?
A7: Don’t underestimate the power of quality cocoa and a pinch of espresso powder-it elevates the chocolate depth and masks any residual bean taste. Also, letting the brownies cool completely before cutting helps them set into perfect squares worthy of any dessert table.
Q8: Why should more people try black bean brownies?
A8: As they challenge the stereotype that healthy can’t be delicious. Black bean brownies prove it’s possible to enjoy a decadent treat while secretly nourishing your body. It’s a tasty win-win-where nutrition meets indulgence in every bite.
To Wrap It Up
these black bean brownies aren’t just a treat-they’re a revelation. By blending indulgence with nutrition, they challenge everything we thought we knew about dessert. so next time you crave something sweet, remember: decadence and health don’t have to be at odds. With a little creativity and nature’s humble black bean, you can savor every bite guilt-free, proving that the secret to truly satisfying brownies is deliciously wholesome.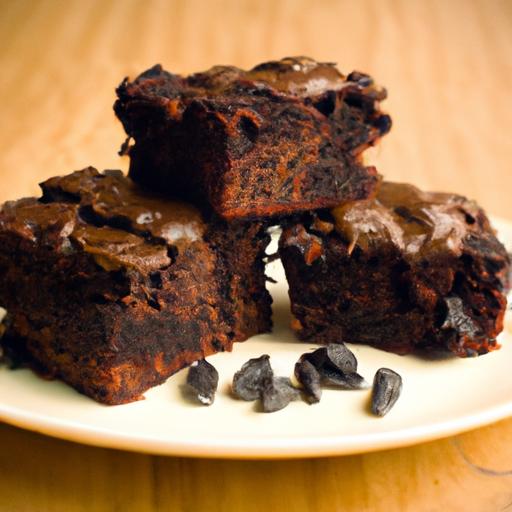
Speedy Sweets begin wiht a flawless cupcake base that’s as adaptable as it is indeed quick to prepare. whether you’re dreaming of rich chocolate,zesty lemon,or decadent vanilla,having a reliable quick cupcake base allows you to unleash creativity without waiting hours in the kitchen. This foundational step ensures every batch springs from a tender crumb and a moist interior that complements any frosting and filling you choose.
Prep and Cook Time
Preparation: 10 minutes
Baking: 15 minutes
Total Time: 25 minutes
Yield
12 standard cupcakes
Difficulty Level
Easy – Perfect for beginners and quick weekend baking sessions
Ingredients
- 1 cup all-purpose flour, sifted
- 3/4 cup granulated sugar
- 1/4 cup unsweetened cocoa powder (optional, for chocolate base)
- 1 teaspoon baking powder
- 1/2 teaspoon baking soda
- 1/4 teaspoon salt
- 1/2 cup milk, room temperature
- 1/4 cup vegetable oil
- 1 large egg, room temperature
- 1 teaspoon vanilla extract
- 2 tablespoons sour cream or Greek yogurt (optional, for moisture)
Instructions
- Preheat your oven to 350°F (175°C) and line a 12-cup muffin tin with cupcake liners to ensure smooth removal.
- mix dry ingredients: In a large bowl, sift together the flour, sugar, cocoa powder (if using), baking powder, baking soda, and salt to avoid clumps.
- Combine wet ingredients: In a separate bowl, whisk the milk, oil, egg, vanilla extract, and sour cream until silky smooth.
- Slowly add the wet mixture to the dry ingredients, folding gently with a spatula until just combined-avoid overmixing to maintain a tender crumb.
- Fill the cupcake liners about 2/3 full with batter, leaving room for rising during baking.
- Bake for 14-15 minutes, or until a toothpick inserted in the center comes out clean. Rotate the tin halfway through baking to ensure even cooking.
- Cool cupcakes in the pan for 5 minutes, then transfer to a wire rack to cool fully before frosting.
Creative Frosting Ideas to Elevate Your Speedy Sweets
While a simple buttercream is always a winner, why not experiment with quick, unexpected frostings to turn your speedy sweets into showstoppers? Try a whipped cream cheese frosting infused with fresh lemon zest for a radiant pop or a smooth chocolate ganache that sets beautifully in minutes. For a fruity twist, blend softened cream cheese with mashed ripe strawberries, or whip coconut cream with toasted coconut flakes and a dash of vanilla.
Time-Saving Tips for baking and Decorating Cupcakes
- Prep all ingredients before starting to bake to speed through mixing and reduce stress.
- Use an ice cream scoop for consistent cupcake sizes that bake evenly.
- Cool cupcakes upside down over a parchment-lined tray to keep tops flat-ideal for frosting.
- Piping bag hack: Fill a zip-top bag with frosting, snip a corner, and pipe directly for quick, mess-free decorating.
- decorate in stages: Pipe your frosting, then sprinkle edible glitter, chopped nuts, or fresh berries immediately before serving to maximize freshness.
Perfect Pairings and Presentation for Every Party
Fresh cupcakes deserve fresh accompaniments. Serve alongside a vibrant berry compote or a small pitcher of homemade caramel sauce for dipping. Display cupcakes on tiered stands or rustic wooden boards mixed with edible flowers such as pansies or violets for an elegant touch. Complement savory bites at brunch with citrus-poppy seed cupcakes or spice-laden chai cupcakes for autumnal gatherings. Thoughtful presentation can transform these quick treats into centerpieces that steal the show.

Tips for Success
- Ingredient temperature matters: Use room temperature eggs and milk for the fluffiest texture.
- Substitute milk with buttermilk to add tang and softness to the crumb.
- Overmixing causes toughness: Fold until just combined to maintain lightness.
- Make ahead: Bake cupcake bases a day in advance and freeze unfrosted for up to 2 months; thaw fully before frosting.
- Allergy-friendly: Substitute all-purpose flour with gluten-free blends; swap oil with applesauce for moisture with less fat.
Nutritional Information
| Nutrient | Amount per Cupcake |
|---|---|
| Calories | 185 kcal |
| protein | 3 g |
| Carbohydrates | 28 g |
| Fat | 6 g |
For further inspiration on cake bases and speedy sweets, visit our Quick Baking Tips guide or explore expert baking techniques at King Arthur Baking Company.
Q&A
Q&A: Speedy Sweets - Quick Cupcake Recipes for Every Occasion
Q1: What inspired the creation of “Speedy Sweets: Quick Cupcake Recipes for Every Occasion”?
A: We wanted to make the joy of baking cupcakes accessible to everyone, no matter their schedule. Life gets busy, but that shouldn’t mean sacrificing delicious homemade treats. “speedy Sweets” was born from the desire to simplify cupcake baking without skimping on flavor or fun.
Q2: how quick are these cupcake recipes really?
A: Many of the recipes in “Speedy Sweets” can be whipped up,baked,and frosted in under 30 minutes. From start to finish, including ingredient prep and decoration, these cupcakes are designed to satisfy your sweet tooth with minimal wait-perfect for last-minute celebrations or unexpected guests.
Q3: Are these recipes beginner-friendly?
A: Absolutely! Whether you’re a seasoned baker or a novice, the step-by-step instructions and handy tips make these cupcakes approachable for everyone. We’ve included shortcuts and handy hacks that keep the process fun and foolproof.
Q4: What types of occasions do these recipes cater to?
A: From casual family gatherings to birthday parties, office celebrations, and impromptu date nights, ”Speedy Sweets” covers it all. There are themed cupcakes for holidays, kid-friendly flavors, and even elegant options for more formal events – all made quick and easy.
Q5: Do the recipes accommodate dietary restrictions?
A: Yes! The book includes speedy recipes that cater to gluten-free, dairy-free, and vegan diets without compromising taste or texture.We believe everyone deserves a sweet treat, no matter their dietary needs.Q6: Can these cupcakes be customized?
A: Definitely. each recipe comes with variation suggestions-from swapping fillings to experimenting with frostings and toppings. These creative twists let you tailor your cupcakes to personal preferences or the theme of your event.
Q7: What’s the secret to making cupcakes both fast and fluffy?
A: It’s all about ingredient balance and simple techniques. Quick-mix batters, room-temperature ingredients, and smart leavening choices help achieve that soft, airy crumb without long prep times.Plus, our tips ensure your cupcakes rise perfectly every time.
Q8: Any advice for decorating speedy cupcakes?
A: Keep it simple and stylish.Use ready-made frostings with fresh fruit or edible decorations, or try no-fuss swirls using a piping bag. The book also includes fun,low-effort decorating ideas that look impressive but take mere minutes.Q9: How can I ensure my speedy cupcakes stay fresh?
A: Store them in an airtight container at room temperature for up to two days or refrigerate for longer freshness. For best results, frost cupcakes right before serving, especially on hot days.
Q10: Where can I find “Speedy Sweets: Quick Cupcake Recipes for Every Occasion”?
A: You can grab your copy online at major bookstores, as well as through digital platforms for eBook versions. Get ready to bake fast and enjoy sweet results!
Closing Remarks
With these speedy sweets in your baking arsenal, you’re always just minutes away from delightful cupcakes that brighten any occasion.Whether it’s a last-minute celebration or an everyday craving,these quick cupcake recipes prove that deliciousness doesn’t have to come with a long wait. So grab your mixing bowl, whisk up some magic, and let your kitchen become the sweetest spot in the house-one speedy cupcake at a time.happy baking!