Sizzling Tofu Broccoli Stir Fry combines simplicity with vibrant nutrition, making it a go-to dish for anyone seeking a quick yet deeply satisfying meal. This stir fry celebrates the wholesome pairing of protein-packed tofu and fiber-rich broccoli,creating a harmonious balance that nourishes the body and delights the palate.Rooted in Asian culinary traditions, this dish has become a modern staple-perfect for weeknight dinners or meal prep.
Prep and Cook Time
Planning: 15 minutes
cooking: 12 minutes
Total Time: 27 minutes
Yield
Serves 4 generous portions
Difficulty Level
Easy - perfect for beginners and seasoned cooks alike
Ingredients
- 14 oz (400g) firm tofu, pressed and cut into 1-inch cubes
- 3 cups broccoli florets, fresh or lightly steamed
- 2 tbsp vegetable oil (canola or peanut oil preferred for high heat)
- 3 cloves garlic, minced
- 1-inch piece fresh ginger, grated
- 1 small red chili, thinly sliced (optional, for heat)
- 3 tbsp soy sauce (or tamari for gluten-free)
- 1 tbsp hoisin sauce
- 1 tbsp rice vinegar
- 1 tbsp maple syrup or honey
- 1 tsp toasted sesame oil
- 2 tbsp water (to loosen the sauce)
- 1 tsp cornstarch, mixed with 2 tbsp cold water
- Sesame seeds for garnish
- Chopped scallions for finishing touch
Instructions
- Prepare the tofu: Wrap the tofu in a clean kitchen towel and press gently to remove excess moisture. Cube the tofu evenly to ensure consistent browning.
- Heat the wok or large skillet over medium-high heat: Add the vegetable oil and swirl to coat. Carefully add the tofu cubes in a single layer. Let them cook undisturbed for 3-4 minutes until the bottoms turn a golden crust.
- Flip and continue cooking: Gently turn the tofu cubes to brown all sides, about 4 minutes more. Remove tofu and set aside on a paper towel-lined plate to absorb any extra oil.
- Sauté aromatics: Add a touch more oil if needed, than toss in garlic, ginger, and sliced chili. Stir vigorously for 30 seconds until fragrant yet not burnt.
- Add broccoli florets: Toss them into the wok and cook for 4-5 minutes, stirring frequently.The broccoli should turn luminous green and become tender-crisp.
- Whisk together the sauce: In a small bowl, combine soy sauce, hoisin, rice vinegar, maple syrup, toasted sesame oil, and water. Pour this mixture over the broccoli and stir well.
- return tofu to the wok: Gently fold the tofu into the vegetables and sauce. Give the cornstarch slurry a quick stir, then pour into the pan.cook, stirring continuously, until the sauce thickens and glazes the tofu and broccoli evenly (about 2 minutes).
- Final touches: Taste and adjust seasoning if needed. Remove from heat and sprinkle with sesame seeds and chopped scallions.
- Serve immediately: plate your sizzling tofu broccoli stir fry over steamed jasmine rice or your favorite noodles for a complete meal.
Tips for Success
- Pressing tofu: Ensures a crispier texture by removing moisture-aim for at least 20 minutes of pressing time using a tofu press or heavy books.
- High heat stir-frying: Use a wok or large skillet and keep ingredients moving to avoid sticking and promote even cooking.
- Vegetable variations: Add snap peas, bell peppers, or baby corn for extra color and crunch.
- Make ahead: Prep tofu and sauce in advance; store separately to maintain freshness. Stir fry quickly just before serving.
- For gluten-free option: Use tamari instead of soy sauce and ensure your hoisin sauce is gluten-free.
- Customize heat level: Omit chili for mild flavors or add chili flakes for a fiery kick.
Serving Suggestions
Enhance your sizzling tofu broccoli stir fry with a side of fragrant jasmine rice or steamed brown rice for a wholesome balance. Alternatively, nestle it atop a bed of soba noodles or serve alongside quinoa for a protein boost. Garnish with a fresh wedge of lime to add a citrusy brightness or sprinkle roasted peanuts for added texture. This dish pairs beautifully with a cucumber salad or miso soup for a vibrant, well-rounded meal.

| nutrient | Per Serving |
|---|---|
| Calories | 280 |
| Protein | 18g |
| Carbohydrates | 14g |
| Fat | 16g |
For related recipes on healthy plant-based dinners, check out our Vegan Stir Fry recipes Collection. For a deeper dive into the health benefits of tofu and broccoli, visit Healthline’s detailed guide.
Q&A
Q&A: Sizzling Tofu Broccoli Stir Fry – A Healthy flavor Boost
Q1: What makes the Sizzling Tofu Broccoli Stir Fry a “healthy flavor boost”?
A1: This dish is a vibrant party of nutrients and taste! Packed with protein-rich tofu and fiber-loaded broccoli, it delivers a powerhouse of vitamins and minerals. the sizzling stir fry method locks in flavor without drowning ingredients in oil, creating a light yet intensely savory meal. It’s a perfect way to nourish your body while tantalizing your taste buds.Q2: Why choose tofu and broccoli as the star ingredients?
A2: Tofu is a versatile plant-based protein that soaks up flavors beautifully and offers a silky texture. Broccoli brings a satisfying crunch and a bounty of antioxidants, vitamins C and K, and fiber. Together, they form a dynamic duo that supports muscle health, digestion, and immune function – all wrapped up in a deliciously balanced bite.
Q3: How can I make the stir fry sizzle with flavor without excessive oil or sodium?
A3: Use high-quality, aromatic ingredients like fresh ginger, garlic, and a splash of low-sodium soy sauce or tamari. Adding a squeeze of citrus or a dash of chili flakes can brighten and deepen the profile without extra salt or fat. Toasting sesame seeds or incorporating a hint of toasted sesame oil at the end adds a nutty whisper of indulgence-without going overboard.
Q4: Is this recipe adaptable for different dietary preferences?
A4: Absolutely! The Sizzling Tofu Broccoli Stir Fry is naturally vegan and gluten-free if you choose tamari over soy sauce. for a nut-free version, skip added nuts or seeds.If you want more protein, toss in edamame or cashews; if you crave extra veggies, mushrooms, bell peppers, or snap peas fit perfectly. This dish is a blank canvas ready for your creativity.Q5: What’s the secret to achieving that perfect “sizzle” in the stir fry?
A5: High heat and a preheated pan are your best friends. Ensure your tofu cubes are patted dry to prevent steaming. stir frequently but don’t overcrowd the pan-this helps vegetables stay crisp and tofu develop a golden crust. The sizzling sound is the hallmark of flavors caramelizing and mingling, signaling a mouthwatering result.
Q6: How quickly can I prepare this dish on a busy weeknight?
A6: Thanks to its simplicity, this stir fry can be ready in under 20 minutes! While the pan heats, chop your broccoli and press your tofu. The quick cooking time means veggies remain fresh and vibrant. Pair it with steamed rice or noodles, and you’ve got a wholesome, speedy meal that doesn’t compromise on flavor or nutrition.
Q7: Can this stir fry be made ahead or stored as leftovers?
A7: Yes! Prepare and cool the stir fry quickly, then refrigerate in an airtight container for up to 3 days. When reheating, do so in a hot skillet or microwave, adding a splash of water or broth if it truly seems dry. For best texture,consider adding fresh stir-fried broccoli or a crisp salad alongside leftovers.
With its bold flavors,healthful ingredients,and quick cooking time,the Sizzling Tofu Broccoli stir Fry is a delicious way to add color,crunch,and vitality to your dinner table every day!
Closing Remarks
As the final sizzle fades and the aroma of sautéed tofu and vibrant broccoli lingers,this stir fry stands as a testament to how healthy eating can be both simple and sensational. Whether you’re seeking a quick weeknight dinner or a nutrient-packed meal that excites your taste buds,this dish delivers a perfect balance of protein,greens,and bold flavors. So next time you crave a wholesome boost without sacrificing zest, remember that a sizzling tofu broccoli stir fry isn’t just a meal-it’s a vibrant invitation to nourish your body and delight your palate in every bite.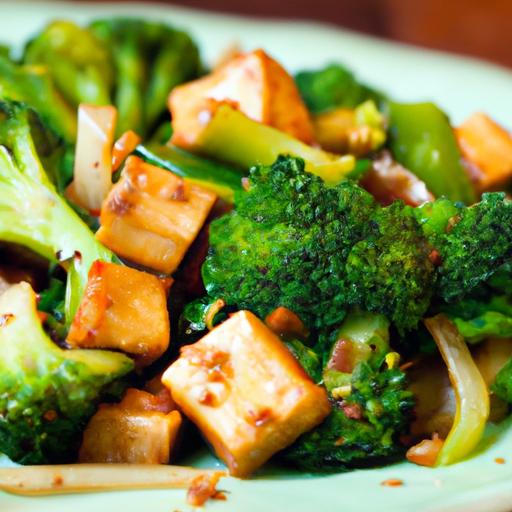
Unlocking the Power of Whole Grain Pasta is a celebration of vibrant flavors and hearty textures that transform a simple meal into a wholesome experience.Whole grain pasta, with its nutty aroma and satisfying bite, offers not just a healthier alternative but an possibility to elevate everyday dishes. Whether your drawn to its nutritional benefits or its rustic charm, mastering this ingredient opens doors to a multitude of appetizing creations that don’t compromise on taste or texture.
Prep and Cook Time
Readiness: 10 minutes
Cooking: 12-14 minutes
Total Time: 22-24 minutes
yield
Serves 4 generously
Difficulty Level
Easy
Ingredients
- 12 oz whole grain pasta (penne, fusilli, or spaghetti)
- 2 tbsp extra virgin olive oil
- 3 cloves garlic, minced
- 1 cup cherry tomatoes, halved
- 1 medium zucchini, diced
- 1 cup baby spinach, loosely packed
- 1/4 cup toasted pine nuts
- 1/3 cup freshly grated Parmesan cheese
- Salt and freshly cracked black pepper, to taste
- 1 tsp crushed red pepper flakes (optional)
- Fresh basil leaves for garnish
Instructions
- Bring a large pot of salted water to a rolling boil. Add the whole grain pasta and cook according to package instructions, typically 12-14 minutes, until al dente. Stir occasionally to prevent sticking.
- While pasta cooks, heat olive oil over medium heat in a large skillet. Add minced garlic and sauté until fragrant, about 1 minute, stirring constantly to avoid burning.
- Add cherry tomatoes and diced zucchini to the skillet. Cook for 5-6 minutes until the tomatoes soften and zucchini becomes tender, stirring occasionally.
- Drain pasta once cooked, reserving 1/2 cup pasta water. Add pasta to the skillet with vegetables.
- Toss everything together, adding reserved pasta water a little at a time to loosen the sauce and help it cling to the whole grain pasta’s hearty texture.
- Fold in baby spinach and toasted pine nuts, cooking for another minute until spinach wilts slightly.
- Season with salt, black pepper, and crushed red pepper flakes, adjusting heat and brightness to your taste.
- Remove from heat and sprinkle generously with parmesan cheese. Toss gently to combine.
- Serve promptly, garnished with fresh basil leaves for a burst of color and aroma.
Tips for Success
- For an even nuttier flavor, choose whole grain pasta made from einkorn or spelt. These ancient grains add depth and unique texture.
- Don’t overcook the pasta; whole grain varieties take a little longer but maintain the best bite when al dente.
- Save some pasta water-it’s a natural binder that enriches your sauce without extra fat.
- Try swapping zucchini for roasted butternut squash or sautéed mushrooms for seasonal variety.
- This dish can be made ahead: keep the pasta and veggies separate, then combine and warm gently with a splash of pasta water before serving.
Serving Suggestions
Plate your vibrant whole grain pasta alongside a crisp mixed green salad dressed with lemon vinaigrette for refreshing contrast. A side of crusty whole wheat bread enhances the rustic theme perfectly. Garnish with extra toasted pine nuts and freshly cracked pepper for visual appeal and an added crunch. For a protein boost, serve with grilled chicken or pan-seared salmon.
| Nutrient | Per Serving |
|---|---|
| Calories | 380 kcal |
| Protein | 14 g |
| Carbohydrates | 62 g |
| Fat | 8 g |

Exploring the depths of whole grain pasta unlocks a world where nutrition and indulgence meet harmoniously. For more inspiration on balanced flavors, check out our article on Healthy Plant-Based pasta Recipes. to learn more about the benefits of whole grains, visit the Whole Grains Council, a trusted authority on whole grain nutrition.
Q&A
Q&A: Unlocking the Power of Whole Grain Pasta – where Taste Meets Health
Q1: What makes whole grain pasta different from regular pasta?
A1: Whole grain pasta is crafted from whole wheat kernels that include the bran, germ, and endosperm, unlike refined pasta which uses only the endosperm. This means whole grain pasta retains all the natural fiber, nutrients, and antioxidants, offering a richer taste and a nutritional boost.
Q2: Does whole grain pasta really taste better?
A2: Absolutely! While it has a nuttier, earthier flavor compared to customary pasta, many find whole grain pasta more satisfying and complex. Its robust taste pairs beautifully with hearty sauces, fresh herbs, and vibrant vegetables, turning every meal into a gourmet experience.
Q3: How does whole grain pasta benefit our health?
A3: Whole grain pasta supports heart health, aids digestion, and helps regulate blood sugar due to its high fiber content. It also provides essential vitamins like B vitamins and minerals such as iron and magnesium, making it a smart choice for sustained energy and overall wellness.
Q4: Can whole grain pasta help with weight management?
A4: Yes! The fiber in whole grain pasta promotes fullness and steadier blood sugar levels, helping to curb overeating and manage appetite. It’s a delicious way to feel satisfied without the extra calories often found in refined foods.
Q5: How do I cook whole grain pasta for the best taste and texture?
A5: Cook whole grain pasta just like regular pasta but keep an eye on it-it tends to be slightly firmer and nuttier when al dente.Try adding a pinch of salt to the boiling water and don’t overcook; a firm bite enhances its natural flavor and texture.
Q6: Is whole grain pasta suitable for gluten-free diets?
A6: Traditional whole grain pasta contains gluten since it’s made from wheat. However, there are whole grain options made from gluten-free grains like brown rice, quinoa, or buckwheat for those with gluten sensitivities or celiac disease.
Q7: How can I incorporate whole grain pasta into my daily meals creatively?
A7: Think beyond spaghetti! Use whole grain pasta in salads, stir-fries, or baked casseroles. Mix it with colorful veggies, drizzle with olive oil and lemon, or combine it with lean proteins and fresh herbs to keep your meals fresh, exciting, and nutritious.
Unlock the hidden potential of whole grain pasta-where every bite nourishes the body and delights the palate. It’s more than just a meal, it’s a celebration of flavor and wellness woven together on your plate.
Key Takeaways
As the humble wheat kernel transforms into a vibrant plate of whole grain pasta, it carries with it a promise-one where flavor and nourishment walk hand in hand. Embracing whole grain pasta is more than a culinary choice; it’s an invitation to savor the rich textures and earthy notes while fueling your body with wholesome goodness. So next time you reach for that box on the shelf, remember: unlocking the power of whole grain pasta means you’re indulging in a delicious blend of taste and health, proving that good eating doesn’t have to come at a compromise. Let every forkful be a celebration of wellness, one grain at a time.
Sweet & savory delight: mastering honey mustard chicken recipes begins with understanding the intricate dance between sweet and tangy flavors that define the beloved honey mustard sauce. This balance is what elevates a simple chicken dish into a mouthwatering sensation that lingers with every bite. It’s more than just a condiment; it’s the heart of the dish, infusing every morsel with luscious depth and brightness.
Prep and Cook Time
- Preparation: 15 minutes
- Cooking: 25 minutes
- Total Time: 40 minutes
Yield
Serves 4 generous portions
Difficulty Level
Medium – approachable for keen home cooks ready to impress
Ingredients
- 4 boneless, skin-on chicken thighs (preferably organic for juiciness and flavor)
- 2 tbsp olive oil
- 1/4 cup Dijon mustard
- 1/4 cup honey (raw or wildflower honey offers complex sweetness)
- 2 tbsp apple cider vinegar
- 1 tsp smoked paprika
- 2 cloves garlic, minced
- Salt and freshly ground black pepper, to taste
- Fresh thyme sprigs for garnish
- Optional: pinch of cayenne for heat
instructions
- Prepare the chicken cuts: pat dry the chicken thighs with paper towels to ensure even browning. Season generously with salt, pepper, and smoked paprika on both sides.
- Heat olive oil: In a large skillet over medium-high heat, warm olive oil until shimmering but not smoking.
- Sear the chicken: Place chicken thighs skin-side down; sauté until the skin caramelizes to a deep,golden brown-about 6-8 minutes. Resist the urge to move them prematurely to build that luscious crust.
- Flip and cook through: Turn chicken over and cook for another 6-7 minutes, until internal temperature reaches 165°F (75°C). Remove chicken from skillet and keep warm.
- Craft the sauce: Lower the heat to medium. Add minced garlic to the skillet and sauté for about 30 seconds until fragrant.Stir in Dijon mustard, honey, and apple cider vinegar. Allow the sauce to bubble gently, stirring occasionally until thickened slightly, about 3-4 minutes.
- Combine flavors: Return chicken to the skillet, spooning the honey mustard sauce over the thighs. Simmer together for 2 minutes, letting the sauce cling and caramelize softly around the edges.
- Final touch: Remove from heat. Garnish with fresh thyme sprigs and a light crack of black pepper. Optionally, sprinkle a pinch of cayenne for a subtle warmth that complements the sweet tang.
Tips for Success
- choosing your chicken: Skin-on, bone-in thighs deliver juiciness and flavor unmatched by breasts. For quicker cooking, skinless breasts can be used but will require careful monitoring to avoid drying out.
- Honey selection: Opt for local or wildflower honeys for nuanced sweetness-avoid ultra-processed honeys that lack depth.
- Caramelization secrets: Ensure the pan is hot enough before adding chicken; a stainless steel pan works wonders to achieve that perfect crust.
- Make-ahead: The honey mustard sauce can be prepared ahead and gently reheated to brush over freshly cooked chicken.
- Adjust sweetness and tang: taste the sauce as you cook-more vinegar intensifies tang while extra honey boosts sweetness. Balancing thes is key to keep it vibrant and never overpowering.
Serving Suggestions
Serve your honey mustard chicken alongside creamy mashed potatoes or fluffy jasmine rice to soak up every luscious drop of sauce. A crisp green salad or roasted asparagus with lemon zest adds freshness and texture contrast. Garnish plates with sprigs of thyme and a drizzle of honey mustard sauce to make the presentation irresistible.

| Nutrient | Per Serving |
|---|---|
| Calories | 380 kcal |
| protein | 35 g |
| Carbohydrates | 12 g |
| Fat | 20 g |
Craving more inspiration on succulent chicken dishes? Explore our Juicy Herb Roasted Chicken Recipe for another mouthwatering adventure.For nutritional guidance on balancing sauces and seasonings, visit the Academy of Nutrition and Dietetics.
Q&A
Q&A: Sweet & Savory Delight – Mastering honey Mustard Chicken Recipes
Q1: What makes honey mustard chicken such a beloved dish?
A1: Honey mustard chicken perfectly marries the rich sweetness of honey with the tangy, slightly spicy kick of mustard. This harmonious blend creates a flavor profile that’s both comforting and exciting, appealing to a wide range of palates. The versatility of the dish also means it can be cooked quickly on a weeknight or elevated for a special dinner.
Q2: What types of mustard work best in honey mustard chicken recipes?
A2: Dijon mustard is a classic choice,known for its smooth texture and balanced sharpness,which complements honey beautifully. Whole grain mustard adds a delightful pop of texture and a rustic look,while yellow mustard offers a milder,slightly tangy base. You can experiment or even combine varieties to customize your sauce.
Q3: How can I ensure my chicken stays juicy and tender?
A3: Marinating the chicken in the honey mustard mixture for at least 30 minutes – or even overnight – lets the flavors deeply infuse and helps tenderize the meat. Cooking methods like baking at a moderate temperature or pan-searing followed by gentle simmering in the sauce also lock in moisture, preventing dryness.
Q4: Are there creative twists to the classic honey mustard chicken?
A4: Absolutely! Try adding fresh herbs such as thyme or rosemary for an aromatic kick. Incorporate a splash of apple cider vinegar or lemon juice to brighten the sauce, or toss in garlic and smoked paprika for a smoky depth. For texture, top with toasted almonds or crispy bacon bits.
Q5: What side dishes pair best with honey mustard chicken?
A5: The sweet and tangy notes of honey mustard chicken pair wonderfully with simple, comforting sides. Think buttery mashed potatoes, roasted vegetables, or a fresh green salad with a light vinaigrette. For a grain option,fluffy couscous,creamy risotto,or wild rice pilaf can absorb the sauce beautifully.
Q6: Can honey mustard chicken be made ahead or frozen?
A6: Yes! The chicken can be marinated and cooked ahead, then cooled and stored in the refrigerator for up to 3 days. It also freezes well – just pack portions into airtight containers and freeze for up to 2 months. reheat gently to preserve juiciness, either in the oven or on the stovetop with a splash of broth.
Q7: Is honey mustard chicken a healthy option?
A7: When prepared thoughtfully, absolutely. Using lean cuts like skinless chicken breasts or thighs,moderating honey quantity,and limiting added sugars keeps it nutritious. Pair it with plenty of veggies and whole grains for a balanced meal that satisfies both taste buds and nutritional goals.
Mastering honey mustard chicken is about balancing sweet and savory while using simple techniques that maximize flavor and texture. Ready to embark on this delicious culinary journey? Your taste buds are in for a treat!
To Wrap It Up
As you embark on your culinary journey with honey mustard chicken, remember that this delightful balance of sweet and savory is more than just a flavor-it’s an experience waiting to be mastered. Whether you prefer a tangy glaze or a creamy dip, the versatility of honey mustard allows you to customize each bite to your liking. With the tips and recipes shared here, you’re well-equipped to transform simple ingredients into a mouthwatering masterpiece that’s sure to impress family and friends alike.So, gather your favorite pantry staples, embrace the harmony of flavors, and let your kitchen be filled with the irresistible aroma of honey mustard chicken perfected. Happy cooking!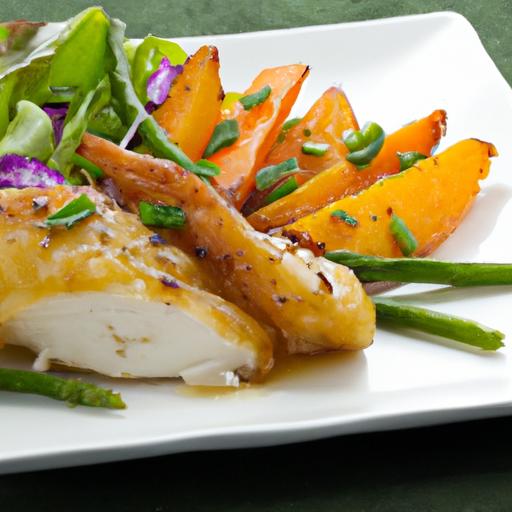
one Pot Creamy Sundried Tomato White Beans is a comforting dish that combines the rustic charm of white beans with the bold, tangy essence of sundried tomatoes. This easy-to-make recipe elevates humble pantry staples into a harmonious symphony of creamy textures and layered flavors, perfect for cozy evenings or weeknight dinners when you crave something nourishing yet effortless.
Inspired by Mediterranean flavors and simplified for convenience, this dish captures that perfect balance between richness and freshness.By cooking everything in one pot, you preserve maximum flavor while minimizing cleanup-a win-win for any home cook.
Prep and Cook Time
- Planning: 10 minutes
- Cooking: 30 minutes
- Total Time: 40 minutes
Yield
Serves 4 generous portions
Difficulty Level
Easy – ideal for beginner to intermediate cooks
Ingredients
- 2 tablespoons olive oil
- 1 medium yellow onion, finely diced
- 3 garlic cloves, minced
- 1 cup sundried tomatoes, chopped (preferably oil-packed)
- 2 cans (15 oz each) white beans, drained and rinsed (cannellini or great northern)
- 3 cups vegetable broth (low sodium preferred)
- 1/2 cup heavy cream or full-fat coconut milk for a dairy-free option
- 1 teaspoon smoked paprika
- 1/2 teaspoon dried thyme
- Salt and freshly cracked black pepper, to taste
- Fresh basil leaves (for garnish)
- Grated Parmesan cheese (optional, for serving)
Instructions
- Heat olive oil in a large heavy-bottomed pot over medium heat. Add diced onions and sauté until translucent,about 5 minutes,stirring occasionally to avoid browning too quickly.
- add the minced garlic and cook for another 1 minute until fragrant, being careful not to burn it.
- Stir in the chopped sundried tomatoes, allowing their rich oils and flavors to infuse for 2 minutes.
- Add the white beans, vegetable broth, smoked paprika, and dried thyme. Stir well and bring the mixture to a gentle simmer.
- Reduce heat to low and cook uncovered for 15-20 minutes, allowing the beans to absorb flavor and the liquid to thicken slightly.
- Using a potato masher or the back of a spoon, mash a portion of the beans directly in the pot to create that creamy texture without needing extra starches.
- Pour in the heavy cream (or coconut milk) and stir until fully incorporated. Heat through for 3-5 minutes until the dish is luxuriously creamy.
- Season generously with salt and cracked black pepper, adjusting to your taste preference.
- Remove from heat and let sit for a couple of minutes to thicken further before serving.
Tips for Success
- For an even deeper flavor, soak dried white beans overnight and cook from scratch, adjusting broth quantities accordingly.
- Use oil-packed sundried tomatoes for richness; if using dry-packed, rehydrate them in warm water before chopping.
- To keep the texture creamy but not mushy, only mash about one-third of the beans.
- Experiment with spices like smoked paprika and thyme, or add a pinch of red chili flakes for subtle heat.
- Make-ahead: Store in an airtight container in the fridge for up to 3 days. Reheat gently, adding a splash of broth or water if needed.
Serving Suggestions and Creative Twists
This dish shines served in rustic bowls and garnished with fresh basil leaves and a sprinkle of grated Parmesan or nutritional yeast for a vegan option. A drizzle of good-quality extra virgin olive oil just before serving adds a silky finish.
Pair it with crusty artisan bread for dipping or over a bed of sautéed spinach for added greens. For a protein boost, top with grilled chicken, pan-seared tofu, or crispy bacon bits.
To elevate the flavors creatively, stir in a handful of baby kale or arugula in the last few minutes of cooking, allowing the greens to wilt slightly. A squeeze of fresh lemon juice brightens the dish and adds a vibrant contrast to the creaminess.

| Nutrient | Per Serving |
|---|---|
| Calories | 320 kcal |
| Protein | 15 g |
| Carbohydrates | 38 g |
| Fat | 10 g |
For more wholesome one pot recipes you’ll love, explore our One Pot Vegetarian Dinners collection.To learn more about the health benefits of white beans and sundried tomatoes, visit Medical News Today.
Q&A
Q&A: One Pot Creamy Sundried Tomato White Beans – Easy & Flavorful
Q1: What is “one Pot Creamy Sundried Tomato White Beans”?
A1: It’s a luscious, comforting dish where tender white beans simmer in a creamy, savory sauce infused with the rich, tangy flavor of sundried tomatoes-all cooked effortlessly in a single pot. This meal is a lovely marriage of simplicity and bold taste, perfect for busy weeknights or a cozy dinner.
Q2: why choose sundried tomatoes in this recipe?
A2: Sundried tomatoes pack a concentrated burst of sweet-tart umami that transforms ordinary beans into something extraordinary. Their intense flavor adds depth and complexity, giving the dish a vibrant, Mediterranean-inspired twist that elevates every creamy bite.
Q3: can this recipe be made quickly?
A3: Absolutely! This one-pot wonder is designed for ease and speed. With minimal prep and straightforward steps, you can have a hearty, flavorful meal ready in about 30 minutes-no need for multiple pans or a pile of dishes to wash afterward.
Q4: Is this dish vegetarian or vegan?
A4: This recipe is naturally vegetarian and can be made vegan with simple swaps. Use a plant-based cream choice like coconut milk or cashew cream rather of dairy, and choose vegetable broth to keep the flavors rich but plant-powered.
Q5: What makes the beans creamy without heavy cream?
A5: The creaminess comes from the magic of blending part of the beans and stirring in a touch of dairy or dairy-free cream, alongside a bit of olive oil or vegan butter. This technique creates a silky texture without overwhelming the dish with richness.
Q6: are white beans the best choice for this recipe?
A6: Yes! White beans like cannellini or great northern beans have a mild, slightly nutty flavor and smooth texture that pairs perfectly with sundried tomatoes and creamy sauces. Their sturdy shape holds up well during cooking, making each bite hearty and satisfying.
Q7: Can I customize this dish?
A7: Definitely. Add fresh herbs like basil or thyme for brightness, a pinch of chili flakes for heat, or toss in some sautéed spinach or kale for extra greens. This recipe is flexible, inviting you to get creative while keeping things appetizing and fuss-free.
Q8: What should I serve with One Pot Creamy Sundried Tomato White Beans?
A8: It’s fantastic on its own as a protein-packed, comforting meal, but also pairs beautifully with crusty bread, a fresh side salad, or over a bed of fluffy rice or quinoa for a complete, satisfying plate.Q9: How long can I store leftovers?
A9: Store leftovers in an airtight container in the refrigerator for up to 3-4 days. Reheat gently on the stove or microwave, adding a splash of water or broth if needed to loosen the sauce and keep that creamy texture intact.
Q10: Who will love this dish?
A10: Anyone craving cozy, wholesome comfort food with a complex twist. From vegetarians looking for easy meals, to busy home cooks wanting big flavor with minimal effort, this creamy sundried tomato white beans dish is sure to delight taste buds and hearts alike!
Closing Remarks
In the world of weeknight dinners, the One Pot Creamy Sundried Tomato White Beans dish stands out as a shining example of simplicity meeting sumptuous flavor. This easy, comforting recipe not only saves you time and effort but also delivers a rich, tangy twist that elevates humble white beans to a whole new level.Whether you’re a seasoned home cook or a kitchen newbie, this creamy, vibrant meal invites you to savor each bite while appreciating the magic of one-pot cooking. So next time you’re searching for a dish that’s as effortless as it is delicious, remember: sometimes, all it takes is one pot to create a truly memorable meal.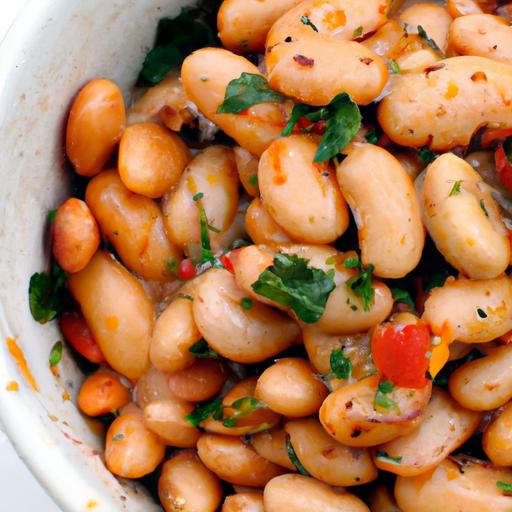
mastering grilled chicken breast is both an art and a science-one that promises juicy, healthy, and delicious results every time you fire up the grill. This beloved protein, cherished for its versatility and lean nutrition, can transform an ordinary meal into a flavorful feast when handled with care. Understanding the delicate balance of moisture retention, flavor infusion, and precise cooking techniques unlocks a world of vibrant tastes and satisfying textures that elevate grilled chicken breast beyond the everyday.
Prep and Cook Time
- Preparation: 15 minutes (plus 1-2 hours marinating for best results)
- Cooking: 12-15 minutes
- Total Time: Approximately 1 hour 30 minutes
Yield
- Serves 4
Difficulty Level
- Easy to Medium
Ingredients
- 4 boneless, skinless chicken breasts (about 6 oz each)
- 1/4 cup olive oil (extra virgin for richness)
- 3 tablespoons fresh lemon juice (for tenderizing and brightness)
- 3 garlic cloves, minced
- 1 tablespoon honey (balances acidity and enhances caramelization)
- 1 teaspoon smoked paprika (adds warmth and subtle smokiness)
- 1 teaspoon dried oregano (classic herbaceous note)
- 1/2 teaspoon ground black pepper
- 1 teaspoon kosher salt (or to taste)
- Fresh herbs for garnish: parsley or cilantro (optional)
Instructions
- Prepare the marinade: In a medium bowl, whisk together the olive oil, lemon juice, minced garlic, honey, smoked paprika, dried oregano, salt, and pepper until fully combined into a harmonious blend of flavors.
- Marinate the chicken: place the chicken breasts in a resealable plastic bag or shallow dish and pour the marinade over, making sure each breast is coated evenly. Seal or cover, then refrigerate for at least 1 hour, preferably up to 2 hours. This step ensures the meat absorbs the marinade’s acids and herbs,leading to a tender,flavorful bite.
- Preheat the grill: Heat your gas or charcoal grill to medium-high heat (about 400°F or 204°C). Oiling the grill grates lightly prevents sticking and helps achieve appealing grill marks.
- Grill the chicken: Remove the chicken from the marinade and shake off excess. Place the breasts on the grill. Cook for 5-7 minutes per side, flipping once, until the internal temperature reaches 165°F (74°C) measured with an instant-read thermometer. Avoid constant flipping to allow even cooking and caramelization.
- Rest before serving: Transfer grilled chicken to a plate and tent loosely with foil. Let it rest for 5 minutes, allowing juices to redistribute and enhance moistness.
- Slice and garnish: Slice the chicken against the grain for a tender finish and garnish with freshly chopped parsley or cilantro for a vibrant, fresh touch.
Tips for Success
- Marinating time matters: While a short 30-minute marinade can add flavor, 1-2 hours maximizes tenderness without compromising texture.
- Avoid overcooking: Grill chicken breasts to an internal temp of 165°F (74°C) and no higher to keep the meat juicy and prevent dryness.
- Use a meat thermometer: Instant-read thermometers are your best friend for perfectly cooked chicken every time.
- Try dry brining: For a quicker option, sprinkle salt and seasonings directly on chicken and refrigerate uncovered for 1 hour before grilling.
- Variations: Swap smoked paprika for chipotle powder for smoky heat or add fresh rosemary and thyme for an herbal twist.
- Make ahead: marinate overnight for deep flavor, and grill just before serving for convenience.
Serving Suggestions
Present your grilled chicken breast alongside a medley of healthy sides like grilled asparagus, quinoa salad with cherry tomatoes and cucumbers, or a refreshing mixed green salad dressed with lemon vinaigrette.A dollop of tzatziki sauce or a sprinkle of toasted pine nuts adds texture and flavor contrast that complements the smoky, juicy chicken beautifully. For a colorful pop, garnish with lemon wedges and fresh herbs to brighten the plate and palate.

| Nutrient | Per Serving |
|---|---|
| Calories | 280 kcal |
| Protein | 35 g |
| Carbohydrates | 4 g |
| Fat | 12 g |
If you’re eager to explore more about balancing flavors and nutrition in poultry dishes, check out our guide on healthy grilled chicken recipes. For deeper insights on poultry safety and cooking temperatures, the USDA Food Safety Information offers a trustworthy resource.
Q&A
Q&A: Mastering Grilled Chicken Breast – Juicy,Healthy,Delicious
Q1: Why is grilled chicken breast often dry,and how can I avoid that?
A: Chicken breast can dry out easily becuase it’s very lean,lacking the fat that helps retain moisture. To keep it juicy, try brining the chicken in a saltwater solution for 30 minutes before grilling. Also, marinating with a bit of oil and acid (like lemon juice or vinegar) helps tenderize the meat. avoid overcooking-use a meat thermometer and pull the chicken off the grill as soon as it hits 160°F (71°C), since it will continue to cook while resting.
Q2: What are the best marinades for grilling chicken breast that enhance flavor without adding to many calories?
A: A simple marinade using olive oil, fresh herbs (like rosemary or thyme), garlic, lemon juice, and a dash of black pepper packs a flavorful punch without unnecessary calories. Greek yogurt-based marinades also work wonders, as the enzymes tenderize meat and keep it moist. Avoid heavy creams or sugary sauces if you wont to keep it healthy.Q3: How can I get those beautiful grill marks without burning the chicken?
A: High heat is your friend for searing and creating grill marks-but only at the start. Preheat your grill to medium-high for a few minutes. Place the chicken breasts down and don’t move them for 2-3 minutes, then rotate 45 degrees for cross-hatch marks. After that,move them to a cooler part of the grill or lower the heat to finish cooking gently without charring.
Q4: Is it necessary to pound chicken breasts before grilling?
A: While not mandatory, pounding chicken breasts to an even thickness ensures uniform cooking and prevents thin parts from drying out before thicker parts are done. Plus, it creates a more tender final bite. If you don’t want to pound, consider slicing the breast horizontally to create thinner cutlets.
Q5: What are some healthy sides that complement grilled chicken breast?
A: Grilled chicken pairs well with vibrant, nutrient-packed sides like quinoa salad with fresh veggies, grilled asparagus or zucchini, or a crisp kale and citrus salad.roasted sweet potatoes or cauliflower rice are also excellent low-calorie carb options that keep the meal balanced and satisfying.
Q6: How can I make grilled chicken breast flavorful for picky eaters?
A: Layer your flavors! Start with a light brine or marinade, then rub with spices like smoked paprika, cumin, or garlic powder. Experiment with finishing sauces-even a drizzle of tangy chimichurri or a squeeze of fresh lime juice right off the grill can elevate the taste without overwhelming sensitive palates.
Q7: Can I grill chicken breast ahead of time and still keep it juicy?
A: Absolutely! Grill the chicken slightly underdone, then cool and store it airtight in the fridge. When ready to serve, gently reheat in a covered pan with a splash of broth or water to restore moisture. Alternatively, slice the chicken and toss it cold into salads or wraps for a healthy, quick meal.
Mastering grilled chicken breast is an art of balancing heat, timing, and flavor. With these tips,you’ll turn a simple,lean protein into a juicy,healthy,and delicious star of your meals every time!
In Retrospect
mastering the art of the grilled chicken breast is more than just a cooking skill-it’s a gateway to endless culinary possibilities that marry health and flavor. With the right techniques, you can transform a simple piece of poultry into a juicy, tender masterpiece that satisfies both your palate and your well-being. So fire up the grill, embrace the process, and savor every bite of this nutritious delight. Your journey to perfectly grilled chicken breast has just begun-and deliciously juicy results await.
Quick & Tasty homemade Pepper Steak: Simple Recipe Guide
Quick & Tasty Homemade Pepper Steak is a culinary gem that brings together tender cuts of beef and the vibrancy of freshly cracked black pepper, creating a dish bursting with bold, comforting flavors. This classic stir-fry, rooted in Western adaptations of Asian cuisine, has become a go-to for flavorful weeknight dinners, combining speed with satisfaction. Whether you’re a seasoned home cook or just starting out, mastering this recipe offers both ease and delight at your dining table.
Prep and Cook Time
- Preparation: 15 minutes
- Cooking: 10 minutes
- Total Time: 25 minutes
Yield
Serves 4 hearty portions
Difficulty Level
Easy to Medium – perfect for busy evenings but remarkable enough for guests
Ingredients
- 12 oz flank steak, thinly sliced against the grain
- 2 tbsp vegetable oil, divided
- 1 large green bell pepper, sliced into thin strips
- 1 medium onion, thinly sliced
- 3 cloves garlic, finely minced
- 1 tbsp freshly cracked black pepper (adjust for desired heat)
- 3 tbsp soy sauce
- 2 tbsp oyster sauce
- 1 tbsp cornstarch
- 1/4 cup beef broth or water
- 1 tsp sugar
- Optional: 1 tsp toasted sesame oil for finishing
instructions
- Prepare the steak: Toss the thinly sliced flank steak with 1 tablespoon cornstarch and a pinch of salt. This helps seal juices and gives the beef a velvety texture after cooking.
- Make the sauce: In a small bowl, whisk together soy sauce, oyster sauce, beef broth, sugar, and half the cracked black pepper. Set aside.
- Heat the wok or large skillet: Add 1 tablespoon of vegetable oil over high heat until shimmering but not smoking. This intense heat ensures a perfect sear.
- stir-fry the steak: Add the beef in a single layer, letting it sear undisturbed for 30 seconds before tossing.Stir-fry until just browned but still tender, about 2-3 minutes. Remove and set aside.
- cook the aromatics and vegetables: Add remaining oil. Sauté minced garlic, onions, and bell peppers until crisp-tender, about 3 minutes, stirring constantly to preserve their vibrancy.
- Combine & finish: Return steak to the skillet. pour in the prepared sauce and add the remaining cracked black pepper. Toss to coat, stirring frequently until the sauce thickens, about 1-2 minutes. If the sauce is too thick, add a splash of broth.
- Optional touch: Drizzle with toasted sesame oil for a subtle nutty aroma before serving.
Chef’s Notes & Tips for Success
- Choosing the perfect cut: Flank steak or sirloin thinly sliced lies at the heart of tender Quick & Tasty Homemade Pepper Steak.Both soak up sauce beautifully without losing texture.
- Balance bold flavors: Freshly cracked black pepper dominates this dish, so don’t skimp for that signature zing. Adjust the amount to your spice comfort level.
- Marinate for 10 minutes: For extra flavor infusion, marinate the steak with soy sauce and pepper before cooking.
- Quick stir-frying: Use high heat with continuous tossing to prevent steaming. Work in batches if your pan feels crowded.
- Perfect sauce consistency: The key is patience-allow the sauce to bubble and thicken gently without burning to achieve a luscious coating for the beef and veggies.
- Make-ahead: Slice veggies and steak ahead of time. The sauce can be mixed in advance as well.
Serving Suggestions
Serve this luscious pepper steak over a bed of steamed jasmine rice or buttery mashed potatoes to soak up every bit of that glossy sauce.Garnish with thinly sliced green onions and a sprinkle of toasted sesame seeds for a pop of color and texture. For an extra touch of freshness, a side of crisp cucumber salad balances the dish beautifully.

Nutritional Information per Serving
| Calories | Protein | Carbohydrates | Fat |
|---|---|---|---|
| 320 kcal | 28 g | 10 g | 18 g |
Delve deeper into flavor pairings and stir-fry techniques with our Perfect Stir-Fry Techniques Guide. For health insights on beef cuts, visit ChooseMyPlate.gov.
Q&A
Q&A: Quick & Tasty Homemade Pepper Steak – Simple Recipe Guide
Q1: What makes this pepper steak recipe quick and easy?
A1: The recipe uses simple ingredients that come together in under 30 minutes, with a straightforward stir-fry technique that cuts down on prep and cooking time. No complicated marinades or long simmering-just quick searing and a flavorful sauce that’s ready before you know it!
Q2: Can I use any cut of steak for this recipe?
A2: For best results, opt for tender cuts like sirloin, flank, or ribeye, sliced thinly against the grain. These cuts cook fast and stay juicy. Tougher cuts can work if sliced super thin, but may need a bit more attention to avoid chewiness.
Q3: What kind of peppers work best?
A3: Classic bell peppers-red,green,or yellow-are ideal because of their natural sweetness and crunch.Feel free to mix colors for a vibrant dish. If you like a little heat, toss in some sliced jalapeño or chili flakes for a spicy kick.
Q4: Is this recipe gluten-free?
A4: It can be! Use tamari or a gluten-free soy sauce substitute instead of regular soy sauce, and double-check any other sauces or seasonings you add. The rest is naturally gluten-free: fresh veggies,beef,and basic pantry staples.
Q5: can I prepare this recipe ahead of time?
A5: You can slice the beef and peppers in advance to save time, but for the freshest, most tender results, stir-fry everything just before serving. If you make it ahead, store in an airtight container and reheat gently to avoid overcooking the beef.
Q6: What’s the secret to that perfect pepper steak sauce?
A6: The magic lies in balancing savory soy sauce, a touch of sweetness (like brown sugar or honey), and a hint of tang from rice vinegar or Worcestershire sauce. A quick cornstarch slurry thickens it to a glossy, clingy finish that coats every bite beautifully.Q7: What sides pair well with pepper steak?
A7: Keep it classic with steamed white rice or fluffy jasmine rice to soak up the sauce. For a low-carb option, try cauliflower rice or sautéed greens like bok choy or spinach. Even simple noodles make a great base.
Q8: How can I customize this recipe to suit my taste?
A8: Feel free to tweak the spice level by adding fresh ginger, garlic, or chili flakes. Swap the bell peppers for other crisp veggies like snap peas or broccoli. Experiment with garnishes like chopped scallions, sesame seeds, or fresh cilantro for extra punch.
Q9: Is pepper steak healthy?
A9: Absolutely! This homemade version is packed with lean protein and colorful veggies, making it a balanced meal. by controlling the ingredients and avoiding excessive oil or sugar, it’s a nutritious and satisfying dinner option.
Q10: Any tips for slicing the steak perfectly?
A10: Yes! Chill your steak in the freezer for about 15-20 minutes before slicing-this firms it up and makes thin slicing easier.Always cut against the grain (perpendicular to the muscle fibers) for maximum tenderness.
Embark on your quick & tasty pepper steak adventure-no fancy skills needed, just fresh ingredients and a pinch of love!
Closing Remarks
With just a few simple ingredients and a handful of easy steps, whipping up a quick and tasty homemade pepper steak is entirely within your reach. This flavorful dish proves that cooking from scratch doesn’t have to be complicated or time-consuming. Whether you’re aiming for a satisfying weeknight dinner or impressing guests with bold, savory flavors, this recipe is your reliable go-to. So, sharpen your knives, fire up that stove, and get ready to savor every bite of a classic comfort meal made right in your own kitchen. Happy cooking!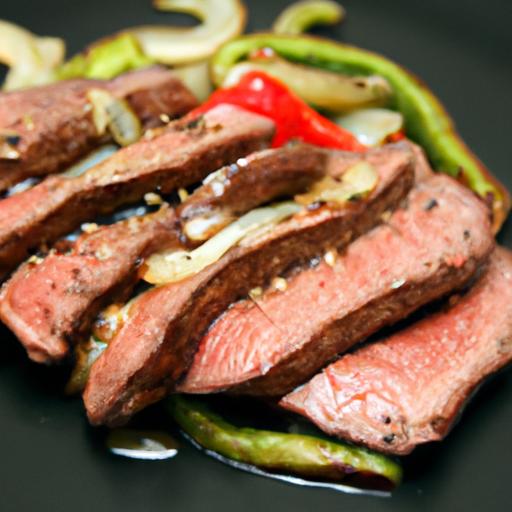
Hearty Sweet Potato Stew welcomes you with its vibrant hues and rich aromas, evoking warmth and nourishment in every spoonful. This stew is a celebration of sweet potatoes’ natural sweetness paired with robust spices and fresh herbs that transform a simple bowl into a soulful experience. Inspired by traditional roots and crafted for modern palates, this dish strikes a sublime balance of textures and flavors that comforts while fueling your body with wholesome goodness.
Prep and Cook Time
Prep Time: 15 minutes
Cook time: 40 minutes
Total Time: 55 minutes
Yield
Serves 6 generous bowls
Difficulty level
Easy – Perfect for both kitchen novices and seasoned home cooks
Ingredients
- 2 lbs sweet potatoes, peeled and cut into 1-inch cubes
- 1 large onion, finely chopped
- 3 cloves garlic, minced
- 1 tbsp fresh ginger, grated
- 1 can (14 oz) diced tomatoes, with juices
- 4 cups vegetable broth, low sodium
- 1 cup canned chickpeas, drained and rinsed
- 1 tsp ground cumin
- 1 tsp smoked paprika
- 1/2 tsp ground cinnamon
- 1/4 tsp cayenne pepper (adjust to taste)
- 2 tbsp olive oil
- 1/4 cup fresh cilantro, chopped
- 1/4 cup fresh parsley, chopped
- Salt and black pepper to taste
- Juice of 1 lemon
Instructions
- Heat the olive oil over medium heat in a large pot. Add the chopped onion and sauté until translucent and beginning to caramelize, about 5 minutes. Stir often to prevent burning.
- Add the garlic and fresh ginger, cooking for another 1-2 minutes until fragrant but not browned.
- Sprinkle in the cumin, smoked paprika, cinnamon, and cayenne. Stir constantly for 30 seconds to toast the spices and unlock thier depth of flavor.
- Dump in the sweet potato cubes and chickpeas,stirring to coat them evenly with the spice and onion mixture. Let this heat together for 3-4 minutes.
- Pour in the diced tomatoes with their juices along with the vegetable broth. Stir well and bring the mixture to a gentle boil.
- once boiling, reduce heat to simmer and cover partially. Let cook for 25-30 minutes, or until the sweet potatoes are tender but hold their shape carefully-avoid overcooking for a better texture in your hearty sweet potato stew.
- Season with salt and pepper to taste. Stir in the fresh lemon juice to brighten the stew.
- Remove from heat and fold in the chopped fresh cilantro and parsley, reserving some for garnish.
- Ladle the stew into warm bowls and garnish with the remaining herbs. Optionally, add a dollop of Greek yogurt or a sprinkle of toasted pumpkin seeds for an extra touch.
Tips for Success
- Customize the spice level: Adjust cayenne pepper or add a dash of hot sauce to suit your heat preference.
- Make it vegan or vegetarian-friendly: Stick with vegetable broth and skip any dairy toppings.
- Texture balance: For a creamier stew, mash some cooked sweet potatoes against the pot’s side before serving.
- Make ahead: This stew tastes even better after resting overnight in the fridge; simply reheat gently before serving.
- Boost protein content: Add cubed firm tofu or cooked lentils for an extra hearty meal.
serving Suggestions
This stew shines when paired with a crusty whole-grain bread to sop up its luscious broth or a scoop of fluffy quinoa for added heartiness. A radiant side salad with lemon vinaigrette creates a refreshing contrast, while a sprinkle of toasted nuts or seeds on top adds delightful crunch and visual appeal. Garnish thoughtfully with fresh herbs, vibrant chili flakes, or a swirl of creamy coconut yogurt for inviting colors and textures that speak to the soul of this hearty sweet potato stew.
| Nutrient | Per Serving |
|---|---|
| Calories | 280 |
| Protein | 7 g |
| Carbohydrates | 45 g |
| Fat | 6 g |

Ready to explore more comforting recipes rich in spices and fresh ingredients? Check out our Moroccan Tagine Recipes for inspiration. For spice health benefits and culinary tips, visit Healthline’s complete guide on cumin.
Q&A
Q&A: Hearty Sweet Potato Stew – A Comforting Twist on Tradition
Q1: What makes sweet potato stew a unique comfort food compared to traditional stews?
A1: Unlike typical stews that frequently enough rely on root vegetables like potatoes or carrots, sweet potato stew introduces a natural sweetness and vibrant color that elevates the dish. The creamy texture of cooked sweet potatoes blends seamlessly with savory spices and hearty ingredients, creating a cozy yet unexpectedly bright flavor profile. Its a comforting hug in a bowl with a touch of novelty.
Q2: Can you describe the flavor profile of a hearty sweet potato stew?
A2: Imagine the earthiness of tender sweet potatoes mingling with the warmth of cinnamon or smoked paprika, balanced by savory onions, garlic, and robust herbs like thyme or rosemary. It’s a beautiful dance between sweet, smoky, and herbaceous notes, finished with a splash of acidity-like a hint of lemon juice or vinegar-to brighten and balance the richness.
Q3: What ingredients are essential to crafting this stew?
A3: The stars of the show are sweet potatoes-cubed or mashed to your preferred consistency. Alongside them, onions and garlic build the aromatic base; tomatoes or broth provide depth; legumes such as chickpeas or beans add protein and texture; and spices like cumin, coriander, or cinnamon give warmth. Fresh herbs and a touch of heat, like chili flakes, can also enhance complexity.
Q4: Is this stew suitable for vegetarians or vegans?
A4: Absolutely! Sweet potato stew is naturally plant-based and easily adaptable. By using vegetable broth rather of chicken or beef stock, and omitting any dairy-based toppings, it becomes a nourishing, vegan-friendly meal packed with fiber, vitamins, and wholesome goodness.
Q5: How can you elevate this stew to make it a complete meal?
A5: Pair your hearty sweet potato stew with crusty bread or warm naan for dipping. Adding a scoop of cooked grains-quinoa, rice, or barley-can make it extra filling. A dollop of coconut yogurt or a drizzle of tahini adds creaminess and a subtle nutty flavor, making every bite luscious and satisfying.
Q6: What occasions or seasons is sweet potato stew best enjoyed?
A6: This stew shines brightest in the cooler months, when you crave something warming and restorative. It’s perfect for casual family dinners,cozy weekend lunches,or even meal prepping for busy weeks.Its comforting nature also makes it a fantastic centerpiece for a laid-back autumn gathering or a holiday side dish with a twist.
Q7: Any tips for customizing this stew to personal taste?
A7: Definitely! If you love spice, add more chili or a splash of hot sauce. For a smoky kick, incorporate smoked paprika or chipotle peppers. Swap out chickpeas for lentils or white beans depending on what’s on hand. Fresh herbs like cilantro or parsley added just before serving brighten the stew, and a squeeze of citrus at the end enhances all the flavors.
Q8: How do you store and reheat sweet potato stew?
A8: Store leftovers in an airtight container in the fridge for up to 4 days, or freeze for longer storage. When reheating, do so gently on the stovetop or microwave with a splash of broth or water to revive the stew’s luscious consistency. It often tastes even better the next day as the flavors meld beautifully overnight.
Key Takeaways
As the aromatic steam rises from your bowl of hearty sweet potato stew, you’re not just savoring a meal-you’re embracing a comforting twist on tradition that warms both body and soul. This vibrant dish proves that simple, wholesome ingredients can come together to create something truly exceptional. whether enjoyed on a chilly evening or shared around the table with loved ones, sweet potato stew invites you to explore familiar flavors in a refreshingly new way. So next time you crave comfort food with a nourishing touch, let this stew be your tasty reminder that tradition is ever-evolving-and always worth savoring.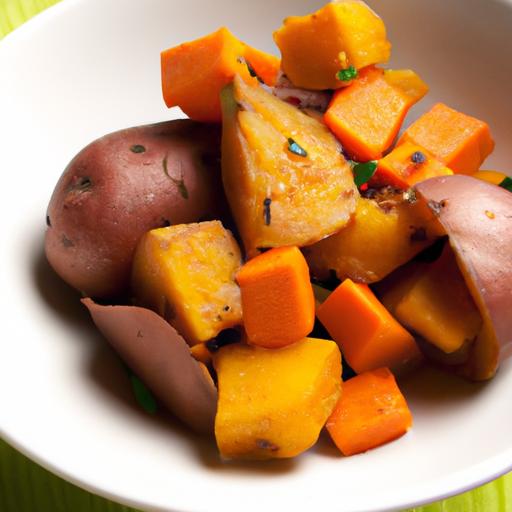
Zesty Grilled Chicken breasts with Fresh Herbs & lemon Twist is a celebration of vibrant,fresh flavors that transform simple chicken into a succulent,mouthwatering feast. Combining the zing of lemon and the aromatic burst of freshly picked herbs, this recipe invites both novice and seasoned grillers to experience a truly elevated grilling experience that’s both healthy and irresistibly appetizing. With every bite, you’ll uncover layers of complexity – the tangy marinade tenderizes and infuses, while the subtle char and smoky notes from the grill seal in juiciness, making each chicken breast a tender delight.
Prep and Cook Time
- Preparation: 15 minutes
- marinating: 2 hours (minimum)
- Grilling: 12-15 minutes
- Total Time: Approximately 2 hours 30 minutes
Yield
serves 4 generous portions
Difficulty Level
Easy – Perfect for any home cook looking to impress with minimal effort but maximum flavor.
Ingredients
- 4 boneless, skinless chicken breasts (about 6 ounces each)
- 1/4 cup extra virgin olive oil
- 2 cloves garlic, minced
- 1 tablespoon fresh rosemary, finely chopped
- 1 tablespoon fresh thyme, finely chopped
- 1/4 cup fresh flat-leaf parsley, chopped
- Juice and zest of 2 large lemons
- 1 teaspoon smoked paprika
- 1/2 teaspoon crushed red pepper flakes (optional, for a slight kick)
- Salt and black pepper to taste
Instructions
- Prepare the marinade: In a medium bowl, whisk together the olive oil, minced garlic, chopped rosemary, thyme, parsley, lemon juice, lemon zest, smoked paprika, crushed red pepper flakes, salt, and pepper untill fully combined.
- Marinate the chicken: Place the chicken breasts into a large resealable bag or shallow dish and pour the marinade over them. Ensure every piece is evenly coated. Seal and refrigerate for at least 2 hours, ideally overnight to maximize flavor infusion and tenderness.
- Preheat the grill: Heat your grill to medium-high, about 375°F to 400°F. Oil the grates lightly to prevent sticking.
- Grill the chicken: Remove chicken breasts from the marinade, letting excess drip off.Place on the grill and cook for 6-7 minutes per side,or until the internal temperature reaches 165°F. Resist the urge to flip too often-this allows the perfect char to form.
- rest and finish: Transfer the grilled chicken to a clean plate and let it rest for 5 minutes. This step locks in the juices, ensuring a tender bite.
- Garnish with a fresh lemon twist: Just before serving, add an extra squeeze of fresh lemon juice and a sprinkle of chopped parsley or thyme for brightness and a refreshing finish.
Tips for Success
- Marinating Time: While 2 hours is sufficient,marinating overnight deepens herb and citrus flavors,making the chicken incredibly tender.
- Grill Temperature: Keeping the grill at medium-high ensures a nice sear without drying out the chicken.
- Herb Variations: Substitute rosemary or thyme with fresh oregano or basil for a Mediterranean twist.
- Lemon Zest vs. Lemon Juice: zest adds aromatic oils and fragrance, complementing the acidity of the juice for a balanced bright profile.
- Make-Ahead: You can prep the marinade and chicken up to 24 hours ahead, storing them covered in the refrigerator.
- Indoor Cooking Option: To replicate the grill marks indoors, use a grill pan on the stovetop over medium-high heat, cooking similarly.
Serving Suggestions
Present your grilled chicken breasts on a rustic wooden board or vibrant serving platter. Accompany them with a fresh herb salad – perhaps a mix of baby arugula, cherry tomatoes, and shaved fennel, drizzled with a light lemon vinaigrette. For a hearty side,grilled asparagus or steamed quinoa tossed with pine nuts and parsley perfectly complements the dish. Garnish each chicken breast with thin lemon slices and a sprig of rosemary or thyme to enhance visual appeal and reinforce flavor cues.

| Nutrient | Per Serving |
|---|---|
| Calories | 280 kcal |
| Protein | 45 g |
| Carbohydrates | 3 g |
| Fat | 8 g |
For more inspiration, check out our Easy Herb-Marinated Grilled Chicken recipe. To explore the science behind grilling perfect chicken, this National Geographic grilling guide offers expert insights.
Q&A
Q&A: All About Zesty Grilled Chicken Breasts with Fresh Herbs & Lemon Twist
Q1: What makes this grilled chicken recipe “zesty”?
A1: The zestiness comes from a vibrant combination of fresh lemon juice and lemon zest, which infuses the chicken with bright, tangy notes. Paired with fragrant herbs like rosemary, thyme, and parsley, every bite bursts with lively, refreshing flavors that dance on your palate.
Q2: Can I use dried herbs if I don’t have fresh ones on hand?
A2: Absolutely! While fresh herbs provide a more aromatic and vibrant flavor, dried herbs can be a handy substitute. Just remember that dried herbs are more concentrated, so use about one-third the amount called for in fresh herbs to avoid overpowering the dish.
Q3: How do I ensure the grilled chicken breasts stay juicy and tender?
A3: Key tips include marinating the chicken for at least 30 minutes (or up to 2 hours) to let the citrus and herbs work their magic, grilling over medium heat to avoid drying out, and letting the meat rest a few minutes after grilling to allow the juices to redistribute.
Q4: What’s the best way to grill the chicken if I don’t have a grill?
A4: No grill? No problem! You can use a grill pan on your stove or even a broiler in your oven. Both achieve that lovely seared exterior and juicy interior. Just preheat your pan or broiler and keep a close eye to prevent burning,turning the chicken breasts halfway through cooking.
Q5: Can this recipe be adapted for other types of meat or vegetables?
A5: Definitely! The fresh herb and lemon marinade is versatile. It effectively works beautifully with salmon, shrimp, pork chops, or even hearty vegetables like zucchini and bell peppers. Adjust cooking times accordingly, and you’ll have a zesty, herbaceous dish every time.
Q6: What sides pair best with zesty grilled chicken breasts?
A6: The bright flavors of this chicken shine alongside simple, fresh sides. Think light quinoa salad, grilled asparagus, garlic mashed potatoes, or a crisp mixed greens salad with a light vinaigrette. These sides complement without competing, creating a balanced meal.
Q7: Can I prepare this dish ahead of time?
A7: Yes! You can marinate the chicken up to 24 hours in advance to deepen the flavors. For best texture, grill just before serving. if needed, cooked chicken can be stored in the fridge for 2-3 days and reheated gently to retain juiciness.
Q8: Any tips to enhance the lemon twist even more?
A8: for an extra zing, add a splash of lemon-infused olive oil or a sprinkle of lemon pepper seasoning after grilling. A few fresh lemon slices grilled alongside the chicken also add smoky citrus aroma that elevates the dish beautifully.
In Conclusion
these zesty grilled chicken breasts-with their vibrant medley of fresh herbs and a bright lemon twist-remind us that simple ingredients can create unusual flavors. whether served on a sunny patio or as the star of a weeknight dinner,this dish elevates familiar poultry into a celebration of freshness and zest. So next time you’re looking to impress your taste buds with minimal effort,let this recipe be your go-to guide for grilling greatness,were each bite bursts with sunshine and savor.
]]>Exploring the Rich Flavors Behind Sizzling Pepper Steak
Sizzling Pepper Steak and Rice is a beloved dish that unites a bold,peppery flavor profile with tender,savory beef and the comforting warmth of perfectly cooked rice. Originating from a fusion of Western and Asian culinary traditions, this dish captivates with its aromatic contrast-sharp black pepper melding seamlessly with rich soy and garlic notes. My first encounter with this classic was in a bustling city diner, where the sizzling sound alone stirred an appetite that few dishes could match. What sets it apart is the harmony between the juicy steak’s texture and the piquant heat of freshly cracked black pepper, creating an irresistible bite each time.
Prep and Cook Time
- Readiness: 15 minutes
- Cooking: 20 minutes
- Total Time: 35 minutes
Yield
Serves 4 hearty portions
Difficulty Level
Medium – Ideal for home cooks looking to impress with a quick yet flavorful meal
Ingredients
- 1 lb sirloin steak,thinly sliced against the grain
- 2 tbsp freshly cracked black pepper
- 3 cloves garlic,minced
- 1 medium onion,thinly sliced
- 2 tbsp soy sauce (preferably low sodium)
- 1 tbsp oyster sauce
- 1 tsp sesame oil
- 1 tbsp vegetable oil,plus extra for searing
- 1/2 cup beef broth
- 1 tsp cornstarch,dissolved in 1 tbsp water
- 2 cups cooked jasmine rice (see tips below)
- Optional garnish: sliced scallions and toasted sesame seeds
Instructions
- Prepare the rice: Begin by cooking your jasmine rice according to package instructions or using a rice cooker. For a fluffier texture,rinse the rice under cold water before cooking to remove excess starch.
- Marinate the steak: Toss the thinly sliced sirloin with soy sauce, oyster sauce, minced garlic, and half of the cracked black pepper.Allow it to marinate for 10 minutes to infuse the flavors deeply.
- Heat the pan: Use a heavy-bottomed skillet or cast iron pan over medium-high heat. Add the vegetable oil and wait until it shimmers-this ensures the perfect sear and sizzling sound.
- Sear the steak: Add the marinated beef in a single layer. Let it sear untouched for 1-2 minutes before stirring. Sauté until just browned and cooked through (about 3-4 minutes), then remove from the pan and set aside.
- Sauté the aromatics: In the same pan, add a touch more oil if needed. Toss in sliced onions and the remaining cracked black pepper. Sauté until the onions soften and become translucent, about 5 minutes, stirring regularly to release the pepper’s aroma.
- Deglaze and create sauce: Pour in the beef broth, scraping up any browned bits on the pan’s bottom for an added umami boost. Stir in sesame oil and the cornstarch slurry to thicken the sauce gently.
- Combine and simmer: Return the steak to the pan. Stir well to coat each piece in the glossy sauce.Simmer together for an additional 2 minutes to meld all flavors and achieve the signature sizzle and texture.
- Plate and serve: Spoon steaming jasmine rice onto plates first, then top generously with the sizzling pepper steak. Garnish with sliced scallions and sesame seeds for a fresh, textured finish.
Tips for Achieving the Signature Sizzle and Texture
High heat and minimal crowding of your pan are essential to capture the iconic sizzle. Use a heavy pan that retains heat well, such as cast iron, to sear the beef to perfection. Slice the steak thinly against the grain; this ensures tenderness without toughness. Freshly cracked black pepper releases volatile oils, creating a vibrant, mouth-tingling flavor-avoid pre-ground pepper for authentic depth. To achieve the right sauce consistency, add the cornstarch slurry gradually, stirring constantly to prevent lumps. resting the steak briefly after cooking locks in juices, keeping every bite juicy.
Choosing the Perfect Rice to Complement every Bite
While jasmine rice is a classic pairing because of its fragrant floral notes and fluffy texture, you can experiment with other varieties. Basmati rice offers a nutty aroma that pairs well with bold, peppery dishes. For a heartier experience, consider brown rice or even a wild rice blend that introduces earthy contrasts. When cooking rice for this dish, aim for a slightly sticky but not mushy finish-this allows each grain to soak up the savory juices of the pepper steak effortlessly.
Creative Twists to Elevate This Timeless Classic
To add an exciting dimension, try incorporating sliced bell peppers or shiitake mushrooms during the onion sauté stage for added texture and color. For a smoky depth, you can substitute black pepper with a blend of white and green peppercorns or introduce a touch of smoked paprika. Elevate freshness by garnishing with finely chopped fresh herbs such as cilantro or Thai basil. For a bold umami boost, a splash of fish sauce or a sprinkle of chili flakes can turn this comfort classic into a spicy sensation. serve with a side of quick pickled cucumbers or kimchi for a bright,tangy counterpoint.
Chef’s notes
- steak choice: Sirloin is affordable and tender enough,but ribeye or flank steak can work beautifully if you prefer richer or leaner cuts.
- Make-ahead tip: Marinate the steak up to 2 hours in advance and keep refrigerated, but cook fresh for best texture.
- Vegetarian option: Substitute beef with thick-cut king oyster mushrooms or firm tofu, adjusting cook time accordingly.
- Storage: Leftovers keep well for 2 days in an airtight container; reheat gently to avoid drying the steak.
- Internal link recommendation: For another satisfying rice and rich-flavor dish, check out our Creamy Chicken Rice Bowl recipe.
- External reference: Learn more about the health benefits of black pepper at WebMD’s Black Pepper Guide.
Serving Suggestions
Present this dish on a warm,shallow bowl to capture the steaming sauce. Garnish subtly with thinly sliced scallions and a scattering of toasted sesame seeds for texture and visual appeal. Adding a wedge of lime on the side introduces a refreshing citrus zing that balances the pepper’s heat. pair with simple steamed or stir-fried greens like bok choy or snap peas to keep the meal vibrant and wholesome. For drinks, a crisp white wine or light lager complements the savory richness perfectly.
| Nutrient | Per Serving |
|---|---|
| Calories | 420 kcal |
| Protein | 38 g |
| Carbohydrates | 45 g |
| Fat | 12 g |

Q&A
Q&A: Sizzling Pepper Steak and Rice – A Flavorful Classic Combo
Q1: What makes pepper steak such a beloved dish?
A1: Pepper steak is a timeless favorite because it perfectly balances bold, savory flavors with tender, juicy beef.The sizzling peppers add a vibrant crunch and a touch of spice that wakes up your taste buds, making every bite a delightful experience.
Q2: Why is rice the ideal partner for pepper steak?
A2: Rice acts as the perfect canvas for pepper steak’s rich, saucy goodness. It absorbs the flavorful juices, creating a comforting and well-rounded meal. Plus, its neutral taste complements the vibrant peppers and seasonings without overpowering them.Q3: How do different peppers influence the flavor profile?
A3: The type of pepper used can dramatically alter the dish’s character-bell peppers add sweetness and crispness,while jalapeños or chili peppers introduce a fiery kick. This flexibility allows cooks to customize the heat level and flavor depth to their liking.
Q4: Can pepper steak and rice be made quickly for a weeknight dinner?
A4: Absolutely! Despite its restaurant-worthy taste, pepper steak is surprisingly speedy to prepare. With a hot skillet and pre-cut ingredients, you can have this sizzling sensation on your table in under 30 minutes.
Q5: What are some creative twists to try with this classic combo?
A5: Try adding fresh herbs like cilantro or basil for a fragrant lift, or swap white rice for jasmine or brown rice to add extra texture and nutrition. For a smoky touch, toss in some charred peppers or a splash of soy sauce mixed with a hint of honey.
Q6: Is pepper steak a healthy meal option?
A6: When made with lean cuts of beef and plenty of fresh vegetables, pepper steak paired with rice can be a balanced and nutritious dish. It offers a satisfying source of protein, fiber, and vital vitamins, especially when served with colorful peppers.
Q7: How do you achieve that signature sizzling sound and aroma?
A7: The secret lies in cooking the beef and peppers over high heat in a hot skillet or wok. the quick searing locks in juices and caramelizes the ingredients,producing that enticing sizzle and mouthwatering aroma that make this dish so irresistible.
Q8: What’s the best way to serve pepper steak and rice for an extraordinary presentation?
A8: Plate the fluffy rice in a neat mound and spoon the pepper steak mixture generously over the top. Garnish with freshly chopped scallions or a sprinkle of sesame seeds for a pop of color and texture that’s sure to impress guests.
Whether you’re a seasoned cook or a curious food lover, sizzling pepper steak and rice offers a flavorful journey into bold flavors and satisfying comfort-a classic combo that never goes out of style.
Future Outlook
As the savory aroma of tender pepper steak mingles with fluffy, fragrant rice, it’s clear why this classic combo continues to captivate taste buds around the world. Whether enjoyed as a comforting weeknight dinner or a special meal to impress guests, sizzling pepper steak and rice brings together bold flavors and satisfying textures in perfect harmony. So next time you crave a dish that’s both hearty and vibrant, remember this timeless pairing-simple to prepare, unforgettable to savor. Your kitchen’s new favorite tradition awaits on the plate.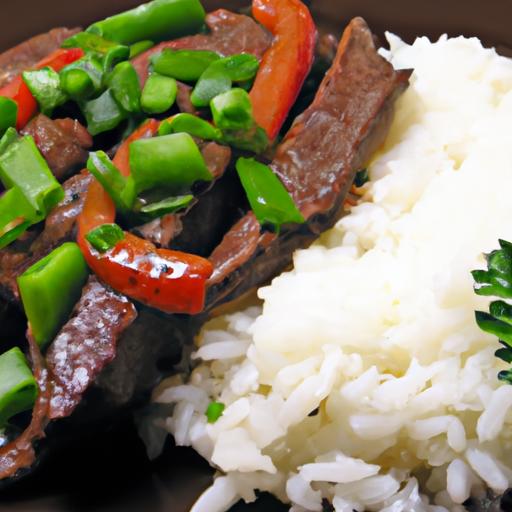
Brighten Your Table: Easy, Zesty Corn Salsa Recipe Guide
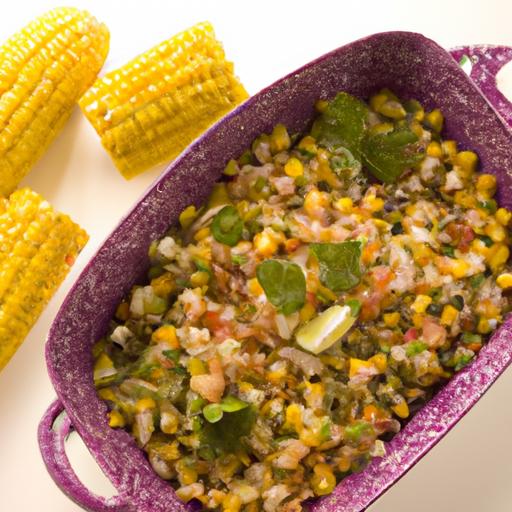
Brighten your table with a vibrant corn salsa that bursts with fresh flavors and bright colors. Originating from the southern regions of the United States and Mexico, this versatile salsa has become a beloved staple for summer cookouts and healthy snacks alike. Every bite offers a perfect harmony of sweetness from ripe corn, zing from zesty citrus, and warmth from carefully balanced spices. Whether you’re looking to refresh classic tacos or elevate your appetizer game, this easy corn salsa recipe invites you to embrace freshness and simplicity in one colorful dish.
Prep and Cook Time
- Prep Time: 15 minutes
- Cook Time: 10 minutes (optional for roasting corn)
- Total Time: 25 minutes
Yield
serves 4-6 as a side or dip
Difficulty Level
Easy
Ingredients
- 3 cups fresh corn kernels (about 4 medium ears, shucked)
- 1 medium red bell pepper, finely diced
- 1 small red onion, finely chopped
- 1 jalapeño, seeded and minced (adjust heat to preference)
- 1 cup cherry tomatoes, quartered
- 1/2 cup fresh cilantro, chopped
- Juice of 2 limes (about 3 tablespoons)
- 1 teaspoon ground cumin
- 1/2 teaspoon smoked paprika
- Salt and freshly ground black pepper, to taste
- 2 tablespoons olive oil
- Optional: 1 avocado, diced for creaminess
Instructions
- Prepare the corn: For a smoky depth, grill or roast the corn cobs over medium heat until lightly charred, about 8-10 minutes, turning frequently. Allow to cool, then slice off the kernels. Fresh, raw corn works beautifully too for a crisp texture.
- Combine the vegetables: In a large mixing bowl, add the corn kernels, diced red bell pepper, red onion, jalapeño, cherry tomatoes, and chopped cilantro. Toss gently to combine.
- Mix the dressing: In a small bowl,whisk together the lime juice,olive oil,ground cumin,smoked paprika,salt,and black pepper.The citrus should brighten but not overpower the spices.
- Marinate the salsa: Pour the dressing over the vegetable mixture and toss until all ingredients are evenly coated. For best results, let the salsa sit for at least 10 minutes to allow flavors to meld.
- Add creamy element (optional): Gently fold in diced avocado just before serving to add richness and balance the zesty lime.
- Adjust seasoning: Taste and add more salt or lime juice as needed to perfect the balance of flavors.
Chef's Notes: Tips for Success
- Roasting corn: Adds a smoky undertone that deepens the flavor profile but skip it for a crisp, raw freshness perfect for hot days.
- Heat level: adjust the jalapeño quantity or swap it for serrano peppers if you prefer more spice.
- Make ahead: Prepare up to 4 hours in advance and refrigerate. Freshen with a squeeze of extra lime before serving.
- Texture tips: For extra crunch, add finely chopped jicama or cucumber.
- Substitutions: Use frozen corn thawed and drained in a pinch, but fresh corn always Brightens Your Table best.
Serving Suggestions That Brighten Your Table
Serve this zesty corn salsa chilled or at room temperature alongside grilled chicken, fish tacos, or as a topping for baked potatoes. Garnish with a sprinkle of crumbled cotija cheese and a wedge of lime for added brightness and appeal. For casual entertaining, offer it with warm tortilla chips or atop crisp lettuce cups for a refreshing light bite. This salsa also pairs beautifully with avocado slices and smoky grilled meats, adding a delightful contrast that enlivens every forkful.

| Nutrient | Amount per Serving |
|---|---|
| calories | 110 kcal |
| Protein | 3 g |
| Carbohydrates | 18 g |
| Fat | 4 g |
For a deeper dive into seasonally inspired salsas, check out our Summer Fruit Salsa Recipes collection. To explore the history and health benefits of corn, visit the National Corn Growers Association.
Q&A
Q&A: Brighten Your Table with an Easy, Zesty corn Salsa Recipe
Q1: What makes corn salsa a grate addition to any meal?
A1: Corn salsa is a vibrant burst of color and flavor that instantly livens up your table.Its natural sweetness combined with zesty ingredients like lime juice and jalapeños creates a refreshing balance. It’s versatile, pairing beautifully with chips, tacos, grilled meats, or even as a topping for salads and bowls.
Q2: Is this corn salsa recipe difficult to prepare?
A2: Not at all! This recipe is designed for simplicity and speed. With just a handful of fresh ingredients and minimal prep, you can whip up a bright, zesty salsa in under 15 minutes-perfect for busy weeknights or last-minute gatherings.
Q3: What key ingredients give this salsa its signature zing?
A3: Fresh corn kernels provide the sweet base, while diced tomatoes add juiciness and color. The brightness comes from freshly squeezed lime juice, and the heat is layered in with chopped jalapeños or serranos. Fresh cilantro and a pinch of salt tie everything together with herbal and savory notes.
Q4: Can I customize the heat level in this corn salsa?
A4: Absolutely! The heat is entirely adjustable. for a mild salsa, reduce or omit the jalapeños. If you crave some serious kick,consider adding extra chilies,a dash of cayenne pepper,or even a drizzle of hot sauce. The key is to balance the flavors so the salsa remains bright and zesty.
Q5: How long can I store corn salsa, and does it lose its freshness?
A5: Fresh corn salsa is best enjoyed within 2-3 days when stored in an airtight container in the refrigerator. Over time,the corn may soften and the flavors can mellow,so for optimal zestiness and crunch,serve it fresh.
Q6: Can I use canned or frozen corn rather of fresh?
A6: While fresh corn is ideal for the best texture and flavor, canned or frozen corn can be a convenient substitute. If using canned, be sure to drain and rinse well to avoid excess saltiness. Frozen corn should be thawed and drained. The salsa may be slightly less crisp but still delicious.Q7: What are some creative ways to enjoy this corn salsa besides as a dip?
A7: The possibilities are endless! Spoon it over grilled chicken or fish for a bright topping, mix it into cooked quinoa or rice bowls for added texture, or use it as a filling for tacos and burritos. It also makes a lively side for scrambled eggs or avocado toast-perfect for morning or night.Q8: Any pro tips for making the salsa extra vibrant and flavorful?
A8: Yes! Toast the fresh corn kernels in a dry skillet until slightly charred for a smoky depth. Also, let the salsa rest for 10-15 minutes before serving to allow the flavors to meld. Lastly, always use fresh lime juice rather than bottled for that unmistakable zing.
Brighten your table and tantalize your taste buds with this easy, zesty corn salsa-because every meal deserves a splash of sunshine!
Future Outlook
As the final sprinkle of fresh cilantro settles into your zesty corn salsa, your table transforms from ordinary to extraordinary in mere minutes.This bright and breezy recipe isn’t just a dish-it’s an invitation to celebrate the vibrant flavors of summer any time of year. Whether you’re hosting a lively gathering or simply craving a fresh snack, this easy corn salsa brings a sunny splash of color and zest to every bite. So go ahead, brighten your table and your taste buds with this simple, irresistible recipe-you’ve just unlocked the secret to effortless, flavorful fun.