Bake perfect scones from scratch brings the timeless comfort of freshly baked, golden-topped treats right to your kitchen. Rooted in British teatime tradition, scones are delicate by nature-fluffy inside and tender to the bite, crowned with a crisp, buttery crust. My love affair with scones began on a misty morning in the English countryside, where each bite paired with clotted cream and jam felt like a warm hug. This recipe post unlocks the secrets behind achieving that flawless texture and invites you to experiment with creative flavor twists that transform humble scones into memorable delights.
prep and Cook Time
- Preparation: 15 minutes
- Resting: 10 minutes
- Baking: 12-15 minutes
- Total: 40 minutes
Yield
Yields 8 medium-sized scones-perfect for sharing or savoring over a few days.
Difficulty Level
Easy. Ideal for beginners, with simple steps that guarantee impressive results.
Ingredients
- 2 cups all-purpose flour, sifted for a light, airy crumb
- 1/4 cup granulated sugar, to add subtle sweetness
- 1 tablespoon baking powder, for that essential lift
- 1/2 teaspoon fine sea salt, to enhance flavor balance
- 6 tablespoons unsalted butter, cold and cubed for flakiness
- 3/4 cup whole milk, chilled to bind the dough gently
- 1 large egg, for richness and color
- Optional: 1 teaspoon vanilla extract or zest of 1 lemon for floral brightness
Instructions
- Preheat your oven to 400°F (200°C) and line a baking sheet with parchment paper or a silicone mat.
- Combine the dry ingredients: In a large mixing bowl,whisk together the flour,sugar,baking powder,and salt,ensuring even distribution for consistent rise.
- Cut in the butter: Using a pastry cutter or your fingertips, quickly work the cold butter into the dry mix until the mixture resembles coarse crumbs dotted with pea-sized butter pieces. Keep everything chilled to maintain flakiness.
- Mix wet ingredients: In a small bowl, beat the egg with milk and optional vanilla or citrus zest.
- Form the dough: Pour the wet mixture into the dry ingredients and stir gently with a fork or spatula until just combined. The dough should be slightly sticky but hold together-avoid over-mixing to preserve tenderness.
- Knead lightly: Turn the dough out onto a lightly floured surface and fold it over itself 3 to 4 times. This brief kneading develops the structure without toughening the scones.
- Shape and cut: Pat the dough into a 1-inch thick circle. Using a floured round cutter,cut out scones and place them on the prepared baking sheet,spacing them about 2 inches apart.
- Brush tops: Lightly brush each scone with a bit of milk or beaten egg for a luminous golden crust.
- Bake: Bake until risen and golden brown,about 12-15 minutes. Rotate the tray halfway through for even color.
- Cool briefly: Let scones rest for 5 minutes on a wire rack before serving to lock in softness.
Tips for Success
- Butter temperature: Use cold butter straight from the fridge to ensure flaky layers instead of dense dough.
- Avoid overworking: Handle dough as little as possible to keep scones tender and crumbly rather than tough.
- Resting time: Allowing the dough to rest for 10 minutes before cutting encourages better rise and flakiness.
- Milk substitutes: Whole milk offers richness, but you can use buttermilk for tang or dairy-free alternatives for dietary needs.
- Flavor variations: Add mix-ins like dried fruits, chopped nuts, or grated cheese to complement your sweet or savory preferences.
- Make ahead: Freeze unbaked scones on a tray, then transfer to a freezer bag.Bake them frozen, adding a few extra minutes to the bake time.
Serving Suggestions
Warm scones fresh from the oven and serve with a generous spoonful of clotted cream and fruit preserves, such as strawberry or raspberry jam. For a modern twist, spread goat cheese and honey or serve alongside a cup of Earl Gray tea or freshly brewed coffee. Garnish with a few edible flowers or a dusting of powdered sugar to elevate presentation for special occasions.

| Nutrient | Per Scone (approx.) |
|---|---|
| Calories | 190 |
| Protein | 4g |
| Carbohydrates | 26g |
| Fat | 7g |
For even more delightful baked treats,discover our Ultimate Batched Butter Biscuits recipe. For expert culinary science behind baking powders and dough aeration, visit King Arthur Baking’s official guide.
Q&A
Q&A: Bake Perfect Scones from Scratch – Easy Recipes Inside
Q: What’s the secret to baking perfect scones from scratch?
A: The secret lies in using cold ingredients, working quickly, and not overmixing the dough. Cold butter creates those flaky, tender layers, while minimal mixing keeps the scone light and crumbly instead of dense and tough. Think of it as a gentle dance with your dough!
Q: Can I customize the flavors in my scones?
A: Absolutely! Scones are a blank canvas waiting for your creativity. Classic add-ins include dried fruits like currants or cranberries, fresh berries, citrus zest, or even savory ingredients like cheese, herbs, or bacon bits. Just fold them in gently before shaping.
Q: Should I use baking powder or baking soda in my scones?
A: Baking powder is your best friend here because it provides a reliable rise in slightly acidic doughs. Baking soda needs an acidic ingredient to activate properly-so unless your recipe has buttermilk or yogurt, stick to baking powder for fluffier scones.
Q: How do I know when my scones are properly baked?
A: Golden brown tops and a skewer inserted into the center coming out clean are your go-to signals. They should feel firm but yield softly under gentle pressure. Don’t overbake - you want moist, tender insides with a lightly crisp crust.
Q: Can I make scones ahead of time?
A: Yes! You can prepare the dough, cut the scones, and freeze them on a baking sheet. Once frozen, transfer to a zip-top bag. Bake straight from frozen, adding a few extra minutes to the baking time. This way, fresh scones are always just minutes away.Q: What’s the ideal accompaniment for homemade scones?
A: Traditionalists love a dollop of clotted cream and a spoonful of jam. But don’t stop there-try honey, lemon curd, or even a smear of your favorite nut butter. Pair with a steaming cup of tea or freshly brewed coffee for the ultimate cozy experiance.
Q: Any tips for shaping scones without a cutter?
A: Certainly! You can shape the dough into a circle about one inch thick, then slice it like a pie into wedges. Alternatively, pat the dough into a rectangle and cut into squares or rectangles with a knife. Just be sure to handle the dough gently to keep those flaky edges intact.
Q: How do I avoid dry scones?
A: Overbaking is frequently enough the culprit. Keep an eye on your oven and remove scones as soon as they turn golden. also, ensure your dough isn’t too dry-if it feels crumbly before baking, a splash of milk or cream can bring it together perfectly.
Baking perfect scones isn’t just science; it’s a joyful ritual. With these tips and easy recipes at your fingertips, your homemade scones will be the star of every teatime!
Insights and Conclusions
Whether you’re a seasoned baker or just starting your culinary journey, mastering the art of perfect scones from scratch is a rewarding adventure that fills your kitchen with irresistible aromas and your table with warm, flaky delights. With these easy recipes in hand,you’re well-equipped to experiment,customize,and create scones that suit every taste-from classic buttery bites to adventurous berry-studded treats.So preheat your oven, gather your ingredients, and let each batch be a delicious reminder that homemade goodness is always just a whisk away. Happy baking!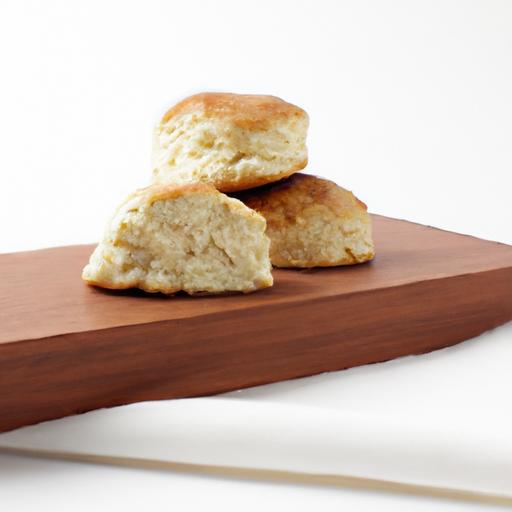
Bake Joy: Your Ultimate Homemade Brownie Mix recipe invites you to unlock the secrets behind a truly rich and fudgy brownie experience. Brownies have been a beloved indulgence since their debut in the late 19th century, but perfecting the balance of moistness, chewiness, and intense chocolate flavor remains a delightful challenge. Whether you crave a dense slice or a lighter bite, understanding the selection of your ingredients and mixing techniques elevates your brownies from good to unforgettable.
Prep and Cook Time
- Preparation: 15 minutes
- Cooking: 25-30 minutes
- Total Time: 40-45 minutes
Yield
- 12 generous servings
Difficulty Level
- Easy to Medium: Perfect for home bakers of all skill levels
Ingredients
- 1 cup (2 sticks) unsalted butter, melted
- 2 cups granulated sugar
- 3/4 cup unsweetened cocoa powder, sifted
- 1 teaspoon pure vanilla extract
- 1 teaspoon salt
- 1 cup all-purpose flour, sifted
- 4 large eggs, room temperature
- 1 cup semi-sweet chocolate chips (optional for added richness)
Step-by-Step Instructions
- Preheat your oven to 350°F (175°C). Line an 8×8-inch baking pan with parchment paper, leaving overhangs for easy removal.
- Combine the melted butter and granulated sugar in a large bowl. Stir until the mixture is glossy and smooth, signaling your brownies will be ultra-moist.
- Whisk in the unsweetened cocoa powder, vanilla extract, and salt until fully incorporated. This step builds the brownie’s rich flavor foundation.
- Add eggs, one at a time, whisking vigorously after each addition. This maintains the batter’s structure and prevents separation, ensuring a fudgy yet tender crumb.
- Fold in the sifted all-purpose flour gently using a rubber spatula.Overmixing here can lead to cakey brownies, so fold just until no streaks remain.
- Stir in chocolate chips for an explosive melty surprise in every bite-optional but highly recommended for chocolate aficionados.
- Pour the luscious batter into your prepared pan, spreading evenly to the edges.
- Bake for 25-30 minutes or until a toothpick inserted near the center comes out with moist crumbs but no wet batter. resist the urge to overbake to keep your brownies decadently soft.
- Cool completely in the pan on a wire rack before slicing to maintain clean edges and perfect texture.
Chef’s Notes: Tips for Success
- Cocoa Quality: Use a high-quality unsweetened cocoa powder for a deep chocolate flavor that packs a punch.
- butter Temperature: Melt butter slowly and cool slightly to avoid cooking eggs prematurely during mixing.
- Mixing method: Use a gentle fold when combining flour to keep brownies tender and fudgy rather than cakey.
- Make-Ahead: Brownie batter can be refrigerated for up to 24 hours. Bring to room temperature before baking for consistent results.
- Storage: Store cooled brownies in an airtight container at room temperature for up to 4 days or freeze for longer shelf life.
- Substitutions: For a dairy-free version, swap butter for coconut oil and use dairy-free chocolate chips.
Serving Suggestions
Serve these irresistibly fudgy brownies warm or at room temperature. Enhance presentation by dusting with powdered sugar or a drizzle of salted caramel sauce. A scoop of vanilla bean ice cream or a dollop of whipped cream contrasts beautifully with their dense, chocolate richness. For gatherings, consider topping with chopped toasted nuts or fresh berries for a burst of texture and color that complements their luscious flavor.

| Nutrient | Per serving |
|---|---|
| Calories | 320 kcal |
| Protein | 4 g |
| Carbohydrates | 45 g |
| Fat | 14 g |
For more expert baking insights and recipes to delight your sweet tooth, check out our ultimate chocolate dessert recipes. Dive deeper into the science of cocoa for authoritative knowledge on your ingredients at The Cocoa Research institute.
Q&A
Q&A: Bake Joy – Your Ultimate Homemade Brownie Mix Recipe
Q1: What makes this homemade brownie mix the “ultimate” one?
A1: The magic lies in its perfect balance of rich cocoa, just-right sweetness, and a hint of vanilla that comes together to create fudgy, decadent brownies every time. Plus, it’s versatile, easy to store, and comes with no preservatives-just pure, homemade joy!
Q2: Can I prepare this brownie mix ahead of time?
A2: Absolutely! One of the best things about this recipe is that you can mix the dry ingredients in advance and keep them airtight for up to three months.When a craving strikes, just add your wet ingredients and bake-you’re minutes away from brownie bliss.Q3: What are the essential ingredients in this mix?
A3: The stars of the show are unsweetened cocoa powder, all-purpose flour, sugar (brown and granulated for depth), baking powder, and a pinch of salt. These foundational ingredients ensure your brownies have that classic bold flavor and perfect texture.
Q4: Is this recipe adaptable for dietary needs?
A4: Definitely! For gluten-free brownies, swap all-purpose flour for a gluten-free blend. Want a vegan twist? Use flax eggs or applesauce and plant-based butter. The recipe’s flexible spirit means everyone can indulge in homemade brownie happiness.
Q5: How do I customize my brownies using this mix?
A5: Here’s where the fun begins: fold in chocolate chips, swirl in caramel, sprinkle chopped nuts, or add a dash of espresso powder to amplify the cocoa flavor. The base mix is your canvas-get creative and make it uniquely yours!
Q6: What’s the best way to store leftover brownies made from this mix?
A6: once baked, brownies are best kept in an airtight container at room temperature for up to four days. For longer freshness, pop them in the fridge or freeze in an airtight container for up to three months. When ready, a fast warm-up will bring back their gooey charm.
Q7: Can kids help with making this homemade brownie mix?
A7: Yes! Measuring and mixing dry ingredients is a safe, engaging activity that lets little bakers feel involved-and nothing beats the proud smile after tasting their creation. Just save the hot oven and melted butter steps for adult supervision.
Q8: How dose this homemade mix compare to store-bought options?
A8: Unlike many store-bought mixes, this recipe is free from artificial flavors, preservatives, and unnecessary fillers. You control every ingredient, ensuring freshness and wholesome goodness, plus the satisfaction of knowing it’s crafted by your own hands.
Q9: What tips can definitely help me achieve the perfect brownie texture?
A9: For fudgy brownies, avoid over-mixing once you add the wet ingredients-stir just until combined. Use high-quality cocoa powder and don’t overbake; pull them out when a toothpick shows a few moist crumbs. Let them cool to set that luscious texture.
Q10: Where can I find the full recipe for Bake Joy’s ultimate brownie mix?
A10: Dive into the full recipe and step-by-step guide in our article “Bake Joy: Your Ultimate Homemade Brownie Mix Recipe.” It’s your ticket to bakery-quality brownies right from your kitchen,ready to share and savor!
Insights and Conclusions
As the last crumbs of your homemade brownies vanish and the rich,chocolaty aroma lingers in your kitchen,remember that the true joy of baking lies not just in the final bite-but in the memories made along the way. With “Bake Joy: Your Ultimate Homemade Brownie Mix Recipe,” you’re equipped to whip up delightful treats anytime, turning simple ingredients into moments of sweet indulgence. So gather your loved ones, preheat that oven, and let every batch be a delicious reminder that homemade happiness is just a mix away. Happy baking!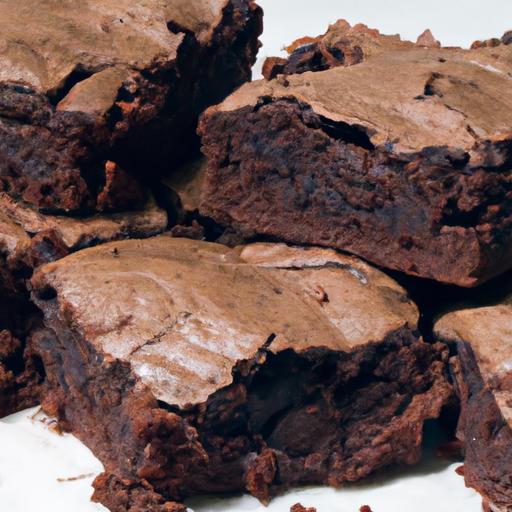
Boost Your Day: No Bake Peanut Butter Cacao Energy Bites are a powerhouse snack designed to fuel your body and satisfy your cravings with minimal effort. These delicious little orbs combine creamy peanut butter and rich cacao-two ingredients celebrated for their ability to deliver sustained energy and antioxidants-making them an ideal pick-me-up during your busiest moments.
Prep and Cook Time
Prep time: 15 minutes
Chill Time: 30 minutes
Total Time: 45 minutes
Yield
Makes approximately 20 energy bites
Difficulty Level
Easy – No baking,no complicated steps,and ready in under an hour.
Ingredients
- 1 cup rolled oats (gluten-free if preferred)
- ½ cup natural peanut butter (smooth or crunchy based on preference)
- ¼ cup raw cacao powder
- ⅓ cup honey or maple syrup for vegan option
- ¼ cup ground flaxseed or chia seeds for added fiber
- 1 tsp pure vanilla extract
- Pinch of sea salt
- Optional additions: mini chocolate chips, shredded coconut, chopped nuts, or dried fruit
Instructions
- Combine Dry Ingredients: In a large mixing bowl, stir together the rolled oats, raw cacao powder, ground flaxseed (or chia seeds), and sea salt until evenly mixed.
- Add Wet Ingredients: Pour the peanut butter, honey (or maple syrup), and vanilla extract over the dry mixture. Use a sturdy spoon or your hands to mix thoroughly until sticky and well combined.
- Customize Your Bites: If desired, fold in optional mix-ins like mini chocolate chips or chopped nuts for texture and flavor bursts.
- Form the Bites: With clean hands, scoop about one tablespoon of the mixture and roll tightly into balls. Place them on a parchment-lined baking sheet.
- Chill: Refrigerate the energy bites for at least 30 minutes to allow them to firm up and meld flavors beautifully.
- Store and Enjoy: Once set, transfer to an airtight container and keep refrigerated for up to 1 week or freeze for longer storage.
tips for Success
- Peanut Butter Choice: Use natural peanut butter without added sugars or oils for the cleanest flavor and healthiest option.
- Oats Texture: For a finer texture,pulse rolled oats in a food processor before mixing.
- Sweetness Level: Adjust honey or maple syrup to taste-less for a more bitter cacao punch,more for sweetness.
- Binding Issues: If mixture feels too crumbly, add a splash of unsweetened almond milk or extra peanut butter until it holds together well.
- Make ahead: Prepare a batch early in the week for quick, grab-and-go energy boosts anytime.
Serving Suggestions
Present your peanut butter cacao energy bites in a small decorative bowl or wrapped individually in parchment paper for convenient snacking on the go. Garnish with a light dusting of cacao powder or a sprinkle of crushed nuts for a gourmet finish. Pair with a glass of iced almond milk or a cup of green tea to complement the rich,nutty flavors.
| Nutrient | Amount per Bite |
|---|---|
| Calories | 95 kcal |
| Protein | 3 g |
| Carbohydrates | 10 g |
| Fat | 6 g |
| Fiber | 2 g |
Discover more wholesome snack inspiration by visiting our Healthy Snacking Ideas collection. For detailed nutritional insights on cacao’s benefits, explore this scientific overview from the National Institutes of Health.

Q&A
Q&A: Boost your Day with No Bake peanut Butter Cacao Energy Bites
Q1: What exactly are No Bake peanut Butter Cacao Energy Bites?
A: Think of them as your mini power-packed superheroes-bite-sized morsels made from wholesome ingredients like creamy peanut butter, rich cacao, oats, and a touch of natural sweetness. No baking required, just a quick mix and chill for an energizing treat that fuels your day!
Q2: Why should I choose these energy bites over othre snacks?
A: These energy bites strike the perfect balance between taste, nutrition, and convenience. They deliver sustained energy without the crash,thanks to the healthy fats from peanut butter,antioxidants from cacao,and fiber from oats. Plus, they’re naturally sweetened, gluten-free, and utterly delicious.
Q3: How long does it take to make them?
A: From start to finish, about 15-20 minutes.No oven time means you just combine,roll,and refrigerate. Perfect for busy mornings or mid-afternoon boosts when you need a quick, guilt-free pick-me-up.
Q4: Can I customize the recipe?
A: absolutely! Add chia seeds for extra omega-3s, shredded coconut for a tropical twist, or swap peanut butter for almond or sunflower seed butter if you’re allergic or craving variety. These bites are as flexible as your taste buds.Q5: How do these energy bites support my daily routine?
A: Packed with protein and healthy fats,they keep hunger at bay and energy steady. Whether you’re powering through work, hitting the gym, or chasing after kids, these bites help maintain focus and stamina without the sugar jitters.
Q6: Are these suitable for kids and picky eaters?
A: Yes! The naturally sweet and chocolatey flavor is usually a hit with all ages. Plus, they’re small and portable-great for lunchboxes, after-school snacks, or anytime cravings.
Q7: Where can I store these bites, and how long will they last?
A: Keep them in an airtight container in the fridge for up to one week, or freeze them in batches for up to a month. Just thaw a few minutes before enjoying your energizing treat.
Q8: What’s the best time of day to eat them?
A: Anytime you need a little boost! Morning coffee companion, pre- or post-workout snack, or even a midday energy lifter. These bites are the perfect little fuel stations for your busy life.Q9: Are these energy bites vegan and allergy-friendly?
A: The classic version is vegan-friendly if you use plant-based chocolate and avoid honey (replace it with maple syrup). For allergies, swap peanut butter with your preferred seed or nut butter. Always check ingredient labels to be safe!
Q10: Can these bites really replace a meal?
A: While nutrient-dense, they’re best as a snack rather than a full meal replacement. They complement your diet with quick energy and nutrition but pairing them with a balanced meal is ideal for sustained health.
Ready to supercharge your snack game? Whip up these no bake peanut butter cacao energy bites and watch your day get a whole lot brighter-in the most delicious way!
Closing Remarks
Ready to power through your day without the hassle of the kitchen? These no-bake peanut butter cacao energy bites are the perfect blend of rich flavor and quick nourishment, delivering a delicious boost whenever you need it. Packed with natural ingredients and easy to customize, they’re more than just a snack-they’re your new go-to fuel for busy mornings, afternoon slumps, or pre-workout bursts. Give your routine a tasty upgrade and let these little bites of energy keep you moving strong,one delicious nibble at a time.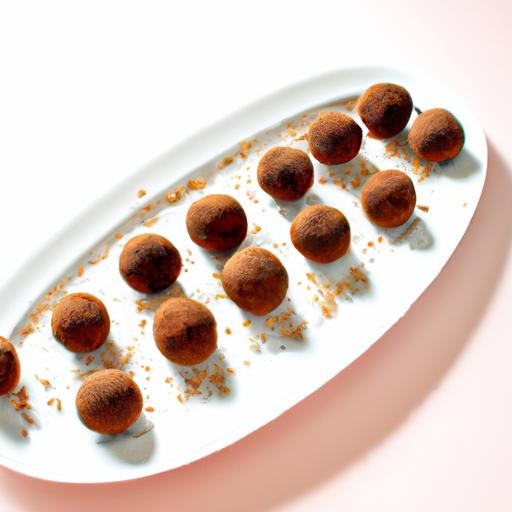
Bake Bliss: Your Ultimate Homemade Brownie Mix Recipe begins with the perfect harmony of carefully selected ingredients that create fudgy richness, unlocking deep flavor notes from premium cocoa and luscious quality chocolates. This recipe brings passion to every bite, ensuring a chewy texture that delights and satisfies even the most discerning chocolate lovers.
Prep and Cook Time
- Prep Time: 15 minutes
- Cook Time: 25 minutes
- Total Time: 40 minutes
Yield
Serves 12 generous, decadent brownies
Difficulty Level
Easy to Medium – Perfect for home bakers seeking a foolproof, customizable brownie recipe.
Ingredients
- 1 cup unsalted butter, melted and slightly cooled
- 1 ½ cups granulated sugar
- 3/4 cup light brown sugar, packed
- 4 large eggs, at room temperature
- 2 tsp pure vanilla extract
- 1 cup premium unsweetened cocoa powder, sifted
- 1 cup all-purpose flour, sifted
- 1 tsp fine sea salt
- 1 tsp baking powder
- 1 ½ cups high-quality bittersweet or semisweet chocolate chips
- Optional mix-ins: 1/2 cup walnuts, pecans, or dried cherries
- Optional toppings: sea salt flakes, caramel drizzle, or toasted coconut flakes
Instructions
- Preheat your oven to 350°F (175°C). Line a 9×13 inch baking pan with parchment paper, letting some overhang for easy removal.
- In a large bowl, whisk together the melted butter, granulated sugar, and brown sugar untill smooth and glossy. This ensures a shiny crust and rich flavor.
- Add the eggs one at a time, whisking vigorously after each addition to create structure and airiness.
- Mix in the vanilla extract, giving the batter its comforting aromatic base.
- In a separate bowl,sift together the cocoa powder,flour,salt,and baking powder. This step eliminates lumps and guarantees even batter consistency.
- Gradually fold the dry ingredients into the wet mixture using a spatula. Stop mixing as soon as the flour disappears to avoid dense brownies.
- Stir in the chocolate chips and any chosen mix-ins, distributing them evenly for melty pockets of joy in every bite.
- pour the batter into the prepared pan, spreading it evenly with a spatula. For elevated texture, sprinkle optional sea salt flakes or toppings before baking.
- Bake for 22-25 minutes until the edges are set but the center still looks slightly fudgy. Insert a toothpick for a few moist crumbs, not clean, to keep that irresistible chew.
- Cool in the pan on a wire rack for at least 30 minutes before slicing to preserve the fudgy texture.
Tips for Success
- Use room temperature eggs for proper emulsification and volume.
- For ultra-fudgy brownies, don’t overbake; keep close watch after 20 minutes.
- Experiment with mix-ins like roasted nuts, espresso powder, or orange zest to highlight the premium cocoa’s complex flavors.
- Try substituting half of the butter with coconut oil for subtle richness and a hint of tropical aroma.
- Store brownies covered at room temperature for up to 3 days or freeze for longer freshness.
Serving Suggestions
Serve your homemade brownies slightly warm with a scoop of vanilla bean ice cream or a drizzle of salted caramel for a decadent treat. Sprinkle freshly chopped nuts or a dusting of powdered sugar for added elegance. Pair with a robust cup of coffee or a rich red wine to truly unlock the layers of flavor in these chewy delights.

Nutritional Information
| Nutrient | Per Serving |
|---|---|
| Calories | 310 |
| Protein | 4g |
| Carbohydrates | 38g |
| fat | 16g |
For a deeper understanding of cocoa varieties and their flavor profiles, visit the Cocoa Project.
Explore more delightful dessert recipes in our Ultimate Chocolate Desserts Collection to satisfy your sweet tooth with ease and creativity.
Q&A
Q&A: Bake Bliss – Your Ultimate Homemade Brownie Mix Recipe
Q1: what makes Bake Bliss the ultimate homemade brownie mix?
A1: Bake Bliss combines the simplicity of a ready-to-use mix with the wholesome charm of baking from scratch. Crafted from premium cocoa, unbleached flour, and just the right amount of sugar, it offers a rich, fudgy texture that melts in your mouth. Plus, it’s free from preservatives and artificial flavors-bringing you pure, homemade bliss in every bite.
Q2: How easy is it to prepare brownies using this mix?
A2: Super easy! Just combine your Bake Bliss base with a few fresh ingredients like eggs, butter, and perhaps a splash of vanilla. Mix, pour into your pan, and bake. Whether you’re a seasoned baker or a newbie, the clear step-by-step instructions ensure success without stress.Q3: Can I customize my brownies with this mix?
A3: Absolutely! Bake Bliss is like a blank canvas waiting for your creativity. Toss in nuts, swirl in caramel, sprinkle sea salt, or fold in chocolate chips.The mix’s balanced flavor supports endless variations, making each batch uniquely yours.
Q4: Is Bake Bliss suitable for dietary preferences or restrictions?
A4: While the basic mix includes common ingredients, you can adapt it easily. Swap butter for plant-based oils to cater to dairy-free diets, or use egg substitutes. the recipe is flexible, inviting you to experiment and make it your own.
Q5: what storage tips help keep Bake Bliss fresh?
A5: Store the dry mix in an airtight container, away from moisture and heat, to preserve its freshness for up to three months. Once baked, brownies are best enjoyed within a few days but can be frozen to extend their joy.
Q6: Why should I choose homemade over store-bought brownie mixes?
A6: Homemade mixes like Bake Bliss empower you with control over ingredients, flavor, and texture while avoiding unneeded additives. It’s a way to reconnect with baking’s heartfelt tradition-inviting love, warmth, and a sense of accomplishment into your kitchen.
Q7: What tips can enhance my baking experience with Bake Bliss?
A7: Use room-temperature eggs and melted butter for a smoother batter. Don’t overmix-fold ingredients gently to keep the brownies tender.Keep an eye on baking time; pulling brownies out slightly underdone results in that irresistible fudgy center.
With Bake Bliss, your homemade brownies become more than just a dessert-they’re an experience of comfort, creativity, and pure chocolate joy. Ready to bake your bliss?
Key Takeaways
As you close the oven door and let those rich, fudgy layers come to life, remember that Bake Bliss isn’t just a recipe-it’s a gateway to homemade happiness. With this ultimate brownie mix in your pantry, indulgent moments are always within reach, whether it’s a spontaneous craving or a planned festivity. So gather your ingredients, unleash your inner baker, and savor the joy that only a perfect homemade brownie can deliver. After all, bliss is best baked fresh.

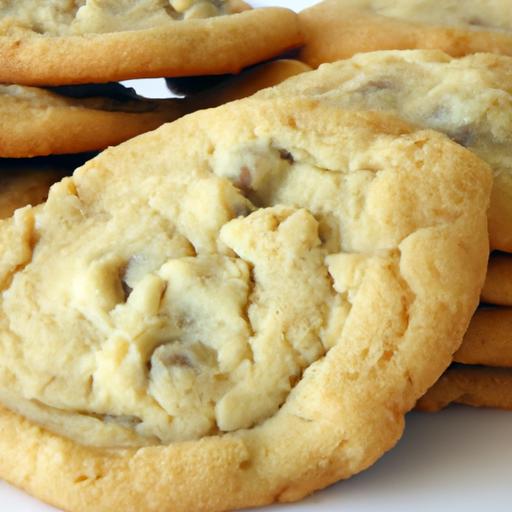
Bake Bliss begins with mastering the art of perfectly chewy and crispy cookies-an irresistible harmony every baker dreams of achieving. Whether it’s the nostalgic scent of warm chocolate chip cookies or the crisp snap of a spiced ginger biscuit, this recipe unlocks classic techniques blended with decadent flavor twists to elevate your homemade creations to bakery-worthy status.With precise ingredients, foolproof methods, and expert decorating tips, you’ll soon create cookies that delight both the eye and the palate.
Prep and cook Time
- Preparation: 15 minutes
- Chilling: 1 hour
- Baking: 12-15 minutes
- Total time: Approximately 1 hour 30 minutes
Yield
Makes approximately 24 medium-sized cookies
Difficulty Level
Easy to Medium – approachable for beginners,with tips to refine texture and flavors for more experienced bakers
Ingredients
- 1 cup unsalted butter,softened
- 1 cup packed light brown sugar
- ½ cup granulated sugar
- 2 large eggs,at room temperature
- 2 teaspoons pure vanilla extract
- 2 ¼ cups all-purpose flour,sifted
- 1 teaspoon baking soda
- ½ teaspoon fine sea salt
- 1 cup semi-sweet chocolate chips or chunks
- Optional: ½ cup chopped toasted pecans or walnuts for added crunch
- Optional: Flaky sea salt for sprinkling on top before baking
Instructions
- Preheat your oven to 350°F (175°C). Line two baking sheets with parchment paper for even baking and easy cleanup.
- Cream the butter and sugars: In a large mixing bowl,beat the softened butter with light brown sugar and granulated sugar using an electric mixer until the mixture is light and fluffy,about 3-4 minutes. This aeration is key to achieving a soft yet chewy texture.
- Add eggs and vanilla: Beat in the eggs one at a time,ensuring each is fully incorporated before adding the next.Stir in the vanilla extract for that deep, sweet aroma.
- Combine dry ingredients: In a separate bowl, whisk together the sifted flour, baking soda, and sea salt. Gradually add these dry ingredients to the wet mixture, mixing gently to avoid overworking the dough, which could dry out your cookies.
- Fold in chocolate chips and nuts: Using a spatula, carefully fold in the chocolate chips and optional nuts, distributing them evenly while preserving the dough’s tenderness.
- Chill the dough: For best results, cover the bowl with plastic wrap and refrigerate for at least 1 hour. This step solidifies the butter, helping cookies spread uniformly and develop deeper flavors.
- Scoop and shape: Using a cookie scoop or tablespoon, drop rounded balls of dough onto the prepared baking sheets, spacing them about 2 inches apart to allow for spreading.
- Optional finishing touch: Lightly sprinkle a pinch of flaky sea salt atop each dough mound to contrast the rich sweetness and enhance complexity.
- Bake: Place trays in the preheated oven and bake for 12-15 minutes, or until edges are golden brown but centers remain soft. Rotate sheets halfway through for even baking.
- Cool: Let cookies rest on the baking sheet for 5 minutes before transferring them to wire racks to cool wholly – this prevents breaking and preserves crisp edges.
Tips for Success
- Butter matters: Use real unsalted butter for optimal flavor and texture. Margarine or low-fat substitutes won’t yield the same chewiness and crispness.
- Don’t skip chilling: Chilling solidifies fats, preventing excessive spreading and deepening taste complexity. If short on time, freeze dough balls for 20 minutes rather.
- Mix-ins innovation: Swap classic chocolate chips for white chocolate,dried cherries,or toffee bits for exciting flavor combinations.
- Adjust sweetness: For less sweet cookies, reduce granulated sugar by 2 tablespoons, balancing moisture while maintaining chewiness.
- Decorating like a pro: For festive occasions, decorate cooled cookies with royal icing or melted chocolate before adding edible glitter or sprinkles for visual flair.
- Storage: Keep cookies fresh by storing in an airtight container at room temperature for up to 5 days, or freeze baked cookies for up to 3 months.
Serving Suggestions
Serve these cookies warm with a tall glass of cold milk or a steaming cup of coffee to amplify their comforting qualities. For gatherings, arrange an elegant platter adorned with fresh berries, edible flowers, or a drizzle of homemade caramel sauce for a decadent presentation. adding a sprinkle of coarse kosher salt just before serving intensifies both the sweet and savory notes,creating an unforgettable bite.

| Nutrition | Per Cookie (approx.) |
|---|---|
| Calories | 150 kcal |
| Protein | 2 g |
| Carbohydrates | 20 g |
| Fat | 7 g |
For even more delicious baking inspiration, check out our Classic Chocolate Chip Cookie Recipe, were we dive deeper into texture variations and flavor profiles.Additionally, learn about the science behind baking chemistry at King Arthur Baking’s Science Guide to perfect your cookie craft.
Q&A
Q&A: Bake Bliss – Irresistible Homemade Cookie Recipes to Try Today
Q1: What makes homemade cookies so special compared to store-bought ones?
A1: Homemade cookies carry a sprinkle of love and creativity that no store-bought cookie can replicate. From selecting your favorite ingredients to customizing flavors and textures, baking at home allows you to craft cookies tailored to your cravings. Plus, the aroma filling your kitchen? Absolutely unbeatable!
Q2: Can beginners successfully bake these cookie recipes?
A2: Absolutely! “Bake Bliss” is designed with bakers of all levels in mind. The step-by-step instructions and helpful tips make these recipes approachable, fun, and foolproof-even if you’ve never cracked an egg before.
Q3: What are some standout cookie recipes featured in the article?
A3: Prepare to be tempted by classics like Chewy Chocolate Chip, crisp and buttery Lemon Shortbread, and adventurous flavors like Spiced Chai Snickerdoodles. Each recipe offers a unique twist ensuring there’s a perfect cookie for every mood.
Q4: how can I customize these recipes to suit dietary restrictions?
A4: The article includes handy substitutions such as gluten-free flour blends, dairy-free alternatives, and natural sweeteners to accommodate various diets. Baking delicious cookies without compromise has never been easier!
Q5: What’s the secret to achieving the perfect texture in homemade cookies?
A5: It’s all about balance! The right mix of wet to dry ingredients, precise baking times, and oven temperature create that ideal harmony between soft, chewy, and crispy edges. Our recipes highlight these elements with insider tips to help you master that perfect bite.
Q6: Can these cookies be made ahead and stored?
A6: Yes! Most cookies keep well for several days at room temperature when stored in airtight containers. Some recipes also freeze beautifully, allowing you to bake in batches and enjoy fresh cookies anytime.
Q7: how can “Bake Bliss” inspire my baking routine?
A7: Beyond recipes, “Bake Bliss” sparks inspiration through creative flavor combinations, beautiful presentation ideas, and encouragement to experiment. It turns baking from a chore into a joyful, blissful experience that delights both baker and taste buds alike.
In Summary
As the sweet aroma of freshly baked cookies wafts through your kitchen, remember that Bake Bliss is more than just a collection of recipes-it’s an invitation to create moments of joy, warmth, and comfort from the simplest ingredients. Whether you’re a seasoned baker or just beginning your cookie journey, these irresistible homemade treats offer endless opportunities to experiment, savor, and share. So preheat your oven, gather your favorite ingredients, and let the magic of baking fill your home with happiness-one delicious cookie at a time.Your next indulgent bite is just a recipe away.