Mini pizza bites are undeniably the perfect crowd-pleasers - bite-sized parcels bursting with rich, savory flavors that ignite the senses from the very first nibble. Rooted in the timeless Italian tradition of pizza-making, these delightful morsels marry the art of crafting tender dough with vibrant sauces and imaginative toppings. Whether served as party snacks or a cozy family treat, mastering their components ensures every mini pizza bite delivers a symphony of textures and tastes that captivate and comfort.
Prep and Cook Time
- Preparation: 20 minutes
- Rising: 1 hour
- Cooking: 12-15 minutes
- Total Time: Approximately 1 hour 35 minutes
Yield
Makes about 24 mini pizza bites, perfect for a small gathering or family snack time.
Difficulty Level
Easy to Medium – ideal for home cooks with some basic dough experience but entirely approachable for adventurous beginners.
Ingredients
- For the dough:
- 2 ½ cups all-purpose flour, sifted
- 1 teaspoon active dry yeast
- 1 teaspoon sugar
- ¾ cup warm water (about 110°F or 43°C)
- 2 tablespoons olive oil, extra virgin
- 1 teaspoon salt
- For the sauce:
- 1 cup crushed tomatoes (preferably san Marzano for authentic taste)
- 2 cloves garlic, minced
- 1 teaspoon dried oregano
- 1 teaspoon olive oil
- Salt and freshly ground black pepper, to taste
- Pinch of red chili flakes (optional, for a subtle kick)
- Toppings: (choose your favorites!)
- ½ cup shredded mozzarella cheese
- ¼ cup mini pepperoni slices
- ¼ cup sliced black olives
- ½ cup fresh basil leaves, chopped
- ¼ cup sun-dried tomatoes, finely chopped
- Optional: roasted bell peppers, caramelized onions, or crumbled feta
Instructions
- Activate the yeast: in a small bowl, combine warm water, sugar, and yeast. stir gently and let it sit for 5-7 minutes until frothy and bubbly - a sign your yeast is alive and ready to work.
- Prepare the dough: In a large mixing bowl, combine sifted all-purpose flour and salt. Create a small well in the center and pour in the yeast mixture along with olive oil. Mix with a wooden spoon until it starts to come together, then knead on a floured surface for 8-10 minutes until smooth and elastic.The dough should be slightly tacky but not sticky.
- Let it rise: Place the dough in a clean, lightly oiled bowl, cover with a damp towel or plastic wrap. Allow it to rise in a warm spot for about 1 hour,or until it doubles in size.
- Prepare the sauce: while the dough rises, heat olive oil in a small saucepan over medium heat. Add minced garlic and sauté until fragrant but not browned, about 1 minute. Stir in crushed tomatoes,oregano,salt,pepper,and optional chili flakes. let the sauce simmer gently for 10-12 minutes, stirring occasionally until thickened. Remove from heat and set aside.
- Preheat your oven: Set your oven to 425°F (220°C). Line a baking sheet with parchment paper or a silicone mat to prevent sticking and ensure even baking.
- Form the mini pizza bites: Punch down the risen dough and divide it into 24 equal portions. Roll each piece into a small ball and flatten slightly.Arrange on the prepared baking sheet about 1 inch apart.
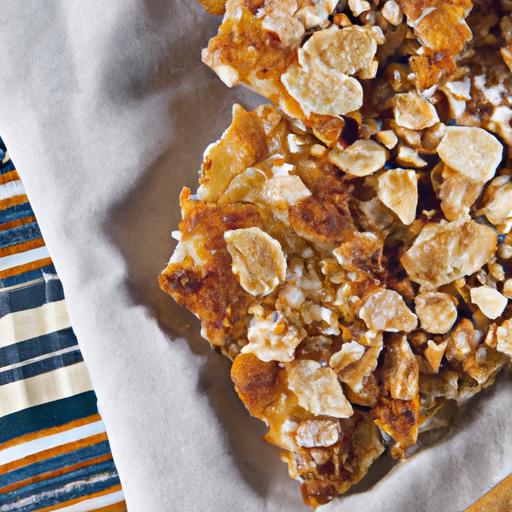
- Assemble: Spoon a teaspoon of the tomato sauce onto each dough round, spreading slightly but leaving the edges visible. Top with shredded mozzarella and your chosen toppings - a pepperoni slice, olive, or a sprinkle of basil really elevate both flavor and appearance.
- Bake: Place the baking sheet in the preheated oven and bake for 12-15 minutes, or until the edges are golden brown and cheese is melted and bubbly. For an extra-crispy bottom, swap the parchment for a pizza stone preheated in the oven.
- Cool and garnish: Remove from oven and let cool 3-5 minutes before transferring to a serving plate.Garnish with fresh basil or a light drizzle of good-quality olive oil for a finishing touch.
Tips for Success
- Dough variations: For a gluten-free option,substitute 2 cups gluten-free flour blend with ½ cup almond flour; adjust liquid slightly.
- Make-ahead magic: Dough can be prepared a day in advance and refrigerated.Bring to room temperature and punch down before shaping.
- Sauce shortcuts: Use a quality store-bought marinara if pressed for time, adding fresh garlic and oregano to ramp up flavor.
- Even baking: Rotate the baking sheet halfway through to ensure consistent browning and crispiness.
- Prevent sogginess: Avoid overloading each bite with sauce or wet toppings. A teaspoon-sized amount maintains balance.
Serving Suggestions
Perfectly warm and crisp, serve these mini pizza bites nestled on a rustic wooden board lined with parchment. Accompany with a tangy marinara dipping sauce or a garlic-infused ranch for added indulgence. Fresh basil, a sprinkle of chili flakes, or grated Parmesan elevate presentation and flavor. Pair with a chilled glass of sparkling water or your favorite craft soda to make snack time feel like a festivity.

| Nutritional Info (per 4 bites) | Amount |
|---|---|
| Calories | 210 kcal |
| Protein | 9 g |
| Carbohydrates | 25 g |
| Fat | 7 g |
For those eager to explore more dough innovations, check out our Perfect Pizza Dough Basics guide. Additionally, dive into the rich history and science behind yeast and baking on King Arthur Baking’s Yeast Guide.
Q&A
Q&A: Mini Pizza Bites – A Simple, Tasty Homemade Recipe Guide
Q1: What exactly are mini pizza bites?
A1: Mini pizza bites are delightful, bite-sized versions of classic pizza-think of them as tiny flavor-packed parcels bursting with gooey cheese, savory sauce, and your favorite toppings. perfect for snacking, parties, or a fun appetizer!
Q2: Why make mini pizza bites at home instead of buying frozen ones?
A2: Homemade mini pizza bites offer unbeatable freshness and customization. You control the ingredients, tailor the flavors to your liking, and avoid preservatives or unwanted additives. plus,the joy of baking from scratch is a rewarding kitchen adventure!
Q3: What basic ingredients do I need for this recipe?
A3: The essentials are simple: pizza dough (store-bought or homemade),pizza sauce,shredded mozzarella cheese,and your favorite toppings-think pepperoni,mushrooms,olives,or fresh basil. Don’t forget a dash of olive oil and some Italian seasoning for that authentic flair.Q4: How do I make the dough if I don’t want to buy it?
A4: A basic pizza dough recipe combines flour, yeast, warm water, olive oil, salt, and a pinch of sugar. Mix, knead until smooth, and let it rise for about an hour. This fresh dough forms the perfect chewy and crisp base for your mini bites.
Q5: How should I shape and assemble the pizza bites?
A5: Roll out the dough thinly, cut into small circles or squares (about 2 inches). Spoon a little pizza sauce onto each piece, sprinkle with cheese, add toppings, then fold or cover with another dough piece to form mini pockets. Seal the edges well!
Q6: What’s the best baking method and temperature?
A6: Preheat your oven to 400°F (200°C).Place the pizza bites on a parchment-lined baking sheet, brush with olive oil for a golden finish, and bake for 12-15 minutes until they’re puffed up and golden brown.
Q7: Can I freeze mini pizza bites to save for later?
A7: Absolutely! Freeze them before baking by placing on a tray, freeze until firm, then transfer to a freezer bag.Bake from frozen,adding a few extra minutes. This way, you’ll always have a quick, scrumptious snack on hand.
Q8: Any tips to jazz up the flavor?
A8: Experiment with different cheeses like sharp cheddar or spicy pepper jack. Add herbs like oregano or red pepper flakes to the sauce. A garlic butter brush before baking adds a savory, aromatic touch that’s hard to resist.
Q9: Are mini pizza bites kid-amiable?
A9: Totally! Their small size and customizable nature make them perfect for picky eaters. Let kids choose their own toppings-it’s a fun way to get them involved in cooking and excited about mealtime.Q10: What dipping sauces pair well with mini pizza bites?
A10: Classic marinara or ranch dressing work beautifully. For a twist, try garlic aioli, spicy sriracha mayo, or a creamy pesto dip. the right sauce elevates your mini bites from tasty treats to irresistible morsels.
Q11: How can I make this recipe gluten-free or vegan?
A11: Use gluten-free pizza dough or a cauliflower crust for a gluten-free option.For vegan bites,swap the cheese for plant-based alternatives and ensure your sauce contains no animal products. The result? Appetizing inclusivity that everyone can enjoy!
Q12: What occasions are mini pizza bites perfect for?
A12: From casual movie nights and game days to birthday parties and potlucks, mini pizza bites bring a crowd-pleasing charm.Their portability and mess-free nature make them a standout finger food for any gathering.
With these mini pizza bites at your fingertips, you’re set to impress guests or satisfy your snack cravings with a simple, tasty homemade delight. Ready, set, bake!
to Conclude
Whether you’re whipping these mini pizza bites up for a quick snack, a party appetizer, or a fun family activity, this simple recipe proves that deliciousness doesn’t have to be complicated. With just a handful of ingredients and a sprinkle of creativity, you can craft bite-sized wonders that satisfy any craving. So next time hunger strikes or guests arrive, remember: these tiny pizzas pack big flavor, and making them at home is easier (and more rewarding) than you think. Happy baking-and even happier tasting!
Hearty Stuffed Bell Pepper Casserole transforms the humble bell pepper into a vibrant celebration of rich textures and comforting flavors. This dish showcases tender peppers filled with a savory medley of meat, rice, and aromatic herbs, baked together in a luscious tomato sauce that brings each bite to life. Rooted in classic home cooking,it’s the ultimate satisfying meal that’s as visually stunning as it is delicious-perfect for family dinners or meal-prep lunches.
Prep and Cook Time
- Readiness: 20 minutes
- Cooking: 45 minutes
- Total Time: 1 hour 5 minutes
Yield
Serves 6 hearty portions
Difficulty Level
Medium – perfect for home cooks ready to master layering flavors and textures
ingredients That Elevate Yoru Stuffed Bell Pepper Casserole to the Next Level
- 6 large bell peppers (choose a mix of red, yellow, and orange for a colorful presentation)
- 1 lb lean ground beef or ground turkey for a lighter alternative
- 1 cup long-grain white rice, rinsed
- 1 medium yellow onion, finely chopped
- 3 cloves garlic, minced
- 1 can (14 oz) crushed tomatoes
- 1/2 cup tomato sauce-adds depth and moisture to the casserole
- 1 tsp smoked paprika-for a subtle smoky undertone
- 1 tsp dried oregano or fresh if available
- 2 tbsp fresh parsley, chopped, for brightness
- 1 cup shredded sharp cheddar cheese, divided
- 1/2 cup beef broth or vegetable broth to keep peppers juicy
- salt and freshly cracked black pepper to taste
- 2 tbsp olive oil for sautéing
- Optional kick: pinch of crushed red pepper flakes or 1 tsp chipotle powder
Mastering Flavor Balance Through Seasoning and Sauces
Building depth starts with perfect seasoning. Saute the onions and garlic in olive oil until soft and fragrant, this releases their natural sweetness that balances the tangy crushed tomatoes. The smoked paprika adds warmth without overpowering, while oregano offers herbaceous notes that complement the richness of the meat. A touch of broth poured around the peppers before baking ensures the casserole stays moist and tender, preventing dryness. Finish with shredded cheddar-it melts into gooey pockets of comfort, tying each bite together harmoniously.
step by Step Guide to Achieving the Perfectly Tender and Juicy Peppers
- Prepare the peppers: Slice the tops off each bell pepper and remove seeds and membranes, keeping the peppers whole.Lightly blanch them in boiling water for 3 minutes to soften, then drain and set aside.
- Sauté the filling: Heat olive oil in a large skillet over medium heat. Add the chopped onions and garlic, cooking until translucent (about 5 minutes).
- Brown the meat: add ground beef to the skillet, breaking it apart as it cooks. season with salt, pepper, smoked paprika, and oregano.Once browned, stir in rinsed rice and cook for 2 minutes to toast slightly.
- Add tomatoes and broth: Stir in the crushed tomatoes, tomato sauce, and beef broth. Let simmer for 10 minutes to meld flavors and partially cook the rice.
- Fill the peppers: Spoon the rich meat and rice mixture into each bell pepper, packing it firmly but gently. place peppers upright in a baking dish.
- Top and bake: Pour a little broth into the baking dish around the peppers. Sprinkle shredded cheddar over the tops. Cover with foil and bake at 375°F (190°C) for 30 minutes.
- Finish uncovered: Remove the foil and bake for an additional 10-15 minutes until the cheese is golden and bubbly,and the peppers are tender but still hold their shape.
Pro Tips for Customizing Your Casserole with Fresh and Hearty Additions
Boost texture and nutrition by mixing in finely chopped mushrooms or diced zucchini with your filling. For a vegetarian twist, swap the ground beef for lentils or quinoa, and use vegetable broth. Adding fresh herbs like basil or cilantro just before serving adds aromatic freshness. If you prefer some heat, stir in diced jalapeños or a drizzle of your favorite hot sauce. Leftovers reheat beautifully, making this casserole a perfect make-ahead dish that deepens in flavor overnight.
Chef’s Notes
- Rice substitution: For a gluten-free option, swap white rice for quinoa or cauliflower rice, adjusting cooking times accordingly.
- Cheese variations: Monterey jack, mozzarella, or a sprinkle of parmesan add different layers of gooeyness and tang.
- Making ahead: Assemble the casserole fully,then refrigerate for up to 24 hours before baking to enhance the melding of flavors.
- Troubleshooting: If your peppers are not tender enough after baking, cover with foil and bake an extra 10 minutes with a splash of broth.
Serving Suggestions
Present your casserole with a fresh green salad tossed in a zesty vinaigrette or steamed seasonal vegetables like green beans or asparagus to balance the rich filling. Garnish with additional freshly chopped parsley or a sprinkle of paprika for color contrast. A dollop of sour cream or tangy Greek yogurt on the side provides creamy contrast and an indulgent touch.Crusty garlic bread elevates the meal into a truly comforting feast.

| Nutrient | Per serving |
|---|---|
| Calories | 420 kcal |
| Protein | 32 g |
| Carbohydrates | 28 g |
| Fat | 18 g |
For more comforting casserole ideas, check out our guide on Ultimate Chicken and Rice Casserole. For nutritional advice on balanced meals, visit EatRight.org.
Q&A
Q&A: Hearty Stuffed bell Pepper Casserole – A Comforting Classic
Q1: What makes stuffed bell peppers such a timeless comfort food?
A1: Stuffed bell peppers combine the heartiness of a home-cooked meal with vibrant colors and flavors that evoke nostalgia. The tender, sweet peppers cradle a savory filling-usually ground meat, rice, and spices-creating a perfect bite that’s satisfying and wholesome. This blend of textures and tastes has made them a beloved dish across generations.
Q2: How does a casserole version differ from conventional stuffed bell peppers?
A2: The casserole reinvents the classic by layering all the ingredients together in one dish rather then stuffing individual peppers. This approach is not only simpler and quicker but also allows flavors to meld beautifully as they bake. It’s perfect for feeding a crowd and great for meal prepping, offering the same comforting essence with less fuss.
Q3: Can I customize the filling to suit dietary needs or preferences?
A3: Absolutely! The beauty of a stuffed pepper casserole lies in its versatility. Use ground turkey or plant-based meat substitutes for lighter or vegetarian options. Swap out rice for quinoa or cauliflower rice to keep it low-carb. Incorporate your favorite herbs, veggies, or cheeses to tailor the dish to your taste buds and lifestyle.Q4: What are some tips for achieving the perfect balance of flavors in this casserole?
A4: Start with sautéed onions and garlic to build depth. Season the meat mixture generously with herbs like oregano, thyme, or smoked paprika. A splash of tomato sauce or diced tomatoes adds acidity and moisture, balancing the sweetness of the bell peppers. don’t forget a good melting cheese on top for that golden, bubbly finish.
Q5: How do I serve and store leftover hearty stuffed bell pepper casserole?
A5: Serve the casserole straight from the oven with a side salad or crusty bread for a comforting meal. Leftovers keep well-store them in an airtight container in the fridge for up to 4 days. Reheat gently in the oven or microwave.It also freezes beautifully, making it a perfect make-ahead dinner for busy weeks.
Q6: Why does this dish bring such warmth beyond its flavors?
A6: Beyond the taste, hearty stuffed bell pepper casserole is a symbol of home and family. It’s a dish that invites sharing, sparks memories of gatherings, and fills the kitchen with cozy aromas. It’s comfort food in its truest form-nourishing body and soul with every savory bite.
To Conclude
Whether you’re craving a cozy weeknight meal or looking to impress family and friends with a dish that feels like a warm hug, this Hearty Stuffed Bell Pepper Casserole delivers on all fronts. Its vibrant colors, rich flavors, and satisfying textures come together to create a comforting classic that’s as nourishing as it is indeed delicious. So next time you want to fill your kitchen with inviting aromas and your table with smiles,remember this casserole – a timeless recipe that turns simple ingredients into lasting memories.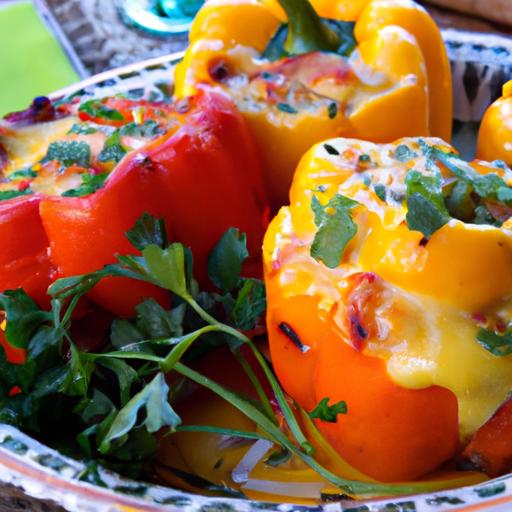
Sizzling Tofu Broccoli Stir Fry combines simplicity with vibrant nutrition, making it a go-to dish for anyone seeking a quick yet deeply satisfying meal. This stir fry celebrates the wholesome pairing of protein-packed tofu and fiber-rich broccoli,creating a harmonious balance that nourishes the body and delights the palate.Rooted in Asian culinary traditions, this dish has become a modern staple-perfect for weeknight dinners or meal prep.
Prep and Cook Time
Planning: 15 minutes
cooking: 12 minutes
Total Time: 27 minutes
Yield
Serves 4 generous portions
Difficulty Level
Easy - perfect for beginners and seasoned cooks alike
Ingredients
- 14 oz (400g) firm tofu, pressed and cut into 1-inch cubes
- 3 cups broccoli florets, fresh or lightly steamed
- 2 tbsp vegetable oil (canola or peanut oil preferred for high heat)
- 3 cloves garlic, minced
- 1-inch piece fresh ginger, grated
- 1 small red chili, thinly sliced (optional, for heat)
- 3 tbsp soy sauce (or tamari for gluten-free)
- 1 tbsp hoisin sauce
- 1 tbsp rice vinegar
- 1 tbsp maple syrup or honey
- 1 tsp toasted sesame oil
- 2 tbsp water (to loosen the sauce)
- 1 tsp cornstarch, mixed with 2 tbsp cold water
- Sesame seeds for garnish
- Chopped scallions for finishing touch
Instructions
- Prepare the tofu: Wrap the tofu in a clean kitchen towel and press gently to remove excess moisture. Cube the tofu evenly to ensure consistent browning.
- Heat the wok or large skillet over medium-high heat: Add the vegetable oil and swirl to coat. Carefully add the tofu cubes in a single layer. Let them cook undisturbed for 3-4 minutes until the bottoms turn a golden crust.
- Flip and continue cooking: Gently turn the tofu cubes to brown all sides, about 4 minutes more. Remove tofu and set aside on a paper towel-lined plate to absorb any extra oil.
- Sauté aromatics: Add a touch more oil if needed, than toss in garlic, ginger, and sliced chili. Stir vigorously for 30 seconds until fragrant yet not burnt.
- Add broccoli florets: Toss them into the wok and cook for 4-5 minutes, stirring frequently.The broccoli should turn luminous green and become tender-crisp.
- Whisk together the sauce: In a small bowl, combine soy sauce, hoisin, rice vinegar, maple syrup, toasted sesame oil, and water. Pour this mixture over the broccoli and stir well.
- return tofu to the wok: Gently fold the tofu into the vegetables and sauce. Give the cornstarch slurry a quick stir, then pour into the pan.cook, stirring continuously, until the sauce thickens and glazes the tofu and broccoli evenly (about 2 minutes).
- Final touches: Taste and adjust seasoning if needed. Remove from heat and sprinkle with sesame seeds and chopped scallions.
- Serve immediately: plate your sizzling tofu broccoli stir fry over steamed jasmine rice or your favorite noodles for a complete meal.
Tips for Success
- Pressing tofu: Ensures a crispier texture by removing moisture-aim for at least 20 minutes of pressing time using a tofu press or heavy books.
- High heat stir-frying: Use a wok or large skillet and keep ingredients moving to avoid sticking and promote even cooking.
- Vegetable variations: Add snap peas, bell peppers, or baby corn for extra color and crunch.
- Make ahead: Prep tofu and sauce in advance; store separately to maintain freshness. Stir fry quickly just before serving.
- For gluten-free option: Use tamari instead of soy sauce and ensure your hoisin sauce is gluten-free.
- Customize heat level: Omit chili for mild flavors or add chili flakes for a fiery kick.
Serving Suggestions
Enhance your sizzling tofu broccoli stir fry with a side of fragrant jasmine rice or steamed brown rice for a wholesome balance. Alternatively, nestle it atop a bed of soba noodles or serve alongside quinoa for a protein boost. Garnish with a fresh wedge of lime to add a citrusy brightness or sprinkle roasted peanuts for added texture. This dish pairs beautifully with a cucumber salad or miso soup for a vibrant, well-rounded meal.

| nutrient | Per Serving |
|---|---|
| Calories | 280 |
| Protein | 18g |
| Carbohydrates | 14g |
| Fat | 16g |
For related recipes on healthy plant-based dinners, check out our Vegan Stir Fry recipes Collection. For a deeper dive into the health benefits of tofu and broccoli, visit Healthline’s detailed guide.
Q&A
Q&A: Sizzling Tofu Broccoli Stir Fry – A Healthy flavor Boost
Q1: What makes the Sizzling Tofu Broccoli Stir Fry a “healthy flavor boost”?
A1: This dish is a vibrant party of nutrients and taste! Packed with protein-rich tofu and fiber-loaded broccoli, it delivers a powerhouse of vitamins and minerals. the sizzling stir fry method locks in flavor without drowning ingredients in oil, creating a light yet intensely savory meal. It’s a perfect way to nourish your body while tantalizing your taste buds.Q2: Why choose tofu and broccoli as the star ingredients?
A2: Tofu is a versatile plant-based protein that soaks up flavors beautifully and offers a silky texture. Broccoli brings a satisfying crunch and a bounty of antioxidants, vitamins C and K, and fiber. Together, they form a dynamic duo that supports muscle health, digestion, and immune function – all wrapped up in a deliciously balanced bite.
Q3: How can I make the stir fry sizzle with flavor without excessive oil or sodium?
A3: Use high-quality, aromatic ingredients like fresh ginger, garlic, and a splash of low-sodium soy sauce or tamari. Adding a squeeze of citrus or a dash of chili flakes can brighten and deepen the profile without extra salt or fat. Toasting sesame seeds or incorporating a hint of toasted sesame oil at the end adds a nutty whisper of indulgence-without going overboard.
Q4: Is this recipe adaptable for different dietary preferences?
A4: Absolutely! The Sizzling Tofu Broccoli Stir Fry is naturally vegan and gluten-free if you choose tamari over soy sauce. for a nut-free version, skip added nuts or seeds.If you want more protein, toss in edamame or cashews; if you crave extra veggies, mushrooms, bell peppers, or snap peas fit perfectly. This dish is a blank canvas ready for your creativity.Q5: What’s the secret to achieving that perfect “sizzle” in the stir fry?
A5: High heat and a preheated pan are your best friends. Ensure your tofu cubes are patted dry to prevent steaming. stir frequently but don’t overcrowd the pan-this helps vegetables stay crisp and tofu develop a golden crust. The sizzling sound is the hallmark of flavors caramelizing and mingling, signaling a mouthwatering result.
Q6: How quickly can I prepare this dish on a busy weeknight?
A6: Thanks to its simplicity, this stir fry can be ready in under 20 minutes! While the pan heats, chop your broccoli and press your tofu. The quick cooking time means veggies remain fresh and vibrant. Pair it with steamed rice or noodles, and you’ve got a wholesome, speedy meal that doesn’t compromise on flavor or nutrition.
Q7: Can this stir fry be made ahead or stored as leftovers?
A7: Yes! Prepare and cool the stir fry quickly, then refrigerate in an airtight container for up to 3 days. When reheating, do so in a hot skillet or microwave, adding a splash of water or broth if it truly seems dry. For best texture,consider adding fresh stir-fried broccoli or a crisp salad alongside leftovers.
With its bold flavors,healthful ingredients,and quick cooking time,the Sizzling Tofu Broccoli stir Fry is a delicious way to add color,crunch,and vitality to your dinner table every day!
Closing Remarks
As the final sizzle fades and the aroma of sautéed tofu and vibrant broccoli lingers,this stir fry stands as a testament to how healthy eating can be both simple and sensational. Whether you’re seeking a quick weeknight dinner or a nutrient-packed meal that excites your taste buds,this dish delivers a perfect balance of protein,greens,and bold flavors. So next time you crave a wholesome boost without sacrificing zest, remember that a sizzling tofu broccoli stir fry isn’t just a meal-it’s a vibrant invitation to nourish your body and delight your palate in every bite.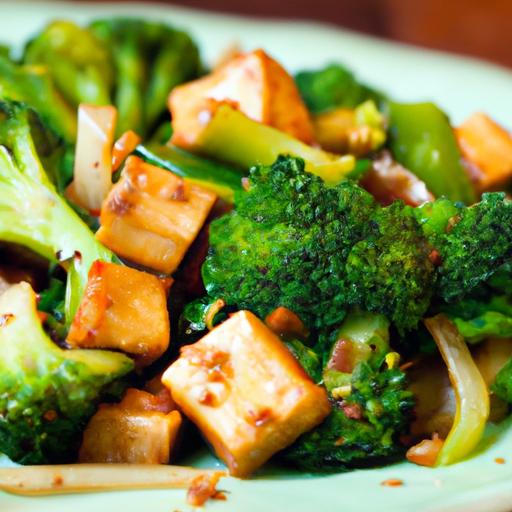
Choosing Nutritious Ingredients for maximum Flavor and Health
Wholesome & fast: Your Guide to Quick Healthy Meals invites you into the vibrant world of nutrient-packed ingredients that bring life and flavor to your kitchen creations. Selecting fresh, colorful produce and high-quality proteins ensures every bite bursts with taste and delivers essential vitamins and minerals. I still remember the first time I discovered the magic of toasted quinoa paired with bright, crunchy vegetables-it transformed a quick lunch into an unforgettable experience. Incorporating nutrient-dense ingredients like leafy greens, seasonal fruits, and heart-healthy fats elevates any recipe, making your meals both satisfying and nourishing.
Prep and Cook Time
- Planning: 10 minutes
- Cooking: 15 minutes
- Total Time: 25 minutes
Yield
serves 4
Difficulty Level
Easy
Ingredients
- 1 cup quinoa,rinsed and drained
- 2 cups vegetable broth (low sodium)
- 1 tbsp extra virgin olive oil
- 1 red bell pepper,diced
- 1 medium zucchini,diced
- 1 cup cherry tomatoes,halved
- 2 cups fresh baby spinach,roughly chopped
- 1/4 cup red onion,finely chopped
- 2 cloves garlic,minced
- 1/4 cup fresh parsley,chopped
- Juice of 1 lemon
- Salt and black pepper,to taste
- Optional: 1/3 cup crumbled feta cheese
instructions
- Toast the quinoa: In a medium saucepan over medium heat,warm 1 tbsp of olive oil. Add the rinsed quinoa and toast for about 3 minutes, stirring frequently enough to prevent burning. This step enhances the nutty flavor and aroma.
- Add broth and cook quinoa: Pour in the vegetable broth, bring to a boil, then reduce heat to low and cover. Simmer until the quinoa is tender and liquid is absorbed, about 15 minutes.
- Prepare the vegetables: While the quinoa cooks, heat a non-stick pan over medium heat. Add a splash of olive oil,then sauté the garlic and red onion until fragrant and translucent,about 2 minutes.
- Add bell pepper and zucchini: Sauté for 5 minutes, stirring occasionally until vegetables are crisp-tender and slightly caramelized.
- Combine ingredients: In a large bowl,fluff the cooked quinoa with a fork. Gently fold in the sautéed vegetables, cherry tomatoes, baby spinach, and chopped parsley. The residual heat will lightly wilt the spinach.
- Season and garnish: Squeeze fresh lemon juice over the mixture,season with salt and black pepper to taste. Add crumbled feta cheese if desired for creamy tanginess.
- Serve warm or chilled: This dish works beautifully as a hearty side or a light main course, perfect for any busy weekday or relaxed weekend meal.
tips for success
- for added protein and texture, toss in roasted chickpeas or grilled chicken slices.
- Substitute quinoa with couscous or bulgur wheat for a different grain profile without sacrificing speed.
- Make-ahead pleasant: Prepare the quinoa and vegetables separately then combine just before serving to preserve freshness and texture.
- Use fresh lemon juice at the end to brighten flavors without overpowering the dish.
- Keep raw cherry tomatoes handy for extra juicy bursts that bring natural sweetness.
Serving Suggestions
Serve this vibrant quinoa salad atop a bed of baby arugula or alongside grilled fish for a balanced meal. Garnish with extra parsley leaves and a drizzle of high-quality olive oil for a glossy finish. Pair with crusty whole grain bread or warm pita for a comforting contrast. This recipe also shines when packed as a colorful lunchbox meal or chilled for summer picnics.

| Nutrient | Per Serving |
|---|---|
| Calories | 320 kcal |
| Protein | 9 g |
| Carbohydrates | 45 g |
| Fat | 8 g |
Time-Saving Cooking techniques That Preserve Nutrients
Steaming vegetables or using a quick sauté with minimal oil are excellent ways to retain natural vitamins and textures without sacrificing speed. Toasting quinoa before cooking not only boosts flavor but also shortens cooking time by releasing natural oils. When possible, prepare ingredients in batches during weekends or evenings to streamline weekday meals. Using airtight containers keeps prepped components fresh and ready to combine,letting you whip up wholesome dishes with ease.
Flavorful Meal Prep Ideas for Busy Weekdays
Batch-cooked grains like quinoa, brown rice, or farro form the perfect base for meal-prep bowls packed with roasted veggies, lean proteins, and tangy dressings. Layer flavors by marinating tofu or chicken in zesty citrus and herb blends overnight. Assemble colorful salads with a mix of raw and cooked components to maintain texture and nutritional balance. Having flavorful dressings on hand-such as tahini lemon or balsamic vinaigrette-makes transforming basic ingredients into satisfying meals effortless and exciting.
Quick and Healthy Recipes You Can Make in Under 30 Minutes
This wholesome quinoa vegetable salad exemplifies “Wholesome & Fast: Your Guide to Quick Healthy Meals” principles with fresh ingredients, simple prep, and vibrant flavors, all ready in under 30 minutes. Whether you’re craving a warm, comforting bowl or a refreshing salad, quick recipes based on fresh produce and whole grains lend themselves to endless customization. Keep nutrient-rich staples stocked and embrace quick-cooking methods for flavorful dinners or energizing lunches that nurture your body and satisfy your palate.
For more inspiration on quick and nourishing meals, explore our Quick Healthy Dinners collection and discover additional fast recipes designed for busy lifestyles.
Learn more about the nutritional benefits of quinoa and its role in a balanced diet at Healthline’s comprehensive guide.
Q&A
Q&A: Wholesome & Fast – your Guide to Quick healthy Meals
Q1: Can healthy meals really be quick to make?
Absolutely! Wholesome doesn’t have to mean complicated.With a little planning and the right ingredients, you can whip up nutritious dishes in 20 minutes or less. Think vibrant salads, one-pan sautés, or nutrient-packed grain bowls-simple, speedy, and satisfying.
Q2: What are some pantry staples that help keep meals fast and healthy?
Keep your kitchen stocked with versatile ingredients like canned beans, quinoa, brown rice, frozen veggies, nuts, and seeds.These items store well, cook quickly, and add fiber, protein, and flavor with minimal effort.
Q3: How can I save time without compromising nutrition?
Batch prepping is your best friend. Chop veggies, cook grains, and portion proteins ahead of time. When hunger strikes, just assemble or reheat! Also, embrace one-pot or sheet-pan recipes-less cleanup, more time saved.
Q4: Are there quick meal ideas that work for picky eaters or kids?
Yes! sneak in veggies by adding finely grated carrots or spinach to pasta sauces, smoothies, or homemade muffins. Customize build-your-own tacos or wraps with colorful, fresh toppings, letting everyone pick what they like.
Q5: What’s a simple, go-to recipe for busy weeknights?
Try a Mediterranean chickpea bowl: toss canned chickpeas with cherry tomatoes, cucumber, olives, feta, lemon juice, and olive oil. Serve over mixed greens or quick-cooked couscous for a balance of protein, fiber, and flavor-all in under 15 minutes.
Q6: How do I keep motivation high for cooking healthy meals fast?
Remember, quick and wholesome meals nourish both body and soul. Celebrate small wins,experiment with colorful spices and herbs,and view cooking as a creative break rather than a chore.When food feels good, it’s easier to stick with.
Q7: Can smoothies be a healthy quick meal?
Definitely! Blend leafy greens, a frozen fruit medley, a scoop of protein powder or yogurt, and some nut butter for a balanced, portable meal. Smoothies are perfect when time’s tight but nutrition can’t be sacrificed.
Q8: Any tips for eating healthy on the go?
Prepare grab-and-go snacks like energy balls, roasted chickpeas, or veggie sticks with hummus. Portable containers with layered salads or mason jar meals also make nutritious meals accessible outside your kitchen.
Eating wholesome food fast is all about smart choices, simple ingredients, and a splash of creativity. With these insights,you’re ready to fuel your day without missing a beat!
Closing Remarks
With these quick and wholesome meal ideas in your culinary toolkit,healthy eating no longer has to be a slow,complicated affair. Whipping up nourishing dishes that fuel your body and delight your taste buds can be both effortless and enjoyable-proof that speed and wellness truly can go hand in hand. So next time time is tight but your appetite for goodness is strong, remember: a nutritious, satisfying meal is just minutes away. here’s to savoring every bite of health, without missing a beat.
Choosing the Perfect Lentils for Maximum Nutrition
Power-Packed Lentil Soup Recipe: High-Protein & Hearty! starts with selecting the right lentils, a small yet mighty ingredient that packs a nutritional punch. Brown, green, red, or black beluga lentils each bring distinct textures and nutrients. For a balance of rich flavor and robust texture,green and brown lentils are top picks,offering a satisfying bite and a wealth of protein,fiber,and essential minerals like iron and folate. Red lentils cook faster and become creamy, perfect for those who prefer a soup with a velvety consistency. Opt for organic lentils whenever possible to maximize nutrient retention and minimize contaminants.
Building Bold Flavors with Fresh Herbs and Spices
To elevate your soup beyond a simple broth, layering fresh herbs and aromatic spices is essential. Start with the classics: garlic, cumin, smoked paprika, and turmeric-each adding warmth and complexity. Fresh herbs like cilantro, parsley, and thyme brighten and freshen every spoonful. Toasting whole spices such as cumin seeds and coriander before sautéing the aromatics intensifies their flavor,creating a fragrant foundation. A splash of fresh lemon juice at the end sharpens the richness and adds a vibrant zing that brings the whole dish alive.
tips for Creating the ultimate Hearty Texture
Texture is key to achieving a truly hearty lentil soup. start by sautéing diced onions, carrots, and celery until soft and golden to build a flavorful mirepoix base. Use a mix of whole and slightly mashed lentils-about a quarter of them lightly pressed against the pot’s side during cooking-to introduce creaminess without losing that important bite. Slow simmering allows lentils to soften gently without becoming mushy. Incorporating diced potatoes or sweet potatoes adds extra body and heartiness. Lastly, finish the soup off with a swirl of Greek yogurt or coconut cream for a luscious mouthfeel.
Healthy Additions to Boost Protein and Vitality
For an extra boost of protein and nutritional vitality, this recipe shines by incorporating quinoa, spinach, and kale.Quinoa cooks quickly and blends seamlessly, enhancing the soup’s protein profile with all nine essential amino acids. Adding dark leafy greens like spinach and kale infuses vitamins A, C, and K as well as antioxidant power. Sprinkle chopped nuts like toasted almonds or pumpkin seeds on top just before serving for crunch and added minerals. Don’t forget a drizzle of extra virgin olive oil for heart-healthy fats, completing this wholesome, nutrient-dense feast.
Prep and Cook Time
- Preparation: 15 minutes
- Cooking: 45 minutes
- Total: 1 hour
Yield
- Serves 6 generous bowls
Difficulty Level
- Easy to Medium – Perfect for beginners and seasoned cooks alike
ingredients
- 1½ cups brown or green lentils, rinsed
- 1 large onion, finely diced
- 2 medium carrots, peeled and diced
- 2 celery stalks, diced
- 3 garlic cloves, minced
- 1 large potato, peeled and diced
- 1 tsp cumin seeds
- 1 tsp smoked paprika
- ½ tsp turmeric powder
- 1 tsp ground coriander
- 6 cups vegetable broth
- 2 cups fresh spinach or kale, chopped
- ½ cup cooked quinoa (optional)
- 2 tbsp extra virgin olive oil
- Salt and freshly ground black pepper, to taste
- Juice of 1 lemon
- Fresh parsley or cilantro, chopped (for garnish)
- Greek yogurt or coconut cream (optional, for serving)
Instructions
- Toast the spices: Heat olive oil in a large pot over medium heat. Add cumin seeds and toast until fragrant, about 1 minute. Stir in smoked paprika, turmeric, and ground coriander.
- Sauté the aromatics: Add the onion, carrots, and celery. Cook until softened and golden, about 7-8 minutes, stirring frequently enough to avoid burning.
- Add garlic and potatoes: Stir in the minced garlic and diced potato, cooking another 2 minutes until aromatic.
- Introduce lentils and broth: Pour in the lentils and vegetable broth. Bring to a boil, then reduce to a simmer.
- Simmer for heartiness: Cover partially and let the soup simmer gently for about 30 minutes until lentils and potatoes are tender. Every 10 minutes,stir,and use the back of a spoon to mash some lentils against the pot for creaminess.
- Add greens and quinoa: Stir in chopped spinach or kale and cooked quinoa. Simmer an additional 5 minutes until greens wilt.
- Season and brighten: Remove from heat. Add lemon juice, salt, and pepper to taste. Adjust seasoning as needed.
- Serve and garnish: Ladle soup into bowls. Add a dollop of Greek yogurt or coconut cream if desired, and sprinkle with fresh parsley or cilantro.
Tips for Success
- Use organic lentils to elevate the dish’s nutritional value and taste.
- For extra depth, add a splash of red wine vinegar or a pinch of cayenne pepper for heat.
- Leftovers taste even better the next day; the flavors meld beautifully.
- Make this soup a full meal by serving it alongside fresh whole grain bread.
- If you prefer a smoother texture, use an immersion blender on half the soup before adding greens.
Serving Suggestions
Present your soup in rustic ceramic bowls to enhance the comforting, earthy vibe. garnish with vibrant fresh herbs and a wedge of lemon on the side for guests to customize acidity. Complement with a crunchy tossed salad or a slice of toasted sourdough for a wholesome, balanced meal.A small drizzle of chili oil or a handful of toasted pumpkin seeds adds a luxurious finishing touch, further boosting both texture and nutrition.
| Nutrient | Per Serving (1 bowl) |
|---|---|
| Calories | 320 kcal |
| Protein | 18 g |
| Carbohydrates | 45 g |
| Fat | 6 g |

For more information on lentils’ nutritional benefits, visit the Healthline Lentils Nutrition Guide.
Q&A
Q&A: Power-Packed Lentil Soup recipe – High-Protein & Hearty!
Q1: Why choose lentils for a hearty, high-protein soup?
A1: Lentils are tiny nutritional dynamos! Packed with protein, fiber, and essential minerals, they provide sustained energy and keep you full longer. Their earthy flavor and creamy texture make them perfect for a comforting, power-packed soup that fuels your body and soul.Q2: What makes this lentil soup recipe “power-packed”?
A2: This recipe combines protein-rich lentils with nutrient-dense veggies and spices that boost flavor and health benefits. its loaded with plant-based protein, fiber, and antioxidants, making it a balanced meal that satisfies cravings without crashing your energy.
Q3: Can I customize the soup to suit my dietary preferences?
A3: Absolutely! This lentil soup is a fantastic canvas for your creativity. add extra veggies like kale or spinach, swap spices to suit your taste buds, or toss in some roasted nuts for crunch. It’s naturally gluten-free and vegan, but can be adapted with chicken broth or cream for non-vegans too.
Q4: How long does it take to prepare this lentil soup?
A4: About 40 minutes from start to finish! Lentils cook quickly compared to other legumes, so you’ll have a steaming bowl of hearty goodness in under an hour-perfect for busy weeknights or meal prep.
Q5: What kitchen tools do I need?
A5: Keep it simple-a large pot or Dutch oven, a cutting board, and a wooden spoon. No fancy gadgets required, just your love for wholesome food!
Q6: How do I store leftovers?
A6: Lentil soup tastes even better the next day! Store leftovers in an airtight container in the fridge for up to 4 days, or freeze portions for up to 3 months.Reheat gently on the stove or in the microwave, adding a splash of water if needed.
Q7: Any tips for making the soup extra creamy without dairy?
A7: Yes! Blend a portion of the cooked soup until smooth and stir it back in. You can also add a dollop of coconut milk or a spoonful of tahini for richness without dairy.
Q8: What makes this lentil soup a great choice for meal prep?
A8: It’s nutritious, filling, and keeps well, so you save time during the week while still eating a wholesome meal. Plus, it freezes beautifully, making it easy to grab a power-packed lunch or dinner anytime.
Enjoy your culinary adventure with this power-packed lentil soup-where nutrition meets comfort in every spoonful!
Key Takeaways
As you savor the last warm spoonful of this power-packed lentil soup, remember that you’re not just indulging in a meal-you’re fueling your body with wholesome, protein-rich goodness that comforts and energizes. whether you’re seeking a hearty lunch,a nutritious dinner,or a cozy bowl to lift your spirits,this recipe stands ready to deliver both flavor and fortitude. So grab your apron, gather those humble lentils, and let this soup become your go-to powerhouse for nourishment and warmth, one delicious spoon at a time.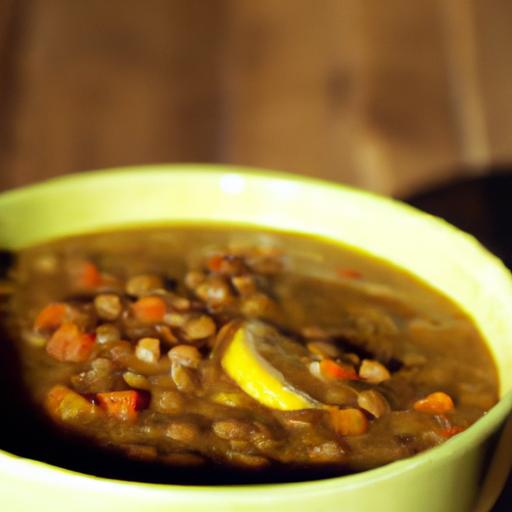
Power-Packed Keto Protein Shakes unlock a world of nutrition and flavor, transforming your daily shake into a powerhouse of health and taste. Crafting the perfect shake base is an art that merges quality ingredients with personalized goals-whether aiming for weight loss, muscle gain, or sustained energy throughout your day. With the right foundations and flavor boosters, your keto shake becomes much more than a quick fix; itS a delicious ritual you’ll look forward to every time.
Prep and Cook time
- Prep Time: 5 minutes
- Cook Time: 0 minutes (blending only)
Yield
- 1 serving (approximately 16 oz)
Difficulty Level
- Easy - perfect for beginners or busy lifestyles
Ingredients for the Perfect Keto Protein Shake base
- 1 cup unsweetened almond milk (or coconut milk for creamier texture)
- 1 scoop high-quality keto-friendly protein powder (whey isolate or collagen peptides)
- 1 tbsp MCT oil or coconut oil for sustained energy
- 2 tbsp heavy cream or full-fat coconut cream to boost richness
- 1/2 tsp vanilla extract for subtle sweetness
- 1 tbsp powdered erythritol or preferred keto sweetener (adjust to taste)
- Ice cubes (optional,for a chilled shake)
Flavor-Boosting Ingredients That Keep Your Shakes Exciting
- 1 tbsp unsweetened cocoa powder for a mocha twist
- 1 tbsp fresh ground flaxseed or chia seeds to add fiber and texture
- Handful fresh or frozen berries (like raspberries or blackberries) for antioxidants and vibrant color
- Pinch cinnamon or nutmeg to warm the palate
- 1 tbsp natural nut butter (almond,macadamia,or peanut) for added creaminess and fats
Instructions
- Combine the base ingredients: Add almond milk,keto protein powder,MCT oil,heavy cream,vanilla extract,and sweetener into a high-speed blender.
- Blend until smooth: Mix on high for about 30 seconds, ensuring no powder clumps remain.
- Add flavor boosters: Incorporate cocoa powder, seeds, nuts, or berries depending on your chosen flavor. Blend for an additional 15 seconds.
- Adjust thickness: Add ice cubes or a splash more almond milk to reach your preferred consistency. blend again briefly.
- Taste test: Modify sweetness or spices as needed, blending briefly after each adjustment.
- Serve instantly: Pour into your favorite glass or shaker bottle for a refreshing boost.
tips for Success
- Use high-quality protein powders: Opt for low-carb, low-additive options to maintain keto integrity and flavor clarity.
- customize fats: Swap MCT oil with avocado or nut butters for different lipid profiles and textures.
- Prep ahead: Mix dry ingredients in a shaker bottle and add liquids on the go for busy mornings.
- Watch sweetness: Rather of overloading with sweeteners, experiment with natural flavors like cinnamon or vanilla to enhance taste.
- Consistency matters: Keep your shake thick enough to feel satisfying but not too dense-adjust with water/milk or ice accordingly.
Tailoring Your Shake to Support Weight Loss, Muscle Gain, or Sustained Energy
For weight loss, emphasize MCT oil and fiber-rich additions like flaxseed to encourage satiety and fat burning. For muscle gain, increase protein powder by an extra half scoop and incorporate nut butters for extra calories and healthy fats. To fuel sustained energy throughout the day, balance your shake with moderate fats and low glycemic sweeteners, ensuring a slow release of energy without insulin spikes.
Serving Suggestions
- Top your shake with a sprinkle of chopped nuts or seeds to add crunch and visual appeal.
- Add a few fresh mint leaves or a dusting of cinnamon for an aromatic flourish.
- Serve chilled with a stainless steel straw in a frosted glass for an Instagram-ready presentation.
- Pair your shake with light keto-friendly snacks like boiled eggs or cheese slices to extend fullness.
| Nutrient | Amount per Serving |
|---|---|
| Calories | 280 – 350 kcal |
| Protein | 25-30 g |
| Net Carbohydrates | 3-5 g |
| Fat | 18-25 g |
For those eager to dive deeper into keto nutrition, check out our detailed guide on calculating your keto macros.To understand the science behind MCT oil and its benefits, visit this Healthline article on MCT oil.

Q&A
Q&A: Power-Packed Keto Protein Shakes - Recipes for Every Goal
Q1: What makes a protein shake “keto-friendly”?
A1: A keto-friendly protein shake is low in carbohydrates, rich in healthy fats, and contains moderate protein to keep your body in a state of ketosis. It avoids sugars and high-carb ingredients that can spike insulin and kick you out of fat-burning mode. Think creamy fats like avocado and coconut oil, plus protein sources like collagen, whey isolate, or plant-based peptides.
Q2: Can keto protein shakes help with weight loss?
A2: Absolutely! When you replace carb-heavy snacks with a satiating keto protein shake, you curb hunger and avoid blood sugar crashes. This steady fuel supply helps your body burn fat for energy efficiently. Plus, the protein supports muscle retention, so you lose fat without sacrificing lean mass.
Q3: How do I tailor a keto protein shake for muscle gain?
A3: To bulk up on keto,your protein intake should be slightly higher,but keep carbs minimal. Incorporate muscle-building ingredients like grass-fed whey isolate or collagen peptides along with healthy fats-MCT oil or nut butters-for sustained energy. Don’t forget electrolytes (like magnesium and potassium) to keep recovery sharp.
Q4: Are keto protein shakes suitable for people with dietary restrictions?
A4: Keto shakes are incredibly adaptable! Whether you’re dairy-free, vegan, or allergic to nuts, you can swap ingredients with coconut milk, hemp protein, or sunflower seed butter. The key is maintaining low carbs and high fat while ensuring you get enough protein.
Q5: What are some creative ingredients to spice up my keto shake?
A5: Let your creativity run wild-add cinnamon for metabolism support, a dash of turmeric for inflammation, or a handful of spinach for fiber without carbs. Cocoa powder turns it into a chocolate delight,while a splash of vanilla or almond extract can satisfy your sweet tooth without sugar.
Q6: Can I prepare keto protein shakes in advance?
A6: Yes! Many keto shakes keep well refrigerated for up to 24 hours. for best texture, blend ingredients fresh or add crunchy toppings like crushed nuts just before drinking. Prepping in advance is a fantastic way to stay on track during busy days.
Q7: How do I know if my keto shake recipe is balanced?
A7: A balanced keto shake typically includes:
- 15-25g of protein
- 10-20g of healthy fats
- Minimal (under 5g) net carbs
Use apps or keto calculators to check macros, and ensure your shake complements your daily nutrition goals without exceeding carb limits.
Q8: Any tips for beginners making keto protein shakes?
A8: Start simple! Use a quality protein powder, add a source of fat like MCT oil or avocado, and a low-carb liquid base such as unsweetened almond milk. Experiment with flavors gradually. Remember, consistency beats complexity-find your favorite combo and make it a ritual.
Fuel your keto journey with these power-packed shakes tailored to your unique goals. Whether shredding fat or building muscle, the right blend delivers nutrition, taste, and satisfaction in every sip!
In Conclusion
As you embark on your keto journey, these power-packed protein shakes stand ready to fuel your body and delight your taste buds-no matter your goal.Whether you’re aiming to sculpt lean muscle, boost energy, or simply stay satiated throughout the day, these recipes offer a versatile and delicious way to keep your macros on point. Remember, the secret to success lies not just in what you eat, but how you nourish yourself with intention and creativity. So blend up one of these shakes, sip with purpose, and let every delicious drop propel you closer to the best version of you. here’s to health, flavor, and the unstoppable power of keto!
Budget-Friendly Bites: Delicious Cheap Vegetarian Meals to Try
Budget-Friendly Bites: Delicious Cheap Vegetarian Meals to Try are not only a lifesaver for busy weeks but also a party of vibrant flavors that don’t break the bank. Imagine a bubbling pot of wholesome ingredients melding together-the aroma alone invites you to the table. Drawing from pantry staples and fresh produce, this recipe transforms simple beans, grains, and spices into a comforting feast that feels nourishing and indulgent all at once.
Prep and Cook Time
Prep Time: 10 minutes
Cook time: 30 minutes
Total Time: 40 minutes
Yield
Serves 4 hearty portions
Difficulty Level
Easy
Ingredients
- 1 cup dried lentils, rinsed and picked over
- 1 can (14 oz) diced tomatoes, with juices
- 1 medium onion, finely chopped
- 3 cloves garlic, minced
- 1 medium carrot, diced
- 1 bell pepper, diced (any color)
- 1 tsp smoked paprika
- 1 tsp ground cumin
- 1/2 tsp chili flakes (optional for a kick)
- 2 cups vegetable broth
- 2 tbsp olive oil
- Salt and freshly ground black pepper, to taste
- Fresh cilantro or parsley for garnish
- Cooked rice or crusty bread for serving
Instructions
- Heat olive oil in a large pot over medium heat. Add the chopped onion and sauté untill translucent and fragrant, about 5 minutes, stirring frequently.
- Add the minced garlic, diced carrot, and bell pepper. Cook for another 5 minutes until the vegetables soften, stirring occasionally to prevent sticking.
- Sprinkle in the smoked paprika, ground cumin, and chili flakes. Stir well to toast the spices and release their aromatic oils-about 1 minute.
- Add the rinsed lentils and canned diced tomatoes with their juices. Mix thoroughly to combine all ingredients.
- Pour in the vegetable broth,stirring once. Bring the mixture to a gentle boil,then reduce heat to low.
- cover the pot and let simmer for 25-30 minutes until the lentils are tender and the liquid is mostly absorbed. Stir occasionally to prevent sticking and check seasoning halfway through.
- Season with salt and freshly ground black pepper to taste. If the dish feels too thick, add a splash of water or broth to loosen.
- Remove from heat and let it rest for 5 minutes before serving.
Chef’s Notes
- Variations: Swap lentils for chickpeas or black beans for a different texture and protein profile.
- make it creamier: Stir in a dollop of plain yogurt or coconut cream just before serving.
- Storing: this one-pot meal keeps well in the fridge for up to 3 days and freezes beautifully for up to 2 months.
- Boost flavor: Add a squeeze of fresh lemon juice at the end to brighten the dish.
- Spice level: Adjust chili flakes or add a dash of hot sauce based on your heat preference.
Serving Suggestions
Serve this colorful lentil and vegetable stew over a bed of steaming brown rice or alongside fresh-cut, crusty bread to soak up every bit of savory sauce. Garnish with vibrant sprigs of cilantro or parsley for a fresh, green contrast. For an added texture, sprinkle toasted pumpkin seeds or crushed nuts on top. Pair it with a simple green salad dressed lightly with lemon and olive oil for a complete,balanced meal that’s as affordable as it is satisfying.

| Nutrient | Per Serving |
|---|---|
| Calories | 320 kcal |
| Protein | 18 g |
| Carbohydrates | 45 g |
| Fat | 7 g |
Discover more ways to create delicious vegetarian meals on a budget by exploring our guide on Wholesome Vegetarian Meals on a Budget. For nutritional facts straight from trusted sources, visit Nutrition.gov.
Q&A
Q&A: Budget-Friendly Bites – Delicious Cheap Vegetarian Meals to Try
Q1: Why choose vegetarian meals when on a tight budget?
A: Vegetarian meals often center around plant-based ingredients like beans, grains, and veggies, which tend to be more affordable than meat. Plus, they’re nutrient-packed and versatile, making it easy to stretch your dollar without sacrificing flavor or nutrition.
Q2: What are some staple ingredients to keep on hand for budget-friendly vegetarian cooking?
A: Keep your pantry stocked with beans (black beans, chickpeas, lentils), rice or quinoa, canned tomatoes, frozen vegetables, potatoes, and whole grains. These are inexpensive,store well for ages,and can morph into countless mouthwatering meals.
Q3: Can eating vegetarian really save money?
A: absolutely! Meat and dairy often make up the bulk of grocery costs. By leaning into affordable plants, you reduce your bill and open up creative culinary possibilities like hearty stews, flavorful curries, and vibrant salads-without spawning a mountain of receipts.
Q4: What are some quick and tasty vegetarian meals that won’t break the bank?
A: Try a spicy chickpea curry with rice, comforting lentil soup, veggie stir-fry over noodles, or classic pasta with a rich tomato and basil sauce. All these dishes use budget-friendly ingredients and can be whipped up in 30 minutes or less.
Q5: How can I make vegetarian meals more satisfying without expensive extras?
A: Focus on layering flavors with affordable spices, herbs, garlic, and onions. Incorporate texture contrasts-crispy roasted veggies alongside creamy mashed potatoes, for example. And don’t skimp on protein-rich plant foods like beans and lentils; they’ll keep you feeling full and fueled.
Q6: Are there any tips for reducing food waste while cooking cheap vegetarian meals?
A: Absolutely! plan meals around overlapping ingredients, store extras properly (freeze leftover beans or veggies), and get creative with scraps-think vegetable stock from peelings or a quick stir-fry with wilting greens. Less waste means more savings.Q7: How can someone new to vegetarian cooking get started without feeling overwhelmed?
A: Start simple. Pick a few easy recipes and experiment with familiar ingredients. Use online resources or veggie meal planners to guide you. Over time, you’ll build confidence-and a repertoire of delicious, wallet-friendly meals that you love.
Q8: What’s the most vital mindset shift for embracing cheap vegetarian eats?
A: Embrace creativity and adaptability. Budget-friendly vegetarian cooking isn’t about strict limitations; it’s about unlocking the potential of humble ingredients and transforming them into satisfying, wholesome meals-with a splash of love and inventiveness!
Key Takeaways
As you embark on your culinary journey through budget-friendly bites, remember that eating well doesn’t have to mean spending a fortune. These delicious,cheap vegetarian meals prove that wholesome ingredients and vibrant flavors can come together without breaking the bank. Whether you’re a seasoned veggie lover or simply looking to stretch your grocery budget, these recipes offer a tasty testament to creativity in the kitchen. so, grab your apron, explore these affordable dishes, and savor the satisfying blend of nutrition, flavor, and frugality-because great meals don’t have to cost a lot to make a big impact on your plate and your wallet.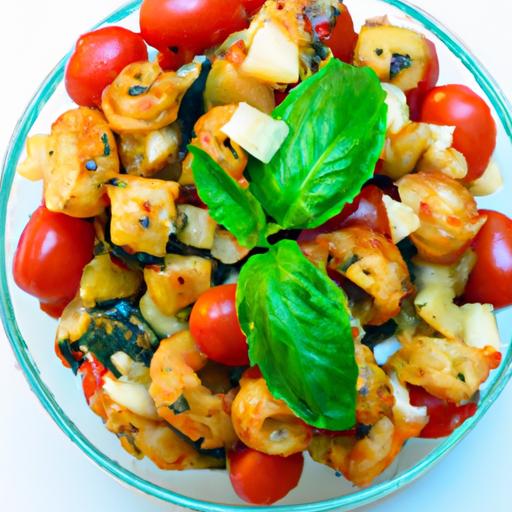
Delicious Gluten-Free Vegan banana Oat Chocolate Chip Muffins
delicious Gluten-Free Vegan Banana Oat Chocolate Chip muffins are a delightful treat that perfectly marries wholesome ingredients with irresistible flavors. Inspired by my journey to craft a snack that’s both nourishing and indulgent, these muffins celebrate the natural sweetness of ripe bananas combined with the hearty texture of gluten-free oats.Each bite offers a symphony of soft, fluffy crumb dotted with melty vegan chocolate chips-making them an ideal companion for breakfast, an afternoon pick-me-up, or a guilt-free dessert.
Prep and Cook Time
- Preparation: 15 minutes
- Baking: 22-25 minutes
- Total time: 40 minutes
Yield
Makes 12 generously sized muffins
Difficulty Level
Easy – perfect for beginner and seasoned bakers alike
Ingredients
- 2 large ripe bananas,mashed (about 1 cup)
- 1 ½ cups gluten-free rolled oats,blitzed into flour
- ½ cup almond flour (for extra moisture and tenderness)
- ¼ cup organic coconut sugar (natural sweetness,adjustable)
- 1 tsp baking powder (gluten-free)
- ½ tsp baking soda
- ½ tsp ground cinnamon (optional,adding warmth)
- ¼ tsp sea salt
- ⅓ cup unsweetened almond milk (or any plant-based milk)
- 2 tbsp melted coconut oil
- 1 tsp vanilla extract
- ¾ cup high-quality vegan chocolate chips (see note below)
Instructions
- Preheat your oven to 350°F (175°C) and line a 12-cup muffin tray with paper liners or grease with coconut oil.
- place the gluten-free rolled oats in a blender or food processor and pulse until they form a fine oat flour.
- In a large bowl, whisk together the oat flour, almond flour, coconut sugar, baking powder, baking soda, cinnamon, and sea salt until evenly combined.
- in a separate bowl, mash the ripe bananas until smooth, then stir in the almond milk, melted coconut oil, and vanilla extract.
- Pour the wet ingredients into the dry ingredients and gently fold them together until just combined-avoid overmixing to maintain a tender crumb.
- Fold in the vegan chocolate chips, reserving a few to sprinkle on top for a stunning finish.
- Divide the batter evenly among the muffin cups, filling each about three-quarters full.
- Sprinkle the reserved chocolate chips on top of each muffin for a tempting visual and extra melty pockets.
- Bake for 22-25 minutes, or until a toothpick inserted into the center comes out clean with just a few moist crumbs attached.
- Allow the muffins to cool in the pan for 10 minutes, then transfer to a wire rack to cool completely. This prevents sogginess and keeps the texture perfect.
Tips for Baking Moist and Fluffy Muffins Every Time
- Use very ripe bananas (with plenty of brown spots) to naturally enhance sweetness and moisture without added sugar.
- Blending the oats into flour ensures a consistent texture and prevents dense patches.
- Do not overmix the batter; stir until ingredients are just combined for loftier muffins.
- Adding almond flour increases tenderness, balancing the heartiness of oats.
- Try warming your almond milk slightly to activate the baking soda and powder better, providing extra rise.
Crafting the Perfect Texture with Gluten-Free Oats and Ripe bananas
Combining gluten-free oats with ripe bananas creates a unique texture that’s both sturdy and soft.Oats bring a subtle chewiness and hearty bite, while bananas infuse every crumb with natural moisture, ensuring the muffins stay fresh and juicy even days after baking. If you want to further enhance texture,sprinkle a handful of chopped walnuts or Pecans into the batter for a delightful crunch or swap almond flour with oat bran for extra fiber.
Balancing Sweetness Naturally for a Healthier Muffin Experience
These muffins rely on the natural sweetness of ripe bananas and a touch of coconut sugar, a less refined sweetener with a lower glycemic index then white sugar. this approach maintains flavor without overwhelming added sugars, perfect for those mindful of healthier choices. Feel free to adjust the sweetness by swapping coconut sugar for maple syrup or agave nectar-just reduce other liquid accordingly to keep batter consistency.
Choosing the Best Vegan Chocolate Chips for Ultimate Indulgence
The choice of vegan chocolate chips makes a difference in every bite of your muffin. Opt for ethical, high-cocoa content vegan chips for deep richness and smooth melting. Brands free from dairy and palm oil offer the best guilt-free indulgence, with hints of dark chocolate cutting through the sweetness perfectly. You can also experiment with adding cocoa nibs or chopped dairy-free dark chocolate chunks for texture and intensity.
Chef’s Notes
- To make these muffins nut-free,substitute almond flour with an additional ¼ cup oat flour or gluten-free all-purpose flour.
- Make-ahead tip: Store cooled muffins in an airtight container and refrigerate for up to 5 days or freeze individually wrapped for up to 3 months.
- For a more decadent twist, fold in 2 tablespoons of dairy-free peanut butter into the batter before baking.
- Swap coconut oil for melted vegan butter to introduce a subtle buttery flavor.
Serving Suggestions
For a picture-perfect presentation, serve these muffins with a dusting of powdered coconut sugar or a light drizzle of vegan chocolate sauce. They pair beautifully with a hot cup of vanilla almond milk latte or a fresh herbal tea. Garnish with a small slice of banana and a few chocolate chips on the side for a charming touch that invites indulgence.

| Nutrient | Per muffin |
|---|---|
| Calories | 180 kcal |
| protein | 3 g |
| Carbohydrates | 30 g |
| Fat | 6 g |
| Fiber | 4 g |
Ready to explore more wholesome baking? Try our Gluten-Free Vegan Blueberry Muffins recipe for another fruity favorite.
Q&A
Q&A: All About Delicious Gluten-Free Vegan Banana Oat Chocolate Chip Muffins
Q1: What makes these banana oat chocolate chip muffins both gluten-free and vegan?
A1: These muffins swap out conventional wheat flour for nutrient-packed oats, naturally gluten-free when certified, and ditch eggs and dairy in favor of plant-based ingredients like mashed bananas and plant milk. this combination ensures everyone-from celiacs to vegans-can enjoy a moist, flavorful treat without worries.
Q2: How do bananas contribute to the texture and taste of these muffins?
A2: Bananas are the unsung heroes here! They add natural sweetness,moisture,and that tender crumb everyone loves in a muffin. Plus, they act as a natural binder, helping ingredients meld together smoothly without the need for eggs.
Q3: Can I use regular chocolate chips rather of vegan ones?
A3: While regular chocolate chips will work, vegan chocolate chips keep this recipe 100% plant-based. They’re free from dairy and sometimes expensive emulsifiers too. For a small splurge, you get creamy, dairy-free bursts of chocolate that keep the muffins aligned with vegan values.
Q4: How do I ensure my oats are truly gluten-free?
A4: Oats themselves don’t contain gluten, but cross-contamination is common during processing. Look for oats labeled “gluten-free” on the package.This certification means they’ve been processed in gluten-free facilities-safe for those with gluten sensitivities.
Q5: Can these muffins be frozen for later?
A5: Absolutely! After baking, let the muffins cool completely, then store them in an airtight container or freezer bag. Pop them in the freezer for up to three months.When ready to enjoy, thaw at room temperature or warm gently in the oven for that fresh-baked magic.
Q6: What’s the secret to getting the perfect rise without eggs?
A6: Baking soda and apple cider vinegar team up in this recipe, creating a bubbly reaction that gives your muffins a fluffy lift.Combined with the moisture from bananas and plant milk, this natural combo ensures tender, airy muffins every time.
Q7: Can I tweak the recipe for added nutrition?
A7: Definitely! Toss in a handful of chopped nuts for crunch, sprinkle chia or flax seeds for omega-3s, or add a dash of cinnamon for warmth. Each addition can elevate both flavor and nutrition-making these muffins a powerhouse snack!
Q8: Are these muffins suitable for kids?
A8: Kids love them! Sweet,chocolaty bites packed with wholesome ingredients make these muffins a perfect lunchbox treat or after-school snack. Plus, knowing they’re free from gluten and animal products gives parents peace of mind.
Q9: How do these muffins compare nutritionally to traditional muffins?
A9: Swapping refined flour and butter for oats and bananas boosts fiber content and reduces unhealthy fats. The natural sweetness means less added sugar, and with plant-based ingredients, these muffins are easier to digest and great for anyone looking for a wholesome, guilt-free indulgence.
Q10: What’s the best way to enjoy these muffins?
A10: Wonderfully versatile! Have them warm for breakfast with a smear of almond butter, pack them for a midday energy boost, or serve them alongside a cup of tea for a cozy afternoon treat.No matter when, these muffins never disappoint!
The Conclusion
Whether you’re navigating dietary restrictions or simply seeking a wholesome treat, these Delicious Gluten-Free Vegan Banana Oat Chocolate Chip Muffins prove that indulgence and nutrition can coexist beautifully. With the natural sweetness of ripe bananas, the hearty goodness of oats, and just the right touch of chocolate, each muffin offers a perfect bite of comfort and energy. easy to whip up and satisfying to eat, they’re an ideal addition to your breakfast table, snack stash, or anytime craving. So go ahead-bake a batch, share with loved ones, and savor the delightful harmony of flavors that make healthy living both simple and scrumptious.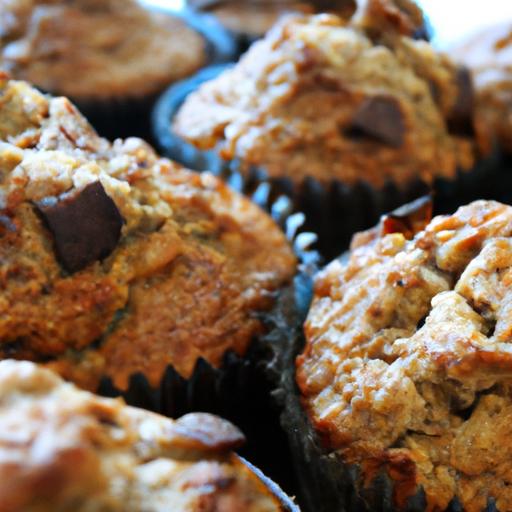
Choosing the Perfect Ingredients for Authentic pastelitos
Delicious Pastelitos Recipe begins with selecting the freshest, highest-quality ingredients that make all the difference between an ordinary pastry and a truly authentic, flavorful delight. Opt for all-purpose flour that is finely sifted to ensure a tender dough, and seek out unsalted butter or, even better, a combination of butter and vegetable shortening for that signature flaky texture. When it comes to fillings, freshness is key-whether you’re using ripe fruits, seasoned meats, or rich cheeses, fresh ingredients will elevate your pastelitos to an irresistible level.
Don’t shy away from exploring your local markets for aromatic spices and herbs like cumin, oregano, or fresh cilantro that can add a depth of flavour to savory fillings. For sweet pastelitos, quality fruit preserves or freshly diced fruits with a touch of cinnamon or vanilla will create a harmonious balance of sweetness and texture.
Mastering the Art of Dough Readiness for flaky, Crispy Layers
To achieve perfectly flaky layers in your pastelitos, the dough preparation is a critical step. Start by chilling your butter and shortening before cutting them into the flour; this keeps pieces solid and creates those signature puffed, delicate layers as the dough bakes. Use cold water sparingly to bring the dough together-too much moisture can make the pastry tough.
Work quickly as you fold and laminate the dough,rolling gently but with deliberate folds to build layers. Resting the dough in the refrigerator, wrapped in plastic, for at least 30 minutes allows the gluten to relax and prevents shrinkage during baking. Once rolled out, use a sharp knife or pastry cutter to create clean edges for perfect pastelito shapes that crisp beautifully in the oven.
Exploring Irresistible Filling Combinations to Satisfy Every Palate
One of the joys of this Delicious Pastelitos Recipe is the versatility of fillings. For savory options, try a mixture of ground beef sautéed with onions, garlic, and a pinch of smoked paprika, or opt for a creamy blend of cheese and sautéed spinach for a vegetarian twist. Sweet pastelitos delight the palate with luscious guava paste paired with cream cheese, or a cinnamon-spiced apple filling bursting with natural juice and texture.
Don’t limit yourself-experiment with combinations like pumpkin and nutmeg, or even spicy chicken with fresh herbs. The key is to balance moisture content and seasoning so the pastry holds up well without becoming soggy.
Pro Tips for Baking and Serving pastelitos Like a pro
Baking pastelitos to golden perfection requires precision. Always preheat your oven to a high temperature-around 400°F (200°C)-to activate the rising steam within the dough layers, resulting in irresistibly crispy, flaky pastry. Use a parchment-lined baking sheet for even heat distribution and easy cleanup.
To achieve a shiny, golden crust, brush each pastry gently with an egg wash just before baking. Keep an eye on the baking time; 15-20 minutes is usually sufficient, but ovens vary. Rotate the tray halfway through baking to encourage even browning.
Once baked, allow pastelitos to rest for a few minutes on a wire rack to retain their crispness. Serve warm, garnished with fresh herbs for savory versions or a dusting of powdered sugar for sweet ones. Accompany them with dipping sauces such as a zesty chimichurri, a creamy queso dip, or a simple honey drizzle for an elevated experience.
prep and Cook Time
- Prep Time: 30 minutes
- Cook Time: 20 minutes
- Total Time: 50 minutes
Yield
- Serves 8 pastelitos
Difficulty Level
- Medium
Ingredients
- 2 cups all-purpose flour, sifted
- 1/2 cup unsalted butter, cold and cubed
- 1/4 cup vegetable shortening, cold
- 1/2 tsp salt
- 1/2 cup ice-cold water
- 1 large egg for egg wash
- Filling of your choice:
- 1 cup ground beef, cooked and seasoned
- or 1 cup guava paste and 1/2 cup cream cheese
Instructions
- Prepare the dough: In a large bowl, combine sifted flour and salt. cut in chilled butter and shortening using a pastry cutter until mixture resembles coarse crumbs with pea-sized pieces.
- Add cold water: Gradually pour ice-cold water, mixing gently with a fork until the dough just comes together. Do not overwork.
- Chill the dough: Form the dough into a disc, wrap in plastic wrap, and refrigerate for 30 minutes to relax the gluten.
- Roll and fold: On a lightly floured surface, roll dough into a rectangle approximately 12×8 inches. Fold into thirds like a letter.rotate the dough, roll again, and repeat the fold twice more to create layers. Chill again for 15 minutes.
- Preheat oven: Heat your oven to 400°F (200°C). Line a baking sheet with parchment paper.
- Shape pastelitos: Roll the dough to about 1/8 inch thick. Cut into rectangles or squares. Place about 1 tablespoon of filling on one half of each piece. Fold over and seal edges firmly with a fork.
- Egg wash: Beat the egg and brush the top of each pastelito lightly for a glossy finish.
- Bake: transfer pastelitos to the baking sheet and bake for 15-20 minutes, until puffed and golden brown. Rotate halfway through for even browning.
- Cool and serve: Remove from oven and place on a wire rack to cool slightly. Serve warm for best flavor and texture.
Chef’s Notes
- For flakier dough: Keep all ingredients cold and avoid over-kneading to prevent toughness.
- Filling tips: Drain excess liquid from fruits or cooked meats to avoid soggy pastelitos.
- Make ahead: Dough can be prepared and chilled up to 24 hours in advance.
- substitutions: Butter can be replaced with all-shortening or half butter, half lard for a traditional touch.
Serving Suggestions
Present these pastelitos on a vibrant platter garnished with fresh cilantro or parsley for savory versions. Accompany with dipping sauces such as a smoky chipotle mayo or a classic garlic aioli. Sweet pastelitos shine with a dusting of powdered sugar and a side of fresh berries or a drizzle of honey. Pair your creation with a bright,refreshing beverage-consider a sparkling lemonade or a robust coffee to complement the rich layers.
| Nutritional Information (per serving) | Calories | Protein | Carbs | Fat |
|---|---|---|---|---|
| Pastelito with Ground Beef Filling | 280 kcal | 12 g | 28 g | 14 g |
| Pastelito with Guava & Cream Cheese | 260 kcal | 6 g | 32 g | 10 g |

want to deepen your pastry skills? Check out our Ultimate Flaky Pastry Dough guide for expert techniques.For more on authentic pastry crafting, visit Serious Eats, a trusted culinary resource.
Q&A
Q&A: Delicious Pastelitos Recipe – A Flavorful Pastry Guide
Q1: What exactly are pastelitos?
A1: Pastelitos are flaky, buttery pastries originating from Latin America and the Caribbean. thay’re typically filled with a sweet or savory mixture, ranging from guava and cream cheese to seasoned meats and cheeses. Think of them as little pockets of joy, bursting with flavor in every bite!
Q2: What makes pastelitos different from other pastries?
A2: Unlike many pastries that rely on a single flavor profile, pastelitos offer a delightful contrast-crispy, golden layers surrounding rich, frequently enough vibrant fillings. Their versatility allows them to shine as either a breakfast treat, snack, or even a party appetizer, bridging cultures and cuisines effortlessly.
Q3: What are the essential ingredients for making pastelitos?
A3: At the heart, pastelitos need good quality puff pastry dough, which gives that signature flaky texture. For the filling, common choices include guava paste with cream cheese for a sweet twist or spiced ground beef or chicken for savory lovers. fresh spices, a touch of sugar or salt depending on the filling, and an egg wash for that golden finish complete the list.
Q4: Can I use store-bought puff pastry for convenience?
A4: Absolutely! Store-bought puff pastry is a fantastic shortcut that still yields delicious results. Just be sure to thaw it properly and handle it gently to maintain those delicate layers. For purists or adventurous bakers, making puff pastry from scratch can be a rewarding challenge, but convenience never compromises flavor.
Q5: How do you prevent pastelitos from becoming soggy?
A5: The trick lies in ensuring the filling isn’t too wet. For fruit fillings, reduce excess juices by cooking them down a bit before filling the dough. For savory options, drain any liquids thoroughly. Also, brushing the pastry edges with egg wash and sealing tightly prevents leaks, keeping the layers crisp and perfect.
Q6: What’s the best way to bake pastelitos to achieve that golden, flaky crust?
A6: Bake them in a preheated oven at around 375°F (190°C) until they puff up and turn a rich golden brown-usually about 20-25 minutes. Applying an egg wash before baking gives them that irresistible sheen and helps with browning. For even baking, place them on a parchment-lined tray and avoid overcrowding.
Q7: Are pastelitos best enjoyed fresh, or can I reheat leftovers?
A7: Pastelitos are undoubtedly best fresh and warm, with that perfect crunch and melting filling. However, leftovers can be reheated in a toaster oven or conventional oven to revive the crispiness. Avoid microwaving if possible, as it tends to make the pastry soggy.
Q8: Can pastelitos be frozen for later?
A8: Yes! Assemble your pastelitos but don’t bake them.Freeze them on a tray until firm, then transfer to a sealed container or bag. When ready to enjoy, bake them straight from frozen-just add a few extra minutes to the baking time. This is a great way to have a fast,delicious snack on hand.
Q9: What creative filling combinations can I try beyond the classic options?
A9: The sky’s the limit! Try spinach and feta for a Mediterranean flair, sweet potato and cinnamon for a cozy twist, or even a spicy black bean and cheese combo for a vegetarian delight. Mixing sweet and savory within one pastelito also makes for a surprising and delightful culinary adventure.
Q10: Any tips for serving pastelitos at gatherings or parties?
A10: Serve pastelitos warm alongside a variety of dips like guava sauce, spicy salsa, or creamy aioli to elevate the experience. Pair them with fresh fruit or a crisp salad to balance richness. Their handheld size makes them perfect finger food-just warn guests to bring napkins as they can get deliciously messy!
With this flavorful pastry guide, you’re now equipped to master pastelitos that dazzle the eyes and delight the palate. Happy baking and buen provecho!
Insights and Conclusions
As you’ve discovered, pastelitos are more than just delightful pastries-they’re edible stories filled with rich flavors and vibrant culture. whether you prefer a savory bite or a sweet treat, mastering this recipe opens the door to endless variations and culinary adventures. So, roll up your sleeves, embrace the flaky dough, and let your kitchen become a haven where tradition meets taste. With each pastelito you create, you’re not just baking-you’re crafting a flavorful experience that brings people together, one delicious pastry at a time.
Crisp & Sweet almond florentines are a timeless confection that masterfully balance the delicate crunch of toasted almonds with a buttery, caramelized lace of golden syrup and honey. originating from Italy and popularized in France, these elegant cookies occupy a cherished spot in any dessert repertoire. Their irresistibly thin, crispy texture combined with the sweet nutty flavor creates an unforgettable indulgence perfect for elevating teatime or enchanting guests.
Prep and Cook Time
- Planning: 15 minutes
- Cooking: 12-15 minutes
- Cooling: 10 minutes
- Total Time: Approximately 40 minutes
Yield
About 24 delicate almond florentines, perfect for sharing or gifting.
Difficulty Level
Medium – patience and precision will reward you with bakery-worthy results.
Ingredients
- 1 cup sliced almonds (lightly toasted for depth of flavor)
- ½ cup granulated sugar
- 3 tablespoons unsalted butter, melted and slightly cooled
- 2 tablespoons honey (preferably mild-flavored, such as acacia)
- 2 tablespoons heavy cream (adds richness and helps caramelize)
- 1 tablespoon all-purpose flour, sifted
- ½ teaspoon pure vanilla extract
- Pinch of fine sea salt
- Optional: 3 ounces dark chocolate, melted (for drizzling or dipping)
Step by Step Guide to Achieving the Ideal Crisp and Golden Finish
- Preheat your oven to 350°F (175°C). Line two baking sheets with parchment paper or silicone mats for easy release.
- Lightly toast the sliced almonds in a dry skillet over medium heat for 3-4 minutes,stirring frequently until golden and fragrant. This step unlocks the nutty depth essential for crisp & sweet almond florentines.
- In a medium bowl,combine the sugar,melted butter,honey,and heavy cream. Whisk gently until fully integrated.
- Sift the flour over the wet mixture. Add the vanilla extract and salt, then gently fold in the toasted almonds, making sure every slice is coated.
- Spoon small dollops (about 1 tablespoon) onto the prepared trays, spaced at least 3 inches apart. Use the back of the spoon to gently spread each dollop into thin rounds, about 3 inches in diameter. Thinness is key to that perfect lace-like crispness.
- Bake for 12-15 minutes or until the florentines turn a deep golden amber and develop a glossy, bubbling surface.Watch closely after the 10-minute mark to avoid burning.
- Remove from oven. Let the cookies cool on the baking sheet for 5 minutes – this allows them to set before transferring.
- Using a thin spatula, gently lift and transfer the florentines onto wire racks to cool entirely. They will crisp further as they cool.
- If desired, drizzle or dip the underside in melted dark chocolate. Place on parchment paper and let the chocolate set before serving.
Expert Tips and Variations to Customize Your Almond Florentines
- For extra crunch: Mix in finely chopped pistachios or hazelnuts alongside almonds for a vibrant, multi-textured twist.
- Flavor play: Infuse the honey mixture with a splash of orange zest or a pinch of cinnamon for subtle aromatic complexity.
- Make-ahead magic: Florentines keep excellently in an airtight tin for up to a week. chocolate-dipped versions are best enjoyed within 3 days.
- Watch your oven carefully: Because florentines are thin, their thin edges can turn too dark quickly. Baking one test cookie first is a good measure.
- Gluten-free option: Replace all-purpose flour with almond flour and reduce the amount to 1 teaspoon; this yields a naturally nutty and crisp cookie.
- Presentation tip: Align cookies on delicate doilies or stack tied in parchment paper bundles for a charming gift.
Serving Suggestions
Serve almond florentines alongside a robust cup of black tea or an espresso for a harmonious counterpoint to their sweetness. Their thin,crisp texture pairs wonderfully with creamy desserts such as panna cotta or vanilla bean ice cream,adding a delightful crunch and nutty accent. garnish plates with fresh berries or edible flowers for an elegant touch that dazzles guests visually and palate-wise.
| Nutrient | Per Serving (1 Florentine) |
|---|---|
| Calories | 95 kcal |
| Protein | 2 g |
| Carbohydrates | 9 g |
| Fat | 6 g |
Explore more exquisite nutty cookies and almond cookie recipes on our site to expand your baking repertoire. For a fascinating dive into florentine history and variations, check out this detailed entry on Britannica.

Q&A
Q&A: Crisp & Sweet – the Ultimate Almond Florentine Recipe Revealed
Q1: What exactly is an Almond Florentine?
A: An Almond Florentine is a delicate, lacy cookie known for its crisp texture and sweet, caramelized almond flavor. Thin as a whisper, these golden beauties are frequently enough studded with toasted almond slices and finished with a drizzle or coating of rich chocolate. Think of them as edible works of art-light, nutty, and irresistibly crunchy.Q2: What makes this Almond Florentine recipe “ultimate”?
A: This recipe strikes the perfect balance between crispness and sweetness by using the right combination of butter, sugar, and almonds, baked just so. The result? Florentines that snap with a satisfying crunch but melt gently upon tasting.Plus, we share insider tips for avoiding common pitfalls like spreading or sogginess, ensuring bakery-quality treats every time.
Q3: Can I customize the recipe?
A: Absolutely! While classic Florentines feature sliced almonds, you can experiment with other nuts like pistachios or hazelnuts. For added depth, try mixing in a pinch of sea salt or a hint of orange zest. Chocolate lovers can get creative by using dark, milk, or white chocolate for coating or drizzling.
Q4: How do I achieve that perfect thin, lacy texture?
A: The secret lies in careful ingredient ratios and baking technique. The sugar caramelizes during baking, causing the batter to spread thinly and crisply. Using melted butter helps with even spreading, and spacing spoonfuls apart on the sheet prevents overlapping. Keep an eye on them as they bake, pulling them out once edges turn a delicate amber.
Q5: What’s the best way to store Almond Florentines?
A: to keep their crispness intact, store Florentines in an airtight container at room temperature. Placing a slice of bread inside the container helps absorb excess moisture and preserves that crisp bite. They’re best enjoyed within a week but can also be frozen for longer storage-just thaw gently before serving.
Q6: Are Almond Florentines difficult to make for beginners?
A: Not at all! The recipe is straightforward and forgiving, making it an excellent choice for bakers new and seasoned alike.With clear instructions and helpful tips, even first-timers can achieve stunning results that rival anything from a patisserie.
Q7: When is the perfect occasion to serve almond Florentines?
A: These elegant cookies are perfect for tea parties, festive holidays, or as a delicate accompaniment to coffee after dinner. Their refined sweetness and crunchy texture also make them wonderful gifts or stunning additions to dessert platters.
Q8: Any pro tips for enhancing flavor and presentation?
A: Toast your almonds lightly before mixing-they’ll bring out a nutty aroma that deepens the overall flavor. For a stunning finish, drizzle with melted dark chocolate or dip one edge for contrast. If you’re feeling fancy,sprinkle a tiny pinch of flaky sea salt over the chocolate before it sets-this sweet and salty combo is pure magic.
to sum up
As the delicate crunch of each almond florentine melts on your tongue, you’ll understand why this timeless treat continues to captivate taste buds around the world. With its perfect harmony of crisp,buttery layers and sweet almond essence,this recipe invites you to rediscover a classic with every bite.Whether enjoyed with afternoon tea or as a charming conclusion to a gourmet meal, these florentines are a testament to the art of simple ingredients transformed into unusual indulgence. So, gather your ingredients, embrace the process, and soon, the ultimate almond florentine will be yours to savor-crisp, sweet, and utterly unforgettable.