Quick & Tasty homemade Pepper Steak: Simple Recipe Guide
Quick & Tasty Homemade Pepper Steak is a culinary gem that brings together tender cuts of beef and the vibrancy of freshly cracked black pepper, creating a dish bursting with bold, comforting flavors. This classic stir-fry, rooted in Western adaptations of Asian cuisine, has become a go-to for flavorful weeknight dinners, combining speed with satisfaction. Whether you’re a seasoned home cook or just starting out, mastering this recipe offers both ease and delight at your dining table.
Prep and Cook Time
- Preparation: 15 minutes
- Cooking: 10 minutes
- Total Time: 25 minutes
Yield
Serves 4 hearty portions
Difficulty Level
Easy to Medium – perfect for busy evenings but remarkable enough for guests
Ingredients
- 12 oz flank steak, thinly sliced against the grain
- 2 tbsp vegetable oil, divided
- 1 large green bell pepper, sliced into thin strips
- 1 medium onion, thinly sliced
- 3 cloves garlic, finely minced
- 1 tbsp freshly cracked black pepper (adjust for desired heat)
- 3 tbsp soy sauce
- 2 tbsp oyster sauce
- 1 tbsp cornstarch
- 1/4 cup beef broth or water
- 1 tsp sugar
- Optional: 1 tsp toasted sesame oil for finishing
instructions
- Prepare the steak: Toss the thinly sliced flank steak with 1 tablespoon cornstarch and a pinch of salt. This helps seal juices and gives the beef a velvety texture after cooking.
- Make the sauce: In a small bowl, whisk together soy sauce, oyster sauce, beef broth, sugar, and half the cracked black pepper. Set aside.
- Heat the wok or large skillet: Add 1 tablespoon of vegetable oil over high heat until shimmering but not smoking. This intense heat ensures a perfect sear.
- stir-fry the steak: Add the beef in a single layer, letting it sear undisturbed for 30 seconds before tossing.Stir-fry until just browned but still tender, about 2-3 minutes. Remove and set aside.
- cook the aromatics and vegetables: Add remaining oil. Sauté minced garlic, onions, and bell peppers until crisp-tender, about 3 minutes, stirring constantly to preserve their vibrancy.
- Combine & finish: Return steak to the skillet. pour in the prepared sauce and add the remaining cracked black pepper. Toss to coat, stirring frequently until the sauce thickens, about 1-2 minutes. If the sauce is too thick, add a splash of broth.
- Optional touch: Drizzle with toasted sesame oil for a subtle nutty aroma before serving.
Chef’s Notes & Tips for Success
- Choosing the perfect cut: Flank steak or sirloin thinly sliced lies at the heart of tender Quick & Tasty Homemade Pepper Steak.Both soak up sauce beautifully without losing texture.
- Balance bold flavors: Freshly cracked black pepper dominates this dish, so don’t skimp for that signature zing. Adjust the amount to your spice comfort level.
- Marinate for 10 minutes: For extra flavor infusion, marinate the steak with soy sauce and pepper before cooking.
- Quick stir-frying: Use high heat with continuous tossing to prevent steaming. Work in batches if your pan feels crowded.
- Perfect sauce consistency: The key is patience-allow the sauce to bubble and thicken gently without burning to achieve a luscious coating for the beef and veggies.
- Make-ahead: Slice veggies and steak ahead of time. The sauce can be mixed in advance as well.
Serving Suggestions
Serve this luscious pepper steak over a bed of steamed jasmine rice or buttery mashed potatoes to soak up every bit of that glossy sauce.Garnish with thinly sliced green onions and a sprinkle of toasted sesame seeds for a pop of color and texture. For an extra touch of freshness, a side of crisp cucumber salad balances the dish beautifully.

Nutritional Information per Serving
| Calories | Protein | Carbohydrates | Fat |
|---|---|---|---|
| 320 kcal | 28 g | 10 g | 18 g |
Delve deeper into flavor pairings and stir-fry techniques with our Perfect Stir-Fry Techniques Guide. For health insights on beef cuts, visit ChooseMyPlate.gov.
Q&A
Q&A: Quick & Tasty Homemade Pepper Steak – Simple Recipe Guide
Q1: What makes this pepper steak recipe quick and easy?
A1: The recipe uses simple ingredients that come together in under 30 minutes, with a straightforward stir-fry technique that cuts down on prep and cooking time. No complicated marinades or long simmering-just quick searing and a flavorful sauce that’s ready before you know it!
Q2: Can I use any cut of steak for this recipe?
A2: For best results, opt for tender cuts like sirloin, flank, or ribeye, sliced thinly against the grain. These cuts cook fast and stay juicy. Tougher cuts can work if sliced super thin, but may need a bit more attention to avoid chewiness.
Q3: What kind of peppers work best?
A3: Classic bell peppers-red,green,or yellow-are ideal because of their natural sweetness and crunch.Feel free to mix colors for a vibrant dish. If you like a little heat, toss in some sliced jalapeño or chili flakes for a spicy kick.
Q4: Is this recipe gluten-free?
A4: It can be! Use tamari or a gluten-free soy sauce substitute instead of regular soy sauce, and double-check any other sauces or seasonings you add. The rest is naturally gluten-free: fresh veggies,beef,and basic pantry staples.
Q5: can I prepare this recipe ahead of time?
A5: You can slice the beef and peppers in advance to save time, but for the freshest, most tender results, stir-fry everything just before serving. If you make it ahead, store in an airtight container and reheat gently to avoid overcooking the beef.
Q6: What’s the secret to that perfect pepper steak sauce?
A6: The magic lies in balancing savory soy sauce, a touch of sweetness (like brown sugar or honey), and a hint of tang from rice vinegar or Worcestershire sauce. A quick cornstarch slurry thickens it to a glossy, clingy finish that coats every bite beautifully.Q7: What sides pair well with pepper steak?
A7: Keep it classic with steamed white rice or fluffy jasmine rice to soak up the sauce. For a low-carb option, try cauliflower rice or sautéed greens like bok choy or spinach. Even simple noodles make a great base.
Q8: How can I customize this recipe to suit my taste?
A8: Feel free to tweak the spice level by adding fresh ginger, garlic, or chili flakes. Swap the bell peppers for other crisp veggies like snap peas or broccoli. Experiment with garnishes like chopped scallions, sesame seeds, or fresh cilantro for extra punch.
Q9: Is pepper steak healthy?
A9: Absolutely! This homemade version is packed with lean protein and colorful veggies, making it a balanced meal. by controlling the ingredients and avoiding excessive oil or sugar, it’s a nutritious and satisfying dinner option.
Q10: Any tips for slicing the steak perfectly?
A10: Yes! Chill your steak in the freezer for about 15-20 minutes before slicing-this firms it up and makes thin slicing easier.Always cut against the grain (perpendicular to the muscle fibers) for maximum tenderness.
Embark on your quick & tasty pepper steak adventure-no fancy skills needed, just fresh ingredients and a pinch of love!
Closing Remarks
With just a few simple ingredients and a handful of easy steps, whipping up a quick and tasty homemade pepper steak is entirely within your reach. This flavorful dish proves that cooking from scratch doesn’t have to be complicated or time-consuming. Whether you’re aiming for a satisfying weeknight dinner or impressing guests with bold, savory flavors, this recipe is your reliable go-to. So, sharpen your knives, fire up that stove, and get ready to savor every bite of a classic comfort meal made right in your own kitchen. Happy cooking!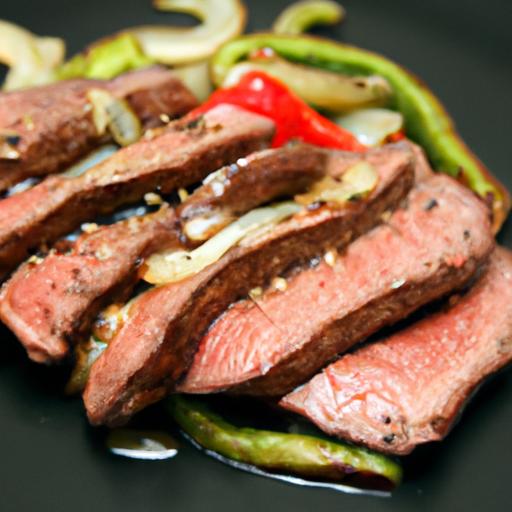
Delicious Homemade Cookie Recipes to Sweeten Your Day open a world of comfort and creativity. Nothing compares to the warmth of fresh-baked cookies, especially when classic favorites receive imaginative twists that excite the palate. By incorporating decadent ingredient combinations, you not only elevate the taste but also create a memorable baking experience that delights family and friends alike. Whether you’re craving the rich embrace of browned butter or the subtle crunch of toasted nuts folded into soft dough, these recipes promise perfection with every bite.
Prep and Cook Time
- Preparation: 15 minutes
- Chilling: 30 minutes (optional for enhanced texture)
- Baking: 10-12 minutes
- Total Time: approximately 45 minutes
Yield
Makes approximately 24 medium-sized cookies, perfect for sharing or an indulgent week’s supply.
Difficulty Level
Easy to Medium – Great for bakers looking to sharpen thier skills and explore versatile flavor profiles.
Ingredients
- 2 1/4 cups all-purpose flour, sifted
- 1 tsp baking soda
- 1/2 tsp fine sea salt
- 3/4 cup unsalted butter, browned and cooled
- 1 cup packed light brown sugar
- 1/2 cup granulated sugar
- 2 large eggs, at room temperature
- 2 tsp pure vanilla extract
- 1 cup bittersweet chocolate chunks
- 1/2 cup chopped toasted pecans
- 1 tsp flaky sea salt (for sprinkling)
- Optional: 1/4 cup milk powder or coconut flakes for added texture and depth
Instructions
- preheat the oven to 350°F (175°C). Line two baking sheets with parchment paper to ensure easy cleanup and even baking.
- Brown the butter
- In a large bowl, whisk together the sifted flour, baking soda, and sea salt. If using milk powder or coconut flakes, add them here for that twist in flavor.
- In a separate bowl, cream the browned butter with brown and granulated sugars until glossy. Beat in the eggs one at a time, then stir in vanilla extract.
- Combine wet and dry ingredients gently with a spatula until just mixed. Overmixing can cause tough cookies, so fold until no streaks of flour remain.
- Fold in chocolate chunks and toasted pecans uniformly, creating pockets of melty chocolate and nutty crunch.
- Chill the dough for 30 minutes if possible – this locks in flavors and helps control spread during baking.
- Scoop dough using a medium cookie scoop (about 1.5 tablespoons) onto prepared sheets, spacing them 2 inches apart.
- Bake for 10-12 minutes or until edges are golden but centers remain soft. Rotate pans halfway for even results.
- Instantly sprinkle flaky sea salt atop the warm cookies to enhance the flavor contrast and impart a gourmet touch.
- Cool on baking sheets for 5 minutes before transferring to wire racks to cool completely.
tips for Success
- Brown your butter carefully-watch it closely and remove from heat just as the nutty aroma emerges to avoid burning.
- Use room temperature eggs to ensure smooth incorporation and a tender crumb.
- Chilling the dough is optional but highly recommended for thicker cookies that bake evenly.
- substitute nuts with chopped walnuts, macadamia nuts, or even crushed pretzels for different textures.
- To make vegan cookies,swap butter for coconut oil and use flax eggs (1 tbsp flaxseed meal + 3 tbsp water per egg).
- Store cookies in an airtight container for up to 5 days or freeze dough balls for up to 3 months.
Serving Suggestions
Pair these irresistible cookies with a glass of cold milk, a steaming cup of fresh coffee, or a scoop of vanilla bean ice cream for the ultimate indulgence. Garnish with a light dusting of powdered sugar or a drizzle of dark chocolate sauce to elevate presentation for special occasions. Serve alongside fresh berries or an espresso shot for an afternoon treat that feels both luxurious and comforting.
| Nutritional Details (per cookie) | Calories | Protein | Carbs | fat |
|---|---|---|---|---|
| Classic Cookie with Pecan & Chocolate | 180 | 2g | 22g | 9g |

For more inspiration on baking techniques and sweet treats, explore our creative cookie decorating guide.To deepen your baking knowledge, visit Serious Eats Baking Science for expert tips on ingredient functionality.
Q&A
Q&A: Delicious Homemade Cookie Recipes to Sweeten Your Day
Q1: What makes homemade cookies taste better than store-bought ones?
A1: Homemade cookies carry a unique charm-it’s the blend of fresh ingredients,love,and the warmth of your own oven! Unlike mass-produced cookies,homemade ones have a personal touch,customizable flavors,and that irresistible aroma that fills your kitchen and heart alike.
Q2: Which basic ingredients are essential for baking classic cookies?
A2: at their core, classic cookies thrive on a simple harmony of flour, sugar, butter, eggs, baking soda (or powder), and a pinch of salt. From there,you can add chocolate chips,nuts,spices,or extracts to craft your signature sweet bite.
Q3: How can I ensure my cookies come out soft and chewy rather than hard and crunchy?
A3: Achieving the perfect soft and chewy texture often hinges on ingredient ratios and technique. Using more brown sugar than white sugar adds moisture, incorporating an extra egg yolk enriches chewiness, and baking just until golden (not overbaking) preserves tenderness. Chilling the dough before baking also helps prevent spreading and keeps the center delightfully soft.
Q4: Can I substitute ingredients to make cookies gluten-free or vegan without sacrificing flavor?
A4: Absolutely! Gluten-free flours like almond or oat flour can replace wheat flour, while flaxseed meal or applesauce are great egg alternatives in vegan recipes. Coconut oil or vegan butter can swap in for dairy butter. with these tweaks and a little experimentation, you can still savor luscious, flavorful cookies that meet dietary needs.Q5: What’s a fun way to personalize cookies for special occasions?
A5: The sky’s the limit! You can customize cookies by adding edible glitter, colorful icing, festive sprinkles, or creative shapes using themed cookie cutters. Incorporate unexpected flavors like lavender, citrus zest, or chai spices to surprise guests-and don’t forget unique fillings like caramel or jam for a sweet twist.
Q6: Any tips for storing homemade cookies to maintain their freshness?
A6: To keep your cookies tasting fresh, store them in an airtight container at room temperature. Soft cookies stay moist longer when paired with a slice of bread inside the container, which helps retain moisture. For longer storage, freeze baked cookies in a freezer-safe bag and thaw at room temperature when craving a sweet treat.
Q7: How can I involve kids in the cookie-baking process?
A7: Baking cookies is a magical family activity! Kids can help measure ingredients, mix dough, shape cookies, and decorate the final creations. It’s a perfect prospect to teach patience, math skills, and kitchen safety-all while making delicious memories.
Q8: What’s a classic cookie recipe to start with for beginners?
A8: The quintessential chocolate chip cookie is a beloved starting point. It’s straightforward, forgiving, and endlessly satisfying. With simple pantry staples and a basic recipe, you’ll quickly gain confidence and the joy of biting into a warm, gooey masterpiece.
Sweetening your day with homemade cookies isn’t just about the treat itself-it’s about the experience, creativity, and joy baked right in. Ready your apron, gather your ingredients, and let the cookie magic begin!
Closing Remarks
Whether you’re craving a classic chocolate chip or eager to experiment with unique flavors, these homemade cookie recipes are sure to bring a touch of sweetness to your day. Baking cookies is more than just mixing ingredients-it’s a way to create moments of joy, share warmth with loved ones, and savor the simple pleasures of life. so, roll up your sleeves, preheat your oven, and let the delightful aroma of freshly baked cookies fill your home. After all,the best recipes aren’t just about taste-they’re about making every day a little sweeter,one bite at a time.
Savor Flavor: Easy Homemade Pepper Steak Recipe to Try Today is your ticket to mastering a beloved classic that transforms simple, bold ingredients into a spectacular, tender dish bursting with umami-rich essence. This recipe honors the timeless Asian-American favorite, marrying tender beef with the aromatic kick of cracked black pepper and the savory depth of a perfectly balanced sauce. Whether this dish sparks memories of family dinners or inspires your first dive into pepper steak, you’ll find each step approachable and rewarding.
prep and Cook Time
- Prep Time: 15 minutes
- Cook Time: 20 minutes
- Total Time: 35 minutes
Yield
Serves 4 hearty portions
Difficulty level
Easy - Perfect for weeknights yet impressive enough for guests
Ingredients
- 1 lb beef flank steak, thinly sliced against the grain
- 2 tbsp vegetable oil (for high-heat searing)
- 1 medium green bell pepper, julienned
- 1 medium red bell pepper, julienned
- 1 medium onion, sliced thinly
- 3 cloves garlic, minced
- 1 tbsp freshly cracked black pepper (adjust to taste)
- 2 tbsp soy sauce (low sodium preferred)
- 1 tbsp oyster sauce
- 1 tbsp cornstarch, dissolved in 3 tbsp cold water
- 1/2 cup beef broth
- 1 tsp sesame oil
- 1 tsp sugar (balances boldness)
- Salt, to taste
Choosing the Perfect Cut of Beef for Tender Pepper Steak
To achieve that melt-in-your-mouth texture, selecting the right cut is key. Flank steak is ideal for pepper steak as it’s lean yet flavorful, and slicing it thinly against the grain ensures tenderness. Other great options include sirloin or skirt steak, both offering a beautiful beefy flavor and fast cooking times. When shopping, look for deep red color with good marbling; avoid cuts that are too thick or tough, as they’ll need longer braising and won’t deliver the signature tenderness.
Mastering the Balance of Spices and Sauces for Authentic Flavor
Authenticity in pepper steak comes not just from the beef but from the harmony of sauce ingredients. The cracked black pepper adds a spicy warmth without overpowering, complimenting the umami-rich soy and oyster sauces beautifully. To get it right, incorporate a pinch of sweetness with sugar, which balances the saltiness and accentuates flavors. Fresh garlic boosts the aroma,while a splash of sesame oil at the end imparts an irresistible nutty finish. Adjust pepper intensity based on preference-from a gentle tickle to a bold blaze.
Step-by-Step Guide to Preparing and Cooking Pepper Steak at Home
- Prepare the beef: Pat the flank steak slices dry with paper towels. This helps achieve a crisp sear. Season lightly with salt and half the cracked black pepper.
- Heat the pan: Use a large cast iron skillet or wok over high heat. Add vegetable oil and swirl to coat.
- Sear the beef: Add the beef in a single layer, working in batches if necessary.Sauté for 1-2 minutes per side until browned but not fully cooked through. Remove and set aside.
- sauté the vegetables: In the same pan, add onions and bell peppers. stir-fry 3-4 minutes until tender-crisp, then add garlic and sauté 30 seconds until fragrant.
- Build the sauce: Return beef to the pan. Pour in beef broth, soy sauce, oyster sauce, sugar, remaining cracked black pepper, and stir to combine.
- Thicken the sauce: Slowly add the cornstarch slurry while stirring gently. Cook for 1-2 minutes until the sauce thickens to a glossy consistency that coats the meat and vegetables beautifully.
- Finish with sesame oil: Drizzle sesame oil over the top and give a final stir. Taste and adjust seasoning as needed.
- Serve immediately: Garnish with sliced green onions or toasted sesame seeds for extra flair.
Tips for Success
- For extra tenderness, marinate the beef in a mixture of 1 tbsp soy sauce and 1 tsp cornstarch for 15-20 minutes before cooking.
- Use a wok or cast iron skillet for optimal high-heat searing.
- If you prefer less spice, reduce black pepper but never omit; it’s the key flavor star.
- Make ahead tip: prepare the sauce and chop veggies beforehand for a quick 15-minute final meal.
- Substitute oyster sauce with mushroom sauce for a vegetarian-amiable sauce base.
Serving Suggestions and Sides to Elevate Your Pepper Steak Experience
Presentation makes the dish sing.Serve your pepper steak steaming over a bed of fluffy steamed white rice or fragrant jasmine rice to soak up every bit of the luscious sauce. For a lighter option, pair it with stir-fried greens like bok choy or snap peas tossed in garlic.A sprinkle of toasted sesame seeds and crisp green onions adds inviting color and texture. For a heartier feast, accompany with garlic mashed potatoes or a side of egg-fried rice accented with scallions and peas.

| Nutrient | Per Serving |
|---|---|
| Calories | 320 |
| Protein | 28g |
| Carbohydrates | 10g |
| Fat | 15g |
discover more flavorful beef recipes in our Best Beef Dishes Collection for your next culinary adventure.
Q&A
Q&A: Savor Flavor – Easy Homemade Pepper Steak Recipe to Try Today
Q1: What makes this homemade pepper steak recipe stand out from others?
A1: This pepper steak recipe balances bold flavors with simplicity, turning pantry staples into a savory masterpiece. Unlike complicated versions, it uses a straightforward marinade and quick stir-fry technique that locks in juicy tenderness and vibrant peppery notes, perfect for weeknight cooking without sacrificing taste.
Q2: Which cut of beef works best for pepper steak?
A2: For tender, flavorful results, flank steak or sirloin strips are ideal. These cuts have just the right amount of marbling and texture to soak up the marinade while staying juicy and tender during quick cooking-no chewy surprises hear!
Q3: How do bell peppers enhance the dish? Can I substitute them?
A3: Bell peppers add freshness, color, and a subtle sweetness that contrasts delightfully with the savory beef and black pepper kick. You can experiment with red, green, or yellow peppers, or even try poblano or anaheim peppers for a smoky twist-each brings its own personality to the plate.
Q4: What’s the secret to achieving that perfect peppery punch?
A4: Freshly cracked black pepper is the star here.Toss it generously both in the marinade and during the final stir-fry. This layering approach ensures the pepper flavor is vibrant and aromatic,giving you that signature spicy warmth without overpowering the other ingredients.
Q5: Can this recipe be made ahead of time?
A5: Absolutely! Marinate the beef strips overnight to deepen the flavors, then simply stir-fry with peppers when ready. It’s a great strategy for busy schedules, so dinnertime feels effortless yet impressive.
Q6: What sides pair well with homemade pepper steak?
A6: Steamed jasmine rice or buttery mashed potatoes are classic companions that soak up the rich sauce beautifully. For a lighter option, try sautéed greens or a crisp cucumber salad to add refreshing contrast.Q7: how can I make this recipe gluten-free?
A7: Simply swap soy sauce for tamari or coconut aminos to keep the savory umami intact without gluten. This adjustment makes the dish accessible for various dietary preferences while preserving its authentic flavor profile.
Q8: Any tips for cooking the beef perfectly?
A8: High heat and quick cooking are key! Sear the beef strips just until browned and slightly pink inside to avoid toughness.Overcrowding the pan can cause steaming instead of searing, so cook in batches if needed for that restaurant-quality crust.
Q9: Can I add other vegetables to this pepper steak?
A9: Definitely! Onions, snap peas, mushrooms, or even baby corn can elevate the dish with additional textures and flavors. Just add them according to their cooking times to maintain crisp-tender freshness.
Q10: What inspired this easy homemade pepper steak?
A10: This recipe is a party of classic Asian-inspired flavors simplified for home cooks craving bold taste without hours in the kitchen. It’s about transforming everyday ingredients into a satisfying,flavor-packed dish that invites everyone to savor each bite.
In Retrospect
With its vibrant blend of tender beef, crisp peppers, and savory sauce, this easy homemade pepper steak recipe invites you to bring bold flavors to your dinner table without the hassle. Whether you’re a seasoned cook or just starting your culinary journey, savoring this dish is a delicious way to elevate everyday meals.So grab your skillet, embrace the sizzle, and let this recipe inspire your next flavorful adventure-because great taste should always be within reach.
Unlock Bold Flavors: Homemade Chimichurri Sauce Recipe invites you to discover the vibrant world of fresh herbs that give this iconic Argentine sauce its signature punch. Rooted in South American tradition, chimichurri is much more than a simple condiment-it’s a celebration of brightness, herbal freshness, and boldness that can elevate any meal, from grilled steaks to roasted vegetables.
Prep and Cook Time
- Preparation: 10 minutes
- Resting Time: 20 minutes (to allow flavors to meld)
- Total Time: 30 minutes
Yield
- About 1 cup of chimichurri sauce
- Serves 4-6 as a condiment
Difficulty Level
- Easy
Ingredients
- 1 cup fresh flat-leaf parsley, firmly packed, finely chopped
- 1/2 cup fresh cilantro, finely chopped (optional but traditional in some regions)
- 1/4 cup fresh oregano leaves, finely chopped
- 4 garlic cloves, minced
- 1 small shallot, finely minced
- 1/3 cup red wine vinegar
- 3/4 cup extra-virgin olive oil
- 1 teaspoon crushed red pepper flakes (adjust to taste)
- 1 teaspoon sea salt
- 1/2 teaspoon freshly ground black pepper
- Juice of 1/2 lemon (optional, for extra brightness)
Instructions
- Prep Your Herbs: Rinse parsley, cilantro, and oregano thoroughly to remove any grit. Pat dry fully with a clean kitchen towel or use a salad spinner. Finely chop all herbs to release their oils and vibrant colors.
- Combine Aromatics: In a medium bowl, mix the minced garlic and shallot with the red wine vinegar. Let this sit for 2-3 minutes to mellow their sharpness.
- Add Herbs and Spices: Stir in the chopped herbs, crushed red pepper flakes, salt, and black pepper. This is the stage where boldness takes shape, so taste to adjust seasoning if needed.
- Emulsify with olive Oil: Slowly drizzle in the olive oil while stirring continuously to bind the sauce into a luscious,slightly thickened emulsion.
- Brighten and Balance: Add lemon juice if using and give it a final stir. The lemon lifts the sauce’s brightness without overpowering the herbal notes.
- Rest: For the best flavor,cover and refrigerate your chimichurri for at least 20 minutes before serving. The flavors deepen and harmonize beautifully.
- Serve: Bring to room temperature before serving; give it a swift stir. Use promptly or store in an airtight container for up to one week.
Chef’s Notes: Tips for Success
- Freshness is key. Use vibrant, fresh herbs to unlock bold flavors-dry herbs won’t deliver the same punch.
- Balancing acidity and oil: If your chimichurri tastes to sharp,add a bit more olive oil or a pinch of sugar to soften the vinegar’s bite.
- Adjust the heat. Control the red pepper flakes for your preferred boldness-start small and build.
- Make-ahead tip: The sauce tastes even better after resting overnight; just re-stir before serving.
- For texture lovers: Rough chop the herbs instead of finely mincing for a chunkier, rustic chimichurri.
- Substitutions: Swap red wine vinegar for apple cider vinegar if desired. Use lemon juice sparingly if you want a subtler lift.
Serving Suggestions
- Grilled meats: Drizzle liberally over grilled ribeye, flank steak, or chicken for a fresh, zesty finish.
- Roasted vegetables: Toss warm roasted potatoes, carrots, or cauliflower with chimichurri to enliven earthy flavors.
- Seafood: Brush over grilled shrimp or drizzle onto pan-seared fish to introduce a shining herbal contrast.
- Breads and sandwiches: Use as a vibrant spread on crusty bread or smear inside sandwiches for an herbaceous kick.
- Garnish ideas: Add a few whole oregano leaves, a sprinkle of smoked paprika, or a wedge of lemon on the side for visual appeal and extra flavor layers.

Nutritional Details per 2 tbsp Serving
| Calories | Protein | Carbohydrates | Fat |
|---|---|---|---|
| 120 | 1g | 1g | 13g |
For those craving a culinary adventure beyond chimichurri, explore our Best Grilled Steak Recipes for perfect pairings. For more about the history and benefits of fresh herbs in sauces, visit Serious Eats.
Q&A
Q&A: Unlock Bold Flavors with Our Homemade Chimichurri Sauce Recipe
Q1: What exactly is chimichurri sauce?
A1: Chimichurri is a vibrant, herbaceous sauce originating from argentina. It’s a zesty blend of fresh parsley, garlic, vinegar, olive oil, and spices that brings a bright, bold punch to grilled meats, veggies, and even sandwiches. Think of it as your ticket to packing an ordinary dish with remarkable flavor.
Q2: Why should I make chimichurri sauce at home?
A2: While you can buy bottled versions, homemade chimichurri bursts with fresh, lively flavor that store-bought just can’t match. Plus, you control the ingredients-no preservatives, just pure goodness. It’s quick to whip up, versatile, and can transform simple meals into culinary adventures.
Q3: What ingredients do I need for the perfect chimichurri?
A3: The essentials are fresh parsley, garlic, red wine vinegar, olive oil, oregano, crushed red pepper flakes, salt, and pepper. Some variations add cilantro,lemon juice,or shallots for a twist. using fresh herbs and good-quality olive oil makes all the difference!
Q4: Can I customize chimichurri sauce to suit my taste?
A4: Absolutely! Love a little heat? Add more red pepper flakes or a splash of hot sauce. Prefer it tangier? Increase the vinegar or add a squeeze of lemon.Feeling adventurous? Experiment with different herbs like mint or basil. Chimichurri is flexible-make it your own bold masterpiece.
Q5: How do I store chimichurri sauce, and how long does it last?
A5: Store your chimichurri in an airtight container in the refrigerator. The flavors actually deepen after a few hours, making it even more appetizing the next day. It typically stays fresh for up to one week. Just give it a good stir before serving!
Q6: What dishes pair best with chimichurri?
A6: Grilled steak is the classic match, but chimichurri truly shines on roasted chicken, grilled shrimp, roasted vegetables, and even as a zesty salad dressing or sandwich spread.It’s the ultimate flavor booster for any dish craving a fresh, herbal kick.
Q7: Is chimichurri sauce healthy?
A7: Yes! Packed with fresh herbs and olive oil, chimichurri delivers antioxidants, healthy fats, and vitamins without heavy cream or butter. It’s a wholesome way to add exciting flavors without extra calories or gluten.
Q8: Can I make chimichurri sauce vegan and gluten-free?
A8: Absolutely. Chimichurri is naturally vegan and gluten-free since it’s made from simple plant-based ingredients. It’s perfect for accommodating various dietary preferences while keeping bold taste at the forefront.
Unlock the magic of this bright, punchy sauce and elevate your meals from mundane to splendid with our homemade chimichurri recipe. Bold flavors await!
Future Outlook
With its vibrant blend of fresh herbs, garlic, and tangy vinegar, chimichurri sauce is more than just a condiment-it’s a passport to bold, unforgettable flavors. By mastering this homemade recipe, your not only elevating your meals but also embracing a rich culinary tradition that transforms the ordinary into extraordinary. So go ahead, drizzle, dip, and savor-because unlocking bold flavors has never been this simple, fresh, or satisfying. Your taste buds will thank you.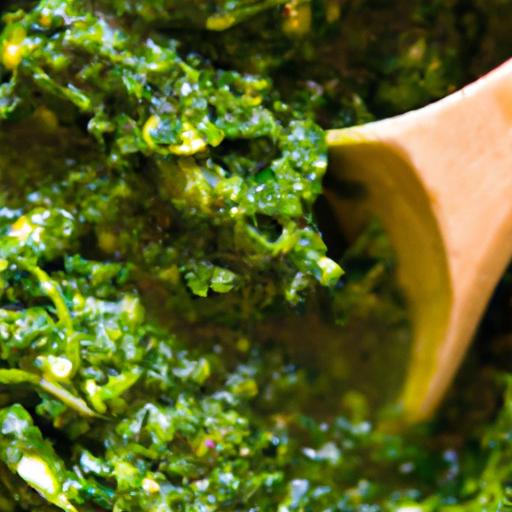
Chill Out: Easy Homemade Blue Raspberry Popsicle Recipe begins with gathering fresh,vibrant ingredients that promise a burst of color and flavor in every bite. Thes popsicles are not only a nostalgic nod to summer fun but also a versatile treat you can tailor to your taste buds. Classic blue raspberry flavorings bring a tangy, sweet zing, while a few simple staples transform this recipe from ordinary to extraordinary.
Prep and Cook Time
- Planning: 15 minutes
- Freezing Time: 6 hours (or overnight)
Yield
6 popsicles (depending on mold size)
Difficulty Level
Easy
Ingredients for Vibrant Blue Raspberry popsicles
- 1 cup fresh or frozen blue raspberries (defrosted if frozen)
- 1/2 cup granulated sugar or honey (adjust for sweetness)
- 1 cup water
- 1 tablespoon fresh lemon juice (for brightness)
- 1/2 teaspoon natural blue raspberry flavor extract (optional but recommended for intense color)
- A pinch of sea salt (to balance sweetness)
- 1/4 teaspoon citric acid or 1 teaspoon lemon zest (to enhance tartness)
Step-by-Step guide to Crafting Vibrant and Flavorful popsicles
- Create a simple syrup: in a small saucepan, combine the water and sugar. Heat over medium, stirring occasionally until the sugar fully dissolves. Remove from heat and allow to cool slightly.
- Prepare the blue raspberry base: place the blue raspberries in a blender along with the lemon juice, sea salt, and the cooled simple syrup. Blend until smooth.
- Strain for smoothness: Pour the mixture through a fine mesh sieve to remove seeds and pulp for a silky texture. Use a spatula to press the pulp to extract maximum flavor.
- Boost the blue raspberry flavor: Stir in the blue raspberry extract and citric acid or lemon zest. Taste and adjust sweetness or tartness as desired.
- Pour into molds: Carefully pour the liquid into popsicle molds, leaving a small gap at the top to allow for expansion as they freeze.
- insert sticks and freeze: Place the sticks in the molds and freeze for at least 6 hours or until fully solidified.
- enjoy! To release,briefly run warm water on the outside of the molds before unmolding your tasty,vibrant popsicles.
Tips and Tricks for Achieving the Ideal Texture and Sweetness
- Balancing act: Adjust the sugar or honey to suit your desired sweetness. Blue raspberries can be tart, so don’t be afraid to fine-tune the balance.
- Texture matters: Straining removes seeds for smooth popsicles, but leaving some for extra texture is a fun variation-especially for kids!
- Freeze evenly: Use silicone molds for easy removal and uniform freezing. avoid overfilling to prevent cracking.
- Natural color boost: Adding a small amount of blue raspberry extract intensifies the color without artificial dyes, creating an eye-catching, vibrant treat.
- Make-ahead tip: Popsicles can be stored in an airtight container or freezer bag for up to 2 weeks.
Creative Variations to Customize Your Blue Raspberry Popsicles
- Mint Infusion: Add 6-8 fresh mint leaves to the blender for a refreshing herbal hint.
- Magical Swirl: Blend in a quarter cup of vanilla Greek yogurt for creamy swirls.
- Berry Medley: Mix in a few whole blueberries or sliced strawberries for bursts of contrasting color and flavor.
- Coconut Dream: Substitute half the water with coconut water for a tropical twist.
- Fizz Factor: Freeze the popsicle base halfway, than add sparkling water before completing the freezing for a fizzy surprise.
Serving Suggestions
These vibrant blue raspberry popsicles look stunning served in clear glasses with a sprinkle of fresh mint or edible flowers for an elegant summer party. Pair with fresh berries or a light fruit salad to round out the refreshing experience. For a festive presentation,dip the popsicle tips in melted dark chocolate and roll in crushed nuts or sprinkles before refreezing.
| Nutrient | Per Popsicle |
|---|---|
| Calories | 70 |
| Protein | 0.5g |
| Carbohydrates | 18g |
| Fat | 0g |
Explore more homemade popsicle recipes to keep your chill game strong all season.For additional nutritional info and tips on fruit selection, visit the USDA official website.

Q&A
Q&A: Chill Out with an Easy Homemade Blue Raspberry Popsicle Recipe
Q1: Why choose blue raspberry for popsicles?
A: Blue raspberry isn’t just a vibrant color-it’s a fun,tangy flavor that instantly sparks summer vibes. Its perfect balance of sweet and tart makes it ideal for refreshing popsicles that cool you down on hot days.
Q2: Can I make these popsicles without artificial colors or flavors?
A: Absolutely! Using fresh or frozen raspberries combined with a touch of natural blue food coloring from butterfly pea flowers or spirulina powder can give you that iconic blue hue without the artificial additives.Q3: What ingredients do I need for the recipe?
A: Simply gather these:
- Fresh or frozen raspberries (for that berry punch)
- Blue food coloring or a natural option
- Water or coconut water (for hydration and a subtle flavor)
- Sweetener like honey, agave, or sugar, adjusted to taste
- Optional: a splash of lemon juice to brighten the flavor
Q4: How do I make the popsicles step-by-step?
A: It’s as easy as 1-2-3!
- Blend raspberries, water (or coconut water), sweetener, and lemon juice until smooth.
- Add natural blue coloring or a few drops of blue food coloring and mix well.
- Pour the mixture into popsicle molds, insert sticks, and freeze for at least 4-6 hours. Voilà!
Q5: Can I customize this recipe?
A: Definitely! Try adding mint for a refreshing twist, mixing in whole raspberries for texture, or using sparkling water rather of still water for a fizzy surprise. The recipe is a blank canvas-get creative!
Q6: How long do homemade popsicles last in the freezer?
A: for best taste and texture, enjoy them within 2-3 weeks. Beyond that, ice crystals may develop, changing the smoothness and flavor.
Q7: Are these popsicles kid-kind?
A: They’re perfect for kids and adults alike! Using natural ingredients means no extra chemicals, just pure fruity fun in every bite.
Q8: What if I don’t have popsicle molds?
A: No problem! Use small paper cups with wooden sticks or even ice cube trays paired with toothpicks. Just be sure the containers are freezer-safe and popsicle-sized.
Ready to chill out? This blue raspberry popsicle recipe is your ticket to an icy, fruity break anytime the heat cranks up!
The Conclusion
There you have it-a simple, vibrant way to beat the heat and bring a burst of blue raspberry bliss to your summer days. This easy homemade popsicle recipe proves that cooling off doesn’t have to be complicated or artificial; with just a few ingredients and a little patience, you can craft a refreshing treat that’s as fun to make as it is to enjoy. So next time the sun’s blazing and the cravings kick in, grab your molds, mix up that tangy blue raspberry goodness, and chill out with a popsicle made just the way you like it. Here’s to sweet, cool moments-and many more popsicle adventures ahead!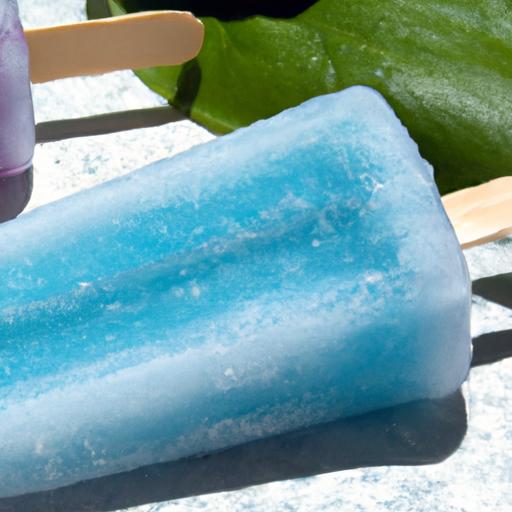
Crispy Delight: Easy homemade Banana Chips Recipe Guide
Crispy delight banana chips are a treat that perfectly balances crunch and flavor, turning simple bananas into irresistibly crispy snacks. Originating from tropical regions were plantains and bananas are staples, these chips boast a long heritage of being both wholesome and delightful. My own journey began when I sought a healthier alternative to store-bought snacks, and mastering the art of crafting these crunchy morsels at home became a revelation of technique and patience.
Prep and Cook Time
- Prep Time: 15 minutes
- Cook Time: 20 minutes (varies by method)
Yield
Approximately 4 servings (about 2 cups of banana chips)
Difficulty Level
Easy to Medium – Perfect for beginners willing to try slicing techniques!
Ingredients
- 3 large firm, green-yellow bananas (not overly ripe)
- 2 cups vegetable oil (or coconut oil for a subtle tropical flavor)
- 1/2 teaspoon salt (adjust to taste)
- 1/4 teaspoon smoked paprika (optional, for a warm smoky kick)
- 1/2 teaspoon chili powder (optional, for a spicy edge)
- 1 teaspoon sugar (optional, balances savory seasoning)
Instructions
- Selecting the Perfect Bananas: Choose firm, slightly underripe bananas-their sturdy texture ensures maximum crunch. Overripe bananas tend to be too soft and oily when fried.
- Mastering Your Slicing Technique: Using a mandoline slicer or a very sharp knife, slice bananas crosswise into uniformly thin rounds, about 1/8 inch thick. Consistency ensures even cooking and golden crispiness.
- Prep the Oil: In a deep, heavy-bottomed pan or fryer, heat vegetable oil to 350°F (175°C). Use a thermometer for accuracy-too hot burns the chips, too low makes them greasy.
- Frying to Golden Crunch: Working in small batches, gently drop slices into the hot oil. Fry for 3-4 minutes or until golden and crisp, flipping halfway. Stir gently to prevent sticking.
- Drain and Season: Using a slotted spoon, transfer chips to a paper towel-lined tray to absorb excess oil. While still warm, sprinkle with salt and your chosen seasonings like smoked paprika, chili powder, and sugar to enhance flavor.
- Cooling: Allow chips to cool wholly on a wire rack.This step ensures they stay crisp and make for the perfect bite.
Chef’s Notes: Tips for Success
- Banana Variety Matters: plantains can be used for a starchier chip but adjust frying time accordingly.
- Uniform Slices: If you don’t have a mandoline, carefully slice with a serrated knife to keep thickness even.
- Oil Temperature maintenance: Avoid overcrowding the pan; drop chips in small batches to keep oil temperature steady.
- Season While Warm: Seasoning sticks best when chips are hot and fresh from the oil.
- Make-ahead: Store cooled chips in an airtight container for up to one week. For extra crunch, reheat briefly in a 250°F oven.
Serving Suggestions
Present your homemade crispy delight banana chips in a vibrant bowl alongside a zesty guacamole dip or a creamy yogurt-based sauce infused with lime and cilantro. Garnish with a sprinkle of finely chopped fresh parsley or toasted sesame seeds for a gourmet touch. For a sweet twist, dust lightly with cinnamon and powdered sugar and serve with rich dark chocolate sauce on the side.

| Nutrient | Amount per 1/4 cup serving |
|---|---|
| Calories | 150 |
| Protein | 1g |
| Carbohydrates | 18g |
| Fat | 8g |
For more ideas on tasty plantain and banana snacks,check out our Tropical snack Recipes Collection. Learn more about the nutritional benefits of bananas on NutritionValue.org.
Q&A
Q&A: crispy Delight – Your Ultimate Easy Homemade Banana Chips Recipe Guide
Q1: What makes homemade banana chips different from store-bought ones?
A1: Homemade banana chips bring a fresh, natural crunch without the preservatives or excess oil found in many store-bought versions. You control the sweetness, seasoning, and cooking method, ensuring every chip bursts with authentic banana flavor and your personal touch.
Q2: Which type of bananas are best for making banana chips?
A2: The firmer, less ripe green or slightly yellow plantains or cooking bananas work best. These varieties hold their shape well during frying or baking and develop a satisfying crispness without turning mushy.
Q3: Can I make banana chips without frying?
A3: Absolutely! Baking or dehydrating banana slices are excellent alternatives to frying. Baking at a low temperature creates a crunchy texture with less oil, while dehydrating preserves maximum nutrients and chewiness for a healthier snack.
Q4: What’s the secret to making perfectly crispy banana chips?
A4: Thin,even slices are key-aim for about 1/8 inch thick. Also,soaking sliced bananas briefly in lemon water helps prevent browning and adds a subtle tang. Lastly, controlling temperature during frying or baking avoids soggy chips and locks in that irresistible crisp.
Q5: Can I add flavors to my banana chips?
A5: Definitely! Banana chips are a versatile canvas.sprinkle cinnamon and sugar for a sweet treat,dust with chili powder and salt for a spicy kick,or even try curry spices for an adventurous twist. The options are endless and fun to experiment with.
Q6: How should I store homemade banana chips to keep them crunchy?
A6: Store them in an airtight container at room temperature, away from moisture and heat. Adding a small sachet of silica gel or a piece of paper towel can help absorb excess humidity, keeping your chips delightfully crisp for up to two weeks.
Q7: Are homemade banana chips a healthy snack option?
A7: When made with minimal oil and natural seasonings, homemade banana chips can be a wholesome, energy-packed snack rich in fiber, potassium, and antioxidants. Just remember to enjoy them in moderation, as portion control is key even for healthy treats.
Q8: Can kids help make banana chips at home?
A8: Yes! Kids can assist by slicing bananas (with supervision), arranging slices on baking trays, or sprinkling spices. This makes for a fun, hands-on kitchen activity that encourages healthy eating habits and creativity.
Ready to crunch into the golden goodness of homemade banana chips? With this guide, you’re all set to make crispy delights that satisfy cravings and celebrate the humble banana in the most delicious way!
The Conclusion
As the final crunch fades, you’ll find that making homemade banana chips is not just a tasty adventure but a simple way to transform everyday fruit into a crispy delight. With just a few steps and wholesome ingredients, you can savor a snack that’s both satisfying and naturally flavorful. So next time the craving strikes, skip the store-bought options and embrace the rewarding process of crafting your own golden, crunchy banana chips-as sometimes, the best treats are the ones made with care at home. Happy snacking!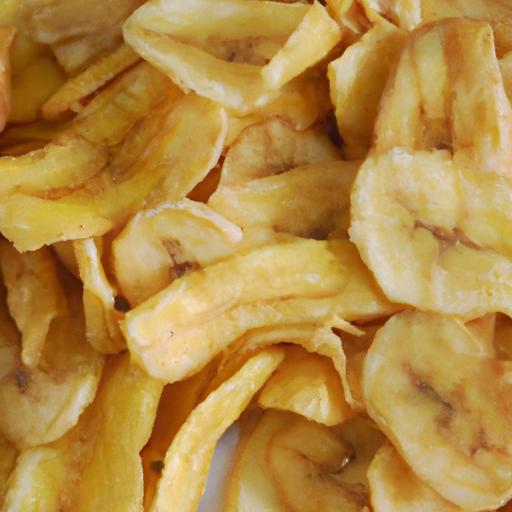
Sip Smart with homemade drinks that harness the vibrant nutritional power of hydrating ingredients. Infusing fresh fruits and herbs into your daily hydration ritual not only elevates flavour but also bolsters your immunity with antioxidant-rich elixirs designed to rejuvenate your body from the inside out. Drawing inspiration from both customary remedies and modern wellness trends, these simple yet sophisticated infusions transform ordinary water into revitalizing beverages that delight the palate and nourish the soul.
Prep and Cook Time
Preparation: 10 minutes
Chilling Time: 1 hour
Total: 1 hour 10 minutes
Yield
4 servings (approximately 8 oz each)
Difficulty Level
Easy – perfect for beginners and busy enthusiasts alike
Ingredients
- 4 cups filtered water
- 1 cup fresh strawberries,hulled and sliced
- 1 medium cucumber,thinly sliced
- 1 lemon,thinly sliced
- 10 fresh mint leaves,gently bruised
- 1 tablespoon raw honey (optional for subtle sweetness)
- 1 teaspoon grated fresh ginger (for a gentle immune-boosting kick)
Instructions
- Combine the base: In a large glass pitcher,pour the filtered water to ensure the purest taste.
- Prepare the produce: Add the sliced strawberries, cucumber, and lemon slices into the water.The citrus and berries naturally infuse vitamins and vibrant color.
- Add fresh herbs and spice: Gently bruise the mint leaves between your fingers to release essential oils before adding them. stir in the grated fresh ginger to elevate the immune-boosting profile without overpowering the drink.
- Sweeten if desired: drizzle the raw honey over the mixture and gently stir until dissolved; this subtle sweetness balances tangy citrus and peppery ginger.
- Chill for maximum flavor: Cover the pitcher and refrigerate for at least 1 hour. This resting period allows the hydrating ingredients to release antioxidants and flavor fully,creating a complex yet refreshing beverage.
- Serve smart: Pour over ice cubes in tall glasses.Optionally,garnish each serving with a fresh mint sprig or a thin lemon wheel for an elegant touch.
Tips for Success
- Variation: Swap strawberries with blueberries or raspberries for a different antioxidant profile and color.
- Herbal swap: Try basil or rosemary for a more aromatic approach to your hydration elixir.
- Honey choice: For vegan-pleasant drinks, replace raw honey with maple syrup or agave nectar.
- Make ahead: Prepare the infusion the night before to maximize flavor and antioxidant extraction.
- Use fresh, organic produce whenever possible to avoid pesticides disrupting the pure taste and health benefits.
- Pro tip: Lightly muddle the berries before adding them to increase juice release without breaking down all the fruit.
Serving Suggestions
Serve this vibrant, healthful beverage in clear glass tumblers or mason jars to showcase the brilliant colors and floating botanicals. Add reusable stainless steel or glass straws for an eco-friendly finish. Pair with light snacks like cucumber sandwiches, fresh fruit platters, or herbal salads to build a refreshing midday wellness break or a graceful accompaniment at brunch.Consider garnishing with edible blossoms or a twist of lemon peel to make every sip feel like an indulgent yet guilt-free treat.
| Nutrient | Per Serving (8 oz) |
|---|---|
| Calories | 30 |
| Protein | 0.5 g |
| Carbohydrates | 7 g |
| Fat | 0.1 g |
| Vitamin C | 40% DV |
| Antioxidants (ORAC units) | High |

For more creative hydration ideas, explore our Infused Waters for Health collection. To learn about the scientific benefits of antioxidants in fruits, visit the national Institutes of Health.
Q&A
Q&A: Sip Smart – Refreshing Homemade Drinks for Vibrant Health
Q1: Why should I choose homemade drinks over store-bought beverages?
A1: Homemade drinks put you in control of every ingredient-no hidden sugars, excessive preservatives, or artificial flavors.By crafting your own refreshing blends, you nourish your body with pure, vibrant nutrients that support long-lasting health and hydration.
Q2: What are some key ingredients to include for a health-boosting homemade drink?
A2: Nature’s pantry is rich and ready! Think antioxidant-packed berries, zesty citrus fruits, fresh herbs like mint and basil, hydrating cucumbers, and superfoods such as chia seeds or ginger. Combining these creates a symphony of flavors that awaken your senses and energize your cells.Q3: Can homemade drinks really impact my energy levels and mood?
A3: absolutely! Ingredients like lemon, ginger, and green tea contain natural compounds that stimulate metabolism and help reduce inflammation.Proper hydration with nutrient-dense drinks also keeps brain fog at bay, uplifting your mood and sharpening your focus throughout the day.
Q4: How can I make my homemade drinks suitable for all seasons?
A4: Customize your concoctions! In warm months, cool off with infused waters and iced herbal teas featuring cucumber and mint.When it’s chilly, cozy up with hot turmeric lattes or spiced apple cider infused with cinnamon and cloves. Each sip becomes a seasonal party of health.
Q5: Are there simple recipes for beginners who want to start sipping smart?
A5: Definitely! Start with a classic-lemon and mint-infused water. Just slice a lemon, add fresh mint leaves, fill a pitcher with water, and let it soak in the refrigerator for a few hours. It’s crisp, revitalizing, and a perfect primer for your homemade drink journey.
Q6: How frequently enough should I replace my daily beverages with homemade options?
A6: Aim to incorporate at least one homemade drink daily. over time, these refreshing choices can replace sugary sodas and processed juices, gradually transforming your hydration habits and boosting your vitality.
Q7: Besides hydration, what other health benefits come from sipping smart?
A7: Beyond quenching thirst, homemade drinks can aid digestion, support immune function, and improve skin radiance. Infusions with ginger soothe the stomach, while hibiscus tea provides antioxidants that help clear the complexion. It’s wellness in a glass!
Q8: where do I find inspiration to keep my drink recipes exciting and creative?
A8: Look to nature’s vibrant colors and seasonal produce. Explore markets for unique fruits like dragon fruit or starfruit, experiment with herbs and spices, and don’t hesitate to blend unexpected flavors. Your kitchen transforms into a playground where healthy,delicious discoveries await.
Sip smart, drink bright, and let every homemade sip be a toast to your vibrant health!
To Wrap It Up
As you embark on your journey to sip smarter, remember that each vibrant homemade drink is more than just a refreshment-it’s a small act of self-care, a burst of nature’s goodness in every glass. By crafting these revitalizing elixirs at home, you’re not only quenching your thirst but also nourishing your body and awakening your senses. So, raise your glass to health, hydration, and happiness, and let these colorful concoctions inspire a lifestyle where every sip supports your vibrant well-being. Here’s to drinking smart and living fully!
Power Up Your Mornings: Homemade Protein Breakfast Bars
Power Up Your Mornings with these homemade protein breakfast bars that blend wholesome ingredients to deliver a sustained energy boost. Whether you’re rushing out the door or savoring a cozy weekend breakfast, these bars perfectly balance rich proteins, enticing textures, and vibrant flavors to set an energized tone for your day.
Prep and Cook Time
- Preparation: 15 minutes
- Baking: 20 minutes
- Cooling: 30 minutes
- Total Time: 1 hour 5 minutes
Yield
Makes 12 bars
difficulty Level
Easy
Ingredients
- 1 cup rolled oats, gluten-free if desired
- ½ cup almond butter (or peanut butter for a richer taste)
- ¼ cup honey or maple syrup
- 1 scoop (30g) vanilla whey or plant-based protein powder
- ½ cup chopped nuts (walnuts, almonds, or pecans)
- ¼ cup dried cranberries or chopped dates
- 2 tbsp chia seeds for added omega-3 and crunch
- ½ tsp cinnamon
- ¼ tsp sea salt
- 1 tsp vanilla extract
- 2 tbsp dark chocolate chips (optional, for a hint of indulgence)
Instructions
- Preheat your oven to 350°F (175°C). Line a 9×9-inch baking pan with parchment paper, leaving some overhang to easily lift the bars after baking.
- In a large mixing bowl,combine the rolled oats,protein powder,chopped nuts,chia seeds,cinnamon,and sea salt. Toss gently to distribute evenly.
- in a small saucepan over low heat, warm the almond butter and honey until smooth and well blended, about 3 minutes. Remove from heat and stir in the vanilla extract.
- Pour the warm almond butter mixture into the dry ingredients and fold together until all components are evenly coated and start to stick. Fold in dried cranberries and chocolate chips last to keep their shape.
- Transfer the mixture into your prepared baking pan. Use a flat spatula or your hands (lightly greased) to firmly press the mixture down-packing it tightly helps the bars hold their shape and creates a satisfying chew.
- Bake for approximately 20 minutes or until edges turn golden brown and the bars feel set to the touch but still slightly soft inside.
- Remove from oven and allow bars to cool completely in the pan on a cooling rack-about 30 minutes. Once cooled, lift out using parchment overhang and slice into 12 bars.
Chef’s Tips for Success
- For a vegan or dairy-free option, substitute honey with maple syrup and use a plant-based protein powder.
- Experiment by swapping almond butter for sunflower seed butter if you have nut allergies.
- If your mixture feels too dry to stick together, add a tablespoon of warm almond milk or water gradually until the texture is just right.
- Press the mixture firmly before baking to avoid crumbly bars that fall apart.
- Store the bars in an airtight container in the refrigerator for up to one week,or freeze individually wrapped bars for up to a month.
serving Suggestions
These bars are perfect on their own or paired with a creamy spread like Greek yogurt or nut butter for an extra protein kick. Garnish with a light sprinkle of hemp seeds or a drizzle of melted dark chocolate for visual appeal and rich flavour contrast.For a refreshing breakfast, serve alongside fresh berries and a hot cup of herbal tea or your favorite coffee blend.

Nutrition Table
| Nutrient | Per Bar |
|---|---|
| Calories | 210 kcal |
| Protein | 12 g |
| Carbohydrates | 18 g |
| Fat | 10 g |
| Fiber | 4 g |
Additional resources
For more creative ways to power Up Your Mornings with high-protein breakfasts, check this curated guide. To understand the science behind why protein fuels your energy levels, visit Healthline’s Protein Benefits Overview.
Q&A
Q&A: Power Up Your Mornings with Homemade Protein Breakfast Bars
Q1: Why should I consider making my own protein breakfast bars instead of buying them?
A: Homemade protein bars offer a perfect blend of control and creativity! You know exactly what goes into them-no hidden sugars,preservatives,or mystery additives. Plus, you can tailor flavors and protein sources to suit your taste buds and dietary needs. It’s like crafting your morning fuel from scratch,ensuring every bite powers you up just right.
Q2: What are the essential ingredients in a homemade protein breakfast bar?
A: At the core, you’ll want a balance of protein (think whey, pea, or nut butters), healthy carbs (oats, quinoa flakes), and fats (nuts, seeds, coconut oil). Natural sweeteners like honey or maple syrup add just enough sweetness without the sugar crash. Don’t forget a pinch of flavor-vanilla, cinnamon, or even dark chocolate chips add excitement to your bars.
Q3: How do protein breakfast bars benefit my morning routine?
A: These bars deliver a steady stream of energy, helping stabilize blood sugar and curb mid-morning cravings.Their protein content aids muscle repair and keeps you feeling satiated longer, so you’re less likely to snack aimlessly. Basically, they’re a grab-and-go power-up that fuels your brain and body, even on the busiest days.
Q4: Can I make protein bars if I’m vegan or have dietary restrictions?
A: Absolutely! Swap dairy proteins for plant-based options like pea protein or hemp seeds.Use flaxseed or chia gel as binders instead of eggs. Customize sweeteners and add-ins to align with your preferences, ensuring your bars are both delicious and inclusive. Adaptability is the homemade bar’s superpower!
Q5: What’s the best way to store homemade protein breakfast bars?
A: Keep them airtight in the fridge, where they stay fresh and firm for about a week. For longer storage, wrap individually and freeze-than simply thaw when you need a quick morning boost. convenience and nutrition, preserved!
Q6: Any tips to make my protein bars extra delicious and nutritious?
A: Mix in superfoods like chia seeds, flaxseed, or spirulina powder for that extra nutrient punch. Experiment with texture by incorporating nuts, dried fruits, or coconut flakes.Toasting your nuts beforehand enhances their flavor, creating bars that tantalize your taste buds while feeding your muscles.
Q7: Where can I find reliable recipes to get started?
A: Plenty of creative food blogs, fitness sites, and nutrition platforms offer tested, inventive recipes. Start simple-think oat-based bars with peanut butter and protein powder-and customize once you get the hang of it. Your ideal protein bar is just a batch away!
Closing Remarks
as the sun rises and your day begins to unfold, powering up your mornings with homemade protein breakfast bars isn’t just a tasty choice-it’s a smart investment in your energy and wellbeing. These bars bring together wholesome ingredients,easy preparation,and the perfect punch of nutrition to keep you fueled from the very first bite. So why settle for the usual grab-and-go fare when you can craft your own delicious, nutrient-packed morning boost? with each bar you make, you’re not only nourishing your body but also embracing a mindful start to every day. Ready to rise, shine, and power up? Your perfect morning bite awaits.
chill Out: Creative Homemade Ice Cream Recipes to Try Today invites you on a flavorful journey where classic creamy textures meet unexpected flavor fusions. Experimenting with unique ingredients and textures transforms simple scoops into an extraordinary experience,and today’s recipes showcase how to master this art with ease.
Prep and Cook Time
- Preparation: 20 minutes
- Churning Time: 30 minutes
- Freezing Time: 4 hours minimum
Yield
Approximately 1 quart (4 generous servings)
Difficulty Level
Medium – ideal for adventurous home cooks ready to explore unique flavors and textures
Ingredients
- 2 cups full-fat coconut milk (for creaminess and subtle tropical flavor)
- 1 cup cashew cream (soaked and blended cashews for smooth texture)
- 3/4 cup organic maple syrup (natural sweetness that complements seasonal fruits)
- 1 teaspoon vanilla bean paste (adds depth and aromatic warmth)
- 1/2 teaspoon sea salt (balances sweetness and enhances flavor)
- 1 cup fresh seasonal fruit puree (e.g., ripe peaches, berries, or mango)
- 1 tablespoon lemon zest (for a bright, refreshing twist)
- Optional mix-ins: toasted coconut flakes, crushed pistachios, or chocolate chunks
Instructions
- Prepare cashew cream: Soak 1 cup of raw cashews in hot water for 1 hour. drain and blend with 1/2 cup water until silky smooth. Set aside.
- Blend base ingredients: In a high-speed blender,combine coconut milk,cashew cream,maple syrup,vanilla bean paste,and sea salt. Blend until fully incorporated and creamy, about 1 minute.
- Add the fruit puree: Stir in the fresh seasonal fruit puree and lemon zest by hand to create bursts of natural sweetness and bright citrus notes.
- Chill mixture: Transfer to a bowl, cover, and chill in the refrigerator for at least 2 hours to enhance flavors and ensure a cold base for churning.
- Churn: Pour the chilled mixture into your ice cream maker and churn according to manufacturer’s instructions (usually 25-30 minutes) until it reaches a soft-serve texture.
- Add mix-ins: In the final 5 minutes of churning,add any optional mix-ins like toasted coconut flakes or pistachios for delightful texture contrasts.
- Freeze to set: Transfer ice cream to an airtight container and freeze for at least 4 hours to firm up before serving.
Tips for Success
- Texture mastery: Using cashew cream provides a velvety, smooth mouthfeel without dairy, making this recipe perfect for vegan ice cream lovers.
- Seasonal fruit choice: Opt for fruits at the peak of ripeness for the richest natural sweetness; fresh peaches in summer or tart cranberries in winter add unique character.
- adjust sweetness: Maple syrup is the sweetener of choice to keep flavors natural, but you can substitute with agave or date syrup as preferred.
- Freeze doneness: When ice cream is too hard to scoop, let it rest at room temperature for 10 minutes to soften perfectly.
- Make ahead: This ice cream base can be prepared up to 2 days in advance, allowing flavors to meld beautifully when chilled before churning.
Serving suggestions
Serve your homemade ice cream in chilled bowls to keep it creamy longer. Garnish with fresh seasonal fruit slices, a sprig of mint, or a drizzle of dark chocolate sauce for a visually stunning presentation. Pair with crisp homemade cookies or toasted nuts to complement the luscious textures and elevate the experience.

| Nutrient | Per Serving |
|---|---|
| Calories | 280 |
| Protein | 4g |
| Carbohydrates | 35g |
| Fat | 15g |
Embrace Creative Homemade Ice Cream Recipes to Try Today by exploring these fresh, vibrant, and dairy-free options. For deeper insight into seasonal flavor pairing, visit Serious Eats on fruit pairings. Ready to expand your dessert repertoire? Check out our Easy Vegan Desserts guide to complement this frozen delight.
Q&A
Q&A: Chill Out – Creative Homemade Ice Cream Recipes to try Today
Q1: Why make homemade ice cream when I can just buy it from the store?
A: Store-bought ice cream is convenient, but homemade gives you creative control. You can experiment with unique flavors, control the sweetness and ingredients, and enjoy the satisfaction of crafting a creamy, dreamy treat tailored just for you. plus, it’s a fun kitchen project that cools you down in more ways than one!
Q2: Do I need an ice cream maker to get that perfect creamy texture?
A: Not at all! While ice cream makers make churning easy and smooth, you can create delightful no-churn recipes using just a freezer and a whisk or mixer. As an example, whipping heavy cream with sweetened condensed milk and your favorite mix-ins can yield luscious results without fancy equipment.
Q3: What are some creative flavor ideas beyond vanilla and chocolate?
A: The flavor playground is endless! Think lavender honey, roasted strawberry balsamic, matcha green tea, spicy mango chili, or even basil-lime sorbet. Don’t shy away from herbs, spices, or unexpected combos. Try to infuse your ice cream base with things like coffee espresso shots, toasted coconut, or crushed pistachios for exciting twists.
Q4: How can I make my homemade ice cream healthier?
A: Swap out heavy cream for Greek yogurt or coconut milk to lower fat and add probiotics. Sweeten naturally with honey, maple syrup, or mashed fruits rather of refined sugar. you can also fold in nutrient-rich add-ins like chia seeds, nuts, or antioxidant-packed berries. Homemade means you decide what goes in-no hidden preservatives or artificial flavors!
Q5: What’s the best way to mix in chunks like cookies, candy, or fruit?
A: Add your mix-ins during the last few minutes of churning or just fold them carefully into a no-churn base before freezing. This prevents sinking and keeps pieces evenly distributed. For extra flair, try swirls of caramel, fudge ribbons, or swatches of fruit preserves for texture and flavor bursts.
Q6: How long can I store homemade ice cream?
A: Typically, homemade ice cream tastes best within two weeks when stored in an airtight container in the freezer. Homemade varieties often lack stabilizers found in commercial brands, so they’re tastier fresh-but don’t worry, they usually keep their creamy charm for a while.
Q7: Can kids get involved in making homemade ice cream?
A: Absolutely! Ice cream making is a perfect activity to inspire young chefs. Kids can help measure ingredients, whisk mixes, and choose fun toppings or flavors.No-churn recipes are especially kid-friendly and mess-friendly-plus, tasting the results is the best part of the job!
Q8: Any tips for achieving a smooth, scoopable ice cream texture?
A: Yes! chilling your ice cream base overnight before freezing helps. When freezing, stir the mixture every 30 minutes during the first 2-3 hours to prevent large ice crystals. Also, using a bit of fat (like cream or coconut milk) and sugar helps with a smoother consistency. And when serving, let ice cream sit at room temp for a few minutes to soften slightly for perfect scoops.
Q9: Can I make dairy-free or vegan ice cream at home?
A: Totally! Use plant-based milks like almond, coconut, oat, or cashew. Coconut milk is a favorite for its rich,creamy texture. Sweeten naturally and add thickeners like chia seeds or avocado for creaminess. There are countless vegan recipes that rival the traditional ones in taste and texture-give your imagination the reigns!
Q10: What’s the most adventurous homemade ice cream flavor you recommend trying?
A: One standout is a smoky chipotle chocolate-rich dark chocolate ice cream with a subtle kick of smoky chili spice. It’s both comforting and daring, perfect for impressing guests or treating yourself to something unforgettable. If you’re feeling even bolder,try incorporating unexpected ingredients like rosemary,black pepper,or even a splash of balsamic vinegar!
Ready to chill out and whip up your own homemade ice cream masterpieces? Grab your ingredients,unleash your creativity,and prepare to taste summer’s coolest delights right in your kitchen!
Final Thoughts
whether you’re craving the classic creaminess of vanilla or feeling adventurous enough to whip up a batch of lavender honey or spicy chocolate chili,homemade ice cream invites you to play with flavors and textures like never before. armed with these creative recipes, your freezer is now a treasure trove of cool delights waiting to be discovered. So go ahead-chill out, get creative, and let every spoonful be a sweet escape crafted by your own hands. The perfect scoop is just a recipe away!
Crafting the Perfect Protein-Packed Tomato Basil Base
Boost Your Day: High-Protein Homemade Tomato Basil Soup begins with selecting the freshest, most vibrant ingredients to transform a humble tomato basil soup into a protein-rich powerhouse. This recipe celebrates the natural sweetness of sun-ripened tomatoes, the aromatic punch of fresh basil, and the richness of carefully chosen protein sources that elevate both flavour and nutrition.
Prep and Cook Time
- Prep Time: 15 minutes
- Cook Time: 30 minutes
- Total Time: 45 minutes
Yield
Serves 4 hearty bowls, perfect for a nourishing lunch or light dinner.
difficulty Level
Easy to Medium - No advanced skills needed, just a bit of love and attention to timing.
Ingredients
- 2 tablespoons olive oil, extra virgin for best flavor
- 1 medium yellow onion, finely chopped
- 4 cloves garlic, minced
- 6 large ripe tomatoes, chopped (or 28 oz canned whole peeled tomatoes, drained)
- 1 cup low-sodium vegetable broth or chicken broth for added depth
- 1 cup fresh basil leaves, roughly chopped
- ½ teaspoon crushed red pepper flakes (optional, for subtle heat)
- 1 cup cooked white beans (cannellini or navy beans), for plant-based protein
- 1 cup shredded cooked chicken breast or diced tofu, depending on preference
- ½ cup plain Greek yogurt, for creaminess and extra protein
- Salt and freshly ground black pepper, to taste
Instructions
- Heat olive oil in a large pot over medium heat. Add the chopped onion and sauté until translucent and fragrant, about 5-7 minutes. Stir occasionally to avoid browning.
- Add the minced garlic and crushed red pepper flakes (if using). Cook for 1 minute until aromatic, taking care not to burn the garlic.
- Stir in the chopped tomatoes and cook down for 10 minutes, breaking them apart with a wooden spoon as they soften, releasing their natural juices.
- Pour in the vegetable broth and bring the mixture to a gentle simmer. Allow to cook for another 10 minutes, letting the flavors meld.
- Add the fresh basil leaves, cooked white beans, and shredded chicken (or tofu). Stir gently to combine. Cook for 5 minutes to warm through the protein.
- Using an immersion blender, puree the soup until smooth but still slightly textured, preserving some bite for interest.
- remove from heat and stir in the Greek yogurt for a creamy finish. Season generously with salt and black pepper to taste.
- Serve hot, garnished with extra fresh basil leaves and a drizzle of olive oil or a sprinkle of grated Parmesan if desired.
Tips for success and Variations
- Ingredient Quality: Choose ripe,ripe tomatoes for a naturally sweet and vibrant base. If fresh tomatoes are out of season, high-quality canned tomatoes work beautifully.
- Protein Swaps: For a vegan protein boost, swap chicken for firm tofu cubes or an extra half cup of white beans.
- Make-Ahead Magic: This soup tastes even better the next day. Store in an airtight container in the fridge for up to 3 days or freeze in portions for up to 3 months.
- Consistency Control: For a thicker tomato basil soup, reduce the broth slightly; for a thinner version, add extra broth or water.
- Texture Tip: Leave some beans whole after blending for added bite and visual appeal.
Serving Suggestions
Present your protein-packed tomato basil soup in wide bowls to showcase its luscious, deep red hue. Garnish with fresh basil leaves and a swirl of olive oil or a dollop of Greek yogurt for creaminess. A crusty slice of garlic bread or whole-grain crackers on the side adds delightful crunch and pairs perfectly. For an extra nutritional punch, sprinkle toasted pumpkin seeds or hemp seeds atop your bowl just before serving.
| Nutrient | Per Serving |
|---|---|
| Calories | 250 kcal |
| Protein | 22 g |
| Carbohydrates | 20 g |
| Fat | 8 g |

For more ways to infuse your meals with vibrant nutrition, check out our Healthy Weeknight dinners. To understand how protein supports muscle health, visit Healthline’s protein guide.
Q&A
Q&A: Boost Your Day with High-Protein Homemade Tomato Basil Soup
Q1: Why choose tomato basil soup as a base for a high-protein meal?
A1: Tomato basil soup is a classic comfort food-rich, tangy, and herbaceous. By transforming it into a high-protein dish, you maintain those familiar flavors while creating a more satisfying, nutrient-packed meal that keeps you energized longer.It’s the perfect blend of tradition and nutrition!
Q2: What ingredients help pump up the protein content in this soup?
A2: To boost protein, common additions include Greek yogurt or cottage cheese for creaminess and muscle-building benefits, cooked lentils or chickpeas for plant-based protein, and sometimes shredded chicken or turkey for a meaty punch. Even hemp seeds or protein powder can be stirred in subtly!
Q3: How does the basil complement the protein-rich elements?
A3: fresh basil offers a bright, peppery counterbalance that lifts the earthy richness of protein sources. Its aromatic oils enhance the soup’s depth, making every spoonful vibrant and fresh, preventing heaviness and adding layers of flavor.Q4: Is this soup suitable for different dietary preferences?
A4: Absolutely! This recipe can be vegan or vegetarian by swapping dairy proteins for plant-based alternatives like silken tofu or blended cashews. For omnivores, lean meats or dairy work wonderfully. It’s a versatile canvas for any palate.
Q5: Can this soup really “boost your day,” as the title suggests?
A5: Yes! Protein sustains energy, supports focus, and aids muscle repair-all crucial for a productive day. Coupled with the antioxidants in tomatoes and the calming scent of basil, this soup is a flavorful, balanced way to fuel both body and mind.
Q6: What’s a simple tip for making this soup extra creamy without heavy cream?
A6: Blend cooked white beans or cauliflower into your soup base. They create a velvety texture and add a subtle nutty flavor, all while enhancing protein and fiber content-guilt-free creaminess at its best!
Q7: How can I make this soup quickly for a busy schedule?
A7: Use canned tomatoes, pre-washed fresh basil, and pre-cooked protein such as rotisserie chicken or canned lentils. A fast sauté and simmer take just 20 minutes, making it ideal for a nourishing lunch or dinner on the fly.
Q8: Any creative garnish ideas to finish the soup?
A8: Try a drizzle of basil pesto, a sprinkle of toasted pumpkin seeds, or a dollop of herbed Greek yogurt.These toppings add texture, extra flavor, and a nutritional boost, turning your soup into a feast for all senses!
With its marriage of tradition and nutrition, the high-protein homemade tomato basil soup is more than just a meal-it’s a daily boost in a bowl!
In Conclusion
As the final spoonful warms your soul and ignites your energy, remember that boosting your day doesn’t have to be elaborate. With a vibrant blend of fresh tomatoes, fragrant basil, and a hearty protein punch, this homemade tomato basil soup offers more than comfort-it delivers nourishment and vitality in every bite. So next time you crave something delicious yet wholesome, reach for this recipe and let it fuel your day the flavorful way. your body-and your taste buds-will thank you.