crispy Parmesan Roasted Brussels Sprouts are a festivity of texture and flavor brought to life with simple yet strategic steps. From selecting the freshest sprouts to achieving that irresistible golden crust,this recipe transforms a humble vegetable into a show-stopping side dish. Having perfected this method over countless kitchens, I find that it strikes a perfect balance between nutty Parmesan richness and the satisfying crispness every Brussels sprout lover craves.
Prep and Cook Time
Preparation: 15 minutes | Cooking: 25 minutes | Total: 40 minutes
Yield
Serves 4 as a side dish
Difficulty Level
Easy
Ingredients
- 1 ½ pounds fresh brussels sprouts, trimmed and halved
- 3 tablespoons extra-virgin olive oil
- 1 teaspoon kosher salt
- ½ teaspoon freshly ground black pepper
- 1 cup finely grated Parmesan cheese (preferably Parmigiano-Reggiano)
- 2 cloves garlic, minced
- 1 teaspoon garlic powder
- 1 tablespoon lemon juice (optional, for brightness)
- Zest of 1 lemon (for garnish)
- Red pepper flakes, a pinch (optional, for subtle heat)
Instructions
- Choosing the Perfect brussels Sprouts: Begin by selecting firm, vibrant green Brussels sprouts with tightly closed leaves. Smaller are sweeter and crisper, while medium-sized offer hearty texture. Avoid yellowing or loose leaves for optimal crunch.
- Prepare and Rinse: Rinse your Brussels sprouts under cold water, then trim the stems and halve each sprout lengthwise, which promotes even roasting and maximum surface crispiness.
- parmesan Coating Preparation: In a large bowl,combine olive oil,minced garlic,garlic powder,salt,and pepper. Toss the sprouts to coat evenly, then sprinkle in the grated Parmesan gradually, stirring gently to create a thin, flavorful crust without clumps.
- Roasting Setup: Preheat your oven to 425°F (220°C). Arrange the sprouts cut-side down in a single layer on a parchment-lined baking sheet. Spacing is key – give sprouts plenty of room so they don’t steam but roast to crisp golden perfection.
- Roast to Golden Perfection: Place the tray in the oven and roast for 20-25 minutes, turning once halfway through. Keep a close eye after 15 minutes: the Parmesan should meld and brown without burning, forming that treasured crispy crust. If you want extra crispiness, switch to broil for the last 1-2 minutes, watching carefully.
- Finish and Serve: Once roasted, toss the sprouts with a splash of fresh lemon juice and sprinkle with lemon zest and red pepper flakes for a lively finishing touch. Serve immediately for that unrivaled crispy experience.
Tips for Success
- Sprout Size Matters: Choose uniform sizes for even roasting. If some are larger, quarter them.
- Parmesan Quality: Freshly grated Parmesan (like Parmigiano-Reggiano) melts beautifully and provides complex nuttiness. Pre-grated cheese can contain anti-caking agents that affect coating texture.
- Spread Out: Don’t overcrowd the pan. Crowding traps steam and soggy sprouts are the enemy of crispiness.
- Make-Ahead: Prepare the Parmesan mixture and coat the sprouts a few hours ahead, then keep refrigerated. Roast right before serving for convenience.
- Substitutions: For a twist, swap Parmesan with Pecorino Romano or add a sprinkle of smoked paprika for smoky warmth.
- Reheating: Reheat in a hot oven or toaster oven to revive crispness. Microwaving will make them lose texture.
Serving Suggestions
These crispy Parmesan roasted Brussels sprouts shine as an elegant side at holiday tables or casual weeknight dinners. Serve alongside herb-roasted chicken or grilled salmon to complement their earthy flavor. For added indulgence, drizzle with balsamic glaze or a dollop of lemon-garlic aioli. Garnish with toasted pine nuts or crisp prosciutto pieces to elevate the dish visually and texturally. Pair with a chilled glass of dry white wine, like Sauvignon Blanc, to balance the richness and brighten your palate.

| Nutrient | Amount per Serving |
|---|---|
| Calories | 180 |
| Protein | 9g |
| Carbohydrates | 12g |
| Fat | 11g |
To learn more about perfect roasting techniques, check out our Ultimate Roasted Vegetables Guide. For nutritional insights on Brussels sprouts, visit ChooseMyPlate.gov.
Q&A
Q&A: Crispy Parmesan Roasted Brussels Sprouts – A flavorful Twist
Q1: What makes these Crispy Parmesan Roasted Brussels Sprouts different from traditional roasted Brussels sprouts?
A1: while classic roasted Brussels sprouts rely on simple olive oil and seasoning, this flavorful twist introduces a generous sprinkling of Parmesan cheese, which crisps up beautifully in the oven. The cheese creates a golden, savory crust that contrasts perfectly with the sprouts’ natural earthiness and slight bitterness, adding a new dimension of flavor and texture.
Q2: How do you achieve that perfect crispy texture on the Brussels sprouts?
A2: The secret lies in thorough drying and high-temperature roasting. After washing, make sure to pat the Brussels sprouts entirely dry. Tossing them in olive oil ensures each leaf gets coated, promoting caramelization. Roasting at around 425°F (220°C) helps create a beautifully crisp exterior while keeping the inside tender. Adding the Parmesan cheese partway through baking lets it melt and crisp without burning.
Q3: Can I customize the seasoning beyond just Parmesan?
A3: Absolutely! While Parmesan is the star, you can elevate the flavor with garlic powder, smoked paprika, or a pinch of red pepper flakes for heat. Fresh herbs like thyme or rosemary add aromatic notes, and a squeeze of lemon juice at the end can brighten the entire dish, balancing the richness of cheese and brussels sprouts.Q4: What’s the best way to prepare Brussels sprouts for roasting? Should I halve them or quarter them?
A4: Halving Brussels sprouts lengthwise is the most common and effective method-it exposes more surface area to the heat, encouraging browning and crispiness. If you want even crisper bites and faster roasting, you can quarter larger sprouts. Just keep in mind that smaller pieces roast faster, so keep an eye to prevent burning.
Q5: Can this recipe fit into different dietary preferences?
A5: Yes! It naturally fits vegetarian diets, and by opting for a vegetarian rennet Parmesan or a plant-based cheese choice, you can make it vegan-amiable. for those watching sodium, try reducing added salt and use a low-sodium Parmesan. The dish is gluten-free by nature, making it accessible for many dietary needs.
Q6: What occasions suit Crispy Parmesan Roasted Brussels Sprouts best?
A6: This dish is incredibly versatile! Whether it’s a weeknight side to jazz up dinner or a fancy addition to holiday feasts, these Brussels sprouts stand out. They pair beautifully with roasted meats, pasta dishes, or as a crispy topping on grain bowls. Their remarkable crunch and cheesy flavor make them a crowd-pleaser at any table.
Q7: Any tips for reheating leftovers without losing crispiness?
A7: Reheating roasted Brussels sprouts can be tricky since they tend to soften. The best method is to pop them back into a hot oven (around 400°F/200°C) for 5-7 minutes to crisp up again. Avoid the microwave, which makes them soggy. You can also refresh them in a hot skillet with a drizzle of olive oil for a fast re-crisp.
This Q&A unpacks the magic behind Crispy Parmesan Roasted Brussels sprouts, inspiring both novices and seasoned cooks to embrace this flavorful twist with confidence!
Final Thoughts
in the grand tapestry of vegetable dishes, Crispy Parmesan Roasted Brussels Sprouts stand out as a vibrant, flavorful thread-transforming a humble green into a culinary star. With their golden, crunchy exterior and savory cheesy embrace, these sprouts invite you to rethink what a simple side can be. Whether served alongside a hearty main or enjoyed as a guilt-free snack, this recipe proves that a little creativity, combined with quality ingredients, can turn even the most overlooked ingredients into irresistible delights. So next time you’re craving something both nutritious and delicious, let these Parmesan-kissed Brussels sprouts inspire your kitchen adventures-and savor every crunchy, flavorful bite.
Wholesome & Wallet-Friendly: Roasted Carrot Quinoa Delight celebrates the harmony of rustic flavors and nutrient-packed ingredients, making it a go-to recipe for those who crave nourishment without breaking the bank. The natural sweetness of perfectly roasted carrots paired with fluffy,protein-rich quinoa creates a vibrant dish full of textures and colors. Inspired by simple Mediterranean fare and the comforting aroma of freshly baked roots, this recipe transforms budget-friendly staples into a satisfying feast that invites both novice and seasoned cooks to master its art.
Prep and Cook Time
- Preparation: 15 minutes
- Roasting & Cooking: 30 minutes
- Total Time: 45 minutes
Yield
serves 4 generous portions
Difficulty Level
Easy - perfect for weeknight dinners or meal prep enthusiasts
Ingredients
- 1 cup quinoa, rinsed thoroughly
- 3 large carrots, peeled and cut into uniform sticks
- 2 tablespoons olive oil, divided
- 1 teaspoon ground cumin
- 1 teaspoon smoked paprika
- 1/2 teaspoon sea salt, divided
- Freshly ground black pepper, to taste
- 1/4 cup chopped fresh parsley, for garnish
- 2 cloves garlic, minced
- Juice of half a lemon
- 1/4 cup toasted pine nuts or slivered almonds (optional, for crunch)
Instructions
- Preheat your oven to 425°F (220°C). Line a baking sheet with parchment paper for easy cleanup and even roasting.
- Prepare the carrots: Toss the carrot sticks in 1 tablespoon olive oil, ground cumin, smoked paprika, and half a teaspoon of sea salt. Spread them evenly on the baking sheet, ensuring no overcrowding to promote caramelization.
- Roast the carrots for 25-30 minutes, flipping halfway to achieve golden edges and a tender interior.They should yield a gorgeous caramelized exterior with a natural sweetness that elevates the dish.
- Simultaneously occurring, cook the quinoa: In a medium saucepan, bring 2 cups of water to a boil. Add quinoa and a pinch of salt, reduce heat to low, cover, and simmer for 15 minutes or until the liquid is absorbed. Remove from heat and fluff with a fork.
- In a small skillet, warm the remaining 1 tablespoon olive oil over medium heat. Add minced garlic and sauté until fragrant and lightly golden-about 1-2 minutes-taking care not to burn it.
- Combine cooked quinoa and roasted carrots in a large bowl. Pour in the garlic oil, stir gently, then add fresh lemon juice, freshly ground black pepper, and the chopped parsley. Toss all ingredients until evenly incorporated.
- Optional: Sprinkle toasted pine nuts or slivered almonds on top for a delightful crunch and nutty depth.
- Adjust seasoning to taste and serve warm or at room temperature for maximum flavor harmony.
Chef’s Notes and Tips for Success
- To maximize flavor, allow the carrots to caramelize slowly without crowding on the pan; this encourages deep roasting rather than steaming.
- If you can’t find fresh parsley, fresh cilantro or chopped basil provide a lovely, fresh alternative.
- Quinoa substitutions: Brown rice or bulgur wheat can be used, but adjust water ratios and cook times accordingly.
- For an added protein boost, consider folding in crumbled feta or chickpeas after the dish is assembled.
- Make-ahead: Both roasted carrots and quinoa store beautifully in airtight containers for up to 3 days, allowing you to assemble quickly for lunches or dinners on busy days.
- Enhance the dish with a drizzle of tahini or a dollop of Greek yogurt when serving for creaminess.
Serving Suggestions
This roasted carrot quinoa delight shines as a vibrant main course or hearty side dish. Plate it alongside grilled chicken or roasted tofu for a complete meal, or enjoy it cold as a refreshing salad topped with crisp cucumber slices and cherry tomatoes. Garnish with additional fresh herbs and a wedge of lemon to brighten the palate. For visual appeal, serve it in a rustic wooden bowl or a brightly colored ceramic dish-accentuating the earthy tones of roasted carrots against the snowy quinoa.
| Nutrient | Per Serving |
|---|---|
| Calories | 280 kcal |
| Protein | 8 g |
| Carbohydrates | 45 g |
| Fat | 7 g |

Discover more nourishing quinoa recipes in our Healthy Quinoa Salads collection and learn about quinoa’s benefits from healthline’s comprehensive guide.
Q&A
Q&A: Wholesome & Wallet-Friendly: Roasted Carrot Quinoa Delight
Q1: What is the Roasted Carrot Quinoa Delight, and why should I try it?
A1: The roasted Carrot Quinoa Delight is a vibrant, nutrient-packed dish that marries the natural sweetness of roasted carrots with the nutty texture of quinoa. It’s a wholesome, budget-friendly meal that’s as kind to your body as it is to your wallet. Perfect for those seeking a healthy yet delicious option that doesn’t require gourmet ingredients or complicated prep.
Q2: Why quinoa and carrots? What makes this combo special?
A2: Quinoa is a powerhouse grain, loaded with protein, fiber, and essential amino acids – a rare find for a plant-based staple. Carrots, conversely, bring natural sweetness, beta-carotene, and crunch. Roasting the carrots caramelizes their sugars, adding depth and warmth that perfectly complements the fluffy quinoa. Together, they create a balanced dish that tastes as comforting as it is nutritious.
Q3: Is this recipe suitable for specific diets?
A3: Absolutely! This delight is naturally vegan, gluten-free, and allergen-friendly.It’s a fantastic choice for anyone following plant-based, paleo, or whole-food diets. Plus, it’s low in fat and free from processed sugars, making it a clean-eating champion.Q4: How does this dish help save money on meals?
A4: both carrots and quinoa are affordable staples that store well and frequently enough come in bulk. Unlike pricey superfoods or exotic ingredients, this dish uses everyday produce that won’t break the bank.Plus, it’s versatile-extras like beans, nuts, or seasonal herbs can be swapped in for variety without increasing costs much.
Q5: What are some creative ways to serve or customize the dish?
A5: The Roasted Carrot Quinoa Delight is a blank canvas! Toss in toasted nuts or seeds for crunch, sprinkle crumbled feta or tahini for creaminess, or zest it up with fresh herbs like parsley, mint, or cilantro. A squeeze of lemon juice or a drizzle of honey balances the flavors beautifully. Serve it warm as a main dish, or chill it for a refreshing grain salad.Q6: Can this dish be meal-prepped?
A6: Definitely! It keeps beautifully in the fridge for up to four days, making it a lifesaver for busy weeks. Batch cooking the quinoa and roasting a big tray of carrots in advance means lunch or dinner is ready in minutes. It also freezes well if you want to stash portions for later.
Q7: Any tips for perfect roasting?
A7: Slice carrots uniformly to ensure even cooking, toss them in a bit of olive oil, honey, salt, and pepper, then roast at around 400°F (200°C) until golden and tender-usually 20 to 25 minutes. Keep an eye toward the end to avoid over-browning. The goal is tender carrots with caramelized edges for maximum flavor.
Q8: Where can beginners find quinoa and how to cook it right?
A8: Quinoa is widely available in most grocery stores,often in the grains aisle. Rinse it thoroughly before cooking to remove its bitter saponin coating. Use a 2:1 water-to-quinoa ratio, simmer for about 15 minutes until it’s fluffy with little spirals appearing.Fluff with a fork and it’s ready to mix into your dish.
Q9: What nutritional benefits does this dish offer?
A9: Beyond being delightfully tasty, it’s rich in plant-based protein, fiber, vitamins A and C from the carrots, and essential minerals like magnesium and iron from quinoa. This combination supports digestion, boosts immunity, and provides lasting energy – all without overwhelming your digestive system or budget.
Q10: Any final words of encouragement for cooking this recipe?
A10: Embrace the simplicity and wholesomeness! This dish proves that healthy eating can be delicious, easy, and affordable. Don’t hesitate to experiment with your pantry staples-sometimes the most delightful meals come from the most humble ingredients. Your body and budget will thank you!
Closing Remarks
In the vibrant world of wholesome eating, the Roasted Carrot Quinoa Delight stands out as a shining example of how nutritious ingredients and budget-friendly choices can come together in perfect harmony. This dish not only nourishes your body with fiber-rich quinoa and sweet,caramelized carrots but also delights your palate with its rustic,comforting flavors. Whether you’re a seasoned home cook or a kitchen newcomer, this recipe invites you to savor simplicity without sacrificing health or your wallet. So next time you’re craving a meal that feels like a warm hug and respects your budget, remember this roasted carrot quinoa delight-a true testament to wholesome eating made easy and affordable.
Savoring roasted duck is an indulgent experience that perfectly balances rich, succulent meat with irresistibly crispy skin. Selecting the ideal duck ensures your journey from oven to plate is flawless, elevating this classic dish to festive-worthy heights. Whether it’s a holiday centerpiece or a special weekend treat, understanding how to choose, prepare, and serve duck unlocks a world of deep flavors and textures that dance on your palate.
Prep and Cook Time
- Readiness Time: 20 minutes
- Marinating Time: 4-6 hours (preferably overnight)
- Cooking time: 1 hour 30 minutes
- Total Time: approximately 2 hours
Yield
Serves 4 to 6 people, ideal for a cozy family feast or intimate dinner party.
Difficulty Level
Medium: Perfect for adventurous cooks ready to master crispy skin and tender duck meat.
Ingredients
- 1 whole duck (around 5 lbs), thawed and patted dry
- 2 teaspoons kosher salt
- 1 teaspoon freshly ground black pepper
- 1 orange, quartered (for cavity)
- 4 cloves garlic, smashed
- 2 sprigs fresh rosemary
- 2 tablespoons soy sauce
- 2 tablespoons honey
- 1 tablespoon Chinese five-spice powder
- 1 tablespoon grated fresh ginger
- 1 tablespoon apple cider vinegar
- 1 tablespoon olive oil
- Optional: 2 star anise pods (for marinade)
Instructions
- Prepare the Duck: Remove the giblets and excess fat from the duck cavity. Rinse under cold water and pat dry thoroughly, both inside and out. Dry skin is crucial to achieve crispiness.
- Score the Skin: Using a sharp knife, gently score the duck’s skin in a diamond pattern, being careful not to cut into the meat. This allows fat to render and crisp up beautifully.
- Season the Duck: Rub the entire duck with kosher salt and pepper,both inside the cavity and on the skin. Insert the orange quarters, garlic cloves, and rosemary sprigs into the cavity to infuse aromatic flavors.
- Mix Marinade: In a bowl, combine soy sauce, honey, Chinese five-spice powder, grated ginger, apple cider vinegar, olive oil, and star anise pods if using. Brush half over the duck and reserve the rest for basting.
- Marinate the Duck: Cover and refrigerate for 4 to 6 hours, preferably overnight, allowing the flavors to deeply penetrate.
- preheat Oven and Prepare Roasting Pan: Set oven to 375°F (190°C). Set a rack in a roasting pan to elevate the duck and allow fat to drip away.
- Roast Initial Phase: Place duck breast side up on the rack. roast for 1 hour, basting every 20 minutes with reserved marinade. This gradual cooking renders fat and builds flavor.
- Increase Heat for crispy Skin: After the first hour, increase the oven temperature to 425°F (220°C). Roast an additional 20-30 minutes until the skin turns a deep golden brown and crackles satisfyingly when poked.
- Rest the Duck: Remove the duck and tent loosely with foil. Let it rest for 15 minutes before carving to allow juices to redistribute, ensuring moist meat.
Chef’s Notes: Tips for Success
- Drying is Key: For ultimate crispy skin, dry the duck uncovered in the fridge overnight to air-dry the skin further.
- Render Fat Wisely: Save the rendered duck fat for roasting potatoes or vegetables-its flavor adds luxurious depth to side dishes.
- Marinade Variations: Swap Chinese five-spice with smoked paprika and fresh thyme for a Mediterranean twist.
- Carving Advice: Use a sharp knife or poultry shears to separate legs and breasts cleanly for a professional-looking presentation.
- Make-Ahead: Fully roast the duck ahead of time, then chill. Reheat at 350°F (175°C) for 15 minutes and broil briefly to rejuvenate crispness.
Serving Suggestions and Pairing Ideas for a Memorable Meal
The luscious texture of roasted duck calls for sides that complement rather than overpower its rich flavors. A classic pairing is roasted root vegetables, their natural sweetness balancing the savory meat. Brighten the plate with a tangy cherry or orange sauce,enhancing both color and taste.
Garnish with fresh herbs like rosemary or thyme sprigs and thin orange slices to echo the citrus notes infused during roasting. A creamy parsnip purée or buttery mashed potatoes provide comforting, mellow counterpoints.
For beverages, consider a robust Pinot Noir or a slightly tannic Merlot that harmonize beautifully with the duck’s depth and the marinade’s spice.

Nutritional Details
| Nutrient | Per Serving |
|---|---|
| Calories | 520 kcal |
| Protein | 38 g |
| Carbohydrates | 8 g |
| Fat | 38 g |
For a deeper dive into poultry preparation and additional roasting techniques,visit Serious Eats’ duck Roasting Guide.
Q&A
Savoring Roasted Duck: A Crispy Delight from Oven to Plate – Q&A
Q1: What makes roasted duck such a special dish compared to othre roasted meats?
A1: Roasted duck is revered for its rich, succulent meat paired with irresistibly crispy skin-a harmonious balance that’s hard to beat. unlike leaner poultry, duck’s higher fat content bastes the meat from within, creating deep flavor and moist texture. When roasted properly, the skin renders to golden, crackling perfection, turning every bite into a textural masterpiece.
Q2: How do you achieve that signature crispy skin on roasted duck?
A2: The magic lies in a few key steps: drying the skin thoroughly before roasting, scoring it gently to release fat, and seasoning it well. Starting with a cold duck and roasting at a moderate temperature helps slowly render fat beneath the skin. For an extra crunch, some chefs finish with a blast of high heat or a brief broil. Patience and careful temperature control truly pay off.
Q3: Is it necessary to prepare the duck in any special way before roasting?
A3: Absolutely! Trimming excess fat, pricking the skin without piercing the meat, and sometimes salting the skin several hours ahead can work wonders. This technique draws moisture from the skin, allowing it to crisp up beautifully. Some cooks also dry-age the duck uncovered in the fridge overnight for that coveted texture and intensified flavor.
Q4: What are some flavor pairings that complement roasted duck?
A4: Duck’s robust flavor pairs wonderfully with sweet, tart, and earthy notes. Classic combinations include fruit-based sauces like orange or cherry glaze, which cut through the richness. Herbs such as thyme or star anise add aromatic depth, while sides like roasted root vegetables or creamy mashed potatoes round out the plate with balance.
Q5: Can roasted duck be made ahead of time, or is it best served fresh from the oven?
A5: While roasted duck is best enjoyed hot for optimal skin crispness, it can be prepared ahead and gently reheated if done carefully.To preserve the skin’s texture, avoid microwaving; rather, reheat in a low oven and finish with a quick broil. Alternatively, shredded duck meat works beautifully cold in salads or sandwiches, showcasing its luscious flavor in a versatile way.
Q6: Any insider tips for someone roasting duck for the first time?
A6: Embrace the process and keep things simple. Don’t shy away from using a roasting rack to allow fat to drip away,and always save rendered duck fat-it’s liquid gold for roasting potatoes or sautéing greens. Lastly, trust your senses; a golden-brown skin and a juicy interior are your signposts to duck perfection.
Whether you’re a curious first-timer or a seasoned foodie, mastering roasted duck promises a culinary adventure filled with crispy thrills and savory delights. From oven rituals to plate presentation, it’s a dish that rewards patience with every luscious bite.
Wrapping Up
As the irresistible aroma of perfectly roasted duck lingers in your kitchen and the golden, crispy skin crackles beneath your knife, you realize that this timeless dish is more than just a meal-it’s an experience. From the meticulous preparation to the oven’s transformative heat, each step unlocks layers of savory depth that culminate in a tender, flavorful masterpiece. Whether served at a festive gathering or a quiet dinner for two, savoring roasted duck invites you to slow down, appreciate craftsmanship, and delight in every sumptuous bite. So next time you seek a culinary adventure that marries tradition with indulgence,let roasted duck take center stage-from oven to plate,a crispy delight worth relishing.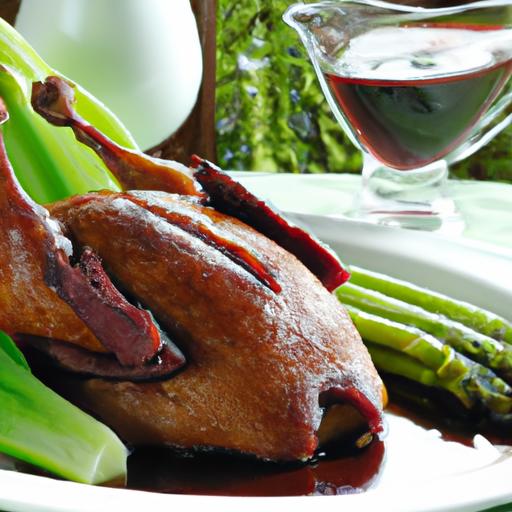
Crunchy Roasted Edamame: Ready in Just 15 Minutes! is the ultimate snack for those who crave a satisfying crunch paired with wholesome nutrition. This simple yet transformative roasting technique takes humble edamame pods from soft steamed bites to irresistibly crispy morsels packed with flavor.Inspired by Japanese izakaya snacks and powered by a love of healthy crunches, this recipe delivers a perfectly roasted edamame treat that’s both quick to make and endlessly customizable.
Prep and Cook Time
- Preparation: 5 minutes
- Roasting: 10 minutes
- Total Time: 15 minutes
yield
Serves 4 as a snack or appetizer
Difficulty Level
Easy – Perfect for novice and seasoned cooks alike
Ingredients
- 2 cups frozen shelled edamame, thawed and patted dry
- 1 tablespoon high-quality olive oil or toasted sesame oil
- 1 teaspoon sea salt, preferably flaky
- 1/2 teaspoon smoked paprika or chili powder (optional for a smoky kick)
- 1/2 teaspoon garlic powder
- 1 teaspoon toasted sesame seeds (optional garnish)
- Fresh lime wedges for serving
Instructions
- Preheat your oven to 400°F (200°C). line a baking sheet with parchment paper or a silicone mat for easy cleanup.
- Ensure your edamame is as dry as possible. Excess moisture will steam the beans rather than roast them, compromising crispiness.
- In a bowl, toss edamame with olive oil, sea salt, smoked paprika, and garlic powder until each piece is evenly coated.
- Spread edamame out in a single layer on the prepared baking sheet, ensuring they have space to crisp without steaming.
- Roast in the oven for 8-10 minutes, shaking the pan halfway through to promote even browning. Look for a golden hue and a fragrant, toasty aroma.
- Remove from oven and immediately sprinkle with toasted sesame seeds and a light squeeze of fresh lime for that pop of brightness.
- Cool slightly before serving to allow maximum crunch texture to develop.
Chef’s Tips for Success
- Start dry and stay dry: Pat your edamame dry with paper towels after thawing to prevent steaming during roasting.
- Customize your spice blend: Try curry powder, za’atar, or even a pinch of cayenne for diverse flavor profiles.
- Use high heat: Roasting at 400°F ensures a crisp exterior without drying the beans inside.
- Don’t overcrowd: Give edamame space on the baking sheet; crowding results in steaming rather than roasting.
- Make ahead: roast edamame can be stored in an airtight container for up to 3 days but is always best fresh for maximum crunch.
serving Suggestions and Creative Pairings
To elevate your crunchy roasted edamame snack, present it in small bowls garnished with a sprinkle of toasted sesame seeds and cracked black pepper. Add a wedge of lime or lemon on the side for an instant zesty lift. This snack pairs beautifully with chilled sake or an Asian-inspired cocktail like a yuzu gimlet.
For a creative appetizer twist, serve your roasted edamame alongside a miso yogurt dip or a spicy Sriracha mayo. Incorporate into grain bowls or salads for an added textural contrast. For a party crowd, fill edible cones or mini cups with the crunchy roasted edamame and delicate nori strips for bite-sized delights.
Nutritional Information
| Serving Size | Calories | Protein | Carbs | Fat |
|---|---|---|---|---|
| ½ cup roasted edamame | 140 kcal | 12g | 10g | 7g |
For further inspiration on healthy snacking, check out our Healthy Snack Ideas guide. Learn more about the nutritional benefits of edamame from trusted sources like the Healthline Edamame Benefits.

Q&A
Q&A: Crunchy Roasted Edamame – Ready in Just 15 Minutes!
Q1: What makes roasted edamame such a great snack?
A1: Roasted edamame is the perfect blend of crunch and nutrition. Packed with plant-based protein,fiber,and essential vitamins,it’s a guilt-free snack that satisfies your savory cravings while keeping you energized. Plus, roasting enhances the natural nuttiness, turning humble soybeans into a crispy delight.
Q2: How can I make crunchy roasted edamame at home in just 15 minutes?
A2: It’s surprisingly simple! Start with shelled or in-shell edamame, toss with olive oil, salt, and your favorite spices, then roast in a preheated oven at about 400°F (200°C).In roughly 12-15 minutes, you’ll get golden, crunchy bites that are warm, toasty, and utterly addictive.Q3: Can I customize the flavors?
A3: Absolutely! The beauty of roasted edamame is its versatility. Try classic sea salt and cracked black pepper, or get creative with garlic powder, smoked paprika, chili flakes, or even a dash of nutritional yeast for a cheesy twist. Sweet lovers might enjoy a sprinkle of cinnamon and a pinch of sugar.
Q4: is roasted edamame a healthy snack option?
A4: Definitely. Edamame is a powerhouse of plant protein and fiber, which help keep you full longer and support digestive health. Roasting instead of frying keeps calories in check, and by controlling your seasoning, you can avoid excess additives common in store-bought snacks.
Q5: Can I use frozen edamame to make this recipe?
A5: Yes! Frozen edamame is just perfect for roasting. Just make sure to thaw and pat them dry so they crisp up nicely in the oven instead of steaming.This quick prep helps achieve that irresistible crunch in no time.
Q6: what’s the best way to store leftover roasted edamame?
A6: keep leftovers in an airtight container at room temperature. They usually stay crunchy for up to two days. If they soften, a quick 3-5 minute re-toast in the oven will refresh their crispness before your next snack attack.
Q7: Can kids enjoy crunchy roasted edamame too?
A7: Absolutely! Roasted edamame makes a super kid-pleasant snack – easy to eat, fun to crunch, and full of nutrients to power their playtime. Just adjust seasoning to be mild and watch how quickly those little hands reach for more.
Feeling snacky? Give crunchy roasted edamame a whirl and discover your new favorite quick fix – nutritious, tasty, and ready before you can decide what movie to watch!
In summary
Whether you’re seeking a quick snack to power through your afternoon or a crunchy, protein-packed addition to your party platter, crunchy roasted edamame fits the bill perfectly-and in just 15 minutes! This simple recipe transforms humble soybeans into a satisfyingly crispy treat that’s as nutritious as it is indeed delicious.So next time hunger strikes, skip the chips and reach for a bowl of these golden, flavorful bites-you’ll be munching smarter, not harder. Crunch on, and enjoy the effortless goodness!
Choosing Fresh Ingredients for Maximum Flavor and Affordability
Budget-friendly Roasted Garlic-Parmesan Zucchini & Tomatoes calls for a mindful selection of produce that maximizes flavor without breaking the bank. Start with firm, vibrant zucchinis-preferably small to medium-sized with smooth skin and no soft spots. These deliver a tender texture and a naturally mild sweetness once roasted. For the tomatoes, seek out ripe, slightly firm varieties like Roma or vine-ripened tomatoes that offer rich flavor and hold up well in the oven. Seasonal farmers’ markets or local co-ops often provide the freshest gems at a fraction of supermarket prices.
When choosing your garlic, look for bulbs that are firm with tight papery skins; avoiding pre-minced or jarred garlic preserves the robust, fresh aroma and ensures a savory punch that’s worth every penny. Parmesan works best when bought as a block of cheese to grate fresh, as pre-grated versions can sometimes lack depth and freshness. This attention to ingredient quality transforms humble vegetables into an irresistible dish brimming with flavor and texture.
Mastering the Roasting Technique to Enhance Sweetness and Texture
To truly unlock the magic of roasted garlic-parmesan zucchini & tomatoes,roasting is your best freind. This technique caramelizes the natural sugars in the vegetables, creating that luscious golden edge and intensified flavor that steaming or frying can’t match. preheat your oven to 425°F (220°C) to ensure a hot environment that crisps the edges without drying the insides.
Arrange your sliced zucchini and halved tomatoes on a rimmed baking sheet in a single, even layer to allow hot air to circulate freely. Toss them lightly in olive oil,seasoning with salt and pepper before placing smashed garlic cloves among them. Roasting for about 20-25 minutes develops a sweet,tender interior with a slight char on the edges,giving the dish its signature balance of soft and crisp textures.Remember, the goal is gentle caramelization, so flipping halfway through ensures an even roast.
Balancing Garlic and Parmesan for the Perfect Savory Kick
Garlic and parmesan are a classic duo that delivers savory complexity in this dish, but balance is key. Too much garlic can overwhelm the bright, fresh qualities of the vegetables, while too little cheese leaves the dish feeling flat. Aim to use 3-4 fresh garlic cloves, lightly crushed but not minced, to infuse the oil and veggies subtly during roasting, allowing the garlic to soften and mellow as it cooks.
Grate about ½ cup of freshly grated Parmesan to sprinkle over the vegetables promptly after roasting, while they’re still hot. This melts slightly, melding with the caramelized edges and offering a nutty, salty finish that enhances every bite. For a deeper flavor, you can briefly broil the dish after adding the cheese for 1-2 minutes, just until bubbling and golden-watch closely to avoid burning.
Creative serving Suggestions to Stretch Your Budget Further
With this roasted garlic-parmesan zucchini & tomatoes recipe, versatility is your ally in making one meal serve several purposes. Serve it as a vibrant side with grilled chicken, pasta, or crusty bread for a complete, cost-conscious meal.For a vegetarian option, layer the vegetables over cooked quinoa or brown rice and drizzle with balsamic glaze for a wholesome bowl packed with flavor and nutrients.
Leftovers transform beautifully into warm sandwiches or flatbreads-just add a handful of fresh greens and a dollop of pesto or a light spread of ricotta. Garnish with freshly chopped basil or parsley to add a fresh burst of color and aroma. Using seasonal, budget-friendly ingredients combined with creative repurposing helps you enjoy maximum flavor and variety without stretching your grocery bill.

Prep and Cook Time
- Readiness: 10 minutes
- Roasting: 25 minutes
- Total Time: 35 minutes
Yield
Serves 4 as a side dish
Difficulty Level
Easy - perfect for beginners and busy weeknights
Ingredients
- 3 medium zucchinis, sliced into ½-inch rounds
- 4 medium ripe Roma tomatoes, halved
- 3-4 garlic cloves, lightly smashed
- 3 tablespoons olive oil
- ½ cup freshly grated Parmesan cheese
- Salt and freshly ground black pepper, to taste
- Fresh basil or parsley, chopped, for garnish (optional)
- Balsamic glaze (optional for drizzling)
Instructions
- Preheat the oven to 425°F (220°C) and line a large rimmed baking sheet with parchment paper or lightly grease it.
- Arrange the sliced zucchini and halved tomatoes in a single layer on the baking sheet, ensuring they are not overcrowded.
- Toss the vegetables gently with olive oil,salt,and pepper. Nestle the smashed garlic cloves evenly among the vegetables.
- Roast for 12 minutes, then use a spatula to flip the vegetables and garlic to promote even browning.
- Continue roasting for another 10-13 minutes, or until the vegetables are tender and caramelized with golden edges.
- Remove the pan from the oven and immediately sprinkle the freshly grated Parmesan cheese over the hot vegetables.
- Optional: Place the baking sheet under the broiler for 1-2 minutes to melt and brown the cheese, watching carefully to prevent burning.
- Transfer to a serving dish, garnish with chopped fresh herbs, and drizzle with balsamic glaze if using.
- Serve warm as a flavorful side or incorporate into other dishes as desired.
Tips for Success
- For a deeper roasted garlic flavor, roast extra whole garlic cloves alongside the vegetables and mash them into the dish as a spread.
- If you prefer a milder cheese, substitute Parmesan with Pecorino Romano or Asiago, but reduce salt accordingly.
- Use a mandoline slicer for uniform zucchini slices, ensuring even cooking and professional presentation.
- Make ahead: Roast the vegetables and store in an airtight container for up to 3 days; reheat gently to preserve texture.
- To keep the dish budget-friendly,buy cheeses in bulk when on sale and freeze portions in zip bags to maintain freshness.
Serving Suggestions
This savory dish shines when paired with simple, complementary flavors. Serve it atop or alongside:
- Warm garlic bread or toasted baguette slices for a rustic appetizer.
- Cooked couscous or whole-grain pasta tossed with fresh herbs and lemon zest for a light entrée.
- A bed of mixed greens drizzled with your favorite vinaigrette to add brightness and crunch.
- Grilled protein such as chicken breast or fish fillets, adding a fresh and healthy balance.
For an extra special touch, sprinkle toasted pine nuts or slivered almonds over the top for added texture and a nutty aroma.
| Nutrient | Amount per Serving |
|---|---|
| Calories | 140 kcal |
| Protein | 7 g |
| Carbohydrates | 8 g |
| Fat | 10 g |
For more inspiring ways to enjoy affordable, seasonal vegetables, check out our Seasonal summer Vegetable Recipes guide. To understand the science behind roasting and how it brings out sweetness in vegetables, visit Serious Eats: The Science of Roasting Vegetables.
Q&A
Q&A: All About Budget-Friendly Roasted Garlic-Parmesan Zucchini & Tomatoes
Q1: What makes this roasted garlic-Parmesan zucchini and tomatoes dish budget-friendly?
A1: This recipe shines because it relies on simple, affordable ingredients that are often staples in any kitchen-zucchini, tomatoes, garlic, and Parmesan cheese. These items are typically low-cost, especially when purchased in season or from local markets. Plus, roasting enhances their natural flavors, so you don’t need fancy spices or expensive extras to create a delicious side dish.
Q2: Why choose zucchini and tomatoes for this recipe?
A2: Zucchini and tomatoes are versatile,nutrient-packed veggies that complement each other perfectly. Zucchini offers a mild, tender base, while tomatoes bring a burst of juicy acidity. Together,roasted with garlic and Parmesan,they create a harmonious blend of savory,tangy,and cheesy notes that’s both satisfying and light.
Q3: How does roasting influence the flavors in this dish?
A3: Roasting is a magical technique that caramelizes the natural sugars in vegetables, intensifying their sweetness and adding depth. Garlic becomes mellow and nutty, zucchini softens but retains a satisfying bite, and tomatoes turn luscious and slightly charred. The oven’s dry heat also crisps up the Parmesan on top,lending a delightful texture contrast.Q4: Can I make this dish vegan or dairy-free?
A4: Absolutely! To keep things vegan or dairy-free, simply swap Parmesan for a plant-based cheese alternative or sprinkle nutritional yeast on top for that cheesy umami flavor. roasting the veggies with garlic and a drizzle of olive oil will still yield a tasty, budget-friendly side.
Q5: What are some serving suggestions for roasted garlic-Parmesan zucchini and tomatoes?
A5: This dish is incredibly versatile. Serve it alongside grilled chicken or fish for a wholesome dinner, toss it with cooked pasta or grains for a filling vegetarian meal, or enjoy it as a warm salad topper. It also works beautifully as a flavorful topping for toasted bread or as a side salad for picnics.
Q6: Any tips for getting the best texture and flavor when roasting?
A6: Yes! Cut your zucchini and tomatoes into uniform pieces to ensure even cooking. use a hot oven (around 400°F/200°C) to achieve caramelization without overcooking. Spread the veggies in a single layer on a baking sheet for maximum browning. And don’t be shy with the garlic and Parmesan-they’re the stars that bring it all together.
Q7: How long can I store leftovers, and can this dish be reheated?
A7: Leftover roasted zucchini and tomatoes can be stored in an airtight container in the fridge for up to 3 days. Reheat gently in the oven or on the stovetop to keep their texture intact.while they’re delicious warm, these veggies can also be enjoyed at room temperature or cold in salads.
Future Outlook
this Budget-Friendly Roasted Garlic-Parmesan Zucchini & Tomatoes dish proves that eating deliciously doesn’t have to drain your wallet. With simple ingredients and straightforward steps, you can transform humble veggies into a flavorful masterpiece that satisfies both your taste buds and your budget. Whether as a side, a light meal, or a colorful addition to your dinner table, this recipe brings together garden-fresh goodness and cheesy comfort in perfect harmony. So next time you’re aiming for a meal that’s easy, economical, and utterly satisfying, remember that a little garlic, Parmesan, and oven magic can turn ordinary zucchini and tomatoes into something extraordinary. Happy cooking-and even happier eating!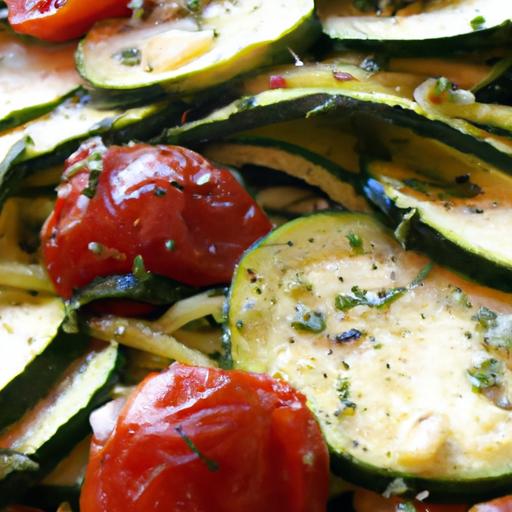
Savor the Flavor: Roasted Potatoes with Mushrooms & Peppers come alive when you choose the freshest, most compatible ingredients and apply time-tested techniques.Selecting the right potatoes and mushrooms is the foundation of this dish, marrying earthiness with a satisfying texture that dances on the palate. Whether you prefer the creamy bite of Yukon Golds or the crisp edges from Red Bliss, pairing them with robust Cremini or delicate Shiitake mushrooms brings depth and umami to every forkful.
Choosing the Perfect Potatoes and Mushrooms for Ultimate Roasting
Selecting potatoes with a medium starch content, such as Yukon Gold or Red Bliss, ensures tender insides and crisp, golden skins. these varieties hold their shape beautifully and develop irresistible caramelization during roasting. For mushrooms, opt for Cremini or button mushrooms for their full-bodied flavor or Shiitakes if you want an earthy, slightly smoky note. Cleaning mushrooms with a damp cloth rather than soaking preserves their texture and prevents sogginess.
Mastering the Art of Seasoning to Elevate Every Bite
Seasoning is where this roasted dish truly shines. A generous coat of extra virgin olive oil not onyl promotes crisping but also enhances flavor absorption. Freshly cracked black pepper and sea salt are must-haves, but layering fragrant herbs like rosemary, thyme, or smoked paprika takes it to the next level. Don’t underestimate the power of garlic-minced or sliced-and a splash of balsamic vinegar that elevates sweetness and tang concurrently.
Techniques to Achieve Crispy Skins and Tender Veggies
Preheat your oven to a high temperature-around 425°F (220°C)-to trigger a Maillard reaction, the magic behind that coveted golden crust. Cut potatoes into uniform pieces to ensure even cooking. Parboiling them briefly before roasting can jumpstart tenderness while drying them well after boiling encourages crispiness. Spread ingredients in a single layer on a rimmed sheet tray, giving space for hot air to circulate. Flip halfway through cooking to guarantee even browning. For mushrooms, roast them separately or after potatoes to avoid excess moisture softening the crisp edges.
Pairing Your Roasted Dish with Complementary Sides and Sauces
To enhance this vibrant medley, pair it with light, fresh sides like a zesty arugula salad tossed with lemon vinaigrette or a creamy herbed yogurt dip. Richer accompaniments, such as garlic aioli or a tangy chimichurri, bring an exciting contrast that harmonizes beautifully with roasted mushrooms and potatoes. For heartier meals, serve alongside grilled chicken or a juicy steak, letting these roasted vegetables steal the spotlight as a flavorful and textured foil.
Prep and cook Time
- Planning: 15 minutes
- Cooking: 35-40 minutes
Yield
Serves 4
difficulty Level
Easy to Medium
Ingredients
- 1.5 pounds Yukon Gold potatoes, washed and cut into 1-inch pieces
- 12 ounces Cremini mushrooms, cleaned and halved
- 1 large red bell pepper, sliced into strips
- 3 tablespoons extra virgin olive oil
- 3 cloves garlic, thinly sliced
- 1 teaspoon fresh rosemary, finely chopped
- 1 teaspoon fresh thyme leaves
- 1 teaspoon smoked paprika
- Salt and freshly ground black pepper, to taste
- 1 tablespoon balsamic vinegar
Instructions
- Preheat your oven to 425°F (220°C). Prepare a large baking sheet by lining it with parchment paper or lightly greasing it.
- Bring a pot of salted water to a boil. Add the potato pieces and parboil for 8-10 minutes until just tender but not falling apart.
- Drain potatoes thoroughly and pat dry with a clean kitchen towel or paper towels to remove excess moisture-this step is crucial for crispy skins.
- In a large mixing bowl, combine the potatoes, mushrooms, and sliced bell pepper. Drizzle with olive oil and balsamic vinegar.
- Add garlic, rosemary, thyme, smoked paprika, salt, and pepper. Toss everything gently to evenly coat the vegetables in the seasoning.
- Spread the vegetables in a single layer on the prepared baking sheet, ensuring they aren’t overcrowded.
- Roast for 20 minutes, then gently flip the vegetables using a spatula for even browning.
- Continue roasting for another 15-20 minutes or until the potatoes are golden and crisp and mushrooms are tender with caramelized edges.
- Remove from oven and let rest for 5 minutes before serving to enhance flavor melding.
Chef’s Notes
- For vegetarian variations, omit balsamic vinegar and swap smoked paprika for cumin for a smoky twist.
- If pressed for time, skip parboiling but roast potatoes an extra 10 minutes at the end, stirring frequently.
- Feel free to add other vegetables like zucchini or cherry tomatoes for a colorful expansion of flavors.
- Make ahead tip: Roast the vegetables up to a day in advance, then reheat in a hot oven for 10 minutes to regain crispiness.
Serving Suggestions
Garnish your roasted potatoes with mushrooms and peppers using freshly chopped parsley or a sprinkle of grated Parmesan to add brightness and umami. Serve alongside a crisp green salad or a cool tzatziki sauce to introduce refreshing textures and a creamy contrast. For dinner parties, plate the dish on rustic wooden boards, allowing guests to savor the flavors with crusty artisan bread and a glass of chilled white wine such as Sauvignon Blanc.
| Nutrient | per Serving |
|---|---|
| Calories | 220 kcal |
| Protein | 5g |
| Carbohydrates | 30g |
| Fat | 9g |

For even more cozy vegetable roasting ideas,explore our roasted vegetable recipes collection. To dive deeper into the science of roasting and optimal seasoning, visit Serious eats for expert tips and techniques.
Q&A
Q&A: Savor the flavor of Roasted Potatoes with Mushrooms & Peppers
Q1: What makes roasted potatoes with mushrooms and peppers a standout dish?
A1: This dish masterfully combines earthy, tender potatoes with the rich, umami depth of mushrooms and the sweet, vibrant crunch of peppers. Roasting brings out the natural sugars in each ingredient, resulting in a harmonious medley of textures and flavors that dance on your palate.
Q2: Which types of potatoes work best for roasting with mushrooms and peppers?
A2: Yukon Gold or red potatoes shine here due to their creamy interior and ability to crisp beautifully on the outside. Their subtle buttery flavor perfectly complements the robust mushrooms and sweet peppers, making every bite a cozy experience.
Q3: How do mushrooms and peppers enhance the overall flavor profile?
A3: Mushrooms add a savory, meaty note that deepens the dish’s complexity, while peppers bring a pop of color and a touch of sweetness or mild spiciness, depending on the variety. Together, they elevate humble roasted potatoes into a vibrant, satisfying feast.
Q4: What’s the secret to achieving perfectly roasted potatoes?
A4: The trick lies in balance-toss the potatoes in olive oil, salt, and herbs, then give them space on the pan to crisp evenly. Preheating the oven to a high temperature (around 425°F/220°C) helps develop that irresistible golden crust while keeping the inside soft and fluffy.
Q5: Can this dish be customized to suit different tastes or diets?
A5: Absolutely! Swap bell peppers for fiery chilies if you crave heat, or add fresh herbs like rosemary or thyme for an aromatic kick. For a vegan boost, drizzle with a tahini dressing post-roast, or incorporate garlic and onion powder to intensify flavors without extra calories.
Q6: What pairs well with roasted potatoes, mushrooms, and peppers?
A6: This dish is versatile-it can stand alone as a hearty vegetarian meal or accompany grilled meats, roasted chicken, or even a crisp green salad.A tangy yogurt dip or a drizzle of balsamic glaze can add an extra layer of flavor to complement the roasted elements.
Q7: How can I make this dish ahead of time without losing its deliciousness?
A7: Roast the potatoes, mushrooms, and peppers a few hours ahead, then gently reheat in the oven to revive their crispness. For meal prep, store them in an airtight container and refresh in a hot skillet or oven before serving to maintain that fresh-from-the-oven charm.
Q8: Any pro tips for elevating the dish to restaurant-quality?
A8: Finish with a sprinkle of flaky sea salt and fresh herbs just before serving, and consider adding a squeeze of lemon juice or a drizzle of infused oil (like garlic or chili oil) to brighten the flavors. Presentation counts, so arrange the components artfully on the plate to entice both eyes and taste buds!
Final thoughts
As the last golden morsel melts on your tongue, you’re reminded that simple ingredients-when roasted to perfection and combined thoughtfully-can transform into a symphony of flavors. Roasted potatoes, mushrooms, and peppers don’t just fill a plate; they tell a story of comfort, warmth, and rustic elegance. whether enjoyed as a hearty side or a standalone delight, this dish invites you to savor not only each bite but also the moments shared around the table.So next time you crave something both familiar and intriguingly vibrant, let this roast remind you that the best flavors often come from the humblest roots.
Golden Rosemary Roasted Potatoes are a festivity of crispy texture and herbaceous aroma, turning an everyday side into an unforgettable delight. Starting with the right potatoes and lovingly infusing fresh rosemary alongside aromatic herbs, this dish captures rustic charm with sophisticated flavor. Whether you’re hosting a dinner party or elevating a weeknight meal, mastering these roasted potatoes promises golden-brown perfection with an irresistible crunch.
Prep and Cook Time
- Planning: 15 minutes
- Cooking: 45 minutes
- Total Time: 60 minutes
Yield
- Serves 4
Difficulty Level
- Easy
Ingredients
- 2 lbs Yukon Gold potatoes, washed and cut into 1-inch cubes
- 3 tbsp extra virgin olive oil
- 2 sprigs fresh rosemary, finely chopped
- 1 tsp fresh thyme leaves
- 4 cloves garlic, minced
- 1 tsp kosher salt
- ½ tsp freshly ground black pepper
- 1 tbsp unsalted butter, melted (optional for extra richness)
- Chopped fresh parsley, for garnish
Instructions
- Choose the right potatoes: Yukon Golds provide a perfect balance, with creamy interiors yet firm enough to crisp beautifully. Avoid waxy or starchy extremes for optimal texture.
- Preheat your oven to 425°F (220°C). This high heat is essential for achieving that coveted golden crust while keeping the inside tender and fluffy.
- Prepare the potatoes: Pat the cut cubes dry using a clean kitchen towel. Excess moisture will steam the potatoes and reduce crispiness.
- In a large mixing bowl, toss potatoes with olive oil, butter, garlic, rosemary, thyme, salt, and black pepper. Spread evenly on a large rimmed baking sheet in a single layer-crowding will cause steaming instead of roasting.
- Roast for 25 minutes. After the first 15 minutes,toss or flip the potatoes gently with a spatula to ensure even browning and prevent sticking.
- Continue roasting for another 20 minutes. Keep a close eye-the potatoes should be an inviting deep golden-brown with crisp edges and tender insides.
- Remove from the oven and let rest briefly. This allows flavors to settle and ensures lingering moisture evaporates for maximum crunch.
- garnish generously with freshly chopped parsley. This adds a burst of color and fresh herbaceous contrast to the warm earthiness of the potatoes.
Tips for Success: Mastering the Roasting Technique
- Patience is key: Resist the urge to overcrowd your pan; this alone transforms your crispiness.
- Cut uniformly: Even-sized potatoes cook evenly, avoiding underdone or overcooked pockets.
- Use high-quality herbs: Fresh rosemary and thyme release an intoxicating fragrance as thay roast alongside the potatoes.
- Flip halfway: Turning the potatoes prevents burning and encourages even caramelization.
- Try a quick parboil (optional): For ultra-crisp results, boil potatoes for 5 minutes first, then drain and dry before roasting.
Serving Suggestions to Elevate Your Crispy herb Delight
These golden, fragrant potatoes pair beautifully with virtually any main course. Consider serving alongside herb-roasted chicken or grilled salmon for a symphony of complementary flavors. For a Mediterranean touch, sprinkle crumbled feta and a drizzle of tangy lemon yogurt over the top. Adding a vibrant side salad with peppery arugula and roasted cherry tomatoes provides refreshing balance.
For festive occasions, present this dish in a rustic ceramic bowl, garnished with additional rosemary sprigs and a sprinkle of flaky sea salt, enhancing both aroma and visual appeal. A glass of chilled Sauvignon Blanc or a light pale ale will perfectly complement the herby crispiness.
| Nutrition Per Serving | Amount |
|---|---|
| Calories | 220 |
| Protein | 3g |
| Carbohydrates | 28g |
| Fat | 9g |

Discover more ways to enhance your kitchen creativity by exploring our Essential Spice Guide.For an authoritative dive into herbs and their culinary uses, visit the American Herb Association.
Q&A
Q&A: Golden Rosemary Roasted Potatoes: Crispy Herb Delight
Q1: What makes Golden Rosemary Roasted Potatoes so special?
A1: These potatoes are the perfect harmony of crispy,golden exteriors and fluffy,tender interiors. Infused with fragrant rosemary and a touch of garlic, each bite bursts with savory herbaceous delight, turning simple spuds into a gourmet treat.
Q2: Which type of potatoes work best for roasting?
A2: Starchy or all-purpose potatoes, like Yukon Gold or Russets, shine in this recipe.Yukon Golds are particularly favored for their natural buttery flavor and creamy texture, which contrasts beautifully with a crisp, golden crust.Q3: how do I achieve that perfect crispy texture without drying out the potatoes?
A3: The secret lies in pre-soaking the cut potatoes in cold water to remove excess starch,then drying them thoroughly before roasting. Tossing them in high-quality olive oil and roasting at a high temperature (around 425°F/220°C) ensures a golden, crispy exterior while keeping the inside fluffy.
Q4: Can I customize the herb mix or add other flavors?
A4: absolutely! While rosemary is the star herb here, feel free to add thyme, oregano, or even a pinch of smoked paprika for a twist. A sprinkle of Parmesan or a drizzle of lemon juice post-roasting can also elevate the dish.
Q5: What dishes pair best with Golden Rosemary Roasted Potatoes?
A5: These potatoes are versatile companions – perfect alongside a juicy roast chicken, grilled steak, or even a hearty vegetarian grain bowl. Their robust flavor and satisfying crunch also make them a crowd-pleasing side for holiday feasts.
Q6: Can I prepare Golden Rosemary Roasted Potatoes ahead of time?
A6: You can prep them in advance by cutting and soaking the potatoes, then refrigerating until ready to roast. For best crispiness, roast them fresh just before serving. leftovers reheat well in a hot oven or air fryer to regain their crunch.
Q7: Is this recipe suitable for beginners?
A7: Absolutely! The method is straightforward and forgiving, making it a perfect introduction to roasting vegetables with herbs.Plus, the rewarding crispy results are sure to impress both novice and seasoned cooks alike.
transform your humble potatoes into a golden, herb-infused delight with this easy yet elegant recipe-as every meal deserves a little crispy magic!
In Retrospect
As the tempting aroma of golden rosemary roasted potatoes lingers in the air, it’s clear that this crispy herb delight is more than just a side dish-it’s a celebration of simple ingredients transformed by timeless flavors. Whether served alongside a hearty roast or enjoyed on their own, these potatoes invite you to savor the perfect harmony of earthy rosemary and irresistibly crunchy, golden exteriors. So next time you crave comfort with a touch of gourmet flair,remember that the secret to culinary magic might just be nestled in a humble pan,roasting to perfection. Your taste buds-and guests-will thank you.
Savor budget-friendly roasted garlic Parmesan zucchini delight is a dish that marries the robust, aromatic essence of garlic with the rich, nutty depth of Parmesan cheese, transforming simple zucchini into an irresistible side or light main. Inspired by Mediterranean flavors and a love for economical cooking, this recipe elevates humble ingredients into a flavorful feast without straining your wallet. The crisp edges of roasted zucchini combine perfectly with garlic’s pungency and Parmesan’s salty tang,creating a harmony that’s both comforting and elegant.
Prep and Cook Time
- Preparation Time: 10 minutes
- Cook Time: 20 minutes
- Total Time: 30 minutes
yield
Serves 4 generous portions, ideal for a family meal or a cozy gathering.
Difficulty Level
Easy – perfect for beginners seeking a rapid, satisfying vegetable side.
Ingredients
- 3 medium zucchini,sliced into ½-inch thick rounds
- 3 tablespoons olive oil,extra virgin for the best flavor
- 4 cloves garlic,finely minced or pressed
- ½ cup grated Parmesan cheese,freshly grated if possible
- 1 teaspoon dried Italian seasoning or a mix of oregano,basil,and thyme
- ½ teaspoon salt,adjust to taste
- ¼ teaspoon freshly ground black pepper
- 1 tablespoon chopped fresh parsley,for garnish (optional)
Instructions
- Preheat your oven to 425°F (220°C) and line a large baking sheet with parchment paper or a silicone baking mat to prevent sticking.
- Prepare the zucchini: Wash and slice the zucchini into uniform ½-inch rounds to ensure even roasting.
- Toss zucchini with olive oil, garlic, Italian seasoning, salt, and pepper in a large bowl. Coating each slice thoroughly ensures every bite explodes with flavor.
- Arrange the zucchini slices in a single layer on the baking sheet, leaving slight gaps so they roast rather of steam.
- Roast for 15 minutes, then remove the tray and sprinkle grated Parmesan cheese evenly over the zucchini, pressing lightly to help it adhere.
- Return to the oven and roast for an additional 5 minutes or until the zucchini edges are golden and the cheese is bubbly and lightly crisped.
- Remove from oven and let cool for 3 minutes. Garnish with fresh parsley for a pop of color and freshness before serving.
Chef’s Notes and Tips for Success
- Choose firm zucchini: Look for bright green,firm zucchinis without soft spots to lend the best texture after roasting.
- Garlic intensity: Adjust the amount of garlic according to your preference.Roasted garlic adds sweetness, while raw minced garlic delivers punchier aroma.
- Cheese swap: Parmesan can be replaced with Pecorino Romano or asiago for a different, but equally delicious, flavor profile.
- Make ahead: Roasted zucchini can be prepared a day ahead and reheated gently in the oven or enjoyed cold in salads.
- Prevent sogginess: Avoid overcrowding the baking sheet to keep zucchini crisp and caramelized rather of mushy.
Serving Suggestions
This roasted garlic Parmesan zucchini delight shines as a versatile side. Complement grilled chicken or fish with a warm serving. To create a vibrant vegetarian meal, top zucchini with a dollop of tangy Greek yogurt or tzatziki and a drizzle of lemon juice.For a hearty option, toss roasted zucchini with cooked pasta and fresh basil for an easy weeknight dinner.Garnish with extra Parmesan shavings, a sprinkle of red pepper flakes for mild heat, or toasted pine nuts for added crunch and luxury appeal.
| Nutritional information (per serving) | Amount |
|---|---|
| Calories | 120 kcal |
| Protein | 6 g |
| Carbohydrates | 8 g |
| Fat | 8 g |

For more flavorful and economical vegetable recipes, check out our Budget Vegetable Roasts Collection. To learn about the health benefits of garlic and Parmesan, visit Healthline’s guide on garlic nutrition.
Q&A
Q&A: Savor Budget-Friendly Roasted Garlic Parmesan Zucchini Delight
Q1: What makes Roasted Garlic Parmesan Zucchini Delight an ideal budget-friendly dish?
A1: This dish shines in its simplicity and affordability. Zucchini is an inexpensive and widely available vegetable, while garlic and Parmesan add bold flavors without breaking the bank. Together, they create a savory, satisfying side or snack that’s both tasty and wallet-friendly.
Q2: How do you prepare the zucchini to get that perfect roasted texture?
A2: The secret lies in slicing the zucchini into even, bite-sized pieces, tossing them in olive oil, minced garlic, and seasoning, then roasting at around 400°F (200°C) until they’re tender and slightly caramelized. This method brings out zucchini’s natural sweetness and ensures a delightful crisp-tender bite.Q3: Can I use substitutes for Parmesan cheese if I’m on a tight budget?
A3: Absolutely! While Parmesan offers a distinctive nutty flair, you can swap in grated Pecorino Romano, Asiago, or even a sharp Cheddar. Nutritional yeast is a great vegan alternative that imparts a cheesy, umami taste and is often budget-friendly too.
Q4: Is this dish suitable for meal prepping and make-ahead cooking?
A4: Yes! Roasted Garlic Parmesan Zucchini keeps wonderfully in the fridge for 3-4 days. Simply reheat it in the oven or a skillet to revive its crispy edges.Its perfect for quick lunches or a speedy dinner side when you’re short on time.
Q5: how can I elevate this zucchini delight without spending more?
A5: Enhancing flavor doesn’t always mean adding cost. Try sprinkling fresh herbs like parsley or basil from your garden or dried Italian seasoning. A squeeze of fresh lemon juice before serving adds bright, zesty notes that make each bite pop.
Q6: Can this dish be adapted for dietary restrictions?
A6: definitely! For a dairy-free version, swap Parmesan for a vegan cheese or nutritional yeast. Garlic can be minimized or replaced with garlic-infused oil if sensitivity is an issue. The recipe’s flexible nature welcomes tweaks to fit your needs.
Q7: What occasions is this dish best suited for?
A7: This Roasted Garlic Parmesan Zucchini Delight is perfect for casual weeknight dinners, potlucks, or as a humble star in a budget-friendly holiday spread. Its comforting, familiar flavors appeal to all ages and palates, making it a versatile crowd-pleaser.
The Way Forward
this Roasted Garlic Parmesan Zucchini Delight proves that eating well doesn’t have to come with a hefty price tag. With simple ingredients and straightforward steps, you can transform everyday zucchini into a savory, cheesy masterpiece that satisfies both your palate and your budget. So next time you’re looking to whip up a quick, affordable dish bursting with flavor, remember this guilt-free indulgence-as sometimes, the best culinary treasures are the ones that bring comfort without breaking the bank. Happy cooking and even happier eating!
Crunchy roasted chickpea salad: vegan & gluten-free delights begin with embodying vibrant textures and bold, layered flavors that breathe life into every bite. Originating from simple Mediterranean and Middle Eastern snacks, roasted chickpeas have evolved into a nutrient-dense, crunchy marvel that adds unmatched character and nutrition to salads. This recipe transforms humble legumes into golden nuggets of crispy magic, building a salad base bursting with freshness, versatility, and wholesome goodness.
Prep and Cook Time
- Planning: 15 minutes
- cooking: 30 minutes
- Total: 45 minutes
Yield
Serves 4 generously
Difficulty Level
Easy
Ingredients
- 1 can (15 oz) chickpeas, rinsed, drained and patted dry
- 2 tbsp olive oil
- 1 tsp smoked paprika
- 1/2 tsp garlic powder
- 1/2 tsp ground cumin
- 1/4 tsp cayenne pepper (optional, for heat)
- Salt and freshly ground black pepper to taste
- 4 cups mixed greens (baby kale, spinach, arugula)
- 1 cup cherry tomatoes, halved
- 1/2 cup cucumber, diced
- 1/4 red onion, thinly sliced
- 1 ripe avocado, diced
- 1/4 cup fresh parsley, chopped
- Juice of 1 lemon
- 2 tbsp tahini
- 1 tbsp maple syrup or agave
- water to thin dressing as needed
Instructions
- Prepare the chickpeas: Preheat your oven to 400°F (200°C). Spread the rinsed and dried chickpeas on a kitchen towel and gently roll to remove excess skin – this helps achieve supreme crunchiness.
- Transfer chickpeas to a mixing bowl. Add olive oil, smoked paprika, garlic powder, cumin, cayenne pepper (if using), salt, and pepper. Toss until every chickpea is evenly coated.
- Roast the chickpeas: Spread the chickpeas in a single layer on a baking sheet lined with parchment paper. Bake for 25-30 minutes, shaking or flipping halfway through to ensure uniform crispiness. Watch carefully to avoid burning. Remove when perfectly golden and crunchy. Let cool slightly.
- Make the dressing: In a small bowl, whisk together tahini, lemon juice, maple syrup, and a splash of water until creamy and pourable. Adjust with more water if needed.
- Assemble the salad: In a large bowl,toss mixed greens,cherry tomatoes,cucumber,red onion,and parsley. Drizzle half the dressing and toss to combine.
- Top with warm crunchy roasted chickpeas and diced avocado. Drizzle remaining dressing just before serving for a luscious finish.
Tips for Success
- Dry chickpeas thoroughly before roasting to maximize crunch and avoid steaming.
- Shake the pan every 10 minutes to roast chickpeas evenly and prevent burning.
- Experiment with seasoning blends like za’atar, curry powder, or chili lime for new flavor twists.
- This salad is best served fresh, but you can roast chickpeas a day ahead and re-crisp in the oven.
- substitute fresh herbs like cilantro or mint to tailor the salad’s aromatic profile.
Serving Suggestions
Present this salad in a wide, shallow bowl to showcase the vibrant color contrasts between the jewel-like cherry tomatoes, emerald greens, and the golden roasted chickpeas. Garnish with a sprinkle of toasted pumpkin seeds or hemp hearts to add an extra nutty crunch. A side of warm, gluten-free flatbread or crisp pita chips invites scooping and sharing.For an added gourmet touch, drizzle a balsamic reduction over the top or scatter pomegranate seeds for bursts of juicy sweetness.
 vegan & gluten-free delight with fresh vegetables and golden chickpeas” class=”wp-image-12345″/>
| Nutrient | Per Serving |
|---|---|
| Calories | 320 kcal |
| Protein | 12 g |
| Carbohydrates | 35 g |
| Fat | 14 g |
For a deeper dive into vegan and gluten-free salad variations, explore our ultimate salad guide.To learn more about the nutritional benefits of chickpeas,visit Healthline’s expert resource.
Q&A
Q&A: All About the Crunchy Roasted Chickpea Salad – A Vegan & Gluten-Free Delight
Q: What makes the Crunchy Roasted Chickpea Salad so special?
A: Imagine a salad that’s not just fresh and vibrant, but also packed with a satisfying crunch and bold flavors.The secret star here is the roasted chickpeas-golden, crispy little nuggets that bring protein, fiber, and a delightful texture punch, transforming a simple salad into a crave-worthy vegan and gluten-free masterpiece.
Q: How do you achieve that perfect crunch with roasted chickpeas?
A: It’s all about the roast! Start by draining and drying your canned chickpeas, then toss them in a mix of olive oil and spices like paprika, garlic powder, and cumin. Roast them in a hot oven until they’re crisp on the outside yet tender inside. Patience pays off-the longer the roast (without burning), the crunchier the chickpeas become.
Q: Can this salad really be both vegan and gluten-free?
A: Absolutely! Chickpeas are naturally gluten-free and plant-based,making them an ideal protein source for anyone avoiding gluten or animal products. plus,the salad can be dressed with a tangy lemon-tahini dressing or a simple vinaigrette-no dairy or gluten in sight,just nourishing goodness.
Q: What veggies complement the crunch of roasted chickpeas best?
A: fresh, crisp veggies like cucumbers, cherry tomatoes, bell peppers, and red onions contrast beautifully with the roasted chickpeas. Add some leafy greens like arugula or spinach for a peppery bite, and perhaps a sprinkle of fresh herbs-cilantro or parsley bring a luminous, herby zing.
Q: Is this salad easy to prepare for busy weeknights?
A: Definitely! The roasted chickpeas can be made in advance and stored in an airtight container for up to a week-ready to toss into a salad whenever hunger strikes. With speedy-prep veggies and a no-fuss dressing, this salad is a perfect go-to for fast, healthy meals.
Q: Can I customize this salad with different flavors or toppings?
A: Yes! This salad is a versatile canvas. Try swapping out spices on the chickpeas-maybe curry powder or smoked paprika for a smoky twist. Add toasted nuts or seeds for extra crunch, or a handful of dried cranberries for a sweet surprise. The possibilities are endless, keeping your taste buds excited every time.
Q: Why should everyone add the crunchy Roasted Chickpea Salad to their meal rotation?
A: As it’s a powerhouse of nutrition and flavor, easy to make, and wonderfully adaptable. Whether you’re vegan, gluten-free, or just hunting for a delicious, wholesome dish, this salad proves that healthy eating can be both simple and sensational. Plus, it’s so crunchy and satisfying, you’ll forget you’re indulging in something good for you!
Concluding Remarks
As you tuck into this Crunchy Roasted Chickpea Salad, you’re not just savoring a vibrant medley of textures and flavors-you’re embracing a wholesome, plant-powered feast that’s both vegan and gluten-free. Whether you’re looking for a nourishing lunch, a satisfying side, or a guilt-free snack, this salad offers a delightful crunch and a burst of nutrition in every bite. Easy to customize and quick to prepare, it’s proof that healthy eating can be exciting, colorful, and utterly delicious. So go ahead-roast those chickpeas, pile on the fresh greens, and enjoy a salad that’s as good for the planet as it is for your palate.
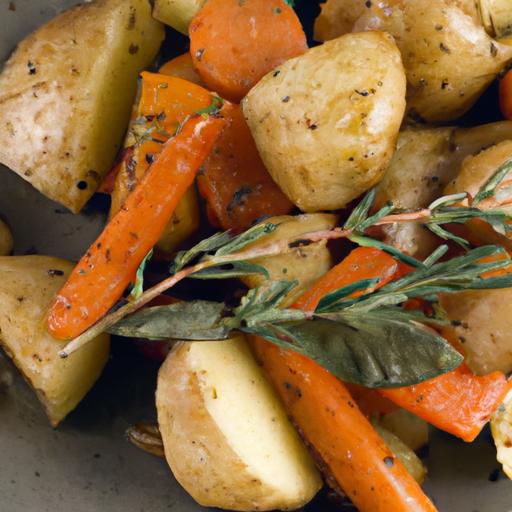
Choosing the Perfect Herbs and Spices for ultimate Flavor
Garlic herb roasted potatoes & carrots come alive when you select the right combination of herbs and spices. Fresh rosemary and thyme are must-haves, offering woody, aromatic notes that complement the earthiness of root vegetables. Adding a pinch of smoked paprika or a dash of cayenne can introduce a subtle warmth, balancing the mellow sweetness of roasted carrots. Don’t underestimate the power of freshly ground black pepper and a touch of sea salt-they amplify every flavor layer without overpowering the dish.
For a fragrant twist,finely chopped fresh parsley sprinkled just before serving gives a vibrant,fresh contrast that enlivens each bite. Choosing organic,high-quality dried herbs ensures the flavors remain robust even after roasting,while using fresh garlic rather than powder maximizes the intensity and brightness of your roast.
Mastering the Art of Roasting for Crispy and Tender Vegetables
Roasting is both an art and a science. Achieving garlic herb roasted potatoes & carrots that are tender inside and perfectly crispy outside hinges on a few key techniques. Start by cutting your potatoes and carrots into uniform pieces to guarantee even cooking. Preheating your oven to a high temperature, around 425°F (220°C), encourages caramelization-this is where those irresistible golden edges develop.
Use a heavy baking sheet or cast-iron skillet to promote even heat distribution.Toss the vegetables thoroughly in a good quality olive oil and the prepared herb and spice mix; the oil not only helps with browning but also acts as a carrier, coating every surface to lock in moisture. Spread vegetables out in a single layer, giving each chunk plenty of room-overcrowding traps steam and results in soggy bites.
Halfway through roasting, give the pan a gentle shake or turn the veggies with a spatula to crisp all sides evenly. Roast for approximately 35-40 minutes until the carrots are tender and the potatoes reveal golden, crunchy exteriors.
Tips for Balancing Garlic Intensity with Sweet Carrot Notes
Garlic herb roasted potatoes & carrots achieve their signature allure by delicately balancing the pungent bite of garlic against the natural sweetness of carrots. To avoid overwhelming the dish, consider using whole garlic cloves that gently roast alongside the vegetables-this mellows their raw pungency into a rich, buttery softness. You can also mince some garlic finely and mix it with oil for a more immediate punch, adding it at the start for robust flavor or halfway through roasting for a fresher hit.
If you desire milder garlic undertones, blanch your garlic cloves briefly before roasting or roast them wrapped in foil alongside the veggies. The natural sweetness of the carrots compliments this mellowed garlic, creating a comforting and harmoniously savory-sweet profile.
Serving Suggestions to Elevate Your Garlic Herb roasted Feast
Present your garlic herb roasted potatoes & carrots on a vibrant platter garnished with sprigs of fresh thyme and rosemary.A light drizzle of high-quality extra virgin olive oil or a sprinkle of flaky sea salt just before serving can brighten flavors.
Pair this dish with a crisp green salad tossed in lemon vinaigrette or alongside a juicy roasted chicken breast for a balanced meal. For a plant-based twist, serve with a tangy tahini sauce or sprinkle with toasted pine nuts and crumbled feta for texture and richness.
Consider adding colorful accompaniments like roasted cherry tomatoes or sautéed mushrooms to create layers of color and flavor that delight the senses while complementing the main dish beautifully.

Prep and Cook Time
- Readiness: 15 minutes
- roasting: 35-40 minutes
- Total: 50-55 minutes
Yield
Serves 4 generously as a side dish
Difficulty Level
Easy – perfect for weeknight dinners and casual gatherings
ingredients
- 1 ½ pounds baby potatoes, halved or quartered depending on size
- 1 pound carrots, peeled and cut into similar-sized pieces
- 4 cloves garlic, peeled (whole or minced as preferred)
- 3 tablespoons extra virgin olive oil
- 1 ½ teaspoons fresh rosemary, finely chopped (or 1 teaspoon dried)
- 1 teaspoon fresh thyme leaves (or ¾ teaspoon dried)
- ½ teaspoon smoked paprika
- Salt and freshly ground black pepper, to taste
- Fresh parsley, chopped for garnish (optional)
Instructions
- Preheat your oven to 425°F (220°C). Line a large baking sheet with parchment paper or lightly grease a cast-iron skillet.
- Prepare the vegetables: Wash and cut baby potatoes and carrots into uniform pieces.Pat dry to remove excess moisture for better roasting.
- mix the herbs and oil: In a large bowl,combine olive oil,minced or whole garlic,rosemary,thyme,smoked paprika,salt,and black pepper. Stir well until evenly combined.
- Toss the veggies: Add potatoes and carrots to the bowl and toss thoroughly to coat every piece in the seasoning mixture.
- Arrange and roast: Spread the veggies in a single layer on the prepared baking sheet, ensuring they are not crowded.
- Roast for 35-40 minutes: Roast, turning once halfway through, until the vegetables are tender and golden brown with crispy edges.
- Finish and garnish: Remove from oven, sprinkle with fresh parsley if desired, and serve immediately for the best texture and flavor.
Chef’s Notes
- Variation: Substitute sweet potatoes for carrots for a different sweet note and creamier texture.
- Make-ahead tip: Prep and toss vegetables in the morning, store covered in the fridge, then roast just before dinner.
- Spice swaps: Add a pinch of dried oregano or basil for Italian flair, or a dash of cumin for a warm, earthy twist.
- Storage: Leftovers keep well in the refrigerator for up to 3 days and reheat beautifully in a hot oven to revive crispiness.
Nutrition Data
| Serving Size | Calories | Protein | Carbs | Fat |
|---|---|---|---|---|
| 1 cup | 180 | 3g | 30g | 6g |
Explore our Mediterranean Roasted Vegetable Salad for another wholesome veggie-packed delight. For more on herbs and health benefits, the Healthline culinary herbs guide offers fantastic insights.
Q&A
Q&A: Garlic Herb Roasted Potatoes & Carrots – A Flavorful Feast
Q1: What makes Garlic Herb Roasted Potatoes & Carrots such a crowd-pleaser?
A1: It’s the magical marriage of simplicity and flavor! Tender potatoes and sweet carrots get a golden makeover, roasted to crispy perfection while soaking up a fragrant blend of garlic, fresh herbs, and a kiss of olive oil. Each bite bursts with comforting warmth and earthy goodness-making it a perfectly cozy side or even a star on its own.
Q2: Which herbs best complement the garlic in this dish?
A2: Classic herbs like rosemary, thyme, and parsley shine here. Rosemary’s piney notes and thyme’s subtle earthiness amplify the garlic’s punch, while parsley adds a fresh, slightly peppery finish. Together, they transform humble root veggies into an herbal symphony.
Q3: Can I customize the vegetables, or are potatoes and carrots the only options?
A3: The beauty of this recipe lies in its versatility! Swap in sweet potatoes, parsnips, or even beets for a colorful twist. Each brings its unique sweetness and texture,making your feast as vibrant as your creativity.
Q4: How do I ensure the potatoes and carrots roast evenly?
A4: Cut your potatoes and carrots into uniform pieces-about 1 to 1.5 inches-to guarantee even cooking. Toss them well in oil and herbs so every nook is coated, then spread them out on the baking sheet without crowding. Plenty of space means maximum crispiness!
Q5: Is roasting the best cooking method for this dish?
A5: Absolutely! Roasting caramelizes natural sugars in the vegetables,elevating their flavor profile. The dry heat crisps edges while keeping centers tender-a texture contrast that’s both satisfying and delicious.
Q6: Any tips for boosting flavor without overpowering the garlic?
A6: Start with fresh garlic-minced or crushed-and roast it gently with the veggies so it mellows into a sweet, nutty undertone. Resist the urge to add too much salt at first; you can always adjust after roasting to maintain that perfect balance.Q7: How can I turn this side dish into a complete meal?
A7: Add a protein like crispy roasted chicken, seared tofu, or chickpeas tossed with the same garlic-herb seasoning. For an extra flourish, sprinkle with toasted nuts or a handful of fresh greens just before serving. Pair with a tangy yogurt dip or a drizzle of balsamic glaze for a feast that dazzles.
Q8: What wine or beverage pairs well with Garlic Herb Roasted Potatoes & Carrots?
A8: Think light and fresh-such as a crisp Sauvignon Blanc or a sparkling water infused with lemon and herbs. These choices cleanse the palate and complement the earthy, herbaceous flavors beautifully.
Q9: Can this dish be prepared ahead of time?
A9: Yes! Roast the veggies earlier and gently reheat in a hot oven to revive their crispness. Alternatively, toss raw veggies in the garlic-herb oil mix and refrigerate-then roast fresh when ready to serve, locking in vibrant flavors.
Q10: Why should I make Garlic Herb Roasted Potatoes & Carrots again and again?
A10: Because it’s comfort food with a gourmet twist-easy enough for a weeknight, impressive enough for guests.It turns simple ingredients into a sensory experience bursting with aromatic, savory delight. Plus, it’s a colorful, nutritious way to celebrate the humble root vegetable!
Future Outlook
As the tantalizing aroma of garlic and fresh herbs lingers in the air, it’s clear that these roasted potatoes and carrots are more than just a side dish-they’re a party of simple ingredients transformed by thoughtful seasoning and perfect roasting. Whether you’re seeking a comforting meal for family dinner or an impressive addition to your holiday table, this flavorful feast promises to delight every palate. So, next time you crave a dish that’s both rustic and refined, remember that a little garlic, a handful of herbs, and some patience in the oven can turn humble root vegetables into a culinary masterpiece worth savoring.