Caramel chicken unveils a captivating dance between sweet richness and deep umami, transforming a simple weeknight meal into a sensory party. Drawing inspiration from Southeast Asian kitchens where caramelization harmonizes with savory notes, this dish invites you to explore the alchemy of sugar, soy, and aromatics. With each bite, the luscious caramelized glaze coats tender chicken pieces, offering a perfect balance that’s both comforting and exhilarating.
Prep and Cook Time
Prep: 15 minutes Cook: 25 minutes Total: 40 minutes
Yield
Serves 4 hungry guests
Difficulty Level
Medium – Perfect for adventurous home cooks ready to master flavor layering
Ingredients
- 1 ½ lbs chicken thighs, boneless and skin-on, cut into bite-sized pieces
- 3 tbsp palm sugar (or light brown sugar), packed
- 3 tbsp soy sauce, preferably dark for richness
- 2 tbsp fish sauce, for that essential umami punch
- 4 cloves garlic, finely minced
- 1 tbsp ginger, grated
- 2 tbsp vegetable oil
- ½ cup water or chicken broth
- 1 small red chili, thinly sliced (optional, for subtle heat)
- 2 green onions, sliced diagonally for garnish
- Fresh cilantro, a small handful, chopped (optional)
- Steamed jasmine rice, to serve
Instructions
- Prepare the caramel sauce: In a heavy-bottom skillet over medium heat, melt the palm sugar, stirring constantly with a silicone spatula until it turns a deep amber color-this process should take about 4 minutes. Be cautious not to let it burn.
- Add aromatics: Promptly stir in the minced garlic and grated ginger. Sauté for 30 seconds until fragrant, ensuring the sugar mixture does not solidify.
- Incorporate liquids: Slowly add the soy sauce, fish sauce, and water or broth. The caramel will sizzle and slightly thicken. stir thoroughly to combine and create a luscious glaze.
- cook the chicken: Add chicken pieces to the skillet, spreading them out for even contact. sauté until golden and glazed on all sides, about 10 minutes, stirring gently to ensure even caramelization.
- Simmer and thicken: Reduce heat to low and simmer uncovered for 5-7 minutes,allowing the sauce to thicken and cling beautifully to each morsel.
- Final touches: Stir in thinly sliced chili if using, then remove from heat. The spicy kick balances the sweet-savory profile wonderfully.
- Plate and garnish: Serve immediately over steaming jasmine rice,garnished with sliced green onions and fresh cilantro for brightness and crunch.
Chef’s Notes: Tips for Success with Caramel Chicken
- Choosing sugar: Palm sugar imparts a complex,woodsy sweetness that elevates the caramel glaze; however,light brown sugar is a convenient substitute that still yields excellent results.
- Preventing bitterness: Keep a close eye on the caramel as it cooks-it can turn from perfectly amber to bitter in seconds. Remove from heat as soon as it reaches deep golden brown.
- Balancing flavors: The fish sauce adds depth and umami but adjust quantities to taste if you prefer milder saltiness.
- Make-ahead: The dish can be prepared up to the simmering stage a day in advance. Store covered in the fridge, then rewarm gently before serving, adding fresh aromatics.
- For crispier texture: After glazing, transfer chicken pieces to a preheated oven at 425°F (220°C) for 5 minutes to caramelize further and develop crisp edges.
Creative Serving Ideas to Elevate Your Caramel Chicken Experience
Transform your plating with dynamic contrasts-serve caramel chicken atop fragrant coconut rice or quinoa for an unexpected twist.Add a side of sautéed bok choy or crunchy pickled vegetables to cut through the richness. For added texture and visual appeal, sprinkle toasted sesame seeds or crushed peanuts on top. A wedge of lime or lemon on the side brightens the dish, offering a burst of acidity that instantly awakens the palate.
For a festive touch, plate in small bamboo steam baskets or rustic wooden bowls. Pair the meal with a chilled riesling or a crisp jasmine tea to enhance the delicate interplay of sweetness and umami. this approachable method ensures you’ll savor every morsel as the caramel glaze beckons you back for more.
| Nutritional Info (per serving) | Amount |
|---|---|
| Calories | 420 kcal |
| Protein | 35 g |
| Carbohydrates | 18 g |
| Fat | 21 g |

Ready to expand your culinary repertoire? Explore our Asian-inspired flavors collection to continue your flavor journey. For an in-depth look at the science behind caramelization, check out this Serious Eats article on caramelization.
Q&A
Q&A: Sweet and Savory – The Allure of Caramel Chicken Magic
Q1: What makes caramel chicken such a captivating dish?
Caramel chicken is a culinary masterpiece that dances beautifully on the palate by marrying the rich, buttery sweetness of caramel with the deep, savory flavors of tender chicken. This contrast creates a magic-a flavor interplay that is both comforting and surprising, inviting diners to explore new taste dimensions with every bite.
Q2: How did caramel chicken become a beloved recipe across different cultures?
While caramel is traditionally associated with desserts, its incorporation into savory dishes like chicken is rooted in inventive home kitchens and street food stalls worldwide. From Asian-inspired caramelized sauces to Western adaptations, caramel chicken highlights humanity’s endless creativity in blending sweet and savory elements to craft unforgettable meals.
Q3: What are the key ingredients that give caramel chicken its unique flavor?
At its heart lies a silky caramel sauce made by carefully melting sugar until it achieves a golden amber hue,often enriched with soy sauce,garlic,ginger,and a splash of vinegar or citrus to balance the sweetness. The chicken,often marinated or seared to lock in juices,absorbs these flavors,resulting in a succulent dish with a glossy,sticky coating.
Q4: Can caramel chicken be adapted for different dietary preferences?
Absolutely! The recipe is incredibly versatile. For example, vegetarians can substitute chicken with tofu or mushrooms, which soak up the caramel sauce just as wonderfully. Gluten-free alternatives can replace soy sauce with tamari, and those watching sugar intake can experiment with natural sweeteners, crafting a dish that retains its magic without compromise.
Q5: What tips can home cooks use to perfect their caramel chicken?
Precision and patience are key. Caramelizing sugar requires careful attention to avoid burning, while balancing the sweet and savory elements calls for thoughtful seasoning. Using fresh, high-quality ingredients and allowing the sauce to thicken properly enhances texture and flavor depth. Lastly,resting the chicken after cooking helps juices redistribute,making every bite moist and tender.
Q6: Why does caramel chicken resonate so strongly with food lovers today?
In an age where culinary boundaries blur and flavor adventures are celebrated, caramel chicken offers both familiarity and novelty. It satisfies the craving for comfort food while awakening taste buds with its unexpected sweet-savory duet. This harmony speaks to a global desire for dishes that are both hearty and indulgent-an irresistible charm that continues to captivate tables worldwide.
Feel inspired to create your own caramel chicken magic? Embrace the symphony of flavors and let this sweet-savory wonder transform your next meal into a delicious celebration!
Closing Remarks
as the final drizzle of caramel sauce settles over tender, succulent chicken, we find ourselves enchanted by a dish that masterfully balances the sweet and savory-a true culinary magic. Caramel chicken is more then a recipe; it’s an invitation to explore the harmonious dance of flavors that defy expectations while comforting the soul. Whether you’re a seasoned chef or an adventurous home cook, embracing this delectable fusion opens a gateway to endless creativity in the kitchen.So next time you crave something both familiar and extraordinary, let caramel chicken be your delicious muse, reminding us all that sometimes, the sweetest surprises come wrapped in savory delights.
Sweet & savory delight: mastering honey mustard chicken recipes begins with understanding the intricate dance between sweet and tangy flavors that define the beloved honey mustard sauce. This balance is what elevates a simple chicken dish into a mouthwatering sensation that lingers with every bite. It’s more than just a condiment; it’s the heart of the dish, infusing every morsel with luscious depth and brightness.
Prep and Cook Time
- Preparation: 15 minutes
- Cooking: 25 minutes
- Total Time: 40 minutes
Yield
Serves 4 generous portions
Difficulty Level
Medium – approachable for keen home cooks ready to impress
Ingredients
- 4 boneless, skin-on chicken thighs (preferably organic for juiciness and flavor)
- 2 tbsp olive oil
- 1/4 cup Dijon mustard
- 1/4 cup honey (raw or wildflower honey offers complex sweetness)
- 2 tbsp apple cider vinegar
- 1 tsp smoked paprika
- 2 cloves garlic, minced
- Salt and freshly ground black pepper, to taste
- Fresh thyme sprigs for garnish
- Optional: pinch of cayenne for heat
instructions
- Prepare the chicken cuts: pat dry the chicken thighs with paper towels to ensure even browning. Season generously with salt, pepper, and smoked paprika on both sides.
- Heat olive oil: In a large skillet over medium-high heat, warm olive oil until shimmering but not smoking.
- Sear the chicken: Place chicken thighs skin-side down; sauté until the skin caramelizes to a deep,golden brown-about 6-8 minutes. Resist the urge to move them prematurely to build that luscious crust.
- Flip and cook through: Turn chicken over and cook for another 6-7 minutes, until internal temperature reaches 165°F (75°C). Remove chicken from skillet and keep warm.
- Craft the sauce: Lower the heat to medium. Add minced garlic to the skillet and sauté for about 30 seconds until fragrant.Stir in Dijon mustard, honey, and apple cider vinegar. Allow the sauce to bubble gently, stirring occasionally until thickened slightly, about 3-4 minutes.
- Combine flavors: Return chicken to the skillet, spooning the honey mustard sauce over the thighs. Simmer together for 2 minutes, letting the sauce cling and caramelize softly around the edges.
- Final touch: Remove from heat. Garnish with fresh thyme sprigs and a light crack of black pepper. Optionally, sprinkle a pinch of cayenne for a subtle warmth that complements the sweet tang.
Tips for Success
- choosing your chicken: Skin-on, bone-in thighs deliver juiciness and flavor unmatched by breasts. For quicker cooking, skinless breasts can be used but will require careful monitoring to avoid drying out.
- Honey selection: Opt for local or wildflower honeys for nuanced sweetness-avoid ultra-processed honeys that lack depth.
- Caramelization secrets: Ensure the pan is hot enough before adding chicken; a stainless steel pan works wonders to achieve that perfect crust.
- Make-ahead: The honey mustard sauce can be prepared ahead and gently reheated to brush over freshly cooked chicken.
- Adjust sweetness and tang: taste the sauce as you cook-more vinegar intensifies tang while extra honey boosts sweetness. Balancing thes is key to keep it vibrant and never overpowering.
Serving Suggestions
Serve your honey mustard chicken alongside creamy mashed potatoes or fluffy jasmine rice to soak up every luscious drop of sauce. A crisp green salad or roasted asparagus with lemon zest adds freshness and texture contrast. Garnish plates with sprigs of thyme and a drizzle of honey mustard sauce to make the presentation irresistible.

| Nutrient | Per Serving |
|---|---|
| Calories | 380 kcal |
| protein | 35 g |
| Carbohydrates | 12 g |
| Fat | 20 g |
Craving more inspiration on succulent chicken dishes? Explore our Juicy Herb Roasted Chicken Recipe for another mouthwatering adventure.For nutritional guidance on balancing sauces and seasonings, visit the Academy of Nutrition and Dietetics.
Q&A
Q&A: Sweet & Savory Delight – Mastering honey Mustard Chicken Recipes
Q1: What makes honey mustard chicken such a beloved dish?
A1: Honey mustard chicken perfectly marries the rich sweetness of honey with the tangy, slightly spicy kick of mustard. This harmonious blend creates a flavor profile that’s both comforting and exciting, appealing to a wide range of palates. The versatility of the dish also means it can be cooked quickly on a weeknight or elevated for a special dinner.
Q2: What types of mustard work best in honey mustard chicken recipes?
A2: Dijon mustard is a classic choice,known for its smooth texture and balanced sharpness,which complements honey beautifully. Whole grain mustard adds a delightful pop of texture and a rustic look,while yellow mustard offers a milder,slightly tangy base. You can experiment or even combine varieties to customize your sauce.
Q3: How can I ensure my chicken stays juicy and tender?
A3: Marinating the chicken in the honey mustard mixture for at least 30 minutes – or even overnight – lets the flavors deeply infuse and helps tenderize the meat. Cooking methods like baking at a moderate temperature or pan-searing followed by gentle simmering in the sauce also lock in moisture, preventing dryness.
Q4: Are there creative twists to the classic honey mustard chicken?
A4: Absolutely! Try adding fresh herbs such as thyme or rosemary for an aromatic kick. Incorporate a splash of apple cider vinegar or lemon juice to brighten the sauce, or toss in garlic and smoked paprika for a smoky depth. For texture, top with toasted almonds or crispy bacon bits.
Q5: What side dishes pair best with honey mustard chicken?
A5: The sweet and tangy notes of honey mustard chicken pair wonderfully with simple, comforting sides. Think buttery mashed potatoes, roasted vegetables, or a fresh green salad with a light vinaigrette. For a grain option,fluffy couscous,creamy risotto,or wild rice pilaf can absorb the sauce beautifully.
Q6: Can honey mustard chicken be made ahead or frozen?
A6: Yes! The chicken can be marinated and cooked ahead, then cooled and stored in the refrigerator for up to 3 days. It also freezes well – just pack portions into airtight containers and freeze for up to 2 months. reheat gently to preserve juiciness, either in the oven or on the stovetop with a splash of broth.
Q7: Is honey mustard chicken a healthy option?
A7: When prepared thoughtfully, absolutely. Using lean cuts like skinless chicken breasts or thighs,moderating honey quantity,and limiting added sugars keeps it nutritious. Pair it with plenty of veggies and whole grains for a balanced meal that satisfies both taste buds and nutritional goals.
Mastering honey mustard chicken is about balancing sweet and savory while using simple techniques that maximize flavor and texture. Ready to embark on this delicious culinary journey? Your taste buds are in for a treat!
To Wrap It Up
As you embark on your culinary journey with honey mustard chicken, remember that this delightful balance of sweet and savory is more than just a flavor-it’s an experience waiting to be mastered. Whether you prefer a tangy glaze or a creamy dip, the versatility of honey mustard allows you to customize each bite to your liking. With the tips and recipes shared here, you’re well-equipped to transform simple ingredients into a mouthwatering masterpiece that’s sure to impress family and friends alike.So, gather your favorite pantry staples, embrace the harmony of flavors, and let your kitchen be filled with the irresistible aroma of honey mustard chicken perfected. Happy cooking!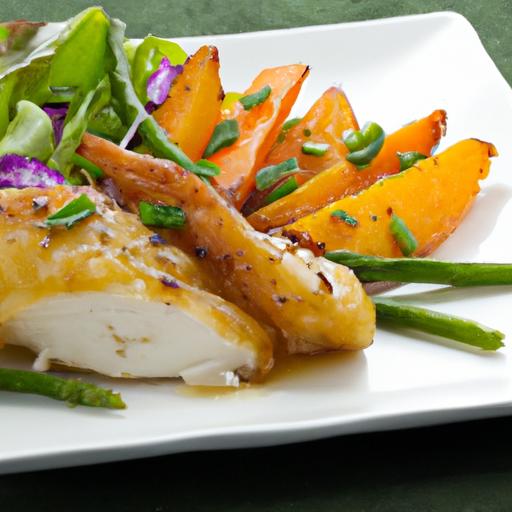
Sweet & Simple: Glazed Baby carrots with Honey Delight
Sweet & Simple: Glazed Baby Carrots with Honey Delight captures the perfect balance between effortless cooking and sublime flavor that will brighten any meal. This humble side dish has become a family favorite in my kitchen, delivering tender, buttery carrots kissed with a luxuriously smooth honey glaze. Through years of experimentation, I’ve unlocked the secret to consistently tender baby carrots, enhanced by the natural sweetness of the perfect honey choice. Whether you’re a novice or a seasoned home cook, this recipe invites you to indulge in pure comfort with minimum fuss and maximum taste.
Prep and Cook Time
- Prep Time: 10 minutes
- Cook time: 20 minutes
- Total Time: 30 minutes
Yield
Serves 4 as a flavorful side dish
Difficulty Level
Easy – perfect for everyday dinners or holiday feasts
Ingredients
- 1 lb baby carrots, peeled and washed
- 2 tbsp unsalted butter
- 3 tbsp high-quality honey (see notes below)
- 1/2 tsp kosher salt
- 1/4 tsp freshly ground black pepper
- 1 tbsp fresh lemon juice (optional, for brightness)
- 1 tsp fresh thyme leaves or finely chopped parsley (for garnish)
Choosing the Right Honey for a Naturally Sweet Finish
The secret to a truly captivating glaze lies in your honey selection. For this dish, opt for a mild, floral honey like clover or orange blossom. These varieties offer a gentle sweetness that complements the earthiness of the carrots without overpowering them.Avoid stronger honeys such as buckwheat or manuka, which can skew the balance and mask the delicate flavors. If you enjoy a nutty or caramel undertone, wildflower honey is a great choice. Using the right honey ensures the glaze remains effortlessly sweet and naturally radiant.
Step by Step Guide to Achieving the Ultimate Honey Glaze
- Prepare your baby carrots: Peel if necessary and rinse under cold water. Pat dry to remove excess moisture, which ensures a better glaze.»
- heat the butter: Place a medium skillet over medium heat. Add the unsalted butter and let it melt until foaming but not browned.
- Add the carrots: toss the carrots into the skillet, stirring to coat them evenly in butter. Sauté for about 5 minutes, letting them develop a light golden crust.
- incorporate the honey: lower the heat to medium-low, drizzle the honey evenly over the carrots, and stir gently to combine.
- Season with salt and pepper: Sprinkle kosher salt and fresh black pepper over the carrots to enhance their natural flavor.
- Simmer gently: Cover the skillet with a lid and allow the carrots to cook for 8-10 minutes, stirring onc or twice.This slow simmering tenderizes the carrots while the honey syrup thickens beautifully.
- Finish with lemon juice: Remove the lid, increase heat slightly and add the fresh lemon juice for a touch of brightness. Stir until the glaze becomes sticky and coats the carrots entirely-about 2 minutes more.
- Garnish and serve: Transfer to a serving dish, sprinkle with fresh thyme or parsley for vibrant color and aroma.
tips for Success
- Use uniformly sized baby carrots to ensure even cooking.
- If your carrots are on the thicker side, parboil them for 3 minutes before glazing to guarantee tenderness.
- To deepen flavor, add a pinch of smoked paprika or a small knob of ginger during the butter melting stage.
- Make-ahead: Prepare the glazed carrots up to step 7 and refrigerate. Reheat gently in a skillet adding a splash of water or butter to refresh the glaze.
- For vegan variation, swap the butter for coconut oil or a plant-based spread.
Creative Serving Suggestions to Elevate Your Baby Carrot Dish
To turn this sweet & simple glazed baby carrot recipe into a show-stopping accompaniment, try these inspired ideas:
- fall Feast: Serve alongside a rosemary roast chicken, garnished with toasted pecans for seasonal crunch.
- Radiant & Fresh: Toss glazed carrots into a warm grain bowl with quinoa, roasted chickpeas, and kale, finishing with a drizzle of tahini.
- Wedding-Style Delight: Pair carrots with a honey-balsamic drizzle and crumbled goat cheese for elegant plating.
- Holiday Sparkle: Add a handful of dried cranberries and chopped pistachios for festive texture and color contrast.
- Pure Simplicity: Present on a rustic wooden board with assorted artisan breads, herb butter, and a glass of chilled white wine for casual entertaining.
| Nutrient | Per Serving |
|---|---|
| Calories | 110 kcal |
| Protein | 1.2 g |
| Carbohydrates | 24 g |
| Fat | 4 g |
Discover more wholesome side dishes in our Healthy Vegetable Recipes collection or learn about the specialty of honeys at the National Honey Board.

Q&A
Q&A: Sweet & Simple – Glazed Baby Carrots with Honey Delight
Q1: What makes “Glazed Baby Carrots with Honey Delight” different from your average carrot side dish?
A1: This recipe turns humble baby carrots into a shimmering, sweet sensation. Rather of just steaming or boiling, the carrots are glazed in a luscious honey-based sauce that amplifies their natural sweetness and adds a beautiful, glossy finish. It’s simplicity elevated to a tastefully elegant level!
Q2: Why use honey as the glaze’s star ingredient?
A2: Honey doesn’t just sweeten; it brings depth and warmth. Its floral notes complement the earthiness of the carrots, creating a harmonious flavor profile. Plus, honey caramelizes beautifully, giving the carrots a delicate crunch and an irresistible sheen.Q3: Can I substitute honey with other sweeteners?
A3: Absolutely! Maple syrup or agave nectar can be excellent alternatives, each introducing a slightly unique character. Maple, for instance, lends a smoky hint, while agave offers a gentle, neutral sweetness. Just keep the glaze ratio the same for best results.
Q4: How do I ensure that my glazed carrots don’t become mushy?
A4: The secret lies in timing.Start by gently steaming the baby carrots until tender but still crisp-about 5 to 7 minutes. Then, finish them in the honey glaze over medium heat, allowing it to thicken and coat each carrot without turning them soggy.Q5: Are there any flavor boosters I can add to this glaze?
A5: Definitely! A pinch of cinnamon or a splash of fresh lemon juice can brighten the dish. For a savory twist, a dash of freshly ground black pepper or a sprinkle of fresh thyme can add complexity and balance the sweetness.
Q6: Is this recipe suitable for special diets?
A6: yes! The dish is naturally vegan (when using plant-based sweeteners), gluten-free, and low in fat. It’s a wonderful side for anyone seeking a wholesome yet delightful vegetable option.
Q7: How can I present these glazed carrots to wow my guests?
A7: Serve them warm on a pristine white platter, garnished with a scattering of chopped fresh parsley or toasted sesame seeds for a contrasting texture. The glossy honey glaze will catch the light and make your table shine just as brightly as your cooking skills!
Q8: Any tips for prepping ahead of time?
A8: You can steam the carrots a day in advance and store them covered in the fridge. When ready to serve,simply prepare the honey glaze and toss the carrots in it. This keeps the carrots fresh, preventing them from soaking up too much glaze and getting soft.
Q9: What dishes pair best with glazed baby carrots?
A9: these sweet delights pair perfectly with roasted meats like chicken or pork, hearty grain bowls, or even a simple weeknight dinner featuring grilled fish. They add a pop of color and sweet flavor balance to any plate.
Q10: Where can I find the best baby carrots for this recipe?
A10: Look for firm, bright orange baby carrots without any cracks or soft spots. Freshness is key, whether you buy pre-packaged or pick them fresh at a farmer’s market. If you prefer, you can even trim and peel regular carrots into bite-sized “baby” pieces!
Key Takeaways
these glazed baby carrots with honey delight prove that simplicity can shine brilliantly on the dinner plate. With just a few easy ingredients, you transform humble roots into a glossy, sweet, and tender side that complements any meal. Whether you’re aiming to elevate your weeknight dinner or add a touch of elegance to a holiday spread, this recipe invites you to savor the natural sweetness of carrots glazed to perfection. So next time you want a dish that’s both effortless and impressive, remember: sometimes, the simplest ingredients create the most delightful flavors.
Honey Pear Galette Delight is an invitation to savor simplicity and rustic charm in every flaky bite. This timeless dessert, rooted deeply in French provincial kitchens, marries the luscious sweetness of ripe pears with the floral warmth of pure honey, encased in a golden, buttery crust that crunches delightfully with each forkful. As a Culinary Content Creator and Food stylist, I’ve found that this humble galette becomes a centerpiece not only for its flavor harmony but also for the captivating textures and inviting aromas that fill your kitchen.
Prep and Cook Time
- Planning: 30 minutes
- Cooking: 40 minutes
- Total Time: 1 hour 10 minutes
Yield
Serves 6 generous slices
Difficulty Level
Medium – perfect for home bakers seeking a balance of rustic technique and elegant flavor
Ingredients
- For the crust:
- 1 ½ cups all-purpose flour, sifted
- ¼ teaspoon fine sea salt
- 10 tablespoons unsalted butter, chilled and cubed
- 3 tablespoons ice-cold water (plus extra if needed)
- 1 tablespoon granulated sugar (optional, for subtle sweetness)
- For the filling:
- 3 large ripe pears (Bosc or Anjou work beautifully), peeled, cored, and thinly sliced
- 2 tablespoons pure honey, plus extra for drizzling
- 1 teaspoon fresh lemon juice
- 1 teaspoon ground cinnamon
- 1 tablespoon all-purpose flour (to absorb pear juices)
- ¼ teaspoon freshly grated nutmeg
- 1 egg yolk (for egg wash)
- 1 tablespoon turbinado sugar (for sprinkling)
Instructions
- Make the crust: Combine the sifted flour, salt, and sugar in a large bowl. Add the chilled butter cubes and, using a pastry cutter or your fingertips, gently toss to coat the pieces in flour. Work quickly to pinch the butter and flour together until the mixture resembles coarse crumbs with some pea-sized bits remaining.
- Add ice water: Drizzle in the 3 tablespoons of ice-cold water one tablespoon at a time, gently mixing with a fork until the dough just holds together. Avoid overworking to maintain a tender, flaky texture.
- Shape and chill dough: Gather the dough into a disk, wrap it tightly in plastic wrap, and refrigerate for at least 30 minutes to rest and chill the butter-this is crucial for flakiness.
- Prepare pear filling: In a bowl, toss the sliced pears gently with lemon juice, honey, cinnamon, nutmeg, and flour. This blend balances sweetness and aroma while absorbing excess juices during baking,keeping the filling juicy yet cohesive.
- Roll out the dough: On a floured surface, roll chilled dough into a roughly 12-inch circle, about ⅛-inch thick. Transfer to a parchment-lined baking sheet.
- Assemble the galette: Pile pear slices in the centre of the dough,leaving a 2-inch border. Fold the edges over the fruit, creating folds to form a rustic crust that hugs the filling.
- Apply egg wash and sugar: Beat the egg yolk with 1 teaspoon water and brush it lightly over the crust edges for a golden finish. Sprinkle turbinado sugar on top for a sparkling,caramelized crust.
- Bake: Preheat oven to 400°F (200°C). Bake galette for 35-40 minutes until the crust is deeply golden and crisp, and the pear filling bubbles enticingly. Rotate halfway for even baking.
- Cool and serve: Allow the galette to cool on the baking sheet for at least 15 minutes. Drizzle additional honey atop just before serving to enhance the floral notes.
Tips for Success with Your Honey Pear Galette
- Chilling the dough: Never skip the refrigeration-cold butter leads to the flaky, layered crust everyone loves.
- Choosing pears: Opt for pears that hold their shape when baked, such as Bosc or Anjou, to avoid a mushy texture.
- Honey varieties: Use a mild, high-quality honey (like wildflower or clover) to complement, not overpower the pears.
- Make ahead: Assemble the galette up to step 7, then refrigerate uncovered for up to 4 hours before baking-this step enhances the melding of flavors.
- Variations: Add a handful of chopped toasted pecans or a sprinkle of crumbled blue cheese beneath the pears for extra depth.
- Troubleshooting: If the bottom crust seems soggy, slide the galette onto a preheated baking stone or tray in the oven’s lower rack for extra crispness.
Serving suggestions
This honey pear galette shines when served warm,accompanied by a scoop of vanilla bean ice cream or a dollop of freshly whipped cream. Garnish with a sprig of fresh thyme or a light dusting of powdered sugar for a visually striking, aromatic finish. Pair with a cup of rich Earl Gray tea or a glass of chilled Riesling to elevate the sweet and rustic experience.
| Nutrient | Per Serving |
|---|---|
| Calories | 320 |
| Protein | 3g |
| Carbohydrates | 45g |
| Fat | 13g |

Explore more rustic dessert ideas in our rustic Fruit Dessert Collection and learn why local honey is prized in baking at National Honey Board.
Q&A
Q&A: Sweet & Rustic – How to Make a Honey Pear Galette Delight
Q1: What exactly is a honey pear galette?
A1: Imagine the charm of a flaky, buttery crust wrapped around tender slices of ripe pears kissed with golden honey-this is a honey pear galette. It’s a rustic, open-faced tart that’s as simple to make as it is indeed stunning to serve, offering a perfect balance between sweet and earthy flavors.Q2: Why choose a galette over a customary pie?
A2: Galettes embrace imperfection beautifully. Unlike pies, they require no pie plates or intricate crimping. The dough is rolled out, fruit arranged in the center, and the edges folded up casually. This creates a homely, artisanal look that’s both inviting and effortlessly elegant-perfect for a cozy gathering or a spontaneous treat.
Q3: What kind of pears work best in this galette?
A3: Opt for firmer pears like bosc or anjou, which hold their shape well during baking. These varieties offer a subtle sweetness and a smooth texture that pairs wonderfully with the honey’s floral notes, creating a delightful contrast in every bite.
Q4: How does honey enhance the flavor of the pears?
A4: Honey doesn’t just sweeten-it adds layers of complexity. Depending on the variety, honey can introduce hints of lavender, wildflowers, or caramel, enriching the pears’ natural juiciness with a warm, aromatic depth that elevates the galette from simple dessert to a flavor experience.
Q5: Can I add other ingredients to customize my galette?
A5: Absolutely! A sprinkle of cinnamon or nutmeg brings cozy warmth, while a handful of chopped nuts adds crunch.For a savory twist, a touch of fresh thyme or rosemary complements the pear’s sweetness brilliantly. Don’t be afraid to experiment and make the galette your own rustic masterpiece.
Q6: What’s the secret to a perfectly flaky crust?
A6: Cold ingredients and minimal handling are key. Use chilled butter cut into small pieces, cold water to bind the dough, and resist the urge to overwork it. This gentle approach creates layers that puff and flake beautifully in the oven, forming the croissant-like texture that makes every bite pure bliss.
Q7: How long should I bake the galette?
A7: Typically, 35 to 40 minutes at 375°F (190°C) until the crust is golden and the pears are tender. Keep an eye on it-the edges should be crisp and inviting, while the fruit filling should bubble lightly, signaling that it’s time to savor the sweet aroma and delectable taste.
Q8: What’s the best way to serve a honey pear galette?
A8: Serve warm, straight from the oven, with a generous scoop of vanilla ice cream or a dollop of whipped cream to mellow the honeyed sweetness. A dusting of powdered sugar or a drizzle of extra honey can add a final touch of rustic elegance.Q9: Is this recipe suitable for beginners?
A9: Definitely! The galette’s forgiving nature makes it a fantastic project for novice bakers. The open-faced design means minor imperfections only add to its charm. Plus, the few simple steps and flexible ingredients invite creativity without stress.
Q10: Any tips for storing leftovers?
A10: If you’re lucky enough to have leftovers, store the galette covered at room temperature for up to two days, or in the fridge for about three.To revive the crust’s crispness,pop it briefly into a warm oven before serving again.
Embark on your baking adventure with this honey pear galette and taste the sweet simplicity of rustic elegance!
The Conclusion
As the golden crust crisps and the honey-kissed pears glisten on your plate, your homemade galette becomes more than just a dessert-it’s a party of simple, rustic elegance. Whether savored warm with a scoop of vanilla ice cream or enjoyed at room temperature alongside a cup of tea,this honey pear galette offers a sweet embrace that’s both comforting and refined. So next time you’re craving a treat that’s effortlessly charming yet richly satisfying, remember that the heart of rustic baking lies in moments like these-where humble ingredients come together to create something truly delightful.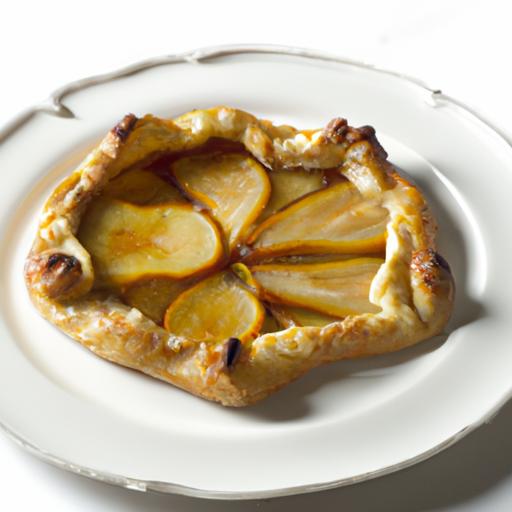
Hearty Sweet Potato Stew welcomes you with its vibrant hues and rich aromas, evoking warmth and nourishment in every spoonful. This stew is a celebration of sweet potatoes’ natural sweetness paired with robust spices and fresh herbs that transform a simple bowl into a soulful experience. Inspired by traditional roots and crafted for modern palates, this dish strikes a sublime balance of textures and flavors that comforts while fueling your body with wholesome goodness.
Prep and Cook Time
Prep Time: 15 minutes
Cook time: 40 minutes
Total Time: 55 minutes
Yield
Serves 6 generous bowls
Difficulty level
Easy – Perfect for both kitchen novices and seasoned home cooks
Ingredients
- 2 lbs sweet potatoes, peeled and cut into 1-inch cubes
- 1 large onion, finely chopped
- 3 cloves garlic, minced
- 1 tbsp fresh ginger, grated
- 1 can (14 oz) diced tomatoes, with juices
- 4 cups vegetable broth, low sodium
- 1 cup canned chickpeas, drained and rinsed
- 1 tsp ground cumin
- 1 tsp smoked paprika
- 1/2 tsp ground cinnamon
- 1/4 tsp cayenne pepper (adjust to taste)
- 2 tbsp olive oil
- 1/4 cup fresh cilantro, chopped
- 1/4 cup fresh parsley, chopped
- Salt and black pepper to taste
- Juice of 1 lemon
Instructions
- Heat the olive oil over medium heat in a large pot. Add the chopped onion and sauté until translucent and beginning to caramelize, about 5 minutes. Stir often to prevent burning.
- Add the garlic and fresh ginger, cooking for another 1-2 minutes until fragrant but not browned.
- Sprinkle in the cumin, smoked paprika, cinnamon, and cayenne. Stir constantly for 30 seconds to toast the spices and unlock thier depth of flavor.
- Dump in the sweet potato cubes and chickpeas,stirring to coat them evenly with the spice and onion mixture. Let this heat together for 3-4 minutes.
- Pour in the diced tomatoes with their juices along with the vegetable broth. Stir well and bring the mixture to a gentle boil.
- once boiling, reduce heat to simmer and cover partially. Let cook for 25-30 minutes, or until the sweet potatoes are tender but hold their shape carefully-avoid overcooking for a better texture in your hearty sweet potato stew.
- Season with salt and pepper to taste. Stir in the fresh lemon juice to brighten the stew.
- Remove from heat and fold in the chopped fresh cilantro and parsley, reserving some for garnish.
- Ladle the stew into warm bowls and garnish with the remaining herbs. Optionally, add a dollop of Greek yogurt or a sprinkle of toasted pumpkin seeds for an extra touch.
Tips for Success
- Customize the spice level: Adjust cayenne pepper or add a dash of hot sauce to suit your heat preference.
- Make it vegan or vegetarian-friendly: Stick with vegetable broth and skip any dairy toppings.
- Texture balance: For a creamier stew, mash some cooked sweet potatoes against the pot’s side before serving.
- Make ahead: This stew tastes even better after resting overnight in the fridge; simply reheat gently before serving.
- Boost protein content: Add cubed firm tofu or cooked lentils for an extra hearty meal.
serving Suggestions
This stew shines when paired with a crusty whole-grain bread to sop up its luscious broth or a scoop of fluffy quinoa for added heartiness. A radiant side salad with lemon vinaigrette creates a refreshing contrast, while a sprinkle of toasted nuts or seeds on top adds delightful crunch and visual appeal. Garnish thoughtfully with fresh herbs, vibrant chili flakes, or a swirl of creamy coconut yogurt for inviting colors and textures that speak to the soul of this hearty sweet potato stew.
| Nutrient | Per Serving |
|---|---|
| Calories | 280 |
| Protein | 7 g |
| Carbohydrates | 45 g |
| Fat | 6 g |

Ready to explore more comforting recipes rich in spices and fresh ingredients? Check out our Moroccan Tagine Recipes for inspiration. For spice health benefits and culinary tips, visit Healthline’s complete guide on cumin.
Q&A
Q&A: Hearty Sweet Potato Stew – A Comforting Twist on Tradition
Q1: What makes sweet potato stew a unique comfort food compared to traditional stews?
A1: Unlike typical stews that frequently enough rely on root vegetables like potatoes or carrots, sweet potato stew introduces a natural sweetness and vibrant color that elevates the dish. The creamy texture of cooked sweet potatoes blends seamlessly with savory spices and hearty ingredients, creating a cozy yet unexpectedly bright flavor profile. Its a comforting hug in a bowl with a touch of novelty.
Q2: Can you describe the flavor profile of a hearty sweet potato stew?
A2: Imagine the earthiness of tender sweet potatoes mingling with the warmth of cinnamon or smoked paprika, balanced by savory onions, garlic, and robust herbs like thyme or rosemary. It’s a beautiful dance between sweet, smoky, and herbaceous notes, finished with a splash of acidity-like a hint of lemon juice or vinegar-to brighten and balance the richness.
Q3: What ingredients are essential to crafting this stew?
A3: The stars of the show are sweet potatoes-cubed or mashed to your preferred consistency. Alongside them, onions and garlic build the aromatic base; tomatoes or broth provide depth; legumes such as chickpeas or beans add protein and texture; and spices like cumin, coriander, or cinnamon give warmth. Fresh herbs and a touch of heat, like chili flakes, can also enhance complexity.
Q4: Is this stew suitable for vegetarians or vegans?
A4: Absolutely! Sweet potato stew is naturally plant-based and easily adaptable. By using vegetable broth rather of chicken or beef stock, and omitting any dairy-based toppings, it becomes a nourishing, vegan-friendly meal packed with fiber, vitamins, and wholesome goodness.
Q5: How can you elevate this stew to make it a complete meal?
A5: Pair your hearty sweet potato stew with crusty bread or warm naan for dipping. Adding a scoop of cooked grains-quinoa, rice, or barley-can make it extra filling. A dollop of coconut yogurt or a drizzle of tahini adds creaminess and a subtle nutty flavor, making every bite luscious and satisfying.
Q6: What occasions or seasons is sweet potato stew best enjoyed?
A6: This stew shines brightest in the cooler months, when you crave something warming and restorative. It’s perfect for casual family dinners,cozy weekend lunches,or even meal prepping for busy weeks.Its comforting nature also makes it a fantastic centerpiece for a laid-back autumn gathering or a holiday side dish with a twist.
Q7: Any tips for customizing this stew to personal taste?
A7: Definitely! If you love spice, add more chili or a splash of hot sauce. For a smoky kick, incorporate smoked paprika or chipotle peppers. Swap out chickpeas for lentils or white beans depending on what’s on hand. Fresh herbs like cilantro or parsley added just before serving brighten the stew, and a squeeze of citrus at the end enhances all the flavors.
Q8: How do you store and reheat sweet potato stew?
A8: Store leftovers in an airtight container in the fridge for up to 4 days, or freeze for longer storage. When reheating, do so gently on the stovetop or microwave with a splash of broth or water to revive the stew’s luscious consistency. It often tastes even better the next day as the flavors meld beautifully overnight.
Key Takeaways
As the aromatic steam rises from your bowl of hearty sweet potato stew, you’re not just savoring a meal-you’re embracing a comforting twist on tradition that warms both body and soul. This vibrant dish proves that simple, wholesome ingredients can come together to create something truly exceptional. whether enjoyed on a chilly evening or shared around the table with loved ones, sweet potato stew invites you to explore familiar flavors in a refreshingly new way. So next time you crave comfort food with a nourishing touch, let this stew be your tasty reminder that tradition is ever-evolving-and always worth savoring.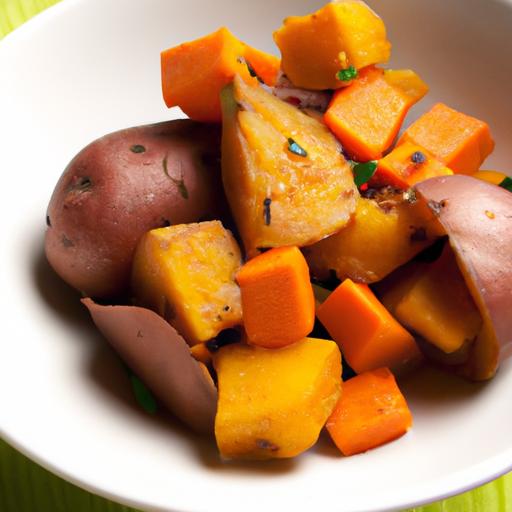
Sweet potato glass noodles captivate with their delightfully translucent strands and uniquely chewy texture, making them a standout ingredient in both conventional and contemporary dishes. Originating from Korean and East Asian cuisine, these noodles impart a subtle, nutty sweetness that elevates simple recipes into flavorful feasts. my first encounter with sweet potato glass noodles was in a bustling Seoul market, where the chef stirred them gently in a sizzling pan, creating a dish both visually mesmerizing and irresistibly satisfying.Their versatility and nutritional benefits make them a beloved pantry staple for anyone eager to explore creative culinary horizons.
Prep and Cook Time
Planning: 10 minutes | Cooking: 15 minutes | Total: 25 minutes
Yield
Serves 4 generously
Difficulty Level
Medium – accessible for confident home cooks
Ingredients
- 200g sweet potato glass noodles, soaked in warm water for 20 minutes and drained
- 2 tablespoons sesame oil
- 3 cloves garlic, minced
- 1 medium carrot, julienned
- 1 small zucchini, julienned
- 100g shiitake mushrooms, sliced thinly
- 3 tablespoons soy sauce (low sodium recommended)
- 1 tablespoon brown sugar
- 2 green onions, sliced on the bias
- 1 tablespoon toasted sesame seeds, for garnish
- Optional: 100g cooked beef strips or tofu cubes, for added protein
Instructions
- Prepare the noodles: After soaking, drain the sweet potato glass noodles well and gently seperate any strands sticking together. Set aside.
- Sauté aromatics: In a large skillet or wok, heat sesame oil over medium heat. Add minced garlic and sauté until fragrant, about 1 minute.
- Add vegetables: Toss in the julienned carrot, zucchini, and sliced shiitake mushrooms. Stir-fry for 4-5 minutes until vegetables are tender-crisp.
- Cook the noodles: Add the drained noodles to the pan, tossing gently to combine. Pour in soy sauce and brown sugar, stirring continuously to evenly coat the noodles and vegetables.
- Incorporate protein (optional): If using, add cooked beef strips or tofu now, mixing to integrate all ingredients thoroughly.
- Finish with green onions: Stir in sliced green onions and cook for another 2 minutes,allowing flavors to meld.
- Serve with garnish: Transfer to a serving platter and sprinkle toasted sesame seeds over the top for a nutty crunch and visual appeal.
Tips for Success
- To perfect the texture of sweet potato glass noodles, avoid over-soaking as they can become mushy. Aim for a tender yet chewy bite.
- Use a wide pan or wok to ensure even cooking without clumping.
- For a vegan twist,swap beef with firm tofu or shiitake mushrooms exclusively.
- Make-ahead tip: Cook noodles and vegetables separately, store in airtight containers, and combine just before serving for freshness.
- Enhance flavor depth by adding a splash of rice vinegar or a pinch of red pepper flakes for subtle heat.
Serving Suggestions
Present your dish in a shallow bowl to showcase the glossy, translucent noodles glistening alongside the vibrant vegetables.Pair with a crisp cucumber salad and a side of kimchi for a balanced Korean-inspired feast. For an elegant touch, garnish with finely chopped cilantro and a drizzle of toasted sesame oil. This versatile meal also pairs beautifully with grilled seafood or simply enjoyed on its own as a light, satisfying entrée.
| Nutrient | Per Serving |
|---|---|
| Calories | 220 |
| Protein | 6g |
| Carbohydrates | 40g |
| Fat | 5g |
| Fiber | 3g |

for those eager to dive deeper into Korean-inspired noodle dishes, explore our Bibimbap recipe.Additionally, to understand the health benefits and science behind sweet potato starch-based noodles, visit this NIH study on sweet potato starch nutrition.
Q&A
Q&A: Sweet Potato Glass Noodles – A Tasty Twist on Tradition
Q1: What exactly are sweet potato glass noodles?
A1: Sweet potato glass noodles, also known as dangmyeon in Korean cuisine, are translucent noodles made from sweet potato starch. unlike traditional wheat or rice noodles, these noodles have a unique chewy texture and a slightly glossy, glass-like appearance, making them not only a treat to eat but also a feast for the eyes.
Q2: How do sweet potato glass noodles differ from regular noodles?
A2: The key difference lies in their ingredient and texture. Made primarily from sweet potato starch, these noodles are gluten-free with a pleasantly springy bite. They are thinner and more elastic than rice noodles and hold sauces exceptionally well, making every bite flavorful. Their glossy sheen gives dishes a modern, almost ethereal quality that elevates even the simplest recipes.
Q3: What cuisines traditionally use sweet potato glass noodles?
A3: Sweet potato glass noodles are a staple in Korean cuisine-most famously in japchae, a savory stir-fry mixed with vegetables, beef, and soy-based sauce. They’re also found in various Asian dishes,including some Chinese and Japanese recipes,valued for their texture and ability to absorb flavors.
Q4: Why are sweet potato glass noodles considered a ‘tasty twist on tradition’?
A4: Traditionally, noodles are made from wheat or rice, but sweet potato glass noodles introduce a fresh, satisfying mouthfeel and a subtly sweet undertone that’s different yet familiar.Using these noodles in classic dishes or innovative recipes adds a creative twist-melding old culinary customs with modern tastes and dietary trends like gluten-free eating.
Q5: Are sweet potato glass noodles healthy?
A5: Yes! Being made from sweet potato starch, they are naturally gluten-free and often lower in calories compared to wheat noodles. They provide a good source of complex carbohydrates. Plus, their chewy texture can help slow down eating, encouraging mindful dining.However, it’s wise to enjoy them as part of a balanced meal rich in vegetables and protein.
Q6: How do you cook sweet potato glass noodles perfectly?
A6: Cooking these noodles is an art. Typically, they require boiling in plenty of water for about 6-8 minutes until translucent and tender but still slightly chewy. Rinse them under cold water to prevent sticking and toss with a little sesame oil if not instantly sauced. Overcooking turns them mushy, so keep an eye on texture!
Q7: What dishes can you make with sweet potato glass noodles?
A7: Beyond the beloved Korean japchae, these noodles inspire diverse dishes-refreshing cold noodle salads, hearty soups, sizzling stir-fries, or even fusion dishes like noodle bowls with roasted veggies and tangy dressings. Their versatility makes them a perfect canvas for experimenting with flavors and textures.
Q8: Where can I find sweet potato glass noodles?
A8: You can find them in Asian grocery stores, frequently enough labelled “dangmyeon” or simply “sweet potato noodles.” Many online retailers also stock them, especially those specializing in Korean or gluten-free products. Look for clear packaging that shows the translucent nature of the dry noodles.Q9: Any tips for first-timers cooking with sweet potato glass noodles?
A9: Absolutely! Soak or boil the noodles properly, don’t skip rinsing with cold water to stop the cooking process, and toss them with a touch of oil to keep them from sticking. Start with tried-and-true recipes like japchae to get a feel for their texture before experimenting with your own creations.
Q10: Why should food lovers give sweet potato glass noodles a try?
A10: As they’re a delightful surprise-offering a noodle experience that’s both nostalgic and novel. With their glossy beauty, chewy texture, and subtle sweetness, sweet potato glass noodles add excitement to your plate and prove that sometimes, the best culinary twists come from reimagining tradition.
In Summary
In the world of noodles, sweet potato glass noodles offer a delightful departure from the ordinary-a blend of tradition and innovation that invites both the curious cook and the seasoned foodie to explore new textures and flavors. Their translucent strands tell a story of culinary heritage while opening doors to vibrant, healthful dishes that satisfy the palate and nourish the body.Whether stir-fried, simmered in soups, or tossed in refreshing salads, these noodles bring a tasty twist that redefines what it means to enjoy a classic staple. So next time you’re seeking a subtle change with a big impact, let sweet potato glass noodles be your delicious invitation to embrace tradition with a fresh, modern flair.
Sweet Slices offer a delectable twist on customary pizza by transforming the crust into a canvas for luscious, layered flavors that dance on the palate. Rooted in the joyful fusion of dessert artistry and rustic simplicity, these delightful creations invite you to explore the perfect crust and toppings that suit every craving – from crisp and buttery bases to rich, fruity, or chocolaty finishes. Whether you’re entertaining guests or indulging in a weekend treat, mastering the essentials of dessert pizza brings a new dimension to sweet satisfaction.
Prep and Cook Time
- Preparation: 20 minutes
- Cooking: 15 minutes
- Total: 35 minutes
Yield
Serves 6-8 slices, perfect for sharing or as an indulgent solo treat.
Difficulty Level
Medium – approachable for adventurous home bakers with some familiarity with dough handling.
Ingredients
- For the crust:
- 2 cups all-purpose flour, sifted
- 1 tsp active dry yeast
- 1 tbsp granulated sugar
- ½ tsp fine sea salt
- ¾ cup warm whole milk (110°F/45°C)
- 2 tbsp unsalted butter, melted
- For the base layer:
- ⅓ cup cream cheese, softened
- 2 tbsp honey or agave syrup
- For sweet toppings:
- 1 cup fresh berries (strawberries, blueberries, raspberries)
- ½ cup dark chocolate chips or chunks
- 2 tbsp toasted sliced almonds
- Fresh mint leaves for garnish
- optional: powdered sugar for dusting
Instructions
- Activate the yeast: In a small bowl, combine warm milk, sugar, and yeast.Stir gently and let sit for 5-7 minutes until frothy – this signals the yeast is alive and ready.
- Prepare the dough: In a large bowl, whisk together flour and salt. Pour in the yeast mixture and melted butter. Stir with a wooden spoon until a rough dough forms.
- Knead to perfection: Transfer the dough to a floured surface and knead for 8-10 minutes until smooth and elastic. If sticky, dust with a bit more flour, but avoid adding too much to keep the crust tender.
- Rise and shine: Place dough in a lightly oiled bowl, cover with a clean kitchen towel, and let rise in a warm spot for about 1 hour or until doubled in size.
- Preheat your oven: Set the oven to 425°F (220°C) and prep a pizza stone or baking sheet by lightly greasing or dusting with cornmeal for extra crunch.
- Shape the crust: Punch down the dough and roll it out into a 12-inch circle on a floured surface. Transfer it to your prepared baking sheet or stone.
- Blind bake the crust: Bake the crust alone for 7-8 minutes to create a sturdy base that won’t become soggy under the toppings.
- Mix the base layer: While the crust is baking, blend cream cheese with honey until smooth. Spread this creamy layer evenly over the warm crust once removed from the oven.
- Add your toppings: Artistically scatter fresh berries, dark chocolate chips, and toasted almonds across the base layer, balancing textures and colors for visual appeal.
- Final bake: Return the pizza to the oven for another 5-7 minutes, just long enough to soften the toppings and warm the chocolate without melting it entirely.
- finish and serve: Once out of the oven, garnish with fresh mint leaves and a delicate dusting of powdered sugar for an irresistible finishing touch.
Tips for Success
- Crust Variations: Swap all-purpose flour for whole wheat or almond flour for a nuttier flavor and added nutrition.
- Base Options: Try mascarpone with a drizzle of maple syrup instead of cream cheese for a richer tang.
- Fruit Substitutions: Use sliced peaches, bananas, or kiwi for a tropical twist that pairs beautifully with the creamy base.
- Chocolate Choices: Experiment with white chocolate or caramel chunks to complement tart fruits.
- Make Ahead: Prepare the dough the day before and refrigerate overnight for deeper flavor development and ease on the dessert day.
Serving Suggestions and Pairings
Serve your dessert pizza warm, slicing it like a classic pie to showcase the vibrant toppings. For a elegant presentation, place each slice on a delicate dessert plate and add a scoop of vanilla bean ice cream or a dollop of whipped cream on the side.Fresh mint not only adds a pop of color but a refreshing contrast to the creamy sweetness.
Pair this sweet treat with a light, sparkling rosé or a cup of bergamot-infused Earl gray tea to elevate the sensory experience. For a cozy night in, a rich hot chocolate with a hint of chili adds an exciting warmth.

| nutrient | Per Slice (1/8) |
|---|---|
| Calories | 225 kcal |
| Protein | 5 g |
| Carbohydrates | 30 g |
| Fat | 9 g |
For further inspiration on creative crusts and dessert ideas, explore our Ultimate Dessert Crusts Guide.To deepen your knowlege about yeast dough fermentation, visit the informative King Arthur Baking resource.
Q&A
Q&A: Sweet Slices – A Delightful dessert Pizza Recipe to Try
Q1: What exactly is a dessert pizza, and how does it differ from traditional pizza?
A1: Dessert pizza is a creative twist on the classic savory dish, swapping out tomato sauce, cheese, and meats for sweet toppings like fruits, chocolate, and cream. Instead of a hearty meal,it’s a fun,shareable treat that combines the crispy,chewy base of a pizza crust with luscious,sugary flavors-making it perfect for satisfying your sweet tooth in a novel way.
Q2: What kind of crust works best for a dessert pizza?
A2: A thin and slightly crispy crust serves as the perfect canvas for dessert pizzas, allowing the toppings to shine without becoming soggy. You can use a traditional pizza dough for that authentic feel or switch things up with puff pastry or even a sugar cookie dough for extra sweetness and ease.
Q3: Which toppings are ideal for creating a delightful dessert pizza?
A3: The possibilities are endless! Fresh fruits like strawberries, blueberries, and bananas add vibrant color and natural sweetness. Nutella or melted chocolate make luscious bases, while mascarpone or cream cheese dollops add a creamy contrast. Sprinkle with nuts, a dusting of powdered sugar, or even mini marshmallows for an extra touch of indulgence.
Q4: How can I make my dessert pizza look as good as it tastes?
A4: Presentation is everything! Arrange fruit slices artistically in concentric circles or playful patterns. Use contrasting colors to make the pizza pop visually. A drizzle of honey or chocolate sauce can add shine and elegance, while a sprinkle of edible flowers or fresh mint leaves brings a fragrant, fresh finish.Q5: Is making a dessert pizza challenging for beginners?
A5: Not at all! Dessert pizza is incredibly beginner-friendly. The dough is easy to handle, and the “sauce” and toppings require minimal preparation. Plus, the recipe invites creativity-no strict rules, just delicious experimentation. It’s a great baking project for families or a fun twist on dessert night with friends.
Q6: Can dessert pizzas be customized for diffrent dietary needs?
A6: Absolutely! Substitute the dough with gluten-free options, use dairy-free cream cheese or coconut yogurt for a lactose-free twist, and opt for natural sweeteners like maple syrup or agave if you want to reduce refined sugar. The versatility of dessert pizza means everyone can enjoy a sweet slice tailored to their preferences.
Q7: What occasions are perfect for serving dessert pizza?
A7: Dessert pizzas shine at casual gatherings, birthday parties, summer picnics, or even as a unique finish to a romantic dinner. Their shareable nature and customizable toppings make them a crowd-pleaser that adds a playful, memorable flair to any occasion.
Q8: Any pro tips for baking the perfect sweet slice?
A8: Keep an eye on the crust-bake until golden but not burnt to maintain that satisfying crunch.Add fresh fruits after baking if you want to keep them vibrant and juicy, while toppings like chocolate or marshmallows can be melted briefly in the oven. And don’t be afraid to mix textures: creamy, crunchy, juicy, and gooey all in one slice create the ultimate dessert pizza experience!
The Way Forward
As you savor the last bite of your Sweet Slices dessert pizza, you’ll realise this isn’t just a treat-it’s a festivity of flavors, textures, and creativity on a plate. Whether you’re sharing it with friends or indulging in a solo moment of sweetness, this recipe opens the door to endless variations and sweet adventures. So next time you crave something both familiar and unexpected, remember: dessert pizza is more than a novelty-it’s a delicious invitation to rethink how we enjoy our favorite sweets. ready to slice into your next culinary creation? The kitchen is waiting.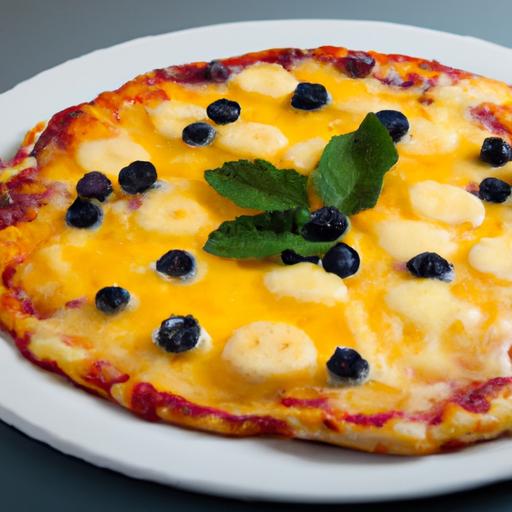
Hearty Sweet Potato Braised Beef: A Budget-Friendly Meal
When it comes to crafting a soul-warming dish that marries comfort with rich,layered flavors,few recipes evoke the same cozy satisfaction as Hearty Sweet Potato Braised Beef. This meal brings together tender, slowly braised beef and the natural sweetness of caramelized sweet potatoes, creating a harmony that’s as nourishing as it is indeed delicious. Inspired by rustic farm-to-table traditions and perfected through countless slow-cooked afternoons,this dish is your gateway to a restaurant-quality experience without the hefty price tag.
Prep and Cook Time
- Prep Time: 20 minutes
- Cook Time: 2 hours 30 minutes
- Total time: 2 hours 50 minutes
Yield
Serves 6 generous portions
Difficulty Level
Medium – Perfect for seasoned home cooks aiming to impress with layered flavors and tender textures.
Ingredients
- 2 lbs chuck roast, trimmed and cut into 2-inch cubes
- 2 large sweet potatoes, peeled and cut into 1-inch cubes
- 1 large onion, thinly sliced
- 4 cloves garlic, minced
- 2 tbsp olive oil
- 1 cup beef broth
- 1 cup dry red wine (optional but recommended for depth)
- 2 tbsp tomato paste
- 1 tbsp Worcestershire sauce
- 2 sprigs fresh rosemary
- 2 sprigs fresh thyme
- 1 bay leaf
- Salt and freshly ground black pepper to taste
- 1 tbsp all-purpose flour
- Fresh parsley, chopped for garnish
Choosing the Perfect Cut of Beef for Tenderness and Flavor
The magic behind a truly tender and flavorful braised beef lies in selecting the right cut. Opting for chuck roast accomplishes two key goals: it’s budget-friendly and uniquely suited for long,slow cooking. This cut is generously marbled with fat and connective tissue that, when braised properly, melts into a luscious, melt-in-your-mouth delight. The collagen breakdown delivers the silky texture that elevates the dish’s comfort factor. Avoid leaner cuts like sirloin as they can dry out and lack the depth that makes this recipe so irresistible.
Unlocking the Natural Sweetness of Sweet Potatoes in Braised Dishes
Sweet potatoes are the unsung heroes of manny braised dishes, offering a subtle sweetness that balances the savory richness of beef. When added at the right time, they soften beautifully without disintegrating. Their caramelized edges and creamy interiors soak up the fragrant broth, making every bite a delightful interplay of texture and taste. To maximize their natural sugars, choose firm, luminous orange sweet potatoes and avoid over-stirring during cooking to encourage light browning.
step-by-Step Guide to Slow Braising for Maximum Depth and Comfort
- Pat the beef cubes dry with paper towels to encourage browning, then season generously with salt and pepper.
- Heat olive oil in a heavy-bottomed Dutch oven over medium-high heat.Sear beef cubes in batches until deeply golden on all sides, about 4-5 minutes per batch. Remove and set aside.
- Add sliced onions to the pot and sauté until translucent and starting to brown, around 7 minutes, stirring occasionally.
- Stir in garlic and cook for 1 minute until fragrant.
- Mix in tomato paste, coating the onions and garlic, and cook for an additional 2 minutes.
- Deglaze the pot with red wine, scraping up all caramelized bits-this builds intense flavor.
- Return the beef to the pot along with beef broth, Worcestershire sauce, rosemary, thyme, and bay leaf. Bring to a gentle simmer.
- cover and transfer to a preheated oven at 300°F (150°C). Slow braise for 2 hours until beef is tender.
- Add diced sweet potatoes to the pot, stir gently, cover again, and braise for an additional 30 minutes until potatoes are soft but maintain shape.
- Remove herbs and bay leaf, then uncover and simmer on stovetop for 10 minutes if you want to thicken the sauce. optionally, sprinkle flour evenly and stir to thicken further for a velvety finish.
- adjust seasoning with salt and pepper to taste.
budget-friendly Tips for Stretching Your Ingredients Without Sacrificing Taste
One of the joys of this recipe is its ability to stretch a few key ingredients into a comforting feast. Using chuck roast invites affordability, while hearty sweet potatoes add volume and nutrition. To save further, consider incorporating seasonal root vegetables like carrots or parsnips, chopped similarly and added alongside sweet potatoes. Economically, substituting red wine with extra beef broth and a splash of balsamic vinegar can maintain acidity and complexity. Using fresh herbs is best, but dried versions concentrated in smaller quantities work well if fresh isn’t accessible.
Chef’s Notes
- Make-ahead: This dish tastes even better the next day as flavors deepen-ideal for batch cooking.
- Variations: Swap sweet potatoes for butternut squash or golden beets for a different sweetness profile.
- Substitutions: For a gluten-free version, skip the flour or use a gluten-free thickener like arrowroot.
- Cooking tip: Don’t rush the searing step; well-browned meat builds the foundation of flavor.
- Storage: Refrigerate leftovers for up to 4 days or freeze for 3 months.
Serving Suggestions
Present this Hearty Sweet Potato Braised Beef on a rustic plate garnished with freshly chopped parsley for a pop of color and freshness.Pair with crusty bread to soak up the luscious sauce or serve atop creamy mashed potatoes or buttered rice for a complete meal. A simple, lightly dressed green salad with tangy vinaigrette will cut through the richness beautifully, balancing the palate.

| Nutrient | per Serving |
|---|---|
| Calories | 420 kcal |
| Protein | 38 g |
| Carbohydrates | 22 g |
| Fat | 18 g |
For more hearty, budget-friendly recipes featuring beef cuts, explore our ultimate guide to affordable beef stews. To understand more about the nutritional benefits of sweet potatoes and beef,consult the Healthline nutrition resource.
Q&A
Q&A: Hearty Sweet Potato Braised Beef – A Budget-Friendly Meal
Q1: What makes sweet potato braised beef a budget-friendly meal?
A1: This dish cleverly combines affordable, nutrient-dense ingredients-like sweet potatoes and cuts of beef that are frequently enough overlooked but flavorful when slow-cooked. Sweet potatoes add bulk, vitamins, and natural sweetness, allowing you to stretch the beef further without sacrificing heartiness or satisfaction.
Q2: Which cut of beef works best for braising in this recipe?
A2: Tougher, less expensive cuts like chuck roast, brisket, or round are perfect. These cuts become tender and melt-in-your-mouth with slow, moist cooking, absorbing the sweet potato’s subtle sweetness and the rich braising liquid.
Q3: How does braising enhance the flavors of the dish?
A3: Braising involves slow-cooking beef in liquid, which breaks down connective tissues, resulting in tender meat infused with the dish’s aromatic spices, herbs, and the natural sweetness of the sweet potatoes. This method transforms simple ingredients into a deeply comforting and flavorful meal.
Q4: Can I customize the seasonings in the recipe?
A4: absolutely! While classic herbs like thyme, rosemary, and bay leaves pair beautifully, feel free to experiment with warm spices such as cinnamon or smoked paprika for extra depth. A splash of balsamic vinegar or soy sauce can also add an exciting twist.
Q5: Is this dish suitable for meal prepping?
A5: Yes! Hearty Sweet Potato Braised Beef actually improves with time as flavors meld together. It stores beautifully in the fridge for up to 4 days, and it freezes well, making it ideal for planning meals ahead without breaking the bank.
Q6: What sides best complement this braised beef dish?
A6: Since the dish is filling on its own, simple sides like steamed greens, crusty bread, or a light green salad work well. For extra comfort, serve it over creamy mashed potatoes or buttered noodles to soak up the luscious braising liquid.
Q7: Can this recipe be adapted for slow cookers or Instant Pots?
A7: definitely! Slow cookers are ideal for hands-off cooking-set it low and slow for 6-8 hours. Instant Pots speed up the process while still tenderizing the beef nicely, giving you a hearty meal in under an hour.
Q8: How does incorporating sweet potatoes benefit the nutritional profile?
A8: Sweet potatoes provide a boost of fiber, vitamins A and C, and natural antioxidants. Their subtle sweetness balances the richness of the beef, making the dish both wholesome and satisfying without relying on expensive or processed ingredients.
Q9: What tips can help maximize flavor without increasing cost?
A9: Browning the beef before braising develops rich, savory notes. Using homemade stock or broth-perhaps from leftover bones or vegetable scraps-enhances depth.Lastly, letting the dish rest overnight in the fridge allows the flavors to fully develop and intensify.
Q10: Why is this meal perfect for budget-conscious cooks?
A10: It transforms simple, inexpensive ingredients into a warming, hearty feast that feeds a crowd. With minimal fuss and maximum flavor, it proves that good cooking doesn’t need to mean big spending-just clever ingredient pairing and patient cooking.
Insights and Conclusions
this Hearty Sweet Potato Braised Beef proves that comfort doesn’t have to come with a hefty price tag.With tender, flavorful beef slowly melting into sweet, velvety potatoes, every bite offers a satisfying harmony of taste and texture-perfect for those cozy nights when you want warmth without worry. Whether you’re a seasoned cook or just starting to explore budget-friendly meals, this dish invites you to embrace simple ingredients transformed by time and care. So next time your pantry calls for inspiration, remember: delicious, nourishing meals like this one are well within reach, proving that hearty doesn’t have to mean expensive.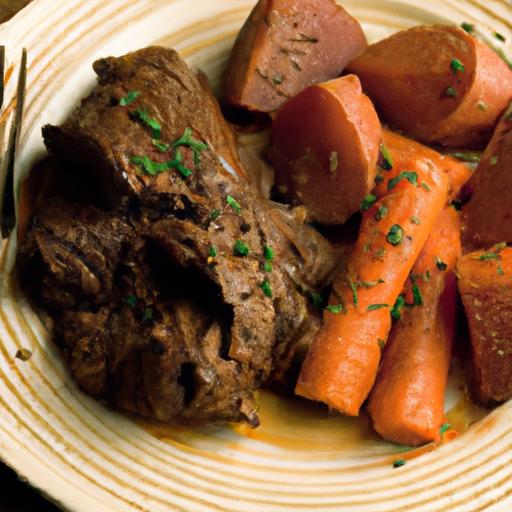
Exploring the Rich History and Cultural Roots of Sweet Potato Curry
Sweet potato curry is a heartwarming dish that bridges cultures and centuries,originating from the vibrant spice trails of South Asia. Traditionally, curries evolved as flavorful, aromatic meals designed to transform humble vegetables into comfort and celebration. The sweet potato, with its naturally creamy texture and gentle sweetness, has long been embraced in various regional cuisines-from Indian kitchens where turmeric and garam masala evoke deep earthiness, to Caribbean tables where warm spices mingle with a hint of sweetness and heat.
This dish embodies the idea of adaptation; it’s a flavorful twist on a classic dish that resonates with home cooks globally.My first encounter with sweet potato curry was in a bustling Indian market, surrounded by the mingling aromas of cumin, coriander, and fresh ginger. It ignited my passion for creating a curry that delivers nourishment and vibrant flavor in every bite-perfect for any season and wonderfully versatile.
Unlocking the Perfect Balance of Spices for a Vibrant Flavor Profile
At the core of exceptional sweet potato curry is the artful balance of spices. The magic lies not only in the quantity but in the order and freshness. Ground turmeric offers warmth and golden color,while cumin seeds add a slightly smoky undertone. Coriander powder introduces a citrusy brightness, and garam masala brings comforting complexity with hints of clove, cardamom, and cinnamon. Fresh ginger and garlic provide a pungent, zesty lift that cuts through the richness, and if you like a touch of heat, fresh green chilies or a dash of cayenne powder will enliven the palate without overwhelming the gentle sweetness of the sweet potatoes.
Choosing the best Sweet Potatoes and Ingredients for Maximum taste
For this recipe, selecting the right variety of sweet potatoes is essential to achieve the creamy texture you desire. Look for firm, smooth-skinned sweet potatoes with a vibrant orange or reddish hue, which typically have a dense, moist flesh that holds together well during cooking. Avoid those that are too soft or have blemishes, as they may break down excessively and create a mushy curry.
Using fresh, high-quality ingredients-such as freshly ground spices, full-fat coconut milk, and garden-fresh herbs-will elevate your sweet potato curry to a new level of depth and satisfaction. The interplay of fresh tomatoes or tamarind paste can offer subtle acidity, balancing the dish’s sweetness and enriching the flavor complexity.
Prep and cook Time
- Planning: 15 minutes
- Cooking: 30 minutes
Yield
Serves 4 generous portions
Difficulty Level
Easy to Medium - ideal for cooks looking to experiment with spices while enjoying a comforting, home-cooked meal
Ingredients
- 2 large sweet potatoes (about 600g), peeled and cut into 1-inch cubes
- 2 tbsp vegetable oil or coconut oil
- 1 tsp cumin seeds
- 1 medium onion, finely chopped
- 3 garlic cloves, minced
- 1-inch piece fresh ginger, grated
- 1-2 green chilies, sliced (optional, adjust to taste)
- 1 tsp turmeric powder
- 1 tsp coriander powder
- 1 tsp cumin powder
- 1 tsp garam masala
- 1 large tomato, chopped or 1/2 cup canned crushed tomatoes
- 1 cup coconut milk (full fat for creaminess)
- 1 cup vegetable broth or water
- Salt to taste
- Fresh cilantro leaves for garnish
- Juice of 1/2 lime (optional)
Step by Step Guide to Crafting a Creamy and Comforting Sweet Potato Curry
- Prepare the sweet potatoes: Peel and dice the sweet potatoes into even 1-inch cubes to ensure uniform cooking. Set aside.
- Heat the oil in a deep skillet or heavy-bottomed pot over medium heat. Add the cumin seeds and toast until fragrant, about 30 seconds.
- Add the chopped onions and sauté until golden brown, about 7 minutes, stirring often to prevent burning. This step builds the curry’s foundational flavor.
- Stir in the minced garlic, grated ginger, and green chilies (if using), cooking for another 2-3 minutes until aromatic.
- Add the ground spices: turmeric, coriander, cumin powder, and garam masala.Stir constantly to toast the spices lightly,about 1 minute,until they release their fragrance.
- Mix in the chopped tomatoes and cook until soft and pulpy, about 5 minutes. This deepens the curry’s richness and adds natural acidity.
- Pour in the coconut milk and vegetable broth, stirring to combine. Bring the mixture to a gentle simmer.
- Add the sweet potato cubes to the pot, stirring gently to coat them in the curry base.
- Cover and simmer on low heat for 20-25 minutes, or until the sweet potatoes are tender but intact. Stir occasionally to prevent sticking.
- Season with salt and adjust the spice balance if needed. Add lime juice if desired for a bright finish.
- Garnish with fresh cilantro leaves before serving.
Chef’s Notes and Tips for success
- Spice customization: Feel free to add a pinch of smoked paprika or mustard seeds for a regional twist.
- Protein additions: Stir in cooked chickpeas or lentils in step 8 to boost protein for a heartier meal.
- Avoid mushiness: Cut sweet potatoes just before cooking to prevent oxidation and keep their structure.
- Make-ahead: This curry tastes even better the next day-prepare in advance and store in an airtight container in the fridge up to 3 days.
- for creamier texture: Blend half the cooked sweet potatoes and return them to the pot to thicken the curry naturally.
Serving Suggestions
Serve this luscious sweet potato curry over steamed basmati rice or alongside warm, buttery naan bread. Garnish with a sprinkle of toasted cashews or a dollop of cooling yogurt for contrast. A side salad of crisp cucumber raita or pickled mango chutney will beautifully brighten the plate, complementing the curry’s warmth and creaminess. For a festive touch, scatter fresh pomegranate seeds on top to add bursts of color and sweetness.

| Nutrient | Per Serving |
|---|---|
| Calories | 320 kcal |
| Protein | 5 g |
| Carbohydrates | 42 g |
| Fat | 12 g |
For a deeper understanding of curry spice blends and their health benefits, check out this BBC Good Food guide on spices.To expand your recipe repertoire, you might enjoy our vegan curry recipes collection that pairs perfectly with this dish.
Q&A
Q&A: Sweet potato Curry – A Flavorful Twist on a Classic Dish
Q1: What makes sweet potato curry different from traditional curry recipes?
A1: Sweet potato curry brings a natural sweetness and creamy texture that transforms the typical savory, spicy curry into a harmonious blend of flavors. Unlike regular vegetable curries, the sweet potatoes introduce a subtle earthy sweetness that balances the heat and spices, creating layers of taste that are both comforting and exciting.Q2: Why should I try sweet potato curry?
A2: If you’re looking to reinvent your curry game, sweet potato curry is a tasty way to do it. it’s nutrient-rich, packed with vitamins and fiber, and offers a delightful contrast of sweet and spicy notes. Plus, it’s versatile-perfect for vegetarians, vegans, and anyone craving a comforting bowl that feels indulgent yet wholesome.
Q3: What spices work best in sweet potato curry?
A3: The magic of sweet potato curry lies in its spice blend. Warm spices like turmeric, cumin, coriander, and cinnamon enhance the earthiness of the sweet potatoes, while a touch of chili or cayenne pepper adds a kick without overpowering the dish. Fresh ginger and garlic brighten the curry, and a sprinkle of garam masala near the end elevates the complexity.
Q4: Can I make sweet potato curry creamy without dairy?
A4: Absolutely! Coconut milk is a classic dairy-free choice that lends a luscious creaminess and subtle sweetness to the curry. It complements the sweet potatoes beautifully, enhancing their natural flavors while keeping the dish vegan-kind and rich in texture.
Q5: What are some good pairings or side dishes for sweet potato curry?
A5: Sweet potato curry pairs wonderfully with fluffy basmati rice or warm naan bread to soak up every bit of the flavorful sauce.For added texture and freshness, consider a crisp cucumber raita or a simple salad with citrusy dressing to lighten the richness of the curry. Roasted chickpeas or sautéed greens also make excellent accompaniments.Q6: Is sweet potato curry easy to make for beginners?
A6: Definitely! Sweet potato curry is forgiving and straightforward. With just a handful of spices, vegetables, and coconut milk, you can create a vibrant, fragrant meal with minimal effort. It’s a perfect gateway dish for anyone wanting to explore the world of curries without feeling overwhelmed.
Q7: Can sweet potato curry be prepared ahead and stored?
A7: Yes! Actually, sweet potato curry frequently enough tastes even better the next day as the flavors deepen when stored overnight. Keep it refrigerated in an airtight container for up to 3-4 days, or freeze portions for a quick and nourishing meal anytime.
Sweet potato curry isn’t just a meal-it’s an adventure for your taste buds. With its captivating balance of sweet and spicy, creamy and hearty, it invites you to experience a classic dish with a fresh and delightful twist. Ready to stir up your spice rack? Sweet potato curry awaits!
To Conclude
As the comforting aroma of sweet potato curry lingers in your kitchen, it’s clear that this vibrant twist on a classic dish offers more than just a meal-it’s an invitation to explore new flavors and embrace the wonderful versatility of familiar ingredients. Whether served over steaming rice or accompanied by warm naan, sweet potato curry brings a delightful balance of sweetness, spice, and heartiness that can transform any dinner into a memorable experience. So next time you’re craving something both nourishing and adventurous, let this flavorful fusion inspire your culinary journey and add a splash of color and warmth to your table.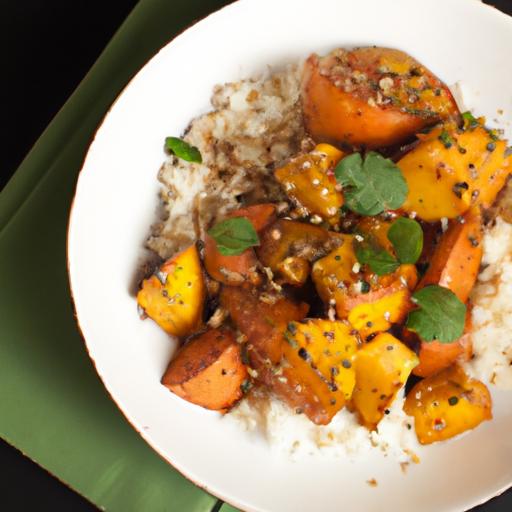
Easy Sweet Treats are a wonderful way to dive into the world of desserts without feeling overwhelmed. Whether you’re just beginning your baking journey or looking for quick, fuss-free creations, understanding how to select the right ingredients and master simple techniques will transform your kitchen into a haven of delicious possibilities. From perfectly ripe fruits to pantry staples like powdered sugar and vanilla extract,each component plays an essential role in achieving effortless dessert success.
Prep and Cook Time
Preparation: 15 minutes Cooking/Baking: 20 minutes (or no-bake for select recipes)
Yield
Serves 6 delicious portions
Difficulty Level
Easy – Perfect for beginners and busy home cooks
Ingredients
- 1 cup all-purpose flour, sifted
- ½ cup powdered sugar, sifted
- ½ tsp baking powder
- ¼ tsp salt
- ½ cup unsalted butter, chilled and cubed
- 1 large egg, room temperature
- 1 tsp pure vanilla extract
- 1 cup heavy cream
- 2 tbsp granulated sugar
- Fresh berries (blueberries, strawberries, raspberries) for topping
- 2 tbsp cocoa powder (optional, for creative twist)
- Honey or maple syrup for drizzle
Instructions
- Prepare your base: In a large bowl, whisk together the sifted flour, powdered sugar, baking powder, and salt until uniformly combined. This ensures no lumps and a smooth dessert foundation.
- Cut in the butter: Add the chilled, cubed butter to the dry ingredients. Using a pastry cutter or your fingertips, blend until the mix resembles coarse crumbs with pea-sized pieces of butter remaining. This method creates a tender texture once baked.
- Mix wet ingredients: In a separate bowl, beat the egg with vanilla extract. Gradually add this to the dry mix, stirring gently until the dough just comes together. Avoid over-mixing to keep the dessert light.
- Chill the dough: Wrap your dough in plastic wrap and refrigerate for 30 minutes. This prevents spreading and enhances texture.
- Bake or no-bake option: For baked delights, preheat your oven to 350°F (175°C). Shape dough into your desired forms and bake on a parchment-lined sheet for 15-20 minutes or until golden at the edges. for no-bake, skip baking and prepare whipped cream topping.
- Whip the cream: In a chilled bowl, pour the heavy cream and slowly add granulated sugar. Whisk until soft peaks form. For a creative twist, fold in cocoa powder for a rich mocha flavor.
- Assemble your dessert: Once the base has cooled, spread the whipped cream gently on top. Artistically arrange fresh berries, then finish with a drizzle of honey or maple syrup for added shine and natural sweetness.
- Final touches: Garnish with a sprinkle of powdered sugar or finely chopped nuts for texture contrast.Serve immediately or chill for 15 minutes to let flavors meld beautifully.
Tips for Success
- For buttery richness, always use cold butter and handle dough minimally to avoid toughness.
- Substitute heavy cream with coconut cream for a dairy-free alternative, enhancing tropical flavors.
- if your dough feels sticky, chill longer or lightly flour your hands before shaping.
- Make-ahead: the baked bases can be stored in an airtight container up to 3 days; whip cream fresh to retain fluffiness.
- Need a gluten-free option? Use a 1:1 gluten-free baking flour blend instead of all-purpose flour.
Serving Suggestions
Present these sweet treats on a rustic wooden board or a clean white platter to highlight the vibrant colors of the fresh berries and creamy toppings. Enhance the visual appeal by adding edible flowers or mint sprigs. Pair with a light herbal tea or a chilled glass of sparkling lemonade for a refreshing balance.

| Nutrient | Amount per serving |
|---|---|
| Calories | 280 kcal |
| Protein | 4 g |
| Carbohydrates | 32 g |
| Fat | 14 g |
For more detailed guidance on selecting quality ingredients, visit Serious Eats’ ingredient guide. to explore additional recipes perfect for beginners, check out our step-by-step baking techniques page.
Q&A
Q&A: Easy Sweet Treats – Simple Dessert Recipes for Beginners
Q1: Why should beginners start with simple dessert recipes?
A1: Diving into the world of baking and sweet treats can feel overwhelming, but starting simple builds confidence and skills without the stress. Easy recipes focus on fundamental techniques and common ingredients, making the process enjoyable rather than intimidating.Plus, there’s nothing quite like the joy of biting into a homemade dessert you whipped up yourself!
Q2: What are some key ingredients to keep on hand for beginner-friendly desserts?
A2: Stocking your pantry with basics like flour, sugar, baking powder, eggs, butter, vanilla extract, and cocoa powder sets you up for success. These versatile staples form the base of countless sweet treats-from cookies and brownies to cakes and puddings-so you’re ready to whip up something delicious at a moment’s notice.
Q3: Can beginners really make delicious desserts without fancy equipment?
A3: Absolutely! Many simple sweet treats require little more than mixing bowls, a whisk or spoon, a baking pan, and an oven or refrigerator. no stand mixer or intricate gadgets needed. Recipes that embrace minimal tools make the journey smoother and less daunting for newbies.
Q4: What’s a foolproof dessert recipe for someone just starting out?
A4: A classic chocolate chip cookie recipe is the quintessential beginner dessert. It’s forgiving,quick to make,and tastes like a warm hug. The steps are straightforward-mix, scoop, bake-and the result is a crowd-pleaser. Plus, once you master cookies, you can experiment with add-ins and flavors!
Q5: How can beginners avoid common dessert-making mistakes?
A5: Patience and precision are key. Measure ingredients carefully, follow the recipe steps in order, and don’t rush baking times. It’s also helpful to prepare all ingredients beforehand (called mise en place) so nothing gets missed or added too early. Remember, practice makes perfect, and every “oops” is a learning experience that sweetens your skills.Q6: What role does creativity play in simple dessert recipes?
A6: Creativity turns a basic recipe into your personal masterpiece. Once you grasp the fundamentals, try swapping chocolate chips for dried fruit, adding a sprinkle of sea salt, or drizzling caramel on top. Personal touches make desserts uniquely yours and keep the adventure deliciously fun!
Q7: Are no-bake desserts good starting points for beginners?
A7: Definitely! No-bake treats like fridge-set cheesecakes, mousse, or layered parfaits eliminate the oven hassle and lower the risk of overbaking. They often come together faster and allow you to focus on assembling flavors and textures-wich is a fantastic way to build dessert confidence.
Q8: How can beginners get inspired to keep exploring dessert recipes?
A8: Inspiration flows from tasting, experimenting, and sharing. Follow baking blogs, watch tutorial videos, or join friendly baking groups online.Sharing your creations with friends and family fuels motivation.Don’t be afraid to try new recipes and have fun-each dessert is a sweet step on your delicious journey!
To Wrap It Up
Whipping up delightful desserts doesn’t have to be daunting. With these easy sweet treats, even beginners can step confidently into the kitchen and create mouthwatering delights that impress and satisfy. Remember, the sweetest success comes from simple steps and a sprinkle of creativity. So next time a craving strikes, don’t hesitate-grab your ingredients, follow these approachable recipes, and enjoy the magic of homemade desserts made just for you. Happy baking!