Mastering Börek begins with selecting the perfect filling-one that bursts with authentic flavors while honoring the rich culinary tradition of this beloved savory pastry. Whether you lean towards succulent meats, fresh herbs, creamy cheeses, or hearty vegetables, the right filling transforms each delicate, flaky layer into a memorable experience. Let’s dive into creating that harmony of flavors and textures, starting with how to choose fillings that elevate your börek from simple to sensational.
Choosing the Perfect Filling for Authentic Flavors
To truly master börek, aim for fillings that balance moisture and seasoning to complement the pastry’s crisp, buttery layers. Customary options include:
- Ground lamb or beef sautéed with onions, garlic, and aromatic spices like cumin and cinnamon;
- Feta cheese combined with fresh parsley or dill for a tangy, herbaceous bite;
- Spinach and leeks cooked down with a hint of nutmeg;
- Potato puree seasoned with paprika and caramelized onions for a comforting vegetarian choice.
Fresh herbs are a must-thyme, mint, or chives can infuse your filling with vibrant notes. Keep fillings slightly firm and not too wet to prevent soggy layers, ensuring that each bite stays crisp and inviting.
Crafting the Ideal Dough Texture for Flaky Perfection
Your dough is the foundation of every great börek. A masterful dough strikes the perfect balance of elasticity and tenderness, enabling you to roll it paper-thin without tearing. Use all-purpose flour combined with a dash of oil and warm water for pliability.Resting the dough for at least 30 minutes under a damp cloth relaxes the gluten and simplifies rolling.
Pro tip: If you want extra flaky layers, consider layering your sheet with melted butter or olive oil as you assemble the börek. This technique creates irresistible golden crispiness once baked.
expert techniques for Rolling and Shaping Börek
Once rested, divide the dough into small balls. Using a lightly floured surface, roll each ball into an ultra-thin circle-almost translucent.The key here is patience, gentle pressure, and a careful swirl of your wrist, which helps elongate the dough evenly.
For shaping, try classic forms such as:
- Triangles: Place a spoonful of filling near the edge, fold into a neat triangle, sealing edges firmly.
- Spirals: Spread filling on a thin sheet, then roll tightly before coiling it into a spiral.
- Rectangular layers: Stack multiple thin sheets brushed with butter, layering filling intermittently for a luxurious multi-layered börek.
ensure edges are well sealed with a touch of water or beaten egg to avoid filling leakage during baking.
Baking Tips and Presentation Ideas to Impress Your Guests
Before baking, brush your börek generously with egg wash or melted butter to achieve that coveted golden sheen. Place on a parchment-lined tray and bake in a preheated oven at 375°F (190°C) for 25-30 minutes until crisp and bubbly.
For a stunning presentation, serve börek warm on a rustic wooden board, garnished with fresh herbs like parsley or mint and accompanied by a bowl of creamy yogurt or tzatziki. Add a wedge of lemon to brighten each bite and elevate the flavor profile.
Prep and Cook Time
- Readiness: 40 minutes (includes dough resting)
- Cooking: 30 minutes
- Total: 1 hour 10 minutes
Yield
Serves 6-8 people,perfect for sharing at brunch or dinner parties.
Difficulty Level
Medium - requires some dough handling skills and attention to rolling techniques, but easily achievable with practice.
Ingredients
- For the Dough:
- 3 cups all-purpose flour, sifted
- 1 cup warm water
- 2 tbsp olive oil
- 1 tsp salt
- For the Filling (Classic Spinach and Feta):
- 400g fresh spinach, washed and roughly chopped
- 200g feta cheese, crumbled
- 1 medium onion, finely diced
- 2 tbsp olive oil
- 1/4 tsp freshly ground black pepper
- 1/2 tsp nutmeg
- 1/4 cup fresh dill, chopped
- For Assembly:
- 1 egg, beaten (for egg wash)
- 3 tbsp melted butter or olive oil (for layering)
Instructions
- Make the dough: In a large bowl, mix sifted flour and salt. Gradually add warm water and olive oil, stirring until dough forms. Knead on floured surface for 8-10 minutes until smooth and elastic. Cover and let rest for 30 minutes.
- Prepare filling: Heat olive oil in skillet over medium heat. Sauté onions until translucent,about 5 minutes,stirring occasionally. Add spinach and cook until wilted, about 4 minutes. Remove from heat; stir in crumbled feta, dill, nutmeg, and black pepper. Let cool.
- Divide dough: Cut rested dough into 8 equal balls. Lightly flour surface and roll each ball into thin, nearly translucent circles.
- assemble börek: Brush dough with melted butter. Spoon filling along one side, then fold dough into desired shape (triangle, spiral, or rectangle). Seal edges gently with water or beaten egg.
- Layer (optional): For multi-layer börek, stack sheets alternately spreading melted butter and filling layers.
- Preheat oven: Set to 375°F (190°C). Line baking tray with parchment paper.
- Brush börek: Generously apply egg wash to each shaped pastry.
- Bake: Place börek on tray and bake for 25-30 minutes until golden and crisp.
- Serve: Let cool 5 minutes before serving warm with fresh herbs and yogurt dips.
Tips for Success
- use warm water for dough to help activate gluten and ease rolling.
- Resting dough is essential – don’t skip it to avoid shrinkage during rolling.
- Keep your work surface lightly floured to prevent sticking, but avoid excess flour that toughens dough.
- If dough tears,repair by gently pressing the edges or patching with a little extra flour and water mixture.
- for a vegan version, substitute feta with seasoned tofu and use olive oil instead of egg wash.
- Make ahead: Börek can be formed and refrigerated for up to 6 hours before baking-ideal for meal prep or entertaining.
Serving Suggestions
Present börek stacked or spiraled on a large platter, garnished with freshly chopped parsley or mint for a splash of color. Pair with a side of cooling garlic yogurt sauce or a crisp salad made from cucumbers, tomatoes, and red onions tossed in a lemon vinaigrette. Add lemon wedges alongside to enhance the flaky pastry’s savory depth.
| Nutritional Info (per serving) | Calories | Protein | Carbohydrates | Fat |
|---|---|---|---|---|
| Spinach & Feta Börek | 320 kcal | 14g | 28g | 18g |

For further inspiration, explore our Turkish pastry and baklava recipes. To deepen your understanding of traditional Turkish spices and herbs, visit Britannica’s guide on Turkish cuisine.
Q&A
Q&A: Mastering Börek – A Delicious Step-by-Step Recipe Guide
Q1: What exactly is Börek?
A1: Börek is a savory pastry originating from the Ottoman Empire, beloved throughout Turkey and the Balkans. It features thin layers of dough-frequently enough phyllo or yufka-wrapped or layered with fillings ranging from cheese and spinach to minced meat, then baked to golden, flaky perfection. Think of it as the crispy, indulgent cousin of your favorite stuffed pie.
Q2: Why is mastering Börek worth the effort?
A2: Becuase Börek isn’t just food; it’s an experience-a delightful dance between crisp layers and rich fillings. With patience and technique, you’ll unlock textures and flavors that wow the senses. Plus, once mastered, Börek becomes your signature dish for gatherings or a comforting weeknight treat.
Q3: Which ingredients are essential for a traditional Börek?
A3: At the heart of Börek is the dough-typically phyllo or handmade yufka-which provides the signature crispness. Common fillings include salty feta or Turkish white cheese,spinach or fresh herbs,onions,and sometimes ground lamb or beef for meat lovers. Olive oil or melted butter is key for brushing the dough layers to achieve that irresistible golden crunch.Q4: Can I make the dough from scratch?
A4: Absolutely! Making yufka dough by hand is a rewarding part of the Börek art. It requires flour, water, a pinch of salt, and lots of stretching to create impossibly thin sheets. For beginners, supermarket phyllo dough offers a convenient shortcut without compromising taste.
Q5: What’s the secret to perfectly crispy Börek?
A5: The magic lies in layering and moisture control. Brush every layer generously with butter or oil, but avoid overly wet fillings that can sog the dough. Bake at a high enough temperature-usually around 375°F (190°C)-until the top is beautifully golden and crisp.
Q6: How versatile is Börek? Can I customize the fillings?
A6: Börek invites creativity! Traditional fillings abound, but you can get playful with mushrooms, pumpkin, or even sweet versions with nuts and honey. The key is balancing moisture and flavor to preserve that flaky texture.
Q7: What’s the best way to serve Börek?
A7: Serve Börek warm, straight from the oven, accompanied by a dollop of tangy yogurt or a fresh salad. The contrast between the crispy pastry and cooling sides creates an unforgettable bite.
Q8: Any tips for beginner Börek makers?
A8: Yes! Take your time with layering-thinner layers mean crispier Börek. If using phyllo, keep the sheets covered with a damp towel to prevent drying out. Practice makes perfect: your hands will become more confident,and you’ll soon master folding or rolling techniques.
Q9: Can Börek be frozen?
A9: Indeed! Börek freezes beautifully before baking. Assemble your Börek, wrap it tightly, and freeze. When ready, bake it straight from frozen, adding a few extra minutes to the baking time, and enjoy fresh, flaky goodness whenever you please.
Q10: Where can I learn more about Börek’s cultural roots?
A10: Dive into Turkish and Balkan culinary blogs, cookbooks, or documentaries exploring Ottoman-era kitchens. Börek is more than a dish-it’s a story of tradition,family,and shared tables that have spanned centuries.
Embark on your Börek journey with patience and passion, and you’ll soon be slicing into layers of golden, crispy delight that tell a delicious story with every bite!
Closing Remarks
Mastering börek is more than just following a recipe-it’s an invitation to embark on a culinary journey filled with flaky layers, rich fillings, and the warm embrace of tradition. With each fold and brush of butter, you craft not only a dish but a story that bridges cultures and generations. Whether you’re a seasoned cook or a curious beginner, this step-by-step guide equips you with the tools and confidence to bring the magic of börek into your kitchen. So roll up your sleeves, embrace the dough’s delicate texture, and let your taste buds savor the triumph of homemade börek-as great cooking, much like life, is best enjoyed one delicious layer at a time.
Savor the Sea: crafting perfect shrimp and scallop risotto is a delightful culinary adventure, inviting you to blend the ocean’s freshest treasures with the creamy alchemy of conventional Italian risotto. This dish embodies the harmony between delicate seafood flavors and decadent textures, elevating your dinner table to gourmet heights. Whether you’re a seasoned chef or a passionate home cook, mastering this recipe ensures your guests will savor every bite and remember the pleasure of perfectly cooked shrimp and scallops entwined in a luscious, velvety risotto.
Prep and Cook Time
- Readiness: 15 minutes
- Cooking: 35 minutes
- Total Time: 50 minutes
Yield
- Serves 4 generous portions
difficulty Level
- Medium
Ingredients
- 1 cup Arborio rice
- 12 large shrimp, peeled and deveined
- 12 medium sea scallops, patted dry
- 4 cups low-sodium seafood stock, kept warm
- 1 small onion, finely chopped
- 3 cloves garlic, minced
- 1/2 cup dry white wine (optional but recommended)
- 3 tbsp unsalted butter, divided
- 2 tbsp extra virgin olive oil
- 1/2 cup freshly grated Parmesan cheese
- 1 tbsp fresh parsley, finely chopped
- 1 tsp fresh thyme leaves
- 1/4 tsp crushed red pepper flakes
- Salt and freshly ground black pepper to taste
- Zest of 1 lemon (optional for brightness)
Instructions
- Prepare the seafood: Pat the shrimp and scallops thoroughly dry with paper towels-this key step ensures a perfect sear.Season lightly with salt and pepper.
- Sear the shrimp and scallops: In a large nonstick skillet, heat 1 tablespoon olive oil and 1 tablespoon butter over medium-high heat.Sauté shrimp until pink and just opaque, about 2 minutes per side.Remove and keep warm. Sear scallops without moving for 2-3 minutes until a golden crust forms, then flip for an additional 1-2 minutes.Remove and set aside with shrimp.
- Start the risotto base: in a heavy-bottomed saucepan, warm 1 tablespoon olive oil over medium heat. Add chopped onion and cook until translucent, about 5 minutes. Stir in garlic and cook for 30 seconds until fragrant.
- Toast the rice: Add Arborio rice, stirring constantly for 2 minutes until the edges of each grain look translucent. This step enhances that signature creamy risotto texture.
- Deglaze with wine: Pour in white wine, stirring continuously until completely absorbed. This deepens flavor complexity.
- Add seafood stock gradually: Ladle 1/2 cup warm stock at a time, stirring frequently. Allow the rice to absorb most of the liquid before adding more.Continue until rice is al dente and creamy, about 20-25 minutes.
- Finish with butter and cheese: Remove pan from heat. Stir in remaining 2 tablespoons butter,freshly grated Parmesan,lemon zest,thyme,red pepper flakes,salt,and black pepper to taste. This layers richness and flavor beautifully.
- Fold in shrimp and scallops: Gently integrate the seared seafood into the risotto, warming them without overcooking. Garnish with chopped parsley just before serving.
Tips for Success
- Choose fresh, dry-packed shrimp and scallops for the best texture and flavor; avoid frozen seafood with added water or preservatives.
- Keep your seafood stock simmering warm-adding cold stock can disrupt the cooking process and texture.
- Constant stirring is essential to release the rice’s natural starches, creating that signature risotto creaminess.
- Don’t rush the cooking; patience ensures perfect al dente rice and well-cooked seafood.
- For a dairy-free version, substitute butter with olive oil and omit Parmesan or use a nut-based cheese option.
- Make ahead: Prepare risotto base ahead and add seafood right before serving to prevent toughness.
serving Suggestions
serve your vibrant shrimp and scallop risotto with a crisp glass of chilled Sauvignon Blanc or Vermentino for a harmonious seafood pairing. Garnish with a sprinkle of fresh parsley, a twist of lemon zest, and an extra drizzle of high-quality olive oil to heighten the sensory experience. For a touch of elegance, add microgreens or edible flowers atop each plate. This dish shines best when enjoyed promptly but also warms beautifully for a next-day indulgence.

| Nutrient | Per Serving |
|---|---|
| Calories | 450 kcal |
| Protein | 35 g |
| Carbohydrates | 50 g |
| Fat | 12 g |
For more delicious seafood dishes that celebrate the ocean’s bounty, explore our seafood pasta recipes collection. To deepen your knowledge of rice varieties perfect for risotto, visit Encyclopaedia Britannica – Risotto.
Q&A
Q&A: Savor the Sea – Crafting Perfect Shrimp and Scallop Risotto
Q1: What makes shrimp and scallop risotto a standout dish?
A1: Shrimp and scallop risotto harmonizes the tender sweetness of fresh seafood with the luscious creaminess of perfectly cooked Arborio rice. It’s a celebration of ocean flavors mingled with the rich, comforting embrace of Italian tradition-a dish that’s elegant yet deeply satisfying.
Q2: How do you choose the best shrimp and scallops for risotto?
A2: freshness is key! Look for shrimp with a firm texture and a mild, briny aroma-avoid any that smell overly fishy. Scallops should be plump, moist, and slightly translucent with no discoloration.Opt for dry-packed scallops over those soaked in water to ensure they sear beautifully and don’t dilute the flavors.
Q3: What type of rice should be used for risotto, and why?
A3: arborio rice reigns supreme in risotto-making thanks to its high starch content.These starch grains release slowly during cooking, imparting that signature creamy texture while the rice remains al dente – tender yet with a subtle bite.
Q4: How do you balance the seafood flavors without overpowering the risotto?
A4: The secret lies in layering flavors gently.Sauté shrimp and scallops just until golden to preserve their natural sweetness.Incorporate seafood stock or a lightly flavored broth to infuse the risotto with oceanic essence without overwhelming it. Finish with a touch of fresh herbs, lemon zest, or a whisper of garlic to brighten but not mask.
Q5: What’s the perfect technique for cooking risotto to creamy perfection?
A5: Patience and love-risotto is a slow dance. Start by toasting the rice lightly in butter and shallots, then add warm broth gradually, stirring constantly. This coaxing coaxed the starches to release,developing that silky,velvety consistency. Resist the urge to rush or add too much liquid at once.
Q6: Can this dish be made ahead of time?
A6: Risotto is best enjoyed fresh, as its creamy texture can stiffen upon standing. However, you can prepare the rice base a bit early and gently reheat it with additional broth just before serving, then quickly fold in the freshly cooked shrimp and scallops.
Q7: What wine pairs best with shrimp and scallop risotto?
A7: Crisp,mineral-driven white wines like a Sauvignon Blanc or an Italian Pinot Grigio complement the dish’s sea notes and creamy richness beautifully. For a touch of elegance, a lightly chilled Champagne or sparkling wine offers vibrant acidity to cleanse the palate.
Q8: Any tips for adding a creative twist to this classic risotto?
A8: Elevate your risotto by infusing the broth with aromatic fennel or saffron for an exotic flair. Garnish with toasted pine nuts or a drizzle of truffle oil for depth. Or toss in some fresh peas or asparagus tips for bursts of color and texture,transforming a familiar favorite into a personalized masterpiece.
With these insights, you’re now equipped to savor the sea in every decadent spoonful of shrimp and scallop risotto-where creamy meets briny, and tradition meets coastal splendor. Buon appetito!
Wrapping Up
As the final grains of creamy arborio rice melt effortlessly on your tongue, carrying the tender embrace of plump shrimp and succulent scallops, you realize that crafting the perfect risotto is more than just a recipe-it’s an art of patience, balance, and respect for the sea’s bounty. Each spoonful invites you to savor not onyl flavors but the story of coastal kitchens and time-honored technique. So next time you crave a dish that whispers elegance and comfort in every bite, remember: with the right touch and a little love, your shrimp and scallop risotto can become a masterpiece that sings the ocean’s praise. Bon appétit!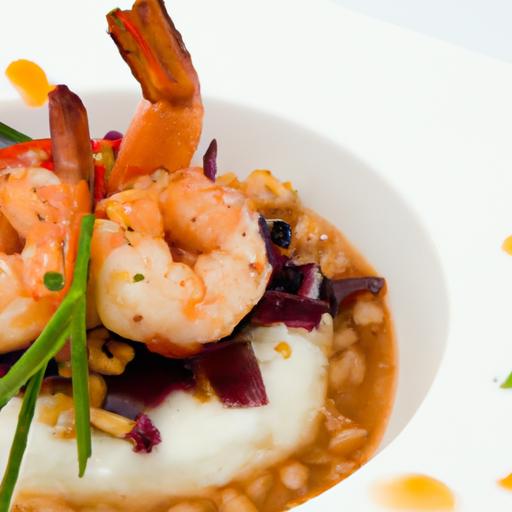
Unlocking Bastilla’s unique layers reveals a captivating journey through Moroccan culinary heritage. This exquisite pastry, renowned for its delicate interplay of crisp phyllo dough, savory poultry, fragrant spices, and crunchy almonds, is a masterpiece that vividly tells the story of North African tradition and French influence.With each bite,you experience a symphony of textures and aromas – the crispy golden crust,the sweet-savory filling infused with cinnamon and saffron,and the subtle nuttiness binding it all together.
Prep and Cook Time
- Preparation: 45 minutes
- Cooking: 1 hour 15 minutes
- Total Time: 2 hours
Yield
Serves 6 generously
Difficulty level
Advanced – requires patience and attention to layering and spice balancing, but the results are heavenly
Ingredients
- For the Filling:
- 1 whole chicken (about 3 lbs), cut into pieces
- 2 large onions, finely chopped
- 4 cloves garlic, minced
- 1 tsp saffron threads, soaked in 2 tbsp warm water
- 2 tsp ground cinnamon
- 1 tsp ground ginger
- 1 tsp turmeric
- 1 tsp black pepper
- 1 tsp salt
- 1/4 cup chopped fresh parsley
- 1/4 cup chopped fresh cilantro
- 3 tbsp olive oil
- 1/2 cup blanched almonds, toasted and roughly chopped
- 3 large eggs
- 2 tbsp sugar
- 1 tsp ground cinnamon (for almond mixture)
- For the Phyllo Layers:
- 12 sheets of phyllo dough, thawed
- 1 cup unsalted butter, melted
- Powdered sugar and cinnamon mix (for garnish)
Instructions
- Prepare the chicken filling: In a large pot, heat the olive oil over medium heat. Add chopped onions and garlic; sauté until translucent and aromatic, about 7 minutes.
- Add the chicken pieces: Stir well to coat with the onion mixture. Pour in saffron water along with cinnamon, ginger, turmeric, pepper, and salt. Cover and simmer on low heat until the chicken is tender and falling off the bone, about 45 minutes. Remove chicken,reserving the broth.
- Shred the chicken: Once cooled slightly, remove bones and skin, shredding the meat finely. Set aside.
- Reduce the broth: Boil the reserved liquid until slightly thickened. Beat the eggs in a bowl,then gradually add the hot broth while whisking continuously to temper the eggs. Return mixture to the stove; stir constantly until thickened, then combine with shredded chicken.Stir in parsley and cilantro.
- Prepare the almond mixture: Mix toasted almonds with sugar and cinnamon.
- Preheat oven to 375°F (190°C): Brush a deep round baking dish or conventional bastilla pan with melted butter.
- Layer the phyllo sheets: Place one sheet in the dish, brushing generously with butter. Repeat layering, allowing the edges to hang over the sides to fold later. Use half of the sheets.
- Add the filling: Spread half of the chicken filling evenly, then sprinkle half the almond mixture over it. Layer with the remaining filling and almonds, then fold the phyllo edges over the top and continue layering with remaining phyllo, buttering each sheet.
- Seal and decorate: fold remaining phyllo edges to seal,brush the top generously with butter,and gently score the crust with a sharp knife in a circular or diamond pattern for a professional finish.
- Bake: Bake for 45-55 minutes or until the bastilla is golden brown and crisp.
- Garnish and serve: Dust lightly with a cinnamon and powdered sugar mix while still warm for the authentic sweet-savory signature.
Tips for Success
- phyllo dough handling: Keep the sheets covered with a damp cloth as you work to prevent drying out.
- Layering: Don’t rush the layering process; generous buttering between sheets is key to crisp, flaky layers.
- Spice balance: Adjust cinnamon and saffron to your preference, but maintain harmony – these spices define the bastilla’s soul.
- Make-ahead: The filling can be prepared a day in advance and refrigerated to deepen flavor.
- Nut substitution: for a twist, try using pistachios or walnuts instead of almonds.
Serving Suggestions
present the bastilla sliced into neat wedges as a stunning centerpiece. Pair with a side of refreshing Moroccan mint tea to complement the spice.Add a light salad with preserved lemon vinaigrette for balance.Garnish with fresh mint sprigs or a sprinkle of extra powdered sugar and cinnamon for elegant visual contrast.

| Nutrient | Per Serving |
|---|---|
| Calories | 450 kcal |
| Protein | 30 g |
| Carbohydrates | 35 g |
| Fat | 20 g |
For a deeper dive into Moroccan spices and their cultural meaning, explore this comprehensive guide to Moroccan cuisine.
Q&A
Q&A: Unlocking Bastilla – A Flavorful Moroccan Pastry Recipe Guide
Q1: What exactly is Bastilla?
A1: Bastilla (also called B’stilla or Pastilla) is a luscious Moroccan pastry that marries sweet and savory in a delicate, flaky package. Traditionally filled with spiced shredded pigeon or chicken, almonds, eggs, and fragrant herbs, all wrapped in thin, crispy warqa dough, it’s a dish that tells stories of Morocco’s rich culinary tapestry.
Q2: Why is Bastilla considered a special dish?
A2: Bastilla is more then just a pastry-it’s a party on a plate. Served at weddings, holidays, and special gatherings, it embodies the harmony of flavors and textures: the crunch of the pastry, the tender meat, the aromatic spices, and the subtle sweetness of cinnamon and powdered sugar dusted on top. It’s a dish that reflects Morocco’s history of cultural blending.
Q3: Can Bastilla be made with ingredients other than pigeon?
A3: Absolutely! While pigeon is the authentic choice, many modern recipes use chicken or even seafood like shrimp or fish to make it more accessible. Vegetarian bastillas with mushrooms, spinach, or lentils also exist, making this recipe versatile and adaptable to different tastes and dietary needs.
Q4: What are the key spices and flavorings that give Bastilla its signature taste?
A4: The magic is in the spices! Ground cinnamon,ginger,saffron,turmeric,and a hint of black pepper create a warm,aromatic profile. Fresh herbs like parsley and cilantro add brightness. A touch of powdered sugar on top gives that quintessential sweet-savory contrast that defines Bastilla.
Q5: How difficult is it to make Bastilla for home cooks?
A5: While it may look extraordinary, Bastilla is surprisingly approachable once you understand the key steps: preparing the filling, layering and folding the warqa dough, and achieving the perfect golden crust.With patience and attention, even novice cooks can embark on this delicious Moroccan journey.
Q6: What tips do you recommend for working with warqa or phyllo dough?
A6: Keep the dough covered with a damp towel to prevent drying. Brush each layer generously with melted butter or oil for crispiness and flavor. Work gently to avoid tearing,and don’t rush the folding process-precision here leads to that beautiful,layered structure.
Q7: How should Bastilla be served?
A7: Bastilla is best served warm, sliced into portions to reveal its intricate layers. Pair it with a fresh salad or a cup of Moroccan mint tea to complement the rich flavors and celebrate an authentic experience.
Q8: Can Bastilla be made ahead of time?
A8: Yes! You can prepare the filling and assemble the pastry a few hours in advance. Keep it refrigerated and bake just before serving to ensure the pastry stays crisp and the filling warm and fragrant.Q9: What makes Bastilla a unique entry in the world of global pastries?
A9: Bastilla stands apart by fusing seemingly opposing elements-sweet and savory, crunchy and tender, aromatic and subtle-into one harmonious dish. Its cultural roots and expressive flavor combinations make it a treasure that fascinates food lovers worldwide.
Q10: Ready to unlock the flavors of Morocco? How should a beginner start their Bastilla adventure?
A10: Start simple: choose a chicken filling,gather your spices,and practice layering phyllo or warqa dough. Embrace the process with an open palate and a bit of patience. Celebrate small victories-crispy edges, balanced flavors-and soon you’ll be sharing this Moroccan masterpiece with friends and family. Bon appétit, or as they say in Morocco, BssaHa!
To Wrap It Up
As you close the pages of this flavorful guide, may the vibrant layers of Bastilla linger in your culinary imagination-each crisp pastry sheet, every fragrant hint of spices, and the delicate balance of savory and sweet inviting you to bring a taste of Morocco into your kitchen. Unlocking bastilla is more than mastering a recipe; it’s embracing a rich tapestry of history and culture wrapped in golden, flaky perfection. So gather your ingredients, channel your inner chef, and let each bite transport you to the bustling souks and aromatic spice markets where this beloved pastry first came to life.Your journey into Moroccan flavors has only just begun.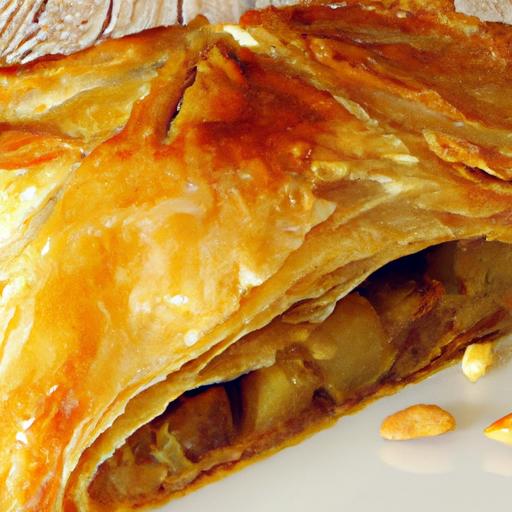
Zero Carb Wonders: Delicious Recipes Without the carbs unlock a whole new culinary playground where rich flavors and satisfying textures reign supreme. Embracing a zero-carb lifestyle doesn’t mean sacrificing taste or creativity.Instead, it invites adventurous cooking with nutrient-dense, wholesome ingredients that nourish your body and excite your palate.By mastering essential ingredients and innovative techniques, you can craft meals that quell every craving – from breakfast’s comforting sizzle to dinner’s hearty indulgence.
Prep and Cook Time
Prep Time: 15 minutes
cook time: 20 minutes
Total Time: 35 minutes
yield
Serves 4 generous portions
Difficulty Level
Easy to Medium – perfect for home cooks looking to elevate their zero-carb repertoire.
Essential Ingredients for Carb-Free Culinary Excellence
- Fresh,high-quality proteins: Grass-fed beef,free-range chicken,wild-caught fish,and pasture-raised eggs create the foundation of flavor and nutrition.
- Healthy fats: Avocado oil, coconut oil, ghee, and butter help build richness while keeping meals satisfying.
- Low-carb vegetables: Leafy greens, zucchini, cauliflower, and mushrooms impart texture, color, and micronutrients.
- Natural seasoning: Himalayan pink salt, black pepper, fresh herbs (rosemary, thyme, parsley), and spices (paprika, cumin, chili flakes) elevate each bite.
- Flavor boosters: fermented foods, bone broth, and umami-rich condiments like anchovy paste or nutritional yeast provide depth without carbs.
Innovative Cooking Techniques to Elevate Every Bite
Exploring cooking methods such as searing, sous vide, roasting, and smoking unlocks layers of flavor and irresistible textures. As an example, sous vide ensures perfectly tender proteins, while swift pan-searing caramelizes the exterior for a stunning crust and juicy interior. Creative uses of spiralizers and dehydrators bring fresh vegetables new form, replacing traditional carb-heavy sides. Incorporating infused fats like herb or chili oils adds an aromatic punch that lingers deliciously on the tongue.
Top Zero Carb Recipes Perfect for Breakfast, Lunch, and Dinner
Breakfast: Start your day with a Zero Carb Wonders: Delicious Recipes Without the Carbs favorite – zucchini “hash browns” with crispy bacon and soft-scrambled pasture-raised eggs, seasoned with fresh chives.
Lunch: Indulge in a seared salmon salad featuring baby kale, avocado slices, and a drizzle of lemon-garlic vinaigrette made with avocado oil and fresh herbs.
Dinner: Savor a slow-roasted herb butter chicken served alongside garlicky sautéed mushrooms and creamy cauliflower mash, proving carb-free doesn’t mean flavor-free.
Recipe: Herb Butter Roasted Chicken with Creamy Cauliflower Mash
Ingredients
- 1 whole free-range chicken (about 3 to 4 lbs), cleaned and patted dry
- 4 tbsp grass-fed butter, softened
- 2 cloves garlic, minced
- 1 tbsp fresh rosemary, finely chopped
- 1 tbsp fresh thyme, finely chopped
- Salt and freshly cracked black pepper, to taste
- 1 medium head cauliflower, chopped into florets
- ¼ cup heavy cream
- 2 tbsp ghee
- 1 tbsp fresh parsley, chopped (for garnish)
Instructions
- Preheat oven to 425°F (220°C). In a small bowl, combine the softened butter, minced garlic, chopped rosemary, and thyme.
- Gently loosen the chicken skin around the breasts and thighs with your fingers. Spread the herb butter mixture evenly under the skin and all over the chicken’s exterior.
- Season the chicken liberally with salt and black pepper. Place it breast-side up on a roasting rack inside a baking pan.
- Roast for about 1 hour and 15 minutes or until the internal temperature reaches 165°F (74°C). Baste every 20 minutes with pan juices for buttery,moist results.
- While the chicken roasts, steam cauliflower florets until tender, about 10 minutes.
- Transfer cauliflower to a food processor. Add heavy cream and ghee. Blend until smooth and creamy. Season with salt and pepper.
- Remove chicken from oven and let rest 10 minutes before carving. Serve alongside cauliflower mash, sprinkle fresh parsley over both for a vibrant finish.
Chef’s Notes
- For a smoky twist, add a teaspoon of smoked paprika to the herb butter mixture.
- Substitute heavy cream with coconut cream for a dairy-free version without compromising creaminess.
- Make the cauliflower mash ahead, reheat gently on low with a splash of cream or broth to maintain silkiness.
- Use leftover chicken juices as a flavorful base for a zero-carb pan sauce by deglazing with bone broth and simmering until reduced.
Serving Suggestions
This dish shines when served with crisp roasted asparagus or a simple arugula salad tossed with lemon and olive oil. Garnish with additional fresh herbs and a lemon wedge to brighten the whole plate. A glass of dry white wine or sparkling mineral water with a rosemary sprig creates an elegant pairing without adding carbs.

| Nutrient | per Serving |
|---|---|
| Calories | 420 kcal |
| Protein | 48 g |
| Carbohydrates | 2 g |
| Fat | 24 g |
Explore more zero carb recipes on our site and expand your culinary horizons. For expert nutritional guidance on carbohydrate reduction, visit the American Diabetes Association.
Q&A
Q&A: Zero Carb Wonders – Delicious Recipes Without the Carbs
Q1: What exactly does “zero carb” mean in the context of these recipes?
A: Zero carb means the recipes are designed to have virtually no carbohydrates-think 0g or so close it won’t impact your carb count. These dishes focus on proteins and fats, steering clear of sugars, starches, and fiber-rich ingredients. The goal? delicious meals that won’t spike your blood sugar or kick you out of ketosis if you’re on a ketogenic diet.
Q2: Why should someone consider zero carb recipes?
A: Peopel turn to zero carb for a variety of reasons-weight loss, blood sugar management, mental clarity, or simply to cut back on carbs for overall health. Zero carb diets can reduce cravings, stabilize energy levels, and often promote fat burning, all while letting you enjoy flavorful, satisfying meals.
Q3: Can zero carb meals really be delicious and satisfying?
A: Absolutely! Think beyond the bland “just meat” stereotype. With creative seasoning, herbs, and cooking techniques, zero carb dishes can be bursting with flavor. Imagine juicy ribeye steaks, crispy pork belly, creamy egg-based dishes, or rich seafood medleys-with sauces and sides that add depth without the carbs.
Q4: What are some common ingredients used in zero carb recipes?
A: The building blocks are meats like beef, pork, chicken, and lamb; seafood including fish and shellfish; eggs; and fats like butter, ghee, olive oil, and animal fats. For seasoning, salt, pepper, garlic powder, herbs (think rosemary, thyme), and spices (paprika, cumin) bring the magic without carbs.
Q5: How do zero carb recipes deal with texture and variety without vegetables or grains?
A: Texture comes from careful cooking techniques-crisping, roasting, slow braising, or searing. Variety comes from exploring different cuts of meat, organ meats, incorporating bone broths, and using eggs and cheeses (if tolerated). Some recipes cleverly use permitted spices and fats to create layers of flavor and mouthfeel.
Q6: Are zero carb recipes suitable for everyone?
A: While many thrive on zero carb diets, it’s important to listen to your body and consult with a healthcare provider especially if you have underlying health conditions. Zero carb can be very effective, but it’s not a one-size-fits-all approach. Some people may prefer low-carb or moderate-carb alternatives for long-term sustainability.
Q7: What’s a simple zero carb recipe a beginner can try?
A: Start with a classic: Pan-seared ribeye steak with herb butter. Season the steak with salt and pepper, sear it in hot butter until beautifully browned, than top with a dollop of butter mixed with fresh herbs like parsley and thyme. Pair with a side of boiled eggs or crispy pork rinds for some crunch!
Q8: How can zero carb recipes fit into a busy lifestyle?
A: Zero carb meals can be surprisingly quick and easy. Bulk cooking roasted meats, slow cooker stews, or making breakfast egg muffins with bacon means you have ready-to-go meals. Many zero carb staples keep well in the fridge or freezer, perfect for weekday lunches or dinners on the run.
Whether you’re a carb-conqueror or just curious, zero carb wonders prove you don’t need bread or pasta to enjoy sumptuous, satisfying food. Dive in, experiment with flavors, and discover a new world of delicious simplicity!
The Conclusion
As we wrap up our journey through the world of zero-carb wonders, it’s clear that cutting out carbs doesn’t mean sacrificing flavor or satisfaction. From savory mains to decadent desserts,these recipes prove that the culinary possibilities are as vast as they are delicious-inviting you to savor every bite without a pinch of guilt. So whether you’re embracing a low-carb lifestyle or simply looking to shake up your meal routine, these dishes are your ticket to flavorful freedom. Dive in,experiment boldly,and discover just how delightful a no-carb kitchen can be. Your taste buds-and your body-will thank you.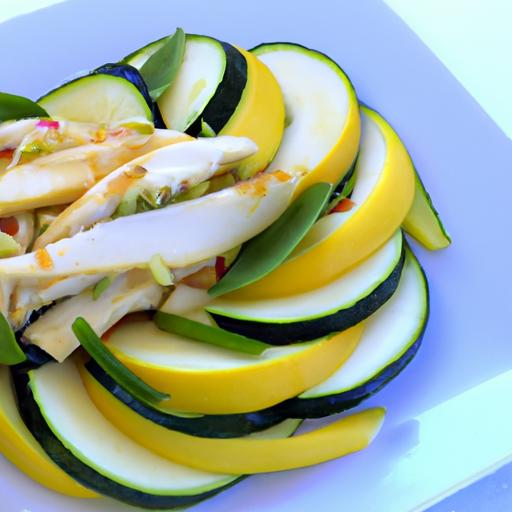
Crunchy veggie sticks offer a vibrant, refreshing crunch that transforms simple snacking into an artful experience. The secret lies not only in the freshness of your vegetables but also in the perfect dip duo that enhances each crisp bite.Understanding the interplay of texture and flavor elevates these wholesome bites from everyday snacks to irresistible treats.
Prep and Cook Time
Preparation: 15 minutes | Cooking: 0 minutes | Total Time: 15 minutes
Yield
Serves 4 as a snack or appetizer
Difficulty Level
Easy - Perfect for beginners and busy home cooks alike
Ingredients
- 2 large carrots, peeled and cut into 4-inch sticks
- 1 large cucumber, deseeded and cut into sticks
- 1 red bell pepper, seeded and sliced into sticks
- 1 yellow bell pepper, seeded and sliced into sticks
- 1 cup cherry tomatoes, whole (optional for added color and burst)
- 1 cup Greek yogurt, plain and full-fat for creamy dip base
- 2 tbsp freshly chopped dill
- 1 tbsp freshly squeezed lemon juice
- 1 clove garlic, minced
- 1/4 cup tahini (for an alternative nutty dip)
- 2 tbsp extra virgin olive oil
- Salt and freshly cracked black pepper, to taste
- 1/2 tsp smoked paprika (optional kick)
Instructions
- Prepare your veggie sticks: Wash and thoroughly dry all vegetables. Ensure sticks are uniform in size to maintain consistent crunch and presentation.
- Make the Yogurt-Dill Dip: In a small bowl, combine the greek yogurt, chopped dill, lemon juice, minced garlic, and a pinch of salt and pepper. mix well until smooth. Adjust seasoning to taste.
- Create the Tahini Dip: Whisk together tahini, olive oil, smoked paprika, and a pinch of salt. Add water, one tablespoon at a time, until you reach a creamy but pourable consistency.
- Chill dips: Cover both dips with plastic wrap and refrigerate for at least 15 minutes to let the flavors meld and develop.
- Plate your crunchy veggie sticks: Arrange the colorful vegetable sticks vertically in a wide, shallow bowl or tray to showcase their natural vibrancy and inviting texture.
- Serve with dips: Pour the dips into small serving bowls. Garnish with a sprinkle of fresh herbs or a drizzle of olive oil on top for an elegant touch.
Tips for Success
- For maximum crispness, soak carrot and cucumber sticks in ice water for 10 minutes before serving, then pat dry to prevent sogginess.
- Substitute Greek yogurt with a plant-based yogurt for a vegan-friendly option without losing creaminess.
- If tahini is too thick or bitter, balance with a teaspoon of honey or maple syrup to mellow the flavor.
- Prepare dips a day ahead to allow deeper flavor infusion; just give a fast stir before serving.
- Consider adding crunchy roasted chickpeas or toasted nuts alongside for an additional textural contrast.
Serving Suggestions
Present your crunchy veggie sticks on a rustic wooden platter lined with parchment paper for a charming, casual feel. Garnish the yogurt-dill dip with a sprig of fresh dill and a lemon wedge on the side. For the tahini dip, a light sprinkle of smoked paprika or toasted sesame seeds adds visual appeal and layers of flavor. Serve chilled alongside a light white wine or sparkling water infused with fresh cucumber and mint for the perfect balanced snack or starter.

| Nutrient | Per Serving |
|---|---|
| Calories | 110 kcal |
| Protein | 5 g |
| Carbohydrates | 14 g |
| Fat | 5 g |
For more creative snacking ideas featuring vibrant produce, check out our Colorful Roasted Vegetable Bowl.To understand the nutritional benefits of fresh produce further, visit the British Nutrition Foundation.
Q&A
Q&A: Crunchy Veggie Sticks – The Perfect Dip Duo Explained
Q1: What makes crunchy veggie sticks such a popular snack choice?
A1: Crunchy veggie sticks are a vibrant celebration of texture and flavor, offering a satisfying snap with every bite. They’re naturally colorful, nutrient-packed, and versatile, making them an appealing, guilt-free alternative to traditional chips or crackers. Their crispness triggers a sensory delight that pairs perfectly with a variety of dips, elevating simple snacking into an art form.Q2: Why is pairing veggie sticks with the right dip so important?
A2: The magic of veggie sticks lies in contrast and complement.A great dip balances or enhances the fresh,earthy notes of the veggies while adding creaminess,tang,or spice. The dip not only introduces additional flavors and textures but also helps to highlight the natural goodness of the veggies, turning a humble snack into a dynamic taste experience.
Q3: Which veggie sticks work best with creamy dips?
A3: Carrot sticks and celery reign supreme here. Their sturdy yet tender crunch is perfect for scooping up luscious, creamy dips such as ranch, tzatziki, or avocado salsa verde. The natural sweetness of carrots pairs beautifully with the cool, herby notes of yogurt-based dips, while celery’s refreshing bitterness cuts thru richer flavors.
Q4: Are there veggie sticks that shine with spicy or tangy dips?
A4: Absolutely! Cucumber sticks and bell pepper strips love a little zing. Their juicy, crisp texture balances hot, spicy dips like sriracha hummus or tangy options like lemony tahini. The mild sweetness of bell peppers adds a delightful counterpoint to bold, punchy flavors, turning each bite into a zesty party.
Q5: can root vegetable sticks be paired with dips too?
A5: Definitely. Beet, parsnip, and jicama sticks bring an earthier, sometimes subtly sweet flavor that pairs well with robust, chunky dips such as black bean salsa or chunky guacamole. These root veg sticks offer extra heft and chewiness, making them perfect for heartier dips that might overwhelm more delicate veggies.
Q6: What’s a foolproof formula for creating the perfect dip duo?
A6: Start with a crisp, fresh veggie stick as your flavor base. choose a dip that either complements the veggie’s natural taste (think creamy ranch with celery) or contrasts it sharply (think spicy harissa with cucumber).Play with texture too-if your veggie is firm and crunchy, opt for a smoother dip; for more tender sticks, try something chunky or grainy. don’t be afraid to experiment-balance, contrast, and personal preference hold the key.
Q7: How can crunchy veggie sticks and dips fit into a healthy lifestyle?
A7: This duo is a nutrient-forward snacking champion. Veggie sticks supply fiber, vitamins, and hydration, while thoughtfully crafted dips can add protein, healthy fats, and probiotics if you choose ingredients like Greek yogurt or fermented foods. Together, they curb cravings, stabilize blood sugar, and satisfy hunger without the overload of empty calories.
Q8: Any tips for serving crunchy veggie sticks and dips at parties?
A8: Presentation is key! Arrange a colorful veggie platter with assorted sticks grouped by color and texture. Offer two or three dips in decorative bowls-one creamy, one spicy, one tangy-to suit varied palates. garnish dips with fresh herbs or a sprinkle of spices to ramp up visual appeal. Keep the veggie sticks chilled and replenished for a fresh crunch all evening.
When it comes to snacking, crunchy veggie sticks and the perfect dip form a taste twosome that’s hard to beat. Their simple harmony of texture and flavor invites endless creativity, making healthy eating both fun and flavorful!
To Conclude
Whether you’re craving a quick snack or planning the perfect appetizer spread, crunchy veggie sticks paired with the right dip elevate any occasion. Their vibrant textures and flavors create a harmonious duo that satisfies both palate and nutrition. So next time you reach for a snack, remember: the perfect dip isn’t just an afterthought-it’s the crunchy veggie stick’s best companion, turning simple bites into unforgettable moments of flavor and freshness. Dive in, dip deep, and let your taste buds celebrate this timeless duo!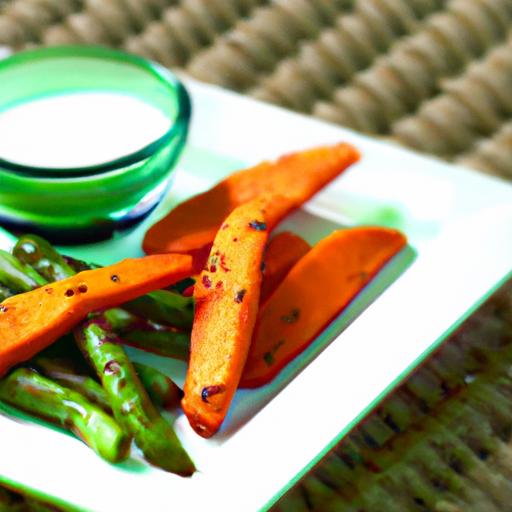
mastering Msemen dough planning is the cornerstone of crafting those irresistibly crisp Moroccan flatbreads with delicate, buttery layers. This beloved North African staple, enjoyed at breakfast tables and street food stands alike, owes its charm to a harmony of simple ingredients and time-honored techniques that transform humble dough into a golden, flaky masterpiece. Preparing msemen is both an art and a sensory experience-the silky texture of the dough in your hands, the rhythmic folding that creates signature layers, and the nutty aroma as it hits a hot griddle conjure warmth and nostalgia.
Prep and Cook Time
- Preparation: 30 minutes (including resting time)
- Cooking: 15-20 minutes
- Total Time: Approximately 50 minutes
Yield
4-6 servings (makes 8 medium-sized msemen)
Difficulty Level
Intermediate – requires patience and practice to perfect folding and cooking technique.
Ingredients
- 2 cups all-purpose flour, sifted
- 1 cup fine semolina (superfine)
- 1 tsp fine salt
- 1 ¼ cups warm water (approximately)
- ½ cup melted unsalted butter, plus extra for folding and cooking
- Vegetable oil (for greasing hands and pan)
Instructions
- Combine dry ingredients: In a large mixing bowl, whisk together the sifted flour, semolina, and salt until evenly blended.
- Add water gradually: Slowly pour warm water into the dry mix, stirring continuously with your hand or a wooden spoon until a shaggy dough forms. The dough should be soft but not sticky.
- Knead thoroughly: Transfer the dough onto a lightly floured surface and knead for 10-12 minutes until smooth and elastic. This step develops the gluten structure critical for pliability.
- Rest the dough: Cover with a damp cloth and let it rest for 15 minutes.Resting softens the dough and aids in gluten relaxation.
- Divide and shape: Divide the dough into 8 equal balls. Grease your hands generously with oil to prevent sticking.
- Roll and butter: On a well-oiled surface, flatten one ball with your fingertips into a thin square or rectangle. Brush with melted butter, ensuring an even layer. The butter is key for crispy, flaky layers.
- Fold layers: Fold the dough into thirds lengthwise, then fold the resulting strip into thirds again widthwise, creating a compact square packet with multiple buttery layers inside. Repeat with all dough balls.
- Rest packets: Place folded packets aside for 10 minutes to relax before cooking.
- Cook to perfection: Heat a non-stick skillet or cast iron griddle over medium heat. Lightly brush with butter. Place the folded msemen flat on the pan and cook for 3-4 minutes on each side until the surface is golden brown and crisp, with visible flaky layers.
- Serve warm: Remove from heat and keep covered with a clean cloth or in a low oven while cooking remaining msemen to maintain softness inside.
Tips for Success
- Use lukewarm water to activate the gluten gently without killing yeast (if using).
- Don’t rush the resting phases-this helps dough elasticity and easier stretching.
- Oil your hands often during shaping to prevent tears and sticking.
- Butter generously between folds; this creates the iconic layered texture.
- Cook msemen on medium heat to ensure a golden crust without burning.
- If your dough feels too dry,pinch in an extra tablespoon of water; too sticky? Add a pinch more semolina.
Serving Suggestions to Elevate Your Msemen Experience
Msemen is traditionally served hot,pairing beautifully with sweet or savory accompaniments. Drizzle with fragrant honey and a dash of cinnamon for a comforting breakfast, or offer alongside a bowl of rich Moroccan stew or shakshuka for a flavorful brunch.Garnish with finely chopped fresh mint or a sprinkle of toasted sesame seeds to add a fresh, nutty note and a pop of color.
For an authentic touch, present msemen stacked on a rustic wooden board with a side of Moroccan harissa for dipping, or with a bowl of olive oil infused with herbs.

| nutrient | Per Serving (1 msemen) |
|---|---|
| Calories | 220 kcal |
| Protein | 5 g |
| Carbohydrates | 32 g |
| Fat | 8 g |
Explore further Moroccan culinary delights by checking out our extensive guide to Moroccan spices, perfect to accompany your msemen creations and deepen your flavor journey.
Q&A
Q&A: Mastering Msemen – A Step-by-Step Moroccan Flatbread Guide
Q1: What exactly is Msemen?
A: Msemen is a traditional Moroccan flatbread known for its flaky, layered texture and slightly sweet, buttery flavor. It’s often enjoyed at breakfast or teatime, either plain or filled with honey, butter, or savory fillings. Think of it as the flaky cousin of a crepe, with a unique, chewy bite.
Q2: Why is Msemen so special compared to other flatbreads?
A: What makes Msemen truly special is its intricate layering technique. Unlike a simple flatbread,it’s folded and rolled multiple times to create delicate,flaky layers that crisp up beautifully when cooked. Its texture strikes a perfect balance between soft and crispy, making every bite a delightful experience.
Q3: what ingredients do I need to make authentic Msemen?
A: The ingredient list is delightfully simple: all-purpose flour, semolina (for a slight crunch), warm water, salt, sugar, and a touch of oil or melted butter for the dough and folding.The magic lies in the technique more than exotic ingredients.
Q4: Is Msemen difficult to make at home?
A: Msemen has a reputation for being tricky because of its folding and rolling steps, but with patience, anyone can master it! The key is to keep your dough well-rested and work on a lightly oiled surface to prevent sticking. Once you nail the folding rhythm,it becomes almost meditative.
Q5: Can you walk me through the basic steps to make Msemen?
A: Absolutely! Here’s the gist:
- Mix & knead the dough: Combine flour, semolina, salt, sugar, and water to form a soft but elastic dough. Let it rest.
- Divide & shape: Roll the dough into small balls.
- Roll out & oil: Flatten each ball into a thin square on an oiled surface.
- Fold for layers: Brush with oil or butter, then fold the edges inward to form a smaller layered square.
- Cook: Fry on a hot griddle or pan until golden brown and crispy on both sides.
Q6: Are there any tips to prevent the dough from tearing while rolling?
A: Tearing is mostly a moisture issue. Make sure your dough is well-hydrated and rested, which makes it more elastic. Also, use plenty of oil on the surface and your rolling pin to help the dough glide effortlessly.
Q7: How do I serve or enjoy Msemen traditionally?
A: Traditionally, Msemen is served warm with butter and honey or dipped into mint tea. Some like to stuff it with spiced meat or vegetables for a savory twist. It’s also fantastic as a simple snack or accompaniment to soup.
Q8: Can I store Msemen, and does it reheat well?
A: Msemen is best enjoyed fresh, but you can store leftovers in an airtight container for a day or two. Reheat gently in a pan or oven to revive its crispiness-avoid the microwave as it can make them rubbery.Q9: Are there any variations of Msemen to explore?
A: Yes! Some variations include adding herbs to the dough, stuffing fillings like seasoned ground meat or cheese before folding, or even sweet versions with cinnamon and sugar inside. Each region in Morocco might add its own twist.
Q10: why should I bother learning Msemen rather of buying bread?
A: Making Msemen at home connects you to centuries of Moroccan culinary heritage and offers an incredibly rewarding, hands-on baking experience. Plus, fresh homemade Msemen has a depth of flavor and satisfying texture that’s impractical to find in store-bought breads. It’s not just bread-it’s edible art.
Ready to fold, fry, and feast? Embrace the rhythm of the rolling pin and unlock the layered secrets of Msemen!
Closing Remarks
As the golden layers of your perfectly cooked msemen reveal their delicate crispness and tender folds, you’ll realize that this humble Moroccan flatbread is much more than just a recipe-it’s a gateway into a rich culinary tradition.Mastering msemen invites you to slow down, embrace the rhythm of dough and patience, and savor the art of simple ingredients transforming into something unusual. Whether enjoyed fresh from the pan with honey and butter or alongside a hearty tagine, msemen carries a timeless story in every bite. So, roll up your sleeves, trust the process, and let this step-by-step guide be your companion on a delicious journey through Morocco’s vibrant flavors and textures-one flaky layer at a time.
Osso Buco with Gremolata is a festivity of bold flavors and tender textures that redefine classic comfort food. This iconic Italian dish, rooted in the rich culinary tradition of Milan, transforms slow-braised veal shanks into a meltingly soft masterpiece, accented perfectly by the shining, citrusy punch of freshly made gremolata. The interplay between the hearty, fragrant stew and the zesty herb topping elevates this dish into an unforgettable dining experience, perfect for both special occasions and intimate weeknight dinners.
Prep and Cook Time
- Planning: 20 minutes
- Cooking: 2 hours 30 minutes
- Total time: 2 hours 50 minutes
Yield
Serves 4 generously
Difficulty Level
Medium – perfect for home cooks looking to impress with hearty flavors and elegant presentation
Ingredients
- 4 veal shanks (about 1 ½ to 2 inches thick, each approximately 10 oz)
- 1 cup all-purpose flour, for dredging
- 4 tbsp olive oil, divided
- 1 large onion, finely chopped
- 2 medium carrots, diced
- 2 celery stalks, diced
- 4 cloves garlic, minced
- 1 cup dry white wine
- 1 ½ cups canned crushed tomatoes
- 2 cups beef or veal broth
- 2 tbsp tomato paste
- 1 tsp dried thyme
- 2 bay leaves
- Salt and freshly ground black pepper, to taste
- Zest of 1 lemon
For the Gremolata Topping:
- ¼ cup finely chopped flat-leaf parsley
- 1 tbsp lemon zest, finely grated
- 2 garlic cloves, minced
Instructions
- Prepare the veal shanks: Pat the veal shanks dry with paper towels. Season generously with salt and pepper, then dredge each shank in the all-purpose flour, shaking off any excess.
- Sear the meat: In a large heavy-bottomed pot or Dutch oven, heat 2 tablespoons of olive oil over medium-high heat. Sear the veal shanks until golden brown on all sides, about 4 minutes per side. Transfer the shanks to a plate and set aside.
- Sauté the soffritto: In the same pot, add the remaining 2 tablespoons of olive oil. Add the chopped onion, carrots, and celery. sauté for about 8 minutes until the vegetables soften and begin to caramelize, stirring often to avoid burning.
- Add garlic and deglaze: Stir in the minced garlic and cook for 1 minute until fragrant. Pour in the white wine to deglaze the pot, scraping up any browned bits stuck to the bottom. bring to a simmer and reduce by half, about 5 minutes.
- Build the braising liquid: Stir in the crushed tomatoes, tomato paste, thyme, bay leaves, and broth. Season with salt and pepper. return the veal shanks to the pot, nestling them into the liquid so they are mostly submerged.
- Slow braise: Reduce the heat to low, cover the pot, and let simmer gently for 2 to 2 ½ hours. Check occasionally to ensure the liquid is simmering gently, adding more broth if it reduces too much. The meat should be fork-tender and falling away from the bone.
- Prepare the gremolata: While the osso buco cooks, mix the chopped parsley, lemon zest, and minced garlic in a small bowl. This fresh, vibrant topping will cut through the richness of the stew beautifully.
- Finish and serve: Remove the veal shanks carefully from the pot and transfer to a warm serving platter. Spoon the tomato-vegetable sauce around the shanks. Sprinkle the gremolata generously over the meat just before serving to add brightness and texture.
Tips for Success
- Choose the right cut: Look for veal shanks with plenty of marrow in the bone, wich enriches the flavor while cooking.
- Dredging Tips: Lightly flouring the shanks helps create a delicious crust and thickens the sauce naturally.
- Low and slow: Braising slowly over low heat guarantees tender, flavorful meat without drying out.
- Make-ahead: Osso buco tastes even better the next day. Refrigerate and gently reheat for a stress-free dinner.
- Gremolata variations: For a herbaceous twist, try adding finely diced fresh basil or mint to your gremolata.
Serving Suggestions
Osso Buco with gremolata is traditionally paired with creamy saffron risotto or a delicate polenta, which absorb the sumptuous sauce brilliantly. For a rustic touch, serve alongside roasted garlic mashed potatoes or buttered egg noodles. Garnish the dish with extra fresh parsley and lemon wedges for added color and zing. A glass of full-bodied red Italian wine like Barolo or Chianti complements the complex layers of flavor perfectly.
| Nutrient | Per Serving |
|---|---|
| Calories | 680 kcal |
| Protein | 58 g |
| Carbohydrates | 18 g |
| Fat | 32 g |

For more Italian classics, explore our risotto recipes. To deepen your knowledge of traditional Italian braising techniques, visit Serious Eats’ detailed guide.
Q&A
Q&A: Osso Buco with gremolata – A Bold Twist on classic Comfort
Q: what exactly is Osso Buco, and why is it considered a comfort food classic?
A: Osso buco, which means “bone with a hole” in Italian, is a traditional Milanese dish featuring braised veal shanks cooked low and slow until meltingly tender. its rich, hearty flavors and luscious marrow-filled bone have made it a beloved comfort food-a warm hug on a plate that dates back centuries.
Q: How does adding gremolata transform this timeless dish?
A: Gremolata-an aromatic mixture of lemon zest, garlic, and parsley-cuts through the richness of the braised meat with vibrant freshness and a zingy brightness. It’s like a spark of sunshine that wakes up the rustic depths of Osso Buco, bringing balance and a bold contemporary twist to a classic comfort dish.
Q: What makes this version of Osso Buco “bold”?
A: The boldness comes from reimagining tradition without losing its soul. Alongside gremolata’s lively punch, chefs frequently enough introduce unexpected ingredients-think smoky roasted tomatoes, a hint of chili, or a splash of exotic spices. These layers add complexity while honoring the dish’s comforting heritage.
Q: Can Osso Buco with gremolata be made with meats other than veal?
A: Absolutely! While veal is classic, beef shanks, pork hocks, or even lamb can carry the slow braise beautifully. Each protein imparts its own flavor personality, and gremolata’s citrusy brightness complements them all, making the dish versatile and exciting.
Q: How should one serve Osso Buco with gremolata to maximize the experience?
A: Serve it over creamy risotto alla Milanese or buttery polenta to soak up every luscious drop of sauce. Spoon generous gremolata over the top just before serving to preserve its fresh zing. A crisp green salad or sautéed greens can add crispness to the plate, balancing richness with freshness.
Q: Is Osso Buco with gremolata challenging to prepare at home?
A: Not at all! it’s a perfect dish for home cooks who enjoy slow-cooked meals. The braise requires patience but minimal active time-just prep, then let the oven do the work. Whipping up gremolata is quick and easy, requiring just a few simple ingredients and a zest of enthusiasm.
Q: What beverage pairs best with this bold yet comforting dish?
A: A robust red wine like Barolo or Chianti Classico complements the savory depths of the Osso Buco while standing up to the bright gremolata. For non-wine drinkers, a sparkling mineral water with a twist of lemon or a well-crafted bitter spritz can echo the dish’s fresh and bold flavors beautifully.
Q: Why should modern food lovers revisit Osso Buco with gremolata today?
A: Because it’s the perfect culinary blend of nostalgia and novelty. This dish invites you to slow down, savor deep, soulful flavors, and then awaken your palate with a splash of brightness. It’s comfort food that doesn’t settle for ordinary-it dares to be bold, fresh, and utterly unforgettable.
To Wrap It Up
As the rich, tender osso buco melts on your tongue, brightened by the zesty punch of gremolata, you’re reminded that comfort food isn’t just about tradition-it’s about bold reinvention. This classic Italian dish, elevated with fresh herbs and citrus, invites you to savor every bite with renewed thankfulness. Whether enjoyed on a quiet evening or shared among friends,osso buco with gremolata promises a harmonious dance of flavors that honors the past while boldly stepping into the future of culinary delight. So next time you crave something familiar yet exciting, let this vibrant twist on a timeless favorite be your go-to comfort on a plate.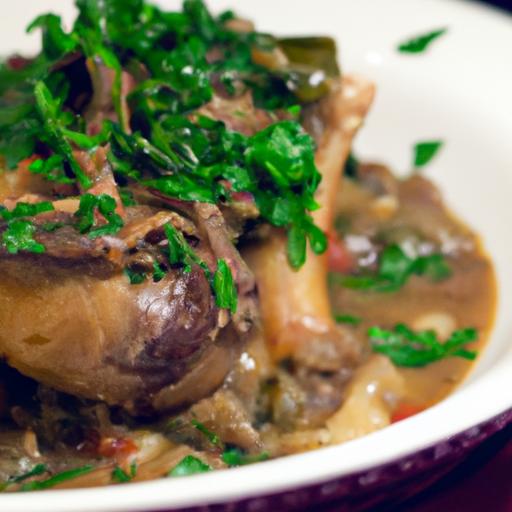
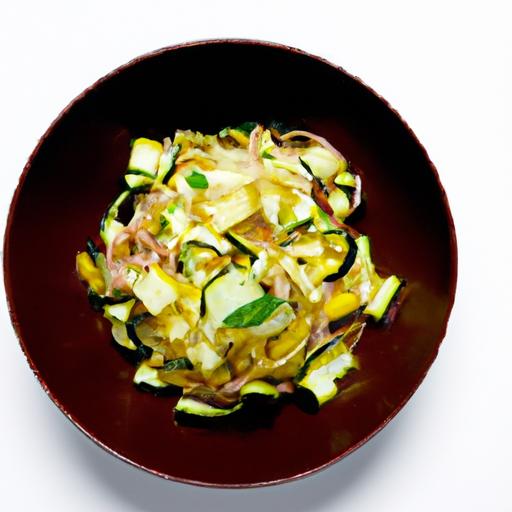
Cozy & Low Carb comfort meals are the ultimate answer to craving hearty, flavor-packed dishes without compromising your health goals. This recipe reimagines classic comfort food by using nourishing low carb ingredients,delivering warmth and satisfaction with every bite. Drawing inspiration from traditional family recipes infused with modern nutrition, this dish balances indulgence and wellness beautifully, making it perfect for any season when you want to embrace cozy vibes without the guilt.
prep and Cook Time
- Readiness: 15 minutes
- Cooking: 35 minutes
- Total Time: 50 minutes
Yield
- Serves 4 hearty portions
Difficulty Level
- Easy
Ingredients
- 1 lb ground turkey (or ground chicken, for a lighter option)
- 2 cups cauliflower florets, finely chopped to mimic rice texture
- 1 medium onion, diced
- 2 cloves garlic, minced
- 1 cup baby spinach, roughly chopped
- 1/2 cup cream cheese, softened
- 1/2 cup shredded mozzarella cheese
- 1/4 cup grated Parmesan cheese
- 1/4 cup chicken broth (low sodium)
- 1 tbsp olive oil
- 1 tsp smoked paprika
- 1/2 tsp dried thyme
- Salt and pepper to taste
- Fresh parsley for garnish
Instructions
- Preheat a large skillet over medium heat and add olive oil.
- Sauté the diced onion until translucent, about 3-4 minutes, stirring occasionally to avoid burning.
- Add minced garlic and cook for 30 seconds until fragrant.
- Incorporate the ground turkey into the skillet,breaking it apart with a spatula. Cook until browned and no longer pink, about 7-8 minutes.
- Season with smoked paprika, dried thyme, salt, and pepper, then stir well to combine.
- Add the chopped cauliflower florets and pour in the chicken broth to help steam and soften the cauliflower, cooking for 5-6 minutes until tender.
- Reduce heat to low, stir in cream cheese until melted and incorporated, creating a creamy base.
- Mix in baby spinach, mozzarella, and Parmesan cheeses, stirring until the spinach wilts and cheese melts evenly.
- Remove from heat and let rest for 3 minutes before serving, allowing flavors to meld and the dish to thicken slightly.
Chef’s Notes
- For an extra flavor boost, add a pinch of red pepper flakes during step 4 for warmth and subtle heat.
- Swap ground turkey with ground beef or pork for richer taste, adjusting seasoning accordingly.
- To make ahead, prepare the mixture up to step 8, refrigerate in an airtight container for up to 2 days, then gently reheat on stovetop or microwave.
- If cream cheese is unavailable, substitute with Greek yogurt but add it off heat to prevent curdling.
- Ensure cauliflower is finely chopped to achieve that comforting “rice” texture,enhancing the dish’s low carb appeal.
Serving Suggestions
Serve this warm and hearty dish in shallow bowls, garnished generously with freshly chopped parsley for a vibrant contrast. Pair it with a crisp side salad dressed with lemon vinaigrette for fresh acidity, or add a few roasted cherry tomatoes to brighten the plate. Drizzle with a little extra virgin olive oil or top with a soft-boiled egg for an added layer of comfort and nutrition.

| Nutrient | Per serving |
|---|---|
| Calories | 320 |
| Protein | 35g |
| Carbohydrates | 7g |
| Fat | 15g |
for more creative low carb dishes, check out our Vegetable Stir Fry Made low Carb. For trusted nutritional insights on cauliflower and its benefits, visit the Healthline article on cauliflower.
Q&A
Q&A: Cozy & Low Carb – comfort Food That’s Healthy and Tasty
Q1: What does “cozy” mean in the context of low-carb cooking?
A: Cozy food is all about warmth, comfort, and that soul-soothing feeling you get from a homemade meal. In low-carb cooking, it’s the art of crafting dishes that not only keep your carb count in check but also wrap you in a warm culinary hug-think creamy soups, savory casseroles, and indulgent yet guilt-free desserts.
Q2: Isn’t low-carb food usually bland or boring? How can it still be tasty?
A: Absolutely not! Low-carb doesn’t mean low-flavor. Herbs,spices,healthy fats,and creative ingredient swaps bring vibrant tastes to the table. From zesty cauliflower “mac and cheese” to spiced coconut chicken,the secret is layering flavors and textures that delight your palate without relying on sugar or starch.
Q3: what are some key ingredients for cozy, low-carb comfort foods?
A: Key players include cauliflower, zucchini, leafy greens, nuts, seeds, and high-quality proteins like chicken, beef, or tofu. Also, don’t underestimate the magic of cream, cheese, and broth-they add richness and depth. And spice it up with paprika, garlic, rosemary, and cinnamon to evoke warmth and familiarity.
Q4: Can you give an example of a cozy low-carb meal?
A: Imagine a steaming bowl of creamy cauliflower and cheddar soup topped with crispy bacon bits and fresh chives. Or a skillet-cooked zucchini lasagna with layers of rich ricotta and savory tomato sauce-all the comfort of traditional recipes but minus the carb overload.
Q5: How can I make low-carb comfort food satisfying after a long day?
A: Focus on meals that offer both texture and flavor complexity. Combine creamy elements with crunch, sweet notes with savory spices, and always aim for filling, nutrient-dense portions. Slow-cooked stews or oven-baked dishes help develop deep flavors that comfort the body and soul.
Q6: Are there easy low-carb dessert options that feel indulgent?
A: Definitely! Think along the lines of dark chocolate avocado mousse, cinnamon-spiced almond flour muffins, or coconut cream parfaits with fresh berries. These treats satisfy sweet cravings while sticking to your low-carb goals-cozy never felt so sweet.
Q7: how can I start integrating cozy, low-carb meals into my routine?
A: Start small by swapping high-carb sides with veggie alternatives-like mashed cauliflower rather of potatoes. Experiment with one comforting recipe a week, and build a repertoire that feels personal and enjoyable.Meal prepping can keep cozy low-carb dishes ready when you need that fast dose of comfort.
Whether it’s a chilly evening or a stressful afternoon,cozy and low carb aren’t just compatible-they’re a delicious duo ready to change the way you think about comfort food. Embrace warmth, flavor, and wellness all on one plate!
Insights and Conclusions
As we’ve journeyed through the warm, welcoming world of cozy, low-carb comfort foods, it’s clear that eating healthy doesn’t mean sacrificing flavor or satisfaction. By embracing wholesome ingredients and clever swaps, you can create dishes that hug your soul and nourish your body all at once. Whether it’s a rich cauliflower mac and cheese or a velvety zucchini lasagna, these recipes prove that comfort and wellness can live deliciously side by side.So next time the craving for something hearty strikes, remember: cozy can be clean, indulgent can be guilt-free, and your kitchen can be the heart of both health and happiness.
Roll with Flavor: Delicious Vegan Sushi Recipes to try Today unveils the joy of crafting vibrant, plant-based sushi right in your kitchen. Embracing colorful vegetables, earthy mushrooms, and creamy avocado, this approach transforms traditional sushi mastery into a delightful vegan experience that pleases both the eyes and the palate. From perfectly steamed sushi rice to inventive fillings, each bite bursts with freshness and umami-a testament to creativity beyond fish and seafood.
Prep and Cook Time
- Preparation: 25 minutes
- Cooking: 20 minutes
- Total: 45 minutes
Yield
Approximately 4 servings (32 bite-sized sushi pieces)
Difficulty Level
Medium – Perfect for home cooks ready to explore rolling techniques and ingredient preparation.
Ingredients
- 2 cups sushi rice, rinsed thoroughly until water runs clear
- 2 ½ cups water
- ¼ cup rice vinegar
- 2 tbsp sugar
- 1 tsp salt
- 1 large ripe avocado, sliced thinly
- 1 medium cucumber, julienned
- 1 large carrot, julienned
- ½ cup pickled daikon radish, sliced into thin strips
- 1 cup seasoned shiitake mushrooms, sautéed and cooled
- 4 sheets nori (seaweed wrappers)
- 2 tbsp toasted sesame seeds for garnish
- Soy sauce or tamari, for serving
- Wasabi and pickled ginger, optional accompaniments
Instructions
- Prepare sushi rice: Combine rinsed sushi rice and water in a rice cooker or pot. Cook according to the rice cooker instructions or simmer on low,covered,for 18 minutes,then let rest for 10 minutes off the heat.
- Season rice: while rice is hot, gently fold the rice vinegar, sugar, and salt mixture into the rice using a wooden paddle or spatula. Spread rice flat on a shallow tray to cool to room temperature while fanning to create a glossy finish.
- Prepare vegan fillings: Julienne cucumber and carrot uniformly for crisp texture. Slice avocado thinly to maintain shape during rolling. Sauté shiitake mushrooms in a splash of soy sauce over medium heat until tender and flavorful, about 5 minutes.
- Roll sushi: Place a bamboo sushi mat on a clean surface. Lay one nori sheet shiny side down. Wet your hands and spread about ⅓ cup of sushi rice evenly over nori, leaving 1 inch at the top uncovered.
- Add fillings: Arrange avocado, cucumber, carrot, pickled daikon, and shiitake mushrooms in a neat horizontal line near the bottom edge of the rice-covered nori.
- roll tightly: Lift the mat edge nearest you and roll forward carefully,enclosing the fillings. Apply gentle pressure to form a firm,even roll.
- Slice sushi: Using a sharp, dampened knife, cut the roll into 8 equal pieces.wipe the blade clean between cuts to keep edges pristine.
- Garnish and serve: Sprinkle toasted sesame seeds over the cut rolls.Arrange on a platter with soy sauce, wasabi, and pickled ginger on the side for an authentic touch.
Tips for Success
- Rice perfection: Rinsing sushi rice thoroughly removes excess starch, preventing a gummy texture. Allow the rice to cool slightly before rolling to avoid tearing the nori.
- ingredient prep: Uniformly cut vegetables ensure elegant presentation and balanced texture in every bite.
- Rolling finesse: Use a bamboo mat lined with plastic wrap for easier cleaning.Practice firm but gentle pressure when rolling to keep the shape intact.
- Substitutions: Swap shiitake for marinated eggplant or grilled tofu for variety. use brown sushi rice for a fiber-rich option, adjusting cook time accordingly.
- Make-ahead tip: Sushi rice is best fresh,but fillings can be prepped and stored in airtight containers up to 24 hours in advance.
Serving Suggestions
Present your colorful vegan sushi rolls on a sleek wooden platter or black slate board to accentuate the vibrant hues. Garnish with fresh microgreens or thin strips of nori for added visual intrigue. Enjoy with a side of chilled green tea or sparkling yuzu soda to refresh the palate. Offering an array of dipping sauces-spicy vegan mayo, ponzu, or miso dressing-invites your guests to customize flavors at the table.
| Nutrition | Per Serving (8 pieces) |
|---|---|
| Calories | 210 |
| Protein | 4 g |
| Carbohydrates | 38 g |
| Fat | 5 g |

For a deeper dive into plant-based Japanese cooking, explore our Vegan Japanese Recipes Collection. You can also learn about the health benefits of sushi rice from Healthline’s extensive guide.
Q&A
Q&A: Roll with Flavor – Delicious Vegan Sushi Recipes to Try Today
Q: What makes vegan sushi different from traditional sushi?
A: While traditional sushi often features raw fish or seafood, vegan sushi uses plant-based ingredients to deliver bold flavors and beautiful textures.Think vibrant veggies, creamy avocado, tangy pickled radish, and even tofu or tempeh – all wrapped in seasoned sushi rice and nori. It’s sushi that’s fresh, compassionate, and irresistibly delicious.
Q: Can vegan sushi provide enough protein?
A: Absolutely! Ingredients like tofu, tempeh, edamame, and even chickpeas pack a protein punch. Combined with nutrient-rich veggies and seaweed, vegan sushi can be a balanced, satisfying meal that nourishes your body and tickles your taste buds.
Q: What are some must-have ingredients for making vegan sushi at home?
A: start with sushi rice seasoned with rice vinegar, sugar, and salt.Grab sheets of nori for wrapping. Fill your rolls with colorful veggies like cucumber, carrot, avocado, bell pepper, and pickled ginger. Adding marinated tofu, spicy vegan mayo, or crunchy tempura bits amps up the texture and flavor.
Q: How do I avoid soggy sushi when making vegan rolls?
A: Keep moisture in check by patting veggies dry before rolling. Use slightly warm, seasoned sushi rice and roll tightly but gently. Avoid overfilling your rolls and slice them with a sharp, wet knife to keep clean, neat cuts.
Q: Are there any creative vegan sushi variations worth trying?
A: Definitely! How about a mango and jalapeño roll for a sweet and spicy kick? Or a smoky BBQ tofu and avocado roll? don’t forget a crunchy tempura mushroom roll or a colorful rainbow roll layered with thinly sliced veggies. The possibilities are endless and deliciously inventive.
Q: Can vegan sushi be a part of a healthy diet?
A: Yes. Vegan sushi is naturally low in saturated fat and can be high in fiber, vitamins, and minerals. It’s a great way to incorporate more plant-based foods into your meals. Pair it with a side of miso soup or a seaweed salad for a nutritious, balanced feast.
Q: What dipping sauces complement vegan sushi best?
A: Classic soy sauce is always a winner, but try mixing it with a hint of wasabi or fresh grated ginger for extra zing. Ponzu sauce offers a citrusy twist, and a creamy vegan spicy mayo can add warmth and richness. Don’t shy away from blending flavors to find your perfect dip.
Embrace the art of rolling with flavor and explore the vibrant world of vegan sushi – your taste buds will thank you!
The Conclusion
As you’ve seen, crafting vibrant vegan sushi is more than just a meal-it’s a celebration of flavors, textures, and creativity rolled into every bite. Whether you’re a seasoned plant-based foodie or a curious newcomer, these recipes invite you to explore the endless possibilities of vegan sushi from the comfort of your kitchen. So grab your bamboo mat, gather fresh ingredients, and embark on a delicious journey that proves sushi can be just as colorful and satisfying without the fish. Roll with flavor and let your taste buds discover a whole new world of plant-powered delight!
Nourish Naturally: Embracing the Power of Whole Foods for Vibrant Health
Nourish Naturally is not just a mantra but a delicious reality with this vibrant Quinoa and Roasted Sweet Potato Buddha Bowl.Inspired by the plant-rich diets of Mediterranean and South American cultures, this recipe is a colorful festivity of whole foods that balance macronutrients while keeping every bite gluten-free and packed with natural energy boosters. The sweet earthiness of roasted sweet potatoes paired with protein-rich quinoa and antioxidant-packed leafy greens creates a wholesome bowl that fuels your body and uplifts your energy naturally.
Prep and Cook Time
Preparation: 15 minutes
Cooking: 30 minutes
Total Time: 45 minutes
Yield
Serves 4 hearty portions
Difficulty Level
Easy - Perfect for weeknight dinners or meal prep
Ingredients
- 1 cup quinoa,rinsed and drained
- 2 medium sweet potatoes,peeled and cubed (about 3 cups)
- 2 tablespoons olive oil,divided
- 1 teaspoon smoked paprika
- 1 teaspoon ground cumin
- 1/2 teaspoon sea salt
- 4 cups mixed baby kale and spinach
- 1 cup cooked chickpeas (canned,rinsed and drained)
- 1/2 cup pomegranate seeds for a burst of color and antioxidants
- 1/4 cup toasted pumpkin seeds for added crunch and zinc
- 1 ripe avocado,sliced
- Juice of 1 lemon
- 2 tablespoons tahini
- 2 cloves garlic,minced
- Fresh parsley or cilantro for garnish
- fresh black pepper,to taste
Instructions
- Preheat your oven to 425°F (220°C). toss the cubed sweet potatoes with 1 tablespoon olive oil,smoked paprika,cumin,and sea salt. Spread evenly on a baking sheet. Roast for 25-30 minutes, turning halfway, until tender and caramelized at the edges.
- While the sweet potatoes roast, cook the quinoa: combine rinsed quinoa with 2 cups water in a medium saucepan. Bring to a boil, then reduce heat to low, cover, and simmer for 15 minutes. Remove from heat, fluff with a fork, and set aside.
- In a small bowl, whisk together tahini, lemon juice, minced garlic, remaining 1 tablespoon olive oil, and a splash of water to reach a creamy drizzle consistency. Season with a pinch of salt.
- In a large mixing bowl, combine the baby kale and spinach with chickpeas. Toss lightly to mix. Distribute the greens evenly over four serving bowls.
- Add the warm roasted sweet potatoes and fluffy quinoa over the greens. Top each bowl with sliced avocado, pomegranate seeds, and toasted pumpkin seeds for texture contrast.
- Drizzle the tahini-lemon dressing generously across each bowl. Finish with fresh parsley or cilantro and freshly cracked black pepper.
Tips for Success
- For a nutty flavor, toast your quinoa for 2-3 minutes in a dry skillet before cooking.
- Swap sweet potatoes with butternut squash or beets for fun seasonal variations.
- Meal prep advantage: keep components separate and assemble just before serving to preserve freshness and texture.
- Ensure chickpeas are well rinsed and drained to reduce any canned saltiness.
- If tahini is too thick, add warm water a teaspoon at a time to loosen it and intensify flavor.
Serving Suggestions
Serve this nourishing bowl with a side of gluten-free flatbread or crisp apple slices for a balanced, energizing meal. Garnish with a wedge of lemon to brighten flavors at the table.Ideal as a vibrant lunch or a light yet satisfying dinner, this bowl pairs beautifully with a chilled herbal iced tea or sparkling water infused with fresh mint.

| Nutrient | Per Serving |
|---|---|
| Calories | 420 |
| Protein | 12g |
| Carbohydrates | 58g |
| Fat | 14g |
| Fiber | 10g |
Explore more gluten-free meal plans to keep your plant-based lifestyle vibrant and flavorful.
For nutritional guidance on whole foods, visit the Academy of Nutrition and Dietetics.
Q&A
Q&A: Nourish Naturally – Your Guide to Healthy Plant-Based Gluten-Free Living
Q1: What does “plant-based gluten-free living” really mean?
A1: Plant-based gluten-free living is a lifestyle choice that focuses on consuming foods derived entirely from plants-fruits, vegetables, legumes, nuts, seeds-while also eliminating gluten, a protein found in wheat, barley, and rye. It’s a nourishing approach that embraces vibrant, whole foods and caters especially to those with gluten sensitivities or celiac disease, without sacrificing flavor or variety.
Q2: Why choose a plant-based gluten-free diet?
A2: This diet offers a powerhouse of health benefits! By combining the nutrient density of plants with the gluten-free commitment, you reduce exposure to inflammatory gluten, increase fiber intake, and flood your body with antioxidants and essential vitamins. Plus, it supports digestion, heart health, and lasting eating habits-kind of a win-win-win!
Q3: Isn’t gluten-free plant-based eating limiting? How do I get variety?
A3: Far from limiting-it’s a playground of colorful, wholesome ingredients! Think quinoa, chickpeas, lentils, sweet potatoes, kale, and a rainbow of fruits.You can experiment with exotic grains like amaranth or teff, whip up creamy nut-based sauces, or bake with almond and coconut flours. Variety isn’t just possible; it’s a delicious adventure.Q4: How can I ensure I’m getting enough protein on this diet?
A4: Protein is plentiful in plant-based foods! Lentils, chickpeas, black beans, tofu, tempeh, quinoa, nuts, and seeds all pack a protein punch. Combining different plant proteins throughout the day ensures you get a complete amino acid profile.Think of your meals as a colorful mosaic-each tile contributes to the whole picture of nourishment.
Q5: What about gluten cross-contamination? How do I stay safe?
A5: vigilance is key. Always read labels carefully and choose certified gluten-free products when possible. In your kitchen, use separate utensils, toasters, and cutting boards if gluten-containing foods are present. Restaurants? don’t hesitate to ask questions about food prep or request gluten-free options. Knowledge is your best tool here.
Q6: Can this lifestyle support weight loss or fitness goals?
A6: Absolutely! A plant-based gluten-free diet is naturally rich in fiber and low in processed sugars and unhealthy fats, which can boost metabolism, promote satiety, and enhance energy levels.Coupled with an active lifestyle, it can definitely help you reach and maintain your health and fitness objectives.
Q7: Any tips for beginners looking to transition smoothly?
A7: Start small and savor the journey.Begin by swapping one meal a day with a plant-based gluten-free option. Explore new recipes, experiment with herbs and spices, and prioritize whole foods over processed substitutes. Meal prepping and batch cooking can keep things stress-free. And remember-curiosity and creativity are your best friends!
Q8: Where can I find inspiration and reliable resources?
A8: Connect with communities online, follow plant-based chefs who emphasize gluten-free cuisine, and dive into cookbooks dedicated to this lifestyle. Websites, blogs, and social media channels can spark culinary creativity, while nutritionists knowledgeable in both plant-based and gluten-free diets can provide personalized guidance.
Nourish Naturally isn’t just a diet-it’s a vibrant way to honor your body, delight your taste buds, and embrace wellness one gluten-free, plant-powered bite at a time.
To Conclude
As you embark on your journey toward vibrant health with plant-based, gluten-free living, remember that nourishment is more than just a diet-it’s a celebration of nature’s bounty and your body’s incredible potential to thrive. By embracing whole foods, colorful ingredients, and mindful choices, you’re not only supporting your well-being but also honoring a lifestyle rooted in compassion and sustainability. Let “Nourish Naturally” be your steadfast companion,guiding you through delicious discoveries and empowering habits that make every meal a step closer to your healthiest,happiest self. Here’s to flourishing with every bite-naturally, fully, and joyfully.