Heavenly Delights: the Secrets Behind angel Food Cake begin wiht mastering the delicate balance of airy sweetness and featherlight texture that only a perfectly whipped egg white foam can deliver. This ethereal cake, a marvel of simplicity and precision, owes its signature cloud-like rise to an expertly handled meringue and the choice of the finest flour to elevate the crumb to its ultimate fluffiness.
Prep and Cook Time
Readiness: 20 minutes | Cooking: 35 minutes | Cooling: 1 hour
Yield
Serves 8 to 10 slices
Difficulty level
Intermediate: Requires careful technique but rewarding for any adventurous baker
Ingredients
- 1 cup (120g) cake flour,sifted
- 1 ½ cups (300g) granulated sugar,divided
- 12 large egg whites,room temperature
- 1 ½ tsp cream of tartar
- ¼ tsp salt
- 1 ½ tsp pure vanilla extract
- ½ tsp almond extract (optional)
Instructions
- Preheat yoru oven to 350°F (175°C). Ensure your angel food cake pan is clean and ungreased for optimal rise.
- Sift the cake flour with ¾ cup (150g) of the granulated sugar twice to aerate and remove lumps. Set aside.
- in a large mixing bowl, using a stand mixer fitted with the whisk attachment, beat the egg whites on medium speed until foamy.
- Add cream of tartar and salt. Increase speed to high and gradually add the remaining ¾ cup (150g) sugar, about one tablespoon at a time, allowing it to dissolve wholly between additions. beat until stiff, glossy peaks form. Proper stiffness is key; the mixture should hold firm peaks without collapsing.
- Gently fold the sifted flour and sugar mixture into the meringue in three additions. Use a rubber spatula and a gentle folding motion to preserve air bubbles.Avoid overmixing to keep the batter airy and light.
- Stir in vanilla and optional almond extracts, folding carefully to integrate flavor without deflating the foam.
- Pour the batter into the tube pan, smoothing the top lightly with the spatula. Do not grease the pan – the batter needs to cling to the sides to rise properly.
- Bake for 35 to 40 minutes, or until the cake is golden and springs back when lightly pressed. A toothpick inserted in the center should come out clean.
- Immediately invert the pan onto a cooling rack or bottle neck. Cooling upside down prevents collapse and maintains volume.
- Once completely cool (about an hour),run a thin knife around the edges and the center tube to release the cake. Carefully remove from pan.
Tips for Success
- Egg whites: Always use fresh, room temperature eggs to achieve maximum volume and stability in your meringue.
- Flour: Cake flour is essential for tenderness and fluffiness. Avoid all-purpose flour as it is too heavy.
- Whisking: Be patient when adding sugar to the egg whites. Slow incorporation allows for smoother, more stable foam.
- Folding: Use gentle strokes to preserve the delicate air pockets; overmixing will deflate the batter.
- Storage: Wrap the cake in plastic wrap once cooled and store at room temperature up to 2 days or freeze tightly for up to 1 month.
- Make-Ahead: The cake can be prepared a day ahead and kept fresh by storing in an airtight container or lightly wrapped.
serving Suggestions
Slice this delicate angel food cake with a serrated knife for clean edges, serving it plain or topped with a dollop of freshly whipped cream and a scatter of fresh berries. A light dusting of powdered sugar adds a snowy finish, enhancing its dreamlike appearance.for a luscious twist, drizzle with raspberry coulis or a drizzle of honey-lavender syrup, pairing beautifully with chamomile tea or chilled Prosecco.

Nutritional Facts (per slice)
| Calories | Protein | Carbs | Fat |
|---|---|---|---|
| 140 kcal | 4g | 33g | 0.2g |
For more baking secrets on how to perfect meringues and flour choices, check out our Complete Meringue Masterclass. Dive deeper into the science of egg white foam on Serious Eats.
Q&A
Q&A: Heavenly Delights – The Secrets Behind Angel Food Cake
Q1: What makes Angel Food Cake so uniquely “heavenly”?
A1: Angel food Cake earns its celestial nickname thanks to its ethereal lightness and cloud-like texture. Unlike dense, butter-rich cakes, this treat is made primarily from egg whites, sugar, and a hint of flour, whipped to airy perfection.The result? A cake that seems to float on your tongue, as if angels themselves crafted it.
Q2: How does Angel Food cake achieve its signature fluffy texture?
A2: The magic lies in technique. Egg whites are whipped into a stiff, glossy meringue, trapping countless microscopic air bubbles. These bubbles expand during baking, giving the cake its lofty rise. The absence of fat-no egg yolks or butter-allows the structure to remain light rather than heavy.
Q3: Why is Angel Food Cake baked in a tube pan?
A3: The classic tube pan is no accident. Its central tube encourages even heat distribution, helping the delicate batter rise evenly. Additionally, the pan’s tall sides provide support, preventing the cake from collapsing as it cools. Many bakers invert the pan post-baking to maintain its lofty height and prevent shrinking.
Q4: Can Angel Food Cake be flavored, or is it always plain?
A4: While traditionally vanilla is the go-to, Angel Food Cake is a blank canvas. Zests of citrus-lemon or orange-can add a bright twist, while extracts like almond or coconut introduce subtle undertones. Just remember: additions should be light so as not to weigh down the batter.
Q5: What are common pitfalls when baking Angel Food Cake?
A5: Overbeating or underbeating the egg whites can sabotage the cake’s delicate structure. overbeaten whites become dry and clumpy, while underbeaten whites won’t hold enough air. Also, any grease or yolk contamination can prevent egg whites from whipping properly. opening the oven door too soon may cause the cake to deflate prematurely.
Q6: How did Angel Food Cake get its name?
A6: This ethereal dessert was christened “Angel Food Cake” in the 19th century, inspired by its lightness-fit for the heavens. Its delicate nature and pure white color seemed to embody the image of angelic food, a divine sweet treat in a world of rich confections.
Q7: What are some delightful ways to enjoy Angel Food Cake?
A7: Served simply with fresh berries and a dusting of powdered sugar, Angel Food Cake sings. Pair it with whipped cream or a tangy fruit compote for added decadence without heaviness.Its subtle sweetness also makes it a versatile base for layered desserts or trifle.
Q8: Is Angel Food Cake suitable for special diets?
A8: Yes! Since it contains no egg yolks or butter,it’s naturally low in fat and cholesterol.plus, it can be a light option for those watching their calorie intake. Just check the sugar content if you’re managing sugar levels, and know that it’s gluten-containing unless you use a special flour substitute.
Unlock the secrets of Angel Food Cake and bring a little slice of heaven to your kitchen!
The Way Forward
As we close the chapter on the ethereal world of angel food cake, it’s clear that this light, airy dessert is much more than just a sweet treat-it’s a testament to the delicate balance of science and artistry. Behind its cloud-like texture and subtle sweetness lies a symphony of carefully whipped egg whites, precise folding techniques, and a touch of magic that transforms simple ingredients into something heavenly. Whether you savor it plain or adorned with fresh berries and whipped cream, angel food cake invites us all to experience a slice of culinary bliss that’s as timeless as it is enchanting. So next time you indulge in its tender crumb and lofty rise, remember the secrets that make this cake truly divine-and delight in every bite from the first to the last.
Mastering Börek begins with selecting the perfect filling-one that bursts with authentic flavors while honoring the rich culinary tradition of this beloved savory pastry. Whether you lean towards succulent meats, fresh herbs, creamy cheeses, or hearty vegetables, the right filling transforms each delicate, flaky layer into a memorable experience. Let’s dive into creating that harmony of flavors and textures, starting with how to choose fillings that elevate your börek from simple to sensational.
Choosing the Perfect Filling for Authentic Flavors
To truly master börek, aim for fillings that balance moisture and seasoning to complement the pastry’s crisp, buttery layers. Customary options include:
- Ground lamb or beef sautéed with onions, garlic, and aromatic spices like cumin and cinnamon;
- Feta cheese combined with fresh parsley or dill for a tangy, herbaceous bite;
- Spinach and leeks cooked down with a hint of nutmeg;
- Potato puree seasoned with paprika and caramelized onions for a comforting vegetarian choice.
Fresh herbs are a must-thyme, mint, or chives can infuse your filling with vibrant notes. Keep fillings slightly firm and not too wet to prevent soggy layers, ensuring that each bite stays crisp and inviting.
Crafting the Ideal Dough Texture for Flaky Perfection
Your dough is the foundation of every great börek. A masterful dough strikes the perfect balance of elasticity and tenderness, enabling you to roll it paper-thin without tearing. Use all-purpose flour combined with a dash of oil and warm water for pliability.Resting the dough for at least 30 minutes under a damp cloth relaxes the gluten and simplifies rolling.
Pro tip: If you want extra flaky layers, consider layering your sheet with melted butter or olive oil as you assemble the börek. This technique creates irresistible golden crispiness once baked.
expert techniques for Rolling and Shaping Börek
Once rested, divide the dough into small balls. Using a lightly floured surface, roll each ball into an ultra-thin circle-almost translucent.The key here is patience, gentle pressure, and a careful swirl of your wrist, which helps elongate the dough evenly.
For shaping, try classic forms such as:
- Triangles: Place a spoonful of filling near the edge, fold into a neat triangle, sealing edges firmly.
- Spirals: Spread filling on a thin sheet, then roll tightly before coiling it into a spiral.
- Rectangular layers: Stack multiple thin sheets brushed with butter, layering filling intermittently for a luxurious multi-layered börek.
ensure edges are well sealed with a touch of water or beaten egg to avoid filling leakage during baking.
Baking Tips and Presentation Ideas to Impress Your Guests
Before baking, brush your börek generously with egg wash or melted butter to achieve that coveted golden sheen. Place on a parchment-lined tray and bake in a preheated oven at 375°F (190°C) for 25-30 minutes until crisp and bubbly.
For a stunning presentation, serve börek warm on a rustic wooden board, garnished with fresh herbs like parsley or mint and accompanied by a bowl of creamy yogurt or tzatziki. Add a wedge of lemon to brighten each bite and elevate the flavor profile.
Prep and Cook Time
- Readiness: 40 minutes (includes dough resting)
- Cooking: 30 minutes
- Total: 1 hour 10 minutes
Yield
Serves 6-8 people,perfect for sharing at brunch or dinner parties.
Difficulty Level
Medium - requires some dough handling skills and attention to rolling techniques, but easily achievable with practice.
Ingredients
- For the Dough:
- 3 cups all-purpose flour, sifted
- 1 cup warm water
- 2 tbsp olive oil
- 1 tsp salt
- For the Filling (Classic Spinach and Feta):
- 400g fresh spinach, washed and roughly chopped
- 200g feta cheese, crumbled
- 1 medium onion, finely diced
- 2 tbsp olive oil
- 1/4 tsp freshly ground black pepper
- 1/2 tsp nutmeg
- 1/4 cup fresh dill, chopped
- For Assembly:
- 1 egg, beaten (for egg wash)
- 3 tbsp melted butter or olive oil (for layering)
Instructions
- Make the dough: In a large bowl, mix sifted flour and salt. Gradually add warm water and olive oil, stirring until dough forms. Knead on floured surface for 8-10 minutes until smooth and elastic. Cover and let rest for 30 minutes.
- Prepare filling: Heat olive oil in skillet over medium heat. Sauté onions until translucent,about 5 minutes,stirring occasionally. Add spinach and cook until wilted, about 4 minutes. Remove from heat; stir in crumbled feta, dill, nutmeg, and black pepper. Let cool.
- Divide dough: Cut rested dough into 8 equal balls. Lightly flour surface and roll each ball into thin, nearly translucent circles.
- assemble börek: Brush dough with melted butter. Spoon filling along one side, then fold dough into desired shape (triangle, spiral, or rectangle). Seal edges gently with water or beaten egg.
- Layer (optional): For multi-layer börek, stack sheets alternately spreading melted butter and filling layers.
- Preheat oven: Set to 375°F (190°C). Line baking tray with parchment paper.
- Brush börek: Generously apply egg wash to each shaped pastry.
- Bake: Place börek on tray and bake for 25-30 minutes until golden and crisp.
- Serve: Let cool 5 minutes before serving warm with fresh herbs and yogurt dips.
Tips for Success
- use warm water for dough to help activate gluten and ease rolling.
- Resting dough is essential – don’t skip it to avoid shrinkage during rolling.
- Keep your work surface lightly floured to prevent sticking, but avoid excess flour that toughens dough.
- If dough tears,repair by gently pressing the edges or patching with a little extra flour and water mixture.
- for a vegan version, substitute feta with seasoned tofu and use olive oil instead of egg wash.
- Make ahead: Börek can be formed and refrigerated for up to 6 hours before baking-ideal for meal prep or entertaining.
Serving Suggestions
Present börek stacked or spiraled on a large platter, garnished with freshly chopped parsley or mint for a splash of color. Pair with a side of cooling garlic yogurt sauce or a crisp salad made from cucumbers, tomatoes, and red onions tossed in a lemon vinaigrette. Add lemon wedges alongside to enhance the flaky pastry’s savory depth.
| Nutritional Info (per serving) | Calories | Protein | Carbohydrates | Fat |
|---|---|---|---|---|
| Spinach & Feta Börek | 320 kcal | 14g | 28g | 18g |

For further inspiration, explore our Turkish pastry and baklava recipes. To deepen your understanding of traditional Turkish spices and herbs, visit Britannica’s guide on Turkish cuisine.
Q&A
Q&A: Mastering Börek – A Delicious Step-by-Step Recipe Guide
Q1: What exactly is Börek?
A1: Börek is a savory pastry originating from the Ottoman Empire, beloved throughout Turkey and the Balkans. It features thin layers of dough-frequently enough phyllo or yufka-wrapped or layered with fillings ranging from cheese and spinach to minced meat, then baked to golden, flaky perfection. Think of it as the crispy, indulgent cousin of your favorite stuffed pie.
Q2: Why is mastering Börek worth the effort?
A2: Becuase Börek isn’t just food; it’s an experience-a delightful dance between crisp layers and rich fillings. With patience and technique, you’ll unlock textures and flavors that wow the senses. Plus, once mastered, Börek becomes your signature dish for gatherings or a comforting weeknight treat.
Q3: Which ingredients are essential for a traditional Börek?
A3: At the heart of Börek is the dough-typically phyllo or handmade yufka-which provides the signature crispness. Common fillings include salty feta or Turkish white cheese,spinach or fresh herbs,onions,and sometimes ground lamb or beef for meat lovers. Olive oil or melted butter is key for brushing the dough layers to achieve that irresistible golden crunch.Q4: Can I make the dough from scratch?
A4: Absolutely! Making yufka dough by hand is a rewarding part of the Börek art. It requires flour, water, a pinch of salt, and lots of stretching to create impossibly thin sheets. For beginners, supermarket phyllo dough offers a convenient shortcut without compromising taste.
Q5: What’s the secret to perfectly crispy Börek?
A5: The magic lies in layering and moisture control. Brush every layer generously with butter or oil, but avoid overly wet fillings that can sog the dough. Bake at a high enough temperature-usually around 375°F (190°C)-until the top is beautifully golden and crisp.
Q6: How versatile is Börek? Can I customize the fillings?
A6: Börek invites creativity! Traditional fillings abound, but you can get playful with mushrooms, pumpkin, or even sweet versions with nuts and honey. The key is balancing moisture and flavor to preserve that flaky texture.
Q7: What’s the best way to serve Börek?
A7: Serve Börek warm, straight from the oven, accompanied by a dollop of tangy yogurt or a fresh salad. The contrast between the crispy pastry and cooling sides creates an unforgettable bite.
Q8: Any tips for beginner Börek makers?
A8: Yes! Take your time with layering-thinner layers mean crispier Börek. If using phyllo, keep the sheets covered with a damp towel to prevent drying out. Practice makes perfect: your hands will become more confident,and you’ll soon master folding or rolling techniques.
Q9: Can Börek be frozen?
A9: Indeed! Börek freezes beautifully before baking. Assemble your Börek, wrap it tightly, and freeze. When ready, bake it straight from frozen, adding a few extra minutes to the baking time, and enjoy fresh, flaky goodness whenever you please.
Q10: Where can I learn more about Börek’s cultural roots?
A10: Dive into Turkish and Balkan culinary blogs, cookbooks, or documentaries exploring Ottoman-era kitchens. Börek is more than a dish-it’s a story of tradition,family,and shared tables that have spanned centuries.
Embark on your Börek journey with patience and passion, and you’ll soon be slicing into layers of golden, crispy delight that tell a delicious story with every bite!
Closing Remarks
Mastering börek is more than just following a recipe-it’s an invitation to embark on a culinary journey filled with flaky layers, rich fillings, and the warm embrace of tradition. With each fold and brush of butter, you craft not only a dish but a story that bridges cultures and generations. Whether you’re a seasoned cook or a curious beginner, this step-by-step guide equips you with the tools and confidence to bring the magic of börek into your kitchen. So roll up your sleeves, embrace the dough’s delicate texture, and let your taste buds savor the triumph of homemade börek-as great cooking, much like life, is best enjoyed one delicious layer at a time.
Hearty Stuffed Bell Pepper Casserole transforms the humble bell pepper into a vibrant celebration of rich textures and comforting flavors. This dish showcases tender peppers filled with a savory medley of meat, rice, and aromatic herbs, baked together in a luscious tomato sauce that brings each bite to life. Rooted in classic home cooking,it’s the ultimate satisfying meal that’s as visually stunning as it is delicious-perfect for family dinners or meal-prep lunches.
Prep and Cook Time
- Readiness: 20 minutes
- Cooking: 45 minutes
- Total Time: 1 hour 5 minutes
Yield
Serves 6 hearty portions
Difficulty Level
Medium – perfect for home cooks ready to master layering flavors and textures
ingredients That Elevate Yoru Stuffed Bell Pepper Casserole to the Next Level
- 6 large bell peppers (choose a mix of red, yellow, and orange for a colorful presentation)
- 1 lb lean ground beef or ground turkey for a lighter alternative
- 1 cup long-grain white rice, rinsed
- 1 medium yellow onion, finely chopped
- 3 cloves garlic, minced
- 1 can (14 oz) crushed tomatoes
- 1/2 cup tomato sauce-adds depth and moisture to the casserole
- 1 tsp smoked paprika-for a subtle smoky undertone
- 1 tsp dried oregano or fresh if available
- 2 tbsp fresh parsley, chopped, for brightness
- 1 cup shredded sharp cheddar cheese, divided
- 1/2 cup beef broth or vegetable broth to keep peppers juicy
- salt and freshly cracked black pepper to taste
- 2 tbsp olive oil for sautéing
- Optional kick: pinch of crushed red pepper flakes or 1 tsp chipotle powder
Mastering Flavor Balance Through Seasoning and Sauces
Building depth starts with perfect seasoning. Saute the onions and garlic in olive oil until soft and fragrant, this releases their natural sweetness that balances the tangy crushed tomatoes. The smoked paprika adds warmth without overpowering, while oregano offers herbaceous notes that complement the richness of the meat. A touch of broth poured around the peppers before baking ensures the casserole stays moist and tender, preventing dryness. Finish with shredded cheddar-it melts into gooey pockets of comfort, tying each bite together harmoniously.
step by Step Guide to Achieving the Perfectly Tender and Juicy Peppers
- Prepare the peppers: Slice the tops off each bell pepper and remove seeds and membranes, keeping the peppers whole.Lightly blanch them in boiling water for 3 minutes to soften, then drain and set aside.
- Sauté the filling: Heat olive oil in a large skillet over medium heat. Add the chopped onions and garlic, cooking until translucent (about 5 minutes).
- Brown the meat: add ground beef to the skillet, breaking it apart as it cooks. season with salt, pepper, smoked paprika, and oregano.Once browned, stir in rinsed rice and cook for 2 minutes to toast slightly.
- Add tomatoes and broth: Stir in the crushed tomatoes, tomato sauce, and beef broth. Let simmer for 10 minutes to meld flavors and partially cook the rice.
- Fill the peppers: Spoon the rich meat and rice mixture into each bell pepper, packing it firmly but gently. place peppers upright in a baking dish.
- Top and bake: Pour a little broth into the baking dish around the peppers. Sprinkle shredded cheddar over the tops. Cover with foil and bake at 375°F (190°C) for 30 minutes.
- Finish uncovered: Remove the foil and bake for an additional 10-15 minutes until the cheese is golden and bubbly,and the peppers are tender but still hold their shape.
Pro Tips for Customizing Your Casserole with Fresh and Hearty Additions
Boost texture and nutrition by mixing in finely chopped mushrooms or diced zucchini with your filling. For a vegetarian twist, swap the ground beef for lentils or quinoa, and use vegetable broth. Adding fresh herbs like basil or cilantro just before serving adds aromatic freshness. If you prefer some heat, stir in diced jalapeños or a drizzle of your favorite hot sauce. Leftovers reheat beautifully, making this casserole a perfect make-ahead dish that deepens in flavor overnight.
Chef’s Notes
- Rice substitution: For a gluten-free option, swap white rice for quinoa or cauliflower rice, adjusting cooking times accordingly.
- Cheese variations: Monterey jack, mozzarella, or a sprinkle of parmesan add different layers of gooeyness and tang.
- Making ahead: Assemble the casserole fully,then refrigerate for up to 24 hours before baking to enhance the melding of flavors.
- Troubleshooting: If your peppers are not tender enough after baking, cover with foil and bake an extra 10 minutes with a splash of broth.
Serving Suggestions
Present your casserole with a fresh green salad tossed in a zesty vinaigrette or steamed seasonal vegetables like green beans or asparagus to balance the rich filling. Garnish with additional freshly chopped parsley or a sprinkle of paprika for color contrast. A dollop of sour cream or tangy Greek yogurt on the side provides creamy contrast and an indulgent touch.Crusty garlic bread elevates the meal into a truly comforting feast.

| Nutrient | Per serving |
|---|---|
| Calories | 420 kcal |
| Protein | 32 g |
| Carbohydrates | 28 g |
| Fat | 18 g |
For more comforting casserole ideas, check out our guide on Ultimate Chicken and Rice Casserole. For nutritional advice on balanced meals, visit EatRight.org.
Q&A
Q&A: Hearty Stuffed bell Pepper Casserole – A Comforting Classic
Q1: What makes stuffed bell peppers such a timeless comfort food?
A1: Stuffed bell peppers combine the heartiness of a home-cooked meal with vibrant colors and flavors that evoke nostalgia. The tender, sweet peppers cradle a savory filling-usually ground meat, rice, and spices-creating a perfect bite that’s satisfying and wholesome. This blend of textures and tastes has made them a beloved dish across generations.
Q2: How does a casserole version differ from conventional stuffed bell peppers?
A2: The casserole reinvents the classic by layering all the ingredients together in one dish rather then stuffing individual peppers. This approach is not only simpler and quicker but also allows flavors to meld beautifully as they bake. It’s perfect for feeding a crowd and great for meal prepping, offering the same comforting essence with less fuss.
Q3: Can I customize the filling to suit dietary needs or preferences?
A3: Absolutely! The beauty of a stuffed pepper casserole lies in its versatility. Use ground turkey or plant-based meat substitutes for lighter or vegetarian options. Swap out rice for quinoa or cauliflower rice to keep it low-carb. Incorporate your favorite herbs, veggies, or cheeses to tailor the dish to your taste buds and lifestyle.Q4: What are some tips for achieving the perfect balance of flavors in this casserole?
A4: Start with sautéed onions and garlic to build depth. Season the meat mixture generously with herbs like oregano, thyme, or smoked paprika. A splash of tomato sauce or diced tomatoes adds acidity and moisture, balancing the sweetness of the bell peppers. don’t forget a good melting cheese on top for that golden, bubbly finish.
Q5: How do I serve and store leftover hearty stuffed bell pepper casserole?
A5: Serve the casserole straight from the oven with a side salad or crusty bread for a comforting meal. Leftovers keep well-store them in an airtight container in the fridge for up to 4 days. Reheat gently in the oven or microwave.It also freezes beautifully, making it a perfect make-ahead dinner for busy weeks.
Q6: Why does this dish bring such warmth beyond its flavors?
A6: Beyond the taste, hearty stuffed bell pepper casserole is a symbol of home and family. It’s a dish that invites sharing, sparks memories of gatherings, and fills the kitchen with cozy aromas. It’s comfort food in its truest form-nourishing body and soul with every savory bite.
To Conclude
Whether you’re craving a cozy weeknight meal or looking to impress family and friends with a dish that feels like a warm hug, this Hearty Stuffed Bell Pepper Casserole delivers on all fronts. Its vibrant colors, rich flavors, and satisfying textures come together to create a comforting classic that’s as nourishing as it is indeed delicious. So next time you want to fill your kitchen with inviting aromas and your table with smiles,remember this casserole – a timeless recipe that turns simple ingredients into lasting memories.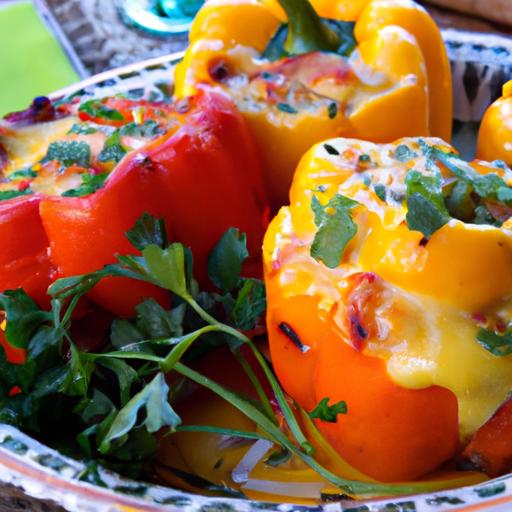
Savor the Sea: crafting perfect shrimp and scallop risotto is a delightful culinary adventure, inviting you to blend the ocean’s freshest treasures with the creamy alchemy of conventional Italian risotto. This dish embodies the harmony between delicate seafood flavors and decadent textures, elevating your dinner table to gourmet heights. Whether you’re a seasoned chef or a passionate home cook, mastering this recipe ensures your guests will savor every bite and remember the pleasure of perfectly cooked shrimp and scallops entwined in a luscious, velvety risotto.
Prep and Cook Time
- Readiness: 15 minutes
- Cooking: 35 minutes
- Total Time: 50 minutes
Yield
- Serves 4 generous portions
difficulty Level
- Medium
Ingredients
- 1 cup Arborio rice
- 12 large shrimp, peeled and deveined
- 12 medium sea scallops, patted dry
- 4 cups low-sodium seafood stock, kept warm
- 1 small onion, finely chopped
- 3 cloves garlic, minced
- 1/2 cup dry white wine (optional but recommended)
- 3 tbsp unsalted butter, divided
- 2 tbsp extra virgin olive oil
- 1/2 cup freshly grated Parmesan cheese
- 1 tbsp fresh parsley, finely chopped
- 1 tsp fresh thyme leaves
- 1/4 tsp crushed red pepper flakes
- Salt and freshly ground black pepper to taste
- Zest of 1 lemon (optional for brightness)
Instructions
- Prepare the seafood: Pat the shrimp and scallops thoroughly dry with paper towels-this key step ensures a perfect sear.Season lightly with salt and pepper.
- Sear the shrimp and scallops: In a large nonstick skillet, heat 1 tablespoon olive oil and 1 tablespoon butter over medium-high heat.Sauté shrimp until pink and just opaque, about 2 minutes per side.Remove and keep warm. Sear scallops without moving for 2-3 minutes until a golden crust forms, then flip for an additional 1-2 minutes.Remove and set aside with shrimp.
- Start the risotto base: in a heavy-bottomed saucepan, warm 1 tablespoon olive oil over medium heat. Add chopped onion and cook until translucent, about 5 minutes. Stir in garlic and cook for 30 seconds until fragrant.
- Toast the rice: Add Arborio rice, stirring constantly for 2 minutes until the edges of each grain look translucent. This step enhances that signature creamy risotto texture.
- Deglaze with wine: Pour in white wine, stirring continuously until completely absorbed. This deepens flavor complexity.
- Add seafood stock gradually: Ladle 1/2 cup warm stock at a time, stirring frequently. Allow the rice to absorb most of the liquid before adding more.Continue until rice is al dente and creamy, about 20-25 minutes.
- Finish with butter and cheese: Remove pan from heat. Stir in remaining 2 tablespoons butter,freshly grated Parmesan,lemon zest,thyme,red pepper flakes,salt,and black pepper to taste. This layers richness and flavor beautifully.
- Fold in shrimp and scallops: Gently integrate the seared seafood into the risotto, warming them without overcooking. Garnish with chopped parsley just before serving.
Tips for Success
- Choose fresh, dry-packed shrimp and scallops for the best texture and flavor; avoid frozen seafood with added water or preservatives.
- Keep your seafood stock simmering warm-adding cold stock can disrupt the cooking process and texture.
- Constant stirring is essential to release the rice’s natural starches, creating that signature risotto creaminess.
- Don’t rush the cooking; patience ensures perfect al dente rice and well-cooked seafood.
- For a dairy-free version, substitute butter with olive oil and omit Parmesan or use a nut-based cheese option.
- Make ahead: Prepare risotto base ahead and add seafood right before serving to prevent toughness.
serving Suggestions
serve your vibrant shrimp and scallop risotto with a crisp glass of chilled Sauvignon Blanc or Vermentino for a harmonious seafood pairing. Garnish with a sprinkle of fresh parsley, a twist of lemon zest, and an extra drizzle of high-quality olive oil to heighten the sensory experience. For a touch of elegance, add microgreens or edible flowers atop each plate. This dish shines best when enjoyed promptly but also warms beautifully for a next-day indulgence.

| Nutrient | Per Serving |
|---|---|
| Calories | 450 kcal |
| Protein | 35 g |
| Carbohydrates | 50 g |
| Fat | 12 g |
For more delicious seafood dishes that celebrate the ocean’s bounty, explore our seafood pasta recipes collection. To deepen your knowledge of rice varieties perfect for risotto, visit Encyclopaedia Britannica – Risotto.
Q&A
Q&A: Savor the Sea – Crafting Perfect Shrimp and Scallop Risotto
Q1: What makes shrimp and scallop risotto a standout dish?
A1: Shrimp and scallop risotto harmonizes the tender sweetness of fresh seafood with the luscious creaminess of perfectly cooked Arborio rice. It’s a celebration of ocean flavors mingled with the rich, comforting embrace of Italian tradition-a dish that’s elegant yet deeply satisfying.
Q2: How do you choose the best shrimp and scallops for risotto?
A2: freshness is key! Look for shrimp with a firm texture and a mild, briny aroma-avoid any that smell overly fishy. Scallops should be plump, moist, and slightly translucent with no discoloration.Opt for dry-packed scallops over those soaked in water to ensure they sear beautifully and don’t dilute the flavors.
Q3: What type of rice should be used for risotto, and why?
A3: arborio rice reigns supreme in risotto-making thanks to its high starch content.These starch grains release slowly during cooking, imparting that signature creamy texture while the rice remains al dente – tender yet with a subtle bite.
Q4: How do you balance the seafood flavors without overpowering the risotto?
A4: The secret lies in layering flavors gently.Sauté shrimp and scallops just until golden to preserve their natural sweetness.Incorporate seafood stock or a lightly flavored broth to infuse the risotto with oceanic essence without overwhelming it. Finish with a touch of fresh herbs, lemon zest, or a whisper of garlic to brighten but not mask.
Q5: What’s the perfect technique for cooking risotto to creamy perfection?
A5: Patience and love-risotto is a slow dance. Start by toasting the rice lightly in butter and shallots, then add warm broth gradually, stirring constantly. This coaxing coaxed the starches to release,developing that silky,velvety consistency. Resist the urge to rush or add too much liquid at once.
Q6: Can this dish be made ahead of time?
A6: Risotto is best enjoyed fresh, as its creamy texture can stiffen upon standing. However, you can prepare the rice base a bit early and gently reheat it with additional broth just before serving, then quickly fold in the freshly cooked shrimp and scallops.
Q7: What wine pairs best with shrimp and scallop risotto?
A7: Crisp,mineral-driven white wines like a Sauvignon Blanc or an Italian Pinot Grigio complement the dish’s sea notes and creamy richness beautifully. For a touch of elegance, a lightly chilled Champagne or sparkling wine offers vibrant acidity to cleanse the palate.
Q8: Any tips for adding a creative twist to this classic risotto?
A8: Elevate your risotto by infusing the broth with aromatic fennel or saffron for an exotic flair. Garnish with toasted pine nuts or a drizzle of truffle oil for depth. Or toss in some fresh peas or asparagus tips for bursts of color and texture,transforming a familiar favorite into a personalized masterpiece.
With these insights, you’re now equipped to savor the sea in every decadent spoonful of shrimp and scallop risotto-where creamy meets briny, and tradition meets coastal splendor. Buon appetito!
Wrapping Up
As the final grains of creamy arborio rice melt effortlessly on your tongue, carrying the tender embrace of plump shrimp and succulent scallops, you realize that crafting the perfect risotto is more than just a recipe-it’s an art of patience, balance, and respect for the sea’s bounty. Each spoonful invites you to savor not onyl flavors but the story of coastal kitchens and time-honored technique. So next time you crave a dish that whispers elegance and comfort in every bite, remember: with the right touch and a little love, your shrimp and scallop risotto can become a masterpiece that sings the ocean’s praise. Bon appétit!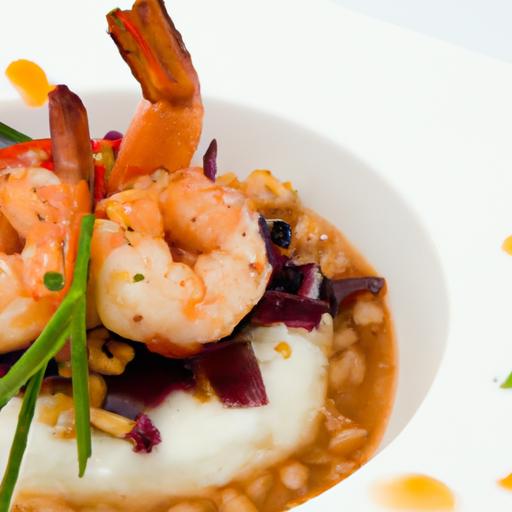
Unlocking Bastilla’s unique layers reveals a captivating journey through Moroccan culinary heritage. This exquisite pastry, renowned for its delicate interplay of crisp phyllo dough, savory poultry, fragrant spices, and crunchy almonds, is a masterpiece that vividly tells the story of North African tradition and French influence.With each bite,you experience a symphony of textures and aromas – the crispy golden crust,the sweet-savory filling infused with cinnamon and saffron,and the subtle nuttiness binding it all together.
Prep and Cook Time
- Preparation: 45 minutes
- Cooking: 1 hour 15 minutes
- Total Time: 2 hours
Yield
Serves 6 generously
Difficulty level
Advanced – requires patience and attention to layering and spice balancing, but the results are heavenly
Ingredients
- For the Filling:
- 1 whole chicken (about 3 lbs), cut into pieces
- 2 large onions, finely chopped
- 4 cloves garlic, minced
- 1 tsp saffron threads, soaked in 2 tbsp warm water
- 2 tsp ground cinnamon
- 1 tsp ground ginger
- 1 tsp turmeric
- 1 tsp black pepper
- 1 tsp salt
- 1/4 cup chopped fresh parsley
- 1/4 cup chopped fresh cilantro
- 3 tbsp olive oil
- 1/2 cup blanched almonds, toasted and roughly chopped
- 3 large eggs
- 2 tbsp sugar
- 1 tsp ground cinnamon (for almond mixture)
- For the Phyllo Layers:
- 12 sheets of phyllo dough, thawed
- 1 cup unsalted butter, melted
- Powdered sugar and cinnamon mix (for garnish)
Instructions
- Prepare the chicken filling: In a large pot, heat the olive oil over medium heat. Add chopped onions and garlic; sauté until translucent and aromatic, about 7 minutes.
- Add the chicken pieces: Stir well to coat with the onion mixture. Pour in saffron water along with cinnamon, ginger, turmeric, pepper, and salt. Cover and simmer on low heat until the chicken is tender and falling off the bone, about 45 minutes. Remove chicken,reserving the broth.
- Shred the chicken: Once cooled slightly, remove bones and skin, shredding the meat finely. Set aside.
- Reduce the broth: Boil the reserved liquid until slightly thickened. Beat the eggs in a bowl,then gradually add the hot broth while whisking continuously to temper the eggs. Return mixture to the stove; stir constantly until thickened, then combine with shredded chicken.Stir in parsley and cilantro.
- Prepare the almond mixture: Mix toasted almonds with sugar and cinnamon.
- Preheat oven to 375°F (190°C): Brush a deep round baking dish or conventional bastilla pan with melted butter.
- Layer the phyllo sheets: Place one sheet in the dish, brushing generously with butter. Repeat layering, allowing the edges to hang over the sides to fold later. Use half of the sheets.
- Add the filling: Spread half of the chicken filling evenly, then sprinkle half the almond mixture over it. Layer with the remaining filling and almonds, then fold the phyllo edges over the top and continue layering with remaining phyllo, buttering each sheet.
- Seal and decorate: fold remaining phyllo edges to seal,brush the top generously with butter,and gently score the crust with a sharp knife in a circular or diamond pattern for a professional finish.
- Bake: Bake for 45-55 minutes or until the bastilla is golden brown and crisp.
- Garnish and serve: Dust lightly with a cinnamon and powdered sugar mix while still warm for the authentic sweet-savory signature.
Tips for Success
- phyllo dough handling: Keep the sheets covered with a damp cloth as you work to prevent drying out.
- Layering: Don’t rush the layering process; generous buttering between sheets is key to crisp, flaky layers.
- Spice balance: Adjust cinnamon and saffron to your preference, but maintain harmony – these spices define the bastilla’s soul.
- Make-ahead: The filling can be prepared a day in advance and refrigerated to deepen flavor.
- Nut substitution: for a twist, try using pistachios or walnuts instead of almonds.
Serving Suggestions
present the bastilla sliced into neat wedges as a stunning centerpiece. Pair with a side of refreshing Moroccan mint tea to complement the spice.Add a light salad with preserved lemon vinaigrette for balance.Garnish with fresh mint sprigs or a sprinkle of extra powdered sugar and cinnamon for elegant visual contrast.

| Nutrient | Per Serving |
|---|---|
| Calories | 450 kcal |
| Protein | 30 g |
| Carbohydrates | 35 g |
| Fat | 20 g |
For a deeper dive into Moroccan spices and their cultural meaning, explore this comprehensive guide to Moroccan cuisine.
Q&A
Q&A: Unlocking Bastilla – A Flavorful Moroccan Pastry Recipe Guide
Q1: What exactly is Bastilla?
A1: Bastilla (also called B’stilla or Pastilla) is a luscious Moroccan pastry that marries sweet and savory in a delicate, flaky package. Traditionally filled with spiced shredded pigeon or chicken, almonds, eggs, and fragrant herbs, all wrapped in thin, crispy warqa dough, it’s a dish that tells stories of Morocco’s rich culinary tapestry.
Q2: Why is Bastilla considered a special dish?
A2: Bastilla is more then just a pastry-it’s a party on a plate. Served at weddings, holidays, and special gatherings, it embodies the harmony of flavors and textures: the crunch of the pastry, the tender meat, the aromatic spices, and the subtle sweetness of cinnamon and powdered sugar dusted on top. It’s a dish that reflects Morocco’s history of cultural blending.
Q3: Can Bastilla be made with ingredients other than pigeon?
A3: Absolutely! While pigeon is the authentic choice, many modern recipes use chicken or even seafood like shrimp or fish to make it more accessible. Vegetarian bastillas with mushrooms, spinach, or lentils also exist, making this recipe versatile and adaptable to different tastes and dietary needs.
Q4: What are the key spices and flavorings that give Bastilla its signature taste?
A4: The magic is in the spices! Ground cinnamon,ginger,saffron,turmeric,and a hint of black pepper create a warm,aromatic profile. Fresh herbs like parsley and cilantro add brightness. A touch of powdered sugar on top gives that quintessential sweet-savory contrast that defines Bastilla.
Q5: How difficult is it to make Bastilla for home cooks?
A5: While it may look extraordinary, Bastilla is surprisingly approachable once you understand the key steps: preparing the filling, layering and folding the warqa dough, and achieving the perfect golden crust.With patience and attention, even novice cooks can embark on this delicious Moroccan journey.
Q6: What tips do you recommend for working with warqa or phyllo dough?
A6: Keep the dough covered with a damp towel to prevent drying. Brush each layer generously with melted butter or oil for crispiness and flavor. Work gently to avoid tearing,and don’t rush the folding process-precision here leads to that beautiful,layered structure.
Q7: How should Bastilla be served?
A7: Bastilla is best served warm, sliced into portions to reveal its intricate layers. Pair it with a fresh salad or a cup of Moroccan mint tea to complement the rich flavors and celebrate an authentic experience.
Q8: Can Bastilla be made ahead of time?
A8: Yes! You can prepare the filling and assemble the pastry a few hours in advance. Keep it refrigerated and bake just before serving to ensure the pastry stays crisp and the filling warm and fragrant.Q9: What makes Bastilla a unique entry in the world of global pastries?
A9: Bastilla stands apart by fusing seemingly opposing elements-sweet and savory, crunchy and tender, aromatic and subtle-into one harmonious dish. Its cultural roots and expressive flavor combinations make it a treasure that fascinates food lovers worldwide.
Q10: Ready to unlock the flavors of Morocco? How should a beginner start their Bastilla adventure?
A10: Start simple: choose a chicken filling,gather your spices,and practice layering phyllo or warqa dough. Embrace the process with an open palate and a bit of patience. Celebrate small victories-crispy edges, balanced flavors-and soon you’ll be sharing this Moroccan masterpiece with friends and family. Bon appétit, or as they say in Morocco, BssaHa!
To Wrap It Up
As you close the pages of this flavorful guide, may the vibrant layers of Bastilla linger in your culinary imagination-each crisp pastry sheet, every fragrant hint of spices, and the delicate balance of savory and sweet inviting you to bring a taste of Morocco into your kitchen. Unlocking bastilla is more than mastering a recipe; it’s embracing a rich tapestry of history and culture wrapped in golden, flaky perfection. So gather your ingredients, channel your inner chef, and let each bite transport you to the bustling souks and aromatic spice markets where this beloved pastry first came to life.Your journey into Moroccan flavors has only just begun.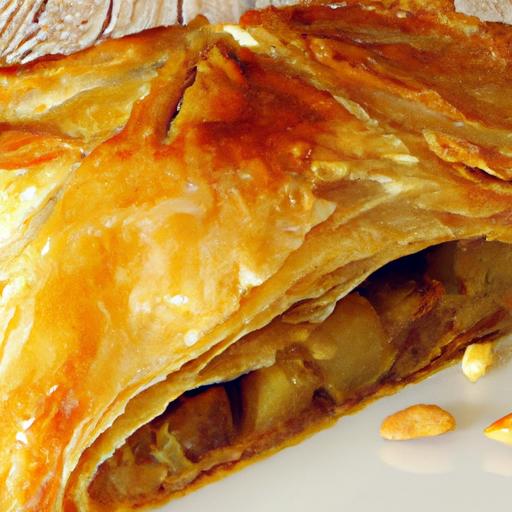
Caramel chicken unveils a captivating dance between sweet richness and deep umami, transforming a simple weeknight meal into a sensory party. Drawing inspiration from Southeast Asian kitchens where caramelization harmonizes with savory notes, this dish invites you to explore the alchemy of sugar, soy, and aromatics. With each bite, the luscious caramelized glaze coats tender chicken pieces, offering a perfect balance that’s both comforting and exhilarating.
Prep and Cook Time
Prep: 15 minutes Cook: 25 minutes Total: 40 minutes
Yield
Serves 4 hungry guests
Difficulty Level
Medium – Perfect for adventurous home cooks ready to master flavor layering
Ingredients
- 1 ½ lbs chicken thighs, boneless and skin-on, cut into bite-sized pieces
- 3 tbsp palm sugar (or light brown sugar), packed
- 3 tbsp soy sauce, preferably dark for richness
- 2 tbsp fish sauce, for that essential umami punch
- 4 cloves garlic, finely minced
- 1 tbsp ginger, grated
- 2 tbsp vegetable oil
- ½ cup water or chicken broth
- 1 small red chili, thinly sliced (optional, for subtle heat)
- 2 green onions, sliced diagonally for garnish
- Fresh cilantro, a small handful, chopped (optional)
- Steamed jasmine rice, to serve
Instructions
- Prepare the caramel sauce: In a heavy-bottom skillet over medium heat, melt the palm sugar, stirring constantly with a silicone spatula until it turns a deep amber color-this process should take about 4 minutes. Be cautious not to let it burn.
- Add aromatics: Promptly stir in the minced garlic and grated ginger. Sauté for 30 seconds until fragrant, ensuring the sugar mixture does not solidify.
- Incorporate liquids: Slowly add the soy sauce, fish sauce, and water or broth. The caramel will sizzle and slightly thicken. stir thoroughly to combine and create a luscious glaze.
- cook the chicken: Add chicken pieces to the skillet, spreading them out for even contact. sauté until golden and glazed on all sides, about 10 minutes, stirring gently to ensure even caramelization.
- Simmer and thicken: Reduce heat to low and simmer uncovered for 5-7 minutes,allowing the sauce to thicken and cling beautifully to each morsel.
- Final touches: Stir in thinly sliced chili if using, then remove from heat. The spicy kick balances the sweet-savory profile wonderfully.
- Plate and garnish: Serve immediately over steaming jasmine rice,garnished with sliced green onions and fresh cilantro for brightness and crunch.
Chef’s Notes: Tips for Success with Caramel Chicken
- Choosing sugar: Palm sugar imparts a complex,woodsy sweetness that elevates the caramel glaze; however,light brown sugar is a convenient substitute that still yields excellent results.
- Preventing bitterness: Keep a close eye on the caramel as it cooks-it can turn from perfectly amber to bitter in seconds. Remove from heat as soon as it reaches deep golden brown.
- Balancing flavors: The fish sauce adds depth and umami but adjust quantities to taste if you prefer milder saltiness.
- Make-ahead: The dish can be prepared up to the simmering stage a day in advance. Store covered in the fridge, then rewarm gently before serving, adding fresh aromatics.
- For crispier texture: After glazing, transfer chicken pieces to a preheated oven at 425°F (220°C) for 5 minutes to caramelize further and develop crisp edges.
Creative Serving Ideas to Elevate Your Caramel Chicken Experience
Transform your plating with dynamic contrasts-serve caramel chicken atop fragrant coconut rice or quinoa for an unexpected twist.Add a side of sautéed bok choy or crunchy pickled vegetables to cut through the richness. For added texture and visual appeal, sprinkle toasted sesame seeds or crushed peanuts on top. A wedge of lime or lemon on the side brightens the dish, offering a burst of acidity that instantly awakens the palate.
For a festive touch, plate in small bamboo steam baskets or rustic wooden bowls. Pair the meal with a chilled riesling or a crisp jasmine tea to enhance the delicate interplay of sweetness and umami. this approachable method ensures you’ll savor every morsel as the caramel glaze beckons you back for more.
| Nutritional Info (per serving) | Amount |
|---|---|
| Calories | 420 kcal |
| Protein | 35 g |
| Carbohydrates | 18 g |
| Fat | 21 g |

Ready to expand your culinary repertoire? Explore our Asian-inspired flavors collection to continue your flavor journey. For an in-depth look at the science behind caramelization, check out this Serious Eats article on caramelization.
Q&A
Q&A: Sweet and Savory – The Allure of Caramel Chicken Magic
Q1: What makes caramel chicken such a captivating dish?
Caramel chicken is a culinary masterpiece that dances beautifully on the palate by marrying the rich, buttery sweetness of caramel with the deep, savory flavors of tender chicken. This contrast creates a magic-a flavor interplay that is both comforting and surprising, inviting diners to explore new taste dimensions with every bite.
Q2: How did caramel chicken become a beloved recipe across different cultures?
While caramel is traditionally associated with desserts, its incorporation into savory dishes like chicken is rooted in inventive home kitchens and street food stalls worldwide. From Asian-inspired caramelized sauces to Western adaptations, caramel chicken highlights humanity’s endless creativity in blending sweet and savory elements to craft unforgettable meals.
Q3: What are the key ingredients that give caramel chicken its unique flavor?
At its heart lies a silky caramel sauce made by carefully melting sugar until it achieves a golden amber hue,often enriched with soy sauce,garlic,ginger,and a splash of vinegar or citrus to balance the sweetness. The chicken,often marinated or seared to lock in juices,absorbs these flavors,resulting in a succulent dish with a glossy,sticky coating.
Q4: Can caramel chicken be adapted for different dietary preferences?
Absolutely! The recipe is incredibly versatile. For example, vegetarians can substitute chicken with tofu or mushrooms, which soak up the caramel sauce just as wonderfully. Gluten-free alternatives can replace soy sauce with tamari, and those watching sugar intake can experiment with natural sweeteners, crafting a dish that retains its magic without compromise.
Q5: What tips can home cooks use to perfect their caramel chicken?
Precision and patience are key. Caramelizing sugar requires careful attention to avoid burning, while balancing the sweet and savory elements calls for thoughtful seasoning. Using fresh, high-quality ingredients and allowing the sauce to thicken properly enhances texture and flavor depth. Lastly,resting the chicken after cooking helps juices redistribute,making every bite moist and tender.
Q6: Why does caramel chicken resonate so strongly with food lovers today?
In an age where culinary boundaries blur and flavor adventures are celebrated, caramel chicken offers both familiarity and novelty. It satisfies the craving for comfort food while awakening taste buds with its unexpected sweet-savory duet. This harmony speaks to a global desire for dishes that are both hearty and indulgent-an irresistible charm that continues to captivate tables worldwide.
Feel inspired to create your own caramel chicken magic? Embrace the symphony of flavors and let this sweet-savory wonder transform your next meal into a delicious celebration!
Closing Remarks
as the final drizzle of caramel sauce settles over tender, succulent chicken, we find ourselves enchanted by a dish that masterfully balances the sweet and savory-a true culinary magic. Caramel chicken is more then a recipe; it’s an invitation to explore the harmonious dance of flavors that defy expectations while comforting the soul. Whether you’re a seasoned chef or an adventurous home cook, embracing this delectable fusion opens a gateway to endless creativity in the kitchen.So next time you crave something both familiar and extraordinary, let caramel chicken be your delicious muse, reminding us all that sometimes, the sweetest surprises come wrapped in savory delights.
Elevate Caprese Salad with a Rich Balsamic Glaze twist
Elevate Caprese Salad with a Rich Balsamic Glaze Twist by mastering a silky balsamic reduction that transforms simple ingredients into an indulgent, flavor-packed experience. This Italian classic gets a luxurious upgrade, marrying the bright, juicy notes of fresh tomatoes and creamy mozzarella with the deep, sweet complexity of a homemade balsamic glaze. Whether you’re entertaining guests or craving a vibrant, easy-to-prepare appetizer, this recipe combines freshness and sophistication effortlessly.
Prep and cook Time
Preparation: 15 minutes Cook time: 15 minutes Total time: 30 minutes
Yield
Serves 4 elegantly
Difficulty Level
Easy – perfect for cooks at any skill level aiming to impress
Ingredients
- 4 large ripe heirloom tomatoes, sliced about ¼-inch thick
- 8 oz fresh buffalo mozzarella, sliced or torn into bite-sized pieces
- 1 cup balsamic vinegar (choose a high-quality aged variety for best flavor)
- 1 Tablespoon honey or pure maple syrup (optional for extra sweetness)
- Fresh basil leaves, whole, for garnish
- Extra virgin olive oil, for drizzling
- Coarse sea salt and freshly cracked black pepper
Step-by-Step Instructions
- Prepare the balsamic reduction: In a small saucepan over medium heat, pour the balsamic vinegar and add honey if using. Stir to combine.
- Simmer gently: Allow the vinegar to come to a low boil, then reduce heat to maintain a gentle simmer. Cook until the liquid has reduced by about half and coats the back of a spoon-approximately 12-15 minutes. Watch closely to prevent burning. Tip: Swirl the pan occasionally instead of stirring to ensure an even reduction.
- Cool the glaze: Remove from heat and let it cool slightly; it will thicken as it cools, achieving a luscious, syrupy consistency.
- Select and prepare tomatoes and mozzarella: Choose firm yet fragrant ripe heirloom tomatoes, avoiding overly soft or watery ones. Slice uniformly to ensure an elegant presentation. Tear mozzarella gently by hand for rustic charm and texture.
- Plate the salad: Alternate layering slices of tomato and mozzarella on a large serving platter or individual plates. Tuck fresh basil leaves between layers to brighten the dish visually and aromatically.
- Season and drizzle: Lightly sprinkle with coarse sea salt and freshly cracked black pepper to enhance natural flavors. Drizzle extra virgin olive oil generously over the salad.
- Finish with balsamic glaze: using a spoon or a squeeze bottle, artistically drizzle the balsamic reduction over the entire salad. The glossy dark glaze adds a seductive depth and shines beautifully against the vibrant colors of the salad.
- Serve instantly: This salad is best enjoyed fresh to capture the perfect harmony of luscious tomatoes,creamy mozzarella,and the rich,tangy sweetness of the glaze.
Tips for Success: Maximizing Freshness and flavor
- Tomato selection: Choose tomatoes that are fragrant and heavy for their size with minimal blemishes. Heirlooms, cherry, or vine-ripened reds bring maximum freshness and sweetness.
- Mozzarella choice: Opt for fresh buffalo mozzarella or high-quality whole milk mozzarella for a creamy texture that contrasts beautifully with the balsamic reduction.
- Make the glaze ahead: Balsamic reduction can be prepared up to 3 days in advance and stored refrigerated in an airtight container. Warm gently before serving.
- Adjust sweetness: Use honey or maple syrup sparingly to balance the tartness of vinegar without overpowering the natural tomato flavor.
- Prevent dilution: Pat tomatoes dry with paper towels before assembling to avoid excess moisture watering down your dish.
Creative Serving Suggestions to Impress Guests and Enhance Taste
For a sophisticated twist, serve your salade caprese on a long wooden board, artfully draped with fresh basil sprigs and scattered toasted pine nuts for crunch. add a sprinkle of freshly cracked pink peppercorns or edible flower petals for pops of color. Pair the salad with a chilled glass of crisp Sauvignon Blanc or a light Italian Prosecco for an elevated dining experience.
Transform this classic into a multi-sensory delight by presenting individual servings in small glass jars or Mason jars for casual gatherings, layering the ingredients to show off the vivid colors and textures. For a more indulgent version, top with crispy prosciutto or a handful of Kalamata olives that add briny depth alongside the balsamic glaze.

| Nutrient | Per Serving (approx.) |
|---|---|
| Calories | 230 kcal |
| Protein | 12 g |
| Carbohydrates | 10 g |
| Fat | 18 g |
For a deeper dive into Italian appetizers, explore our classic bruschetta recipe that pairs beautifully with this dish.Additionally, read more about the health benefits of balsamic vinegar on Healthline.
Q&A
Q&A: Elevate Caprese Salad with a Rich Balsamic Glaze Twist
Q1: What makes the classic Caprese salad so beloved?
A1: The classic Caprese salad is a festivity of simplicity and freshness-ripe, juicy tomatoes, creamy mozzarella, fragrant basil leaves, a drizzle of pure olive oil, and a sprinkle of salt. It’s a vibrant symphony of colors and flavors that capture the essence of italian summer.
Q2: How can a balsamic glaze transform this customary dish?
A2: A rich balsamic glaze adds a luscious depth and sweet tang that beautifully complements the salad’s fresh ingredients. Its syrupy texture brings an indulgent contrast, turning a simple appetizer into a sophisticated bite bursting with more complex flavor layers.
Q3: How do you make a perfect balsamic glaze at home?
A3: Making your own balsamic glaze is surprisingly simple. Just simmer high-quality balsamic vinegar over low heat until it reduces by half and thickens into a glossy, syrupy consistency. For extra richness, a spoonful of honey or brown sugar can be added during reduction to enhance sweetness.
Q4: Are there any tips for assembling the salad with the glaze?
A4: Absolutely! Start with evenly slicing ripe tomatoes and fresh mozzarella. Arrange them artistically on a plate, tuck basil leaves between layers, then lightly season with salt and freshly cracked pepper. Finish by elegantly drizzling the balsamic glaze in a zigzag pattern-less is more, so let the glaze accentuate rather than overpower.
Q5: Can this balsamic glaze twist be paired with other variations?
A5: Yes! Try incorporating heirloom tomatoes for color diversity, or add a sprinkle of toasted pine nuts for crunch. For a smoky edge, grilled peaches or a hint of chili flakes create a surprising yet harmonious balance with the balsamic glaze. The possibilities are endless-let your palate guide the adventure!
Q6: Why is this elevated Caprese salad a great choice for entertaining?
A6: It’s visually stunning, easy to assemble, and offers a refined flavor profile that will impress guests without requiring hours in the kitchen. Plus, the balsamic glaze adds a touch of gourmet flair that transforms this humble dish into a show-stopping starter or side.
Q7: Any final words on enjoying this elevated Caprese experience?
A7: Savor each bite slowly, appreciating how the creamy mozzarella, juicy tomato, fragrant basil, and rich balsamic glaze dance together on your palate.It’s not just a salad-it’s a journey through the heart of Italy, reimagined with a deliciously sweet and tangy twist. Bon appétit!
To Wrap It Up
As you savor the bright freshness of ripe tomatoes and creamy mozzarella,the addition of a luscious balsamic glaze transforms the classic Caprese salad into an extraordinary experience. This simple yet sophisticated twist not only deepens the flavors but also elevates every bite with a delicate balance of sweetness and tang. Whether served as a vibrant appetizer or a light summer meal, the rich balsamic glaze invites you to rediscover the timeless charm of this Italian favorite in a whole new way. So next time you’re craving something fresh and flavorful, drizzle on that glossy glaze and watch your caprese salad blossom into a gourmet masterpiece.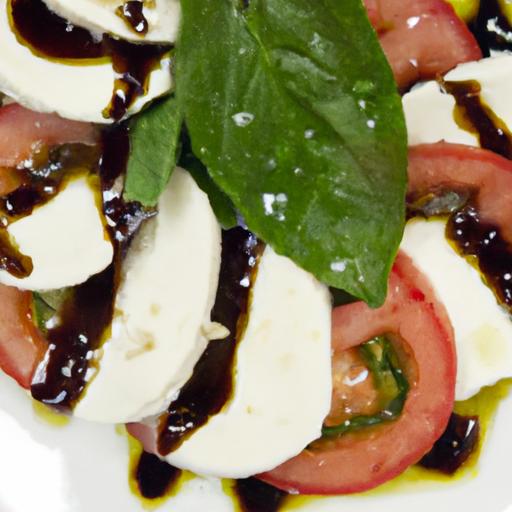
Choosing the Perfect Ingredients for Authentic pastelitos
Delicious Pastelitos Recipe begins with selecting the freshest, highest-quality ingredients that make all the difference between an ordinary pastry and a truly authentic, flavorful delight. Opt for all-purpose flour that is finely sifted to ensure a tender dough, and seek out unsalted butter or, even better, a combination of butter and vegetable shortening for that signature flaky texture. When it comes to fillings, freshness is key-whether you’re using ripe fruits, seasoned meats, or rich cheeses, fresh ingredients will elevate your pastelitos to an irresistible level.
Don’t shy away from exploring your local markets for aromatic spices and herbs like cumin, oregano, or fresh cilantro that can add a depth of flavour to savory fillings. For sweet pastelitos, quality fruit preserves or freshly diced fruits with a touch of cinnamon or vanilla will create a harmonious balance of sweetness and texture.
Mastering the Art of Dough Readiness for flaky, Crispy Layers
To achieve perfectly flaky layers in your pastelitos, the dough preparation is a critical step. Start by chilling your butter and shortening before cutting them into the flour; this keeps pieces solid and creates those signature puffed, delicate layers as the dough bakes. Use cold water sparingly to bring the dough together-too much moisture can make the pastry tough.
Work quickly as you fold and laminate the dough,rolling gently but with deliberate folds to build layers. Resting the dough in the refrigerator, wrapped in plastic, for at least 30 minutes allows the gluten to relax and prevents shrinkage during baking. Once rolled out, use a sharp knife or pastry cutter to create clean edges for perfect pastelito shapes that crisp beautifully in the oven.
Exploring Irresistible Filling Combinations to Satisfy Every Palate
One of the joys of this Delicious Pastelitos Recipe is the versatility of fillings. For savory options, try a mixture of ground beef sautéed with onions, garlic, and a pinch of smoked paprika, or opt for a creamy blend of cheese and sautéed spinach for a vegetarian twist. Sweet pastelitos delight the palate with luscious guava paste paired with cream cheese, or a cinnamon-spiced apple filling bursting with natural juice and texture.
Don’t limit yourself-experiment with combinations like pumpkin and nutmeg, or even spicy chicken with fresh herbs. The key is to balance moisture content and seasoning so the pastry holds up well without becoming soggy.
Pro Tips for Baking and Serving pastelitos Like a pro
Baking pastelitos to golden perfection requires precision. Always preheat your oven to a high temperature-around 400°F (200°C)-to activate the rising steam within the dough layers, resulting in irresistibly crispy, flaky pastry. Use a parchment-lined baking sheet for even heat distribution and easy cleanup.
To achieve a shiny, golden crust, brush each pastry gently with an egg wash just before baking. Keep an eye on the baking time; 15-20 minutes is usually sufficient, but ovens vary. Rotate the tray halfway through baking to encourage even browning.
Once baked, allow pastelitos to rest for a few minutes on a wire rack to retain their crispness. Serve warm, garnished with fresh herbs for savory versions or a dusting of powdered sugar for sweet ones. Accompany them with dipping sauces such as a zesty chimichurri, a creamy queso dip, or a simple honey drizzle for an elevated experience.
prep and Cook Time
- Prep Time: 30 minutes
- Cook Time: 20 minutes
- Total Time: 50 minutes
Yield
- Serves 8 pastelitos
Difficulty Level
- Medium
Ingredients
- 2 cups all-purpose flour, sifted
- 1/2 cup unsalted butter, cold and cubed
- 1/4 cup vegetable shortening, cold
- 1/2 tsp salt
- 1/2 cup ice-cold water
- 1 large egg for egg wash
- Filling of your choice:
- 1 cup ground beef, cooked and seasoned
- or 1 cup guava paste and 1/2 cup cream cheese
Instructions
- Prepare the dough: In a large bowl, combine sifted flour and salt. cut in chilled butter and shortening using a pastry cutter until mixture resembles coarse crumbs with pea-sized pieces.
- Add cold water: Gradually pour ice-cold water, mixing gently with a fork until the dough just comes together. Do not overwork.
- Chill the dough: Form the dough into a disc, wrap in plastic wrap, and refrigerate for 30 minutes to relax the gluten.
- Roll and fold: On a lightly floured surface, roll dough into a rectangle approximately 12×8 inches. Fold into thirds like a letter.rotate the dough, roll again, and repeat the fold twice more to create layers. Chill again for 15 minutes.
- Preheat oven: Heat your oven to 400°F (200°C). Line a baking sheet with parchment paper.
- Shape pastelitos: Roll the dough to about 1/8 inch thick. Cut into rectangles or squares. Place about 1 tablespoon of filling on one half of each piece. Fold over and seal edges firmly with a fork.
- Egg wash: Beat the egg and brush the top of each pastelito lightly for a glossy finish.
- Bake: transfer pastelitos to the baking sheet and bake for 15-20 minutes, until puffed and golden brown. Rotate halfway through for even browning.
- Cool and serve: Remove from oven and place on a wire rack to cool slightly. Serve warm for best flavor and texture.
Chef’s Notes
- For flakier dough: Keep all ingredients cold and avoid over-kneading to prevent toughness.
- Filling tips: Drain excess liquid from fruits or cooked meats to avoid soggy pastelitos.
- Make ahead: Dough can be prepared and chilled up to 24 hours in advance.
- substitutions: Butter can be replaced with all-shortening or half butter, half lard for a traditional touch.
Serving Suggestions
Present these pastelitos on a vibrant platter garnished with fresh cilantro or parsley for savory versions. Accompany with dipping sauces such as a smoky chipotle mayo or a classic garlic aioli. Sweet pastelitos shine with a dusting of powdered sugar and a side of fresh berries or a drizzle of honey. Pair your creation with a bright,refreshing beverage-consider a sparkling lemonade or a robust coffee to complement the rich layers.
| Nutritional Information (per serving) | Calories | Protein | Carbs | Fat |
|---|---|---|---|---|
| Pastelito with Ground Beef Filling | 280 kcal | 12 g | 28 g | 14 g |
| Pastelito with Guava & Cream Cheese | 260 kcal | 6 g | 32 g | 10 g |

want to deepen your pastry skills? Check out our Ultimate Flaky Pastry Dough guide for expert techniques.For more on authentic pastry crafting, visit Serious Eats, a trusted culinary resource.
Q&A
Q&A: Delicious Pastelitos Recipe – A Flavorful Pastry Guide
Q1: What exactly are pastelitos?
A1: Pastelitos are flaky, buttery pastries originating from Latin America and the Caribbean. thay’re typically filled with a sweet or savory mixture, ranging from guava and cream cheese to seasoned meats and cheeses. Think of them as little pockets of joy, bursting with flavor in every bite!
Q2: What makes pastelitos different from other pastries?
A2: Unlike many pastries that rely on a single flavor profile, pastelitos offer a delightful contrast-crispy, golden layers surrounding rich, frequently enough vibrant fillings. Their versatility allows them to shine as either a breakfast treat, snack, or even a party appetizer, bridging cultures and cuisines effortlessly.
Q3: What are the essential ingredients for making pastelitos?
A3: At the heart, pastelitos need good quality puff pastry dough, which gives that signature flaky texture. For the filling, common choices include guava paste with cream cheese for a sweet twist or spiced ground beef or chicken for savory lovers. fresh spices, a touch of sugar or salt depending on the filling, and an egg wash for that golden finish complete the list.
Q4: Can I use store-bought puff pastry for convenience?
A4: Absolutely! Store-bought puff pastry is a fantastic shortcut that still yields delicious results. Just be sure to thaw it properly and handle it gently to maintain those delicate layers. For purists or adventurous bakers, making puff pastry from scratch can be a rewarding challenge, but convenience never compromises flavor.
Q5: How do you prevent pastelitos from becoming soggy?
A5: The trick lies in ensuring the filling isn’t too wet. For fruit fillings, reduce excess juices by cooking them down a bit before filling the dough. For savory options, drain any liquids thoroughly. Also, brushing the pastry edges with egg wash and sealing tightly prevents leaks, keeping the layers crisp and perfect.
Q6: What’s the best way to bake pastelitos to achieve that golden, flaky crust?
A6: Bake them in a preheated oven at around 375°F (190°C) until they puff up and turn a rich golden brown-usually about 20-25 minutes. Applying an egg wash before baking gives them that irresistible sheen and helps with browning. For even baking, place them on a parchment-lined tray and avoid overcrowding.
Q7: Are pastelitos best enjoyed fresh, or can I reheat leftovers?
A7: Pastelitos are undoubtedly best fresh and warm, with that perfect crunch and melting filling. However, leftovers can be reheated in a toaster oven or conventional oven to revive the crispiness. Avoid microwaving if possible, as it tends to make the pastry soggy.
Q8: Can pastelitos be frozen for later?
A8: Yes! Assemble your pastelitos but don’t bake them.Freeze them on a tray until firm, then transfer to a sealed container or bag. When ready to enjoy, bake them straight from frozen-just add a few extra minutes to the baking time. This is a great way to have a fast,delicious snack on hand.
Q9: What creative filling combinations can I try beyond the classic options?
A9: The sky’s the limit! Try spinach and feta for a Mediterranean flair, sweet potato and cinnamon for a cozy twist, or even a spicy black bean and cheese combo for a vegetarian delight. Mixing sweet and savory within one pastelito also makes for a surprising and delightful culinary adventure.
Q10: Any tips for serving pastelitos at gatherings or parties?
A10: Serve pastelitos warm alongside a variety of dips like guava sauce, spicy salsa, or creamy aioli to elevate the experience. Pair them with fresh fruit or a crisp salad to balance richness. Their handheld size makes them perfect finger food-just warn guests to bring napkins as they can get deliciously messy!
With this flavorful pastry guide, you’re now equipped to master pastelitos that dazzle the eyes and delight the palate. Happy baking and buen provecho!
Insights and Conclusions
As you’ve discovered, pastelitos are more than just delightful pastries-they’re edible stories filled with rich flavors and vibrant culture. whether you prefer a savory bite or a sweet treat, mastering this recipe opens the door to endless variations and culinary adventures. So, roll up your sleeves, embrace the flaky dough, and let your kitchen become a haven where tradition meets taste. With each pastelito you create, you’re not just baking-you’re crafting a flavorful experience that brings people together, one delicious pastry at a time.
Eggplant Elevation is more than just a culinary trend-it’s a celebration of a vegetable packed with antioxidants, fiber, and essential nutrients that contribute to heart health, digestive wellness, and glowing skin. Revered across continents, eggplant’s rich, meaty texture and slightly smoky flavor make it a versatile canvas to showcase global flavors while supporting a nutrient-dense diet.
Prep and Cook Time
Preparation: 15 minutes | Cooking: 35 minutes | Total: 50 minutes
Yield
Serves 4 generous portions
Difficulty Level
Medium – great for confident home cooks looking to deepen their veggie repertoire.
Ingredients
- 2 medium eggplants (about 1 ½ pounds), sliced into ½-inch rounds
- 3 tbsp olive oil, divided
- 1 large onion, finely chopped
- 3 cloves garlic, minced
- 1 cup fresh tomatoes, chopped (or canned, no salt added)
- ½ cup fresh basil leaves, torn
- ¼ cup grated Parmesan cheese (optional for topping)
- 1 tsp smoked paprika
- Salt and freshly ground black pepper, to taste
- 1 tbsp balsamic vinegar (to enhance natural sweetness)
Instructions
- Prepare the eggplant: Lay the eggplant slices on paper towels and lightly salt them. Let them rest for 15 minutes to draw out any bitterness, than gently pat dry.
Tip: This step helps avoid sogginess and enhances texture. - Heat 2 tablespoons of olive oil in a large skillet over medium heat. Add the eggplant slices in batches, sautéing until golden brown on both sides, approximately 4 minutes per side.Remove and set aside on a paper towel-lined plate.
- In the same skillet, add the remaining 1 tbsp olive oil. Sauté the chopped onion until translucent and fragrant, about 5 minutes. Stir in the garlic and cook for an additional 1 minute.
- Add the fresh tomatoes and smoked paprika to the skillet. Simmer gently for 10 minutes, stirring occasionally, until a thick sauce forms. Season with salt, pepper, and stir in balsamic vinegar to round out the flavors.
- Layer the eggplant slices back into the skillet or a baking dish, pouring the tomato mixture evenly over them. Sprinkle with torn basil leaves and Parmesan cheese if using.
- Cover and cook on low heat for about 10 minutes to allow flavors to meld or bake in a preheated 375°F (190°C) oven for 15 minutes until hot and bubbly.
- remove from heat and let rest for 5 minutes before serving.
Chef’s Notes
- Variation: For a vegan version, omit Parmesan or use a plant-based alternative. add toasted pine nuts for crunch.
- Substitution: If eggplants are large and seedy, peel them partially for a smoother texture.
- Make-Ahead: Prepare the tomato sauce in advance and store it in the fridge for up to 3 days. Sauté eggplant just before assembling for best results.
- flavor Boost: Add a splash of smoked chili oil or finish with a sprinkle of sumac for an unexpected tang.
- Storage: Leftovers keep well refrigerated for 2 days and reheat beautifully in a skillet or oven.
Serving Suggestions
Present this dish on a warm rustic platter, garnished with a drizzle of extra virgin olive oil and fresh basil leaves for an enticing aroma. pair with crusty whole-grain bread or fluffy couscous to soak up the luscious sauce. A light side salad with citrus vinaigrette complements the richness perfectly, highlighting the Mediterranean essence.
| Nutrient | Per Serving |
|---|---|
| Calories | 180 kcal |
| Protein | 4 g |
| Carbohydrates | 15 g |
| Fat | 11 g |

Expert Tips for Selecting and Preparing Eggplants Perfectly
Choose eggplants with glossy,taut skin free of blemishes or wrinkles for optimal freshness. Lighter, smaller varieties tend to have sweeter, less bitter flesh. Before cooking, peel if the skin is thick or the eggplant feels overly firm. Avoid cutting too thinly to retain moisture and structure during cooking. Pre-salting slices is a classic technique that reduces bitterness and enhances natural flavor, especially important in recipes emphasizing sautéing or roasting.
Pair your culinary exploration of eggplant with other hearty, nutrient-rich vegetables, and explore the depth of global eggplant recipes to elevate your plant-based meals effortlessly. For more imaginative vegetable dishes,check out our Roasted Vegetables with Fusion Flavors article.
eggplant’s nutritional profile and adaptability make it a superstar ingredient celebrated by chefs and nutritionists alike. For further insights on eggplant’s health benefits, visit the British Nutrition Foundation.
Q&A
Q&A: Eggplant Elevation – Deliciously Healthy Recipes to Savor
Q1: What makes eggplant a star ingredient in healthy cooking?
A1: Eggplant is a versatile vegetable packed with fiber, antioxidants, and essential vitamins like B1 and B6. Its unique spongy texture soaks up flavors beautifully, making it perfect for creating dishes that are both nutritious and bursting with taste. Plus, it’s low in calories and fat, making it a guilt-free indulgence!
Q2: How can I prepare eggplant to avoid bitterness?
A2: While modern varieties are less bitter, salting sliced eggplant before cooking can help draw out any lingering bitterness and excess moisture. Simply sprinkle salt, let it sit for 20-30 minutes, then pat dry before proceeding with your recipe.
Q3: What cooking methods best elevate eggplant’s flavor?
A3: Eggplant shines under roasting, grilling, sautéing, or baking. Roasting caramelizes its natural sugars for a sweet-savory depth, grilling adds a smoky char, and baking helps it absorb herbs and spices for a rich, comforting experience. Combining methods, like roasting then blending into dips, can also be transformative.
Q4: Can eggplant be a main dish or is it better as a side?
A4: Eggplant is incredibly versatile-it can star as a hearty main like in a moussaka or stuffed eggplant boat, or complement your meal as a flavorful side such as a smoky baba ganoush or ratatouille. Its meaty texture makes it an excellent plant-based protein substitute in many dishes.
Q5: What are some creative ways to include eggplant in everyday meals?
A5: Try eggplant “steaks” grilled with za’atar and lemon, layered in a vibrant vegetable lasagna, or cubed and tossed into a refreshing Mediterranean salad. For something fast, sauté diced eggplant with garlic and tomatoes for a topping over whole grain pasta or quinoa.
Q6: How does cooking eggplant contribute to health benefits?
A6: Cooking eggplant softens its fibers,making nutrients more accessible while enhancing antioxidant absorption. Roasting and grilling preserve its phytonutrients, and using minimal oil keeps dishes heart-healthy without sacrificing flavor.Q7: Any tips for storing and selecting eggplants?
A7: Choose eggplants with smooth, glossy skin and firm texture without bruises.Store them in a cool, dry place and use within a few days for best freshness. Avoid refrigeration longer-term as it can affect texture and flavor.
Q8: What spices and herbs pair well with eggplant?
A8: Eggplant loves bold Mediterranean and Middle Eastern flavors-think garlic, cumin, coriander, smoked paprika, thyme, oregano, and fresh basil or parsley. A drizzle of tahini or a splash of balsamic vinegar can also elevate the dish’s complexity.
Unlock the full potential of this humble veggie with creative cooking that transforms eggplant into a deliciously healthy superstar!
Wrapping Up
From humble beginnings as a glossy, purple orb, the eggplant has truly risen to culinary stardom, transforming dishes with its unique texture and subtle, earthy flavor. Whether roasted, grilled, baked, or blended into velvety dips, this versatile vegetable offers a deliciously healthy way to elevate your meals and nourish your body. As you experiment with these recipes, you’re not just savoring extraordinary tastes-you’re embracing a world of nutrition and creativity that celebrates the eggplant in all its glory. So next time you spot this vibrant veggie at the market, remember: with a little imagination, eggplant elevation is just a recipe away.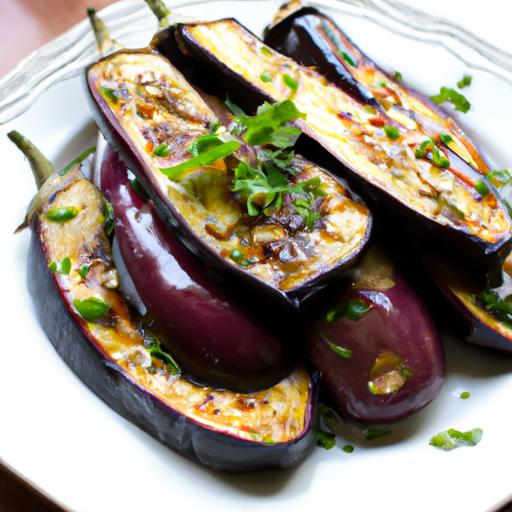
crispy Parmesan Roasted Brussels Sprouts are a festivity of texture and flavor brought to life with simple yet strategic steps. From selecting the freshest sprouts to achieving that irresistible golden crust,this recipe transforms a humble vegetable into a show-stopping side dish. Having perfected this method over countless kitchens, I find that it strikes a perfect balance between nutty Parmesan richness and the satisfying crispness every Brussels sprout lover craves.
Prep and Cook Time
Preparation: 15 minutes | Cooking: 25 minutes | Total: 40 minutes
Yield
Serves 4 as a side dish
Difficulty Level
Easy
Ingredients
- 1 ½ pounds fresh brussels sprouts, trimmed and halved
- 3 tablespoons extra-virgin olive oil
- 1 teaspoon kosher salt
- ½ teaspoon freshly ground black pepper
- 1 cup finely grated Parmesan cheese (preferably Parmigiano-Reggiano)
- 2 cloves garlic, minced
- 1 teaspoon garlic powder
- 1 tablespoon lemon juice (optional, for brightness)
- Zest of 1 lemon (for garnish)
- Red pepper flakes, a pinch (optional, for subtle heat)
Instructions
- Choosing the Perfect brussels Sprouts: Begin by selecting firm, vibrant green Brussels sprouts with tightly closed leaves. Smaller are sweeter and crisper, while medium-sized offer hearty texture. Avoid yellowing or loose leaves for optimal crunch.
- Prepare and Rinse: Rinse your Brussels sprouts under cold water, then trim the stems and halve each sprout lengthwise, which promotes even roasting and maximum surface crispiness.
- parmesan Coating Preparation: In a large bowl,combine olive oil,minced garlic,garlic powder,salt,and pepper. Toss the sprouts to coat evenly, then sprinkle in the grated Parmesan gradually, stirring gently to create a thin, flavorful crust without clumps.
- Roasting Setup: Preheat your oven to 425°F (220°C). Arrange the sprouts cut-side down in a single layer on a parchment-lined baking sheet. Spacing is key – give sprouts plenty of room so they don’t steam but roast to crisp golden perfection.
- Roast to Golden Perfection: Place the tray in the oven and roast for 20-25 minutes, turning once halfway through. Keep a close eye after 15 minutes: the Parmesan should meld and brown without burning, forming that treasured crispy crust. If you want extra crispiness, switch to broil for the last 1-2 minutes, watching carefully.
- Finish and Serve: Once roasted, toss the sprouts with a splash of fresh lemon juice and sprinkle with lemon zest and red pepper flakes for a lively finishing touch. Serve immediately for that unrivaled crispy experience.
Tips for Success
- Sprout Size Matters: Choose uniform sizes for even roasting. If some are larger, quarter them.
- Parmesan Quality: Freshly grated Parmesan (like Parmigiano-Reggiano) melts beautifully and provides complex nuttiness. Pre-grated cheese can contain anti-caking agents that affect coating texture.
- Spread Out: Don’t overcrowd the pan. Crowding traps steam and soggy sprouts are the enemy of crispiness.
- Make-Ahead: Prepare the Parmesan mixture and coat the sprouts a few hours ahead, then keep refrigerated. Roast right before serving for convenience.
- Substitutions: For a twist, swap Parmesan with Pecorino Romano or add a sprinkle of smoked paprika for smoky warmth.
- Reheating: Reheat in a hot oven or toaster oven to revive crispness. Microwaving will make them lose texture.
Serving Suggestions
These crispy Parmesan roasted Brussels sprouts shine as an elegant side at holiday tables or casual weeknight dinners. Serve alongside herb-roasted chicken or grilled salmon to complement their earthy flavor. For added indulgence, drizzle with balsamic glaze or a dollop of lemon-garlic aioli. Garnish with toasted pine nuts or crisp prosciutto pieces to elevate the dish visually and texturally. Pair with a chilled glass of dry white wine, like Sauvignon Blanc, to balance the richness and brighten your palate.

| Nutrient | Amount per Serving |
|---|---|
| Calories | 180 |
| Protein | 9g |
| Carbohydrates | 12g |
| Fat | 11g |
To learn more about perfect roasting techniques, check out our Ultimate Roasted Vegetables Guide. For nutritional insights on Brussels sprouts, visit ChooseMyPlate.gov.
Q&A
Q&A: Crispy Parmesan Roasted Brussels Sprouts – A flavorful Twist
Q1: What makes these Crispy Parmesan Roasted Brussels Sprouts different from traditional roasted Brussels sprouts?
A1: while classic roasted Brussels sprouts rely on simple olive oil and seasoning, this flavorful twist introduces a generous sprinkling of Parmesan cheese, which crisps up beautifully in the oven. The cheese creates a golden, savory crust that contrasts perfectly with the sprouts’ natural earthiness and slight bitterness, adding a new dimension of flavor and texture.
Q2: How do you achieve that perfect crispy texture on the Brussels sprouts?
A2: The secret lies in thorough drying and high-temperature roasting. After washing, make sure to pat the Brussels sprouts entirely dry. Tossing them in olive oil ensures each leaf gets coated, promoting caramelization. Roasting at around 425°F (220°C) helps create a beautifully crisp exterior while keeping the inside tender. Adding the Parmesan cheese partway through baking lets it melt and crisp without burning.
Q3: Can I customize the seasoning beyond just Parmesan?
A3: Absolutely! While Parmesan is the star, you can elevate the flavor with garlic powder, smoked paprika, or a pinch of red pepper flakes for heat. Fresh herbs like thyme or rosemary add aromatic notes, and a squeeze of lemon juice at the end can brighten the entire dish, balancing the richness of cheese and brussels sprouts.Q4: What’s the best way to prepare Brussels sprouts for roasting? Should I halve them or quarter them?
A4: Halving Brussels sprouts lengthwise is the most common and effective method-it exposes more surface area to the heat, encouraging browning and crispiness. If you want even crisper bites and faster roasting, you can quarter larger sprouts. Just keep in mind that smaller pieces roast faster, so keep an eye to prevent burning.
Q5: Can this recipe fit into different dietary preferences?
A5: Yes! It naturally fits vegetarian diets, and by opting for a vegetarian rennet Parmesan or a plant-based cheese choice, you can make it vegan-amiable. for those watching sodium, try reducing added salt and use a low-sodium Parmesan. The dish is gluten-free by nature, making it accessible for many dietary needs.
Q6: What occasions suit Crispy Parmesan Roasted Brussels Sprouts best?
A6: This dish is incredibly versatile! Whether it’s a weeknight side to jazz up dinner or a fancy addition to holiday feasts, these Brussels sprouts stand out. They pair beautifully with roasted meats, pasta dishes, or as a crispy topping on grain bowls. Their remarkable crunch and cheesy flavor make them a crowd-pleaser at any table.
Q7: Any tips for reheating leftovers without losing crispiness?
A7: Reheating roasted Brussels sprouts can be tricky since they tend to soften. The best method is to pop them back into a hot oven (around 400°F/200°C) for 5-7 minutes to crisp up again. Avoid the microwave, which makes them soggy. You can also refresh them in a hot skillet with a drizzle of olive oil for a fast re-crisp.
This Q&A unpacks the magic behind Crispy Parmesan Roasted Brussels sprouts, inspiring both novices and seasoned cooks to embrace this flavorful twist with confidence!
Final Thoughts
in the grand tapestry of vegetable dishes, Crispy Parmesan Roasted Brussels Sprouts stand out as a vibrant, flavorful thread-transforming a humble green into a culinary star. With their golden, crunchy exterior and savory cheesy embrace, these sprouts invite you to rethink what a simple side can be. Whether served alongside a hearty main or enjoyed as a guilt-free snack, this recipe proves that a little creativity, combined with quality ingredients, can turn even the most overlooked ingredients into irresistible delights. So next time you’re craving something both nutritious and delicious, let these Parmesan-kissed Brussels sprouts inspire your kitchen adventures-and savor every crunchy, flavorful bite.