Heavenly Delights: the Secrets Behind angel Food Cake begin wiht mastering the delicate balance of airy sweetness and featherlight texture that only a perfectly whipped egg white foam can deliver. This ethereal cake, a marvel of simplicity and precision, owes its signature cloud-like rise to an expertly handled meringue and the choice of the finest flour to elevate the crumb to its ultimate fluffiness.
Prep and Cook Time
Readiness: 20 minutes | Cooking: 35 minutes | Cooling: 1 hour
Yield
Serves 8 to 10 slices
Difficulty level
Intermediate: Requires careful technique but rewarding for any adventurous baker
Ingredients
- 1 cup (120g) cake flour,sifted
- 1 ½ cups (300g) granulated sugar,divided
- 12 large egg whites,room temperature
- 1 ½ tsp cream of tartar
- ¼ tsp salt
- 1 ½ tsp pure vanilla extract
- ½ tsp almond extract (optional)
Instructions
- Preheat yoru oven to 350°F (175°C). Ensure your angel food cake pan is clean and ungreased for optimal rise.
- Sift the cake flour with ¾ cup (150g) of the granulated sugar twice to aerate and remove lumps. Set aside.
- in a large mixing bowl, using a stand mixer fitted with the whisk attachment, beat the egg whites on medium speed until foamy.
- Add cream of tartar and salt. Increase speed to high and gradually add the remaining ¾ cup (150g) sugar, about one tablespoon at a time, allowing it to dissolve wholly between additions. beat until stiff, glossy peaks form. Proper stiffness is key; the mixture should hold firm peaks without collapsing.
- Gently fold the sifted flour and sugar mixture into the meringue in three additions. Use a rubber spatula and a gentle folding motion to preserve air bubbles.Avoid overmixing to keep the batter airy and light.
- Stir in vanilla and optional almond extracts, folding carefully to integrate flavor without deflating the foam.
- Pour the batter into the tube pan, smoothing the top lightly with the spatula. Do not grease the pan – the batter needs to cling to the sides to rise properly.
- Bake for 35 to 40 minutes, or until the cake is golden and springs back when lightly pressed. A toothpick inserted in the center should come out clean.
- Immediately invert the pan onto a cooling rack or bottle neck. Cooling upside down prevents collapse and maintains volume.
- Once completely cool (about an hour),run a thin knife around the edges and the center tube to release the cake. Carefully remove from pan.
Tips for Success
- Egg whites: Always use fresh, room temperature eggs to achieve maximum volume and stability in your meringue.
- Flour: Cake flour is essential for tenderness and fluffiness. Avoid all-purpose flour as it is too heavy.
- Whisking: Be patient when adding sugar to the egg whites. Slow incorporation allows for smoother, more stable foam.
- Folding: Use gentle strokes to preserve the delicate air pockets; overmixing will deflate the batter.
- Storage: Wrap the cake in plastic wrap once cooled and store at room temperature up to 2 days or freeze tightly for up to 1 month.
- Make-Ahead: The cake can be prepared a day ahead and kept fresh by storing in an airtight container or lightly wrapped.
serving Suggestions
Slice this delicate angel food cake with a serrated knife for clean edges, serving it plain or topped with a dollop of freshly whipped cream and a scatter of fresh berries. A light dusting of powdered sugar adds a snowy finish, enhancing its dreamlike appearance.for a luscious twist, drizzle with raspberry coulis or a drizzle of honey-lavender syrup, pairing beautifully with chamomile tea or chilled Prosecco.

Nutritional Facts (per slice)
| Calories | Protein | Carbs | Fat |
|---|---|---|---|
| 140 kcal | 4g | 33g | 0.2g |
For more baking secrets on how to perfect meringues and flour choices, check out our Complete Meringue Masterclass. Dive deeper into the science of egg white foam on Serious Eats.
Q&A
Q&A: Heavenly Delights – The Secrets Behind Angel Food Cake
Q1: What makes Angel Food Cake so uniquely “heavenly”?
A1: Angel food Cake earns its celestial nickname thanks to its ethereal lightness and cloud-like texture. Unlike dense, butter-rich cakes, this treat is made primarily from egg whites, sugar, and a hint of flour, whipped to airy perfection.The result? A cake that seems to float on your tongue, as if angels themselves crafted it.
Q2: How does Angel Food cake achieve its signature fluffy texture?
A2: The magic lies in technique. Egg whites are whipped into a stiff, glossy meringue, trapping countless microscopic air bubbles. These bubbles expand during baking, giving the cake its lofty rise. The absence of fat-no egg yolks or butter-allows the structure to remain light rather than heavy.
Q3: Why is Angel Food Cake baked in a tube pan?
A3: The classic tube pan is no accident. Its central tube encourages even heat distribution, helping the delicate batter rise evenly. Additionally, the pan’s tall sides provide support, preventing the cake from collapsing as it cools. Many bakers invert the pan post-baking to maintain its lofty height and prevent shrinking.
Q4: Can Angel Food Cake be flavored, or is it always plain?
A4: While traditionally vanilla is the go-to, Angel Food Cake is a blank canvas. Zests of citrus-lemon or orange-can add a bright twist, while extracts like almond or coconut introduce subtle undertones. Just remember: additions should be light so as not to weigh down the batter.
Q5: What are common pitfalls when baking Angel Food Cake?
A5: Overbeating or underbeating the egg whites can sabotage the cake’s delicate structure. overbeaten whites become dry and clumpy, while underbeaten whites won’t hold enough air. Also, any grease or yolk contamination can prevent egg whites from whipping properly. opening the oven door too soon may cause the cake to deflate prematurely.
Q6: How did Angel Food Cake get its name?
A6: This ethereal dessert was christened “Angel Food Cake” in the 19th century, inspired by its lightness-fit for the heavens. Its delicate nature and pure white color seemed to embody the image of angelic food, a divine sweet treat in a world of rich confections.
Q7: What are some delightful ways to enjoy Angel Food Cake?
A7: Served simply with fresh berries and a dusting of powdered sugar, Angel Food Cake sings. Pair it with whipped cream or a tangy fruit compote for added decadence without heaviness.Its subtle sweetness also makes it a versatile base for layered desserts or trifle.
Q8: Is Angel Food Cake suitable for special diets?
A8: Yes! Since it contains no egg yolks or butter,it’s naturally low in fat and cholesterol.plus, it can be a light option for those watching their calorie intake. Just check the sugar content if you’re managing sugar levels, and know that it’s gluten-containing unless you use a special flour substitute.
Unlock the secrets of Angel Food Cake and bring a little slice of heaven to your kitchen!
The Way Forward
As we close the chapter on the ethereal world of angel food cake, it’s clear that this light, airy dessert is much more than just a sweet treat-it’s a testament to the delicate balance of science and artistry. Behind its cloud-like texture and subtle sweetness lies a symphony of carefully whipped egg whites, precise folding techniques, and a touch of magic that transforms simple ingredients into something heavenly. Whether you savor it plain or adorned with fresh berries and whipped cream, angel food cake invites us all to experience a slice of culinary bliss that’s as timeless as it is enchanting. So next time you indulge in its tender crumb and lofty rise, remember the secrets that make this cake truly divine-and delight in every bite from the first to the last.
Savor the Sea: crafting perfect shrimp and scallop risotto is a delightful culinary adventure, inviting you to blend the ocean’s freshest treasures with the creamy alchemy of conventional Italian risotto. This dish embodies the harmony between delicate seafood flavors and decadent textures, elevating your dinner table to gourmet heights. Whether you’re a seasoned chef or a passionate home cook, mastering this recipe ensures your guests will savor every bite and remember the pleasure of perfectly cooked shrimp and scallops entwined in a luscious, velvety risotto.
Prep and Cook Time
- Readiness: 15 minutes
- Cooking: 35 minutes
- Total Time: 50 minutes
Yield
- Serves 4 generous portions
difficulty Level
- Medium
Ingredients
- 1 cup Arborio rice
- 12 large shrimp, peeled and deveined
- 12 medium sea scallops, patted dry
- 4 cups low-sodium seafood stock, kept warm
- 1 small onion, finely chopped
- 3 cloves garlic, minced
- 1/2 cup dry white wine (optional but recommended)
- 3 tbsp unsalted butter, divided
- 2 tbsp extra virgin olive oil
- 1/2 cup freshly grated Parmesan cheese
- 1 tbsp fresh parsley, finely chopped
- 1 tsp fresh thyme leaves
- 1/4 tsp crushed red pepper flakes
- Salt and freshly ground black pepper to taste
- Zest of 1 lemon (optional for brightness)
Instructions
- Prepare the seafood: Pat the shrimp and scallops thoroughly dry with paper towels-this key step ensures a perfect sear.Season lightly with salt and pepper.
- Sear the shrimp and scallops: In a large nonstick skillet, heat 1 tablespoon olive oil and 1 tablespoon butter over medium-high heat.Sauté shrimp until pink and just opaque, about 2 minutes per side.Remove and keep warm. Sear scallops without moving for 2-3 minutes until a golden crust forms, then flip for an additional 1-2 minutes.Remove and set aside with shrimp.
- Start the risotto base: in a heavy-bottomed saucepan, warm 1 tablespoon olive oil over medium heat. Add chopped onion and cook until translucent, about 5 minutes. Stir in garlic and cook for 30 seconds until fragrant.
- Toast the rice: Add Arborio rice, stirring constantly for 2 minutes until the edges of each grain look translucent. This step enhances that signature creamy risotto texture.
- Deglaze with wine: Pour in white wine, stirring continuously until completely absorbed. This deepens flavor complexity.
- Add seafood stock gradually: Ladle 1/2 cup warm stock at a time, stirring frequently. Allow the rice to absorb most of the liquid before adding more.Continue until rice is al dente and creamy, about 20-25 minutes.
- Finish with butter and cheese: Remove pan from heat. Stir in remaining 2 tablespoons butter,freshly grated Parmesan,lemon zest,thyme,red pepper flakes,salt,and black pepper to taste. This layers richness and flavor beautifully.
- Fold in shrimp and scallops: Gently integrate the seared seafood into the risotto, warming them without overcooking. Garnish with chopped parsley just before serving.
Tips for Success
- Choose fresh, dry-packed shrimp and scallops for the best texture and flavor; avoid frozen seafood with added water or preservatives.
- Keep your seafood stock simmering warm-adding cold stock can disrupt the cooking process and texture.
- Constant stirring is essential to release the rice’s natural starches, creating that signature risotto creaminess.
- Don’t rush the cooking; patience ensures perfect al dente rice and well-cooked seafood.
- For a dairy-free version, substitute butter with olive oil and omit Parmesan or use a nut-based cheese option.
- Make ahead: Prepare risotto base ahead and add seafood right before serving to prevent toughness.
serving Suggestions
serve your vibrant shrimp and scallop risotto with a crisp glass of chilled Sauvignon Blanc or Vermentino for a harmonious seafood pairing. Garnish with a sprinkle of fresh parsley, a twist of lemon zest, and an extra drizzle of high-quality olive oil to heighten the sensory experience. For a touch of elegance, add microgreens or edible flowers atop each plate. This dish shines best when enjoyed promptly but also warms beautifully for a next-day indulgence.

| Nutrient | Per Serving |
|---|---|
| Calories | 450 kcal |
| Protein | 35 g |
| Carbohydrates | 50 g |
| Fat | 12 g |
For more delicious seafood dishes that celebrate the ocean’s bounty, explore our seafood pasta recipes collection. To deepen your knowledge of rice varieties perfect for risotto, visit Encyclopaedia Britannica – Risotto.
Q&A
Q&A: Savor the Sea – Crafting Perfect Shrimp and Scallop Risotto
Q1: What makes shrimp and scallop risotto a standout dish?
A1: Shrimp and scallop risotto harmonizes the tender sweetness of fresh seafood with the luscious creaminess of perfectly cooked Arborio rice. It’s a celebration of ocean flavors mingled with the rich, comforting embrace of Italian tradition-a dish that’s elegant yet deeply satisfying.
Q2: How do you choose the best shrimp and scallops for risotto?
A2: freshness is key! Look for shrimp with a firm texture and a mild, briny aroma-avoid any that smell overly fishy. Scallops should be plump, moist, and slightly translucent with no discoloration.Opt for dry-packed scallops over those soaked in water to ensure they sear beautifully and don’t dilute the flavors.
Q3: What type of rice should be used for risotto, and why?
A3: arborio rice reigns supreme in risotto-making thanks to its high starch content.These starch grains release slowly during cooking, imparting that signature creamy texture while the rice remains al dente – tender yet with a subtle bite.
Q4: How do you balance the seafood flavors without overpowering the risotto?
A4: The secret lies in layering flavors gently.Sauté shrimp and scallops just until golden to preserve their natural sweetness.Incorporate seafood stock or a lightly flavored broth to infuse the risotto with oceanic essence without overwhelming it. Finish with a touch of fresh herbs, lemon zest, or a whisper of garlic to brighten but not mask.
Q5: What’s the perfect technique for cooking risotto to creamy perfection?
A5: Patience and love-risotto is a slow dance. Start by toasting the rice lightly in butter and shallots, then add warm broth gradually, stirring constantly. This coaxing coaxed the starches to release,developing that silky,velvety consistency. Resist the urge to rush or add too much liquid at once.
Q6: Can this dish be made ahead of time?
A6: Risotto is best enjoyed fresh, as its creamy texture can stiffen upon standing. However, you can prepare the rice base a bit early and gently reheat it with additional broth just before serving, then quickly fold in the freshly cooked shrimp and scallops.
Q7: What wine pairs best with shrimp and scallop risotto?
A7: Crisp,mineral-driven white wines like a Sauvignon Blanc or an Italian Pinot Grigio complement the dish’s sea notes and creamy richness beautifully. For a touch of elegance, a lightly chilled Champagne or sparkling wine offers vibrant acidity to cleanse the palate.
Q8: Any tips for adding a creative twist to this classic risotto?
A8: Elevate your risotto by infusing the broth with aromatic fennel or saffron for an exotic flair. Garnish with toasted pine nuts or a drizzle of truffle oil for depth. Or toss in some fresh peas or asparagus tips for bursts of color and texture,transforming a familiar favorite into a personalized masterpiece.
With these insights, you’re now equipped to savor the sea in every decadent spoonful of shrimp and scallop risotto-where creamy meets briny, and tradition meets coastal splendor. Buon appetito!
Wrapping Up
As the final grains of creamy arborio rice melt effortlessly on your tongue, carrying the tender embrace of plump shrimp and succulent scallops, you realize that crafting the perfect risotto is more than just a recipe-it’s an art of patience, balance, and respect for the sea’s bounty. Each spoonful invites you to savor not onyl flavors but the story of coastal kitchens and time-honored technique. So next time you crave a dish that whispers elegance and comfort in every bite, remember: with the right touch and a little love, your shrimp and scallop risotto can become a masterpiece that sings the ocean’s praise. Bon appétit!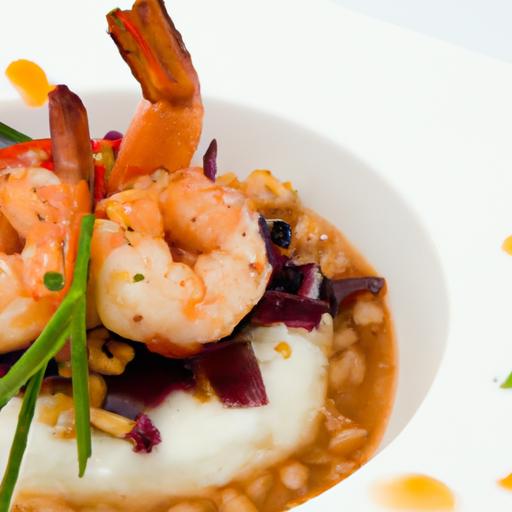
Elevate Caprese Salad with a Rich Balsamic Glaze twist
Elevate Caprese Salad with a Rich Balsamic Glaze Twist by mastering a silky balsamic reduction that transforms simple ingredients into an indulgent, flavor-packed experience. This Italian classic gets a luxurious upgrade, marrying the bright, juicy notes of fresh tomatoes and creamy mozzarella with the deep, sweet complexity of a homemade balsamic glaze. Whether you’re entertaining guests or craving a vibrant, easy-to-prepare appetizer, this recipe combines freshness and sophistication effortlessly.
Prep and cook Time
Preparation: 15 minutes Cook time: 15 minutes Total time: 30 minutes
Yield
Serves 4 elegantly
Difficulty Level
Easy – perfect for cooks at any skill level aiming to impress
Ingredients
- 4 large ripe heirloom tomatoes, sliced about ¼-inch thick
- 8 oz fresh buffalo mozzarella, sliced or torn into bite-sized pieces
- 1 cup balsamic vinegar (choose a high-quality aged variety for best flavor)
- 1 Tablespoon honey or pure maple syrup (optional for extra sweetness)
- Fresh basil leaves, whole, for garnish
- Extra virgin olive oil, for drizzling
- Coarse sea salt and freshly cracked black pepper
Step-by-Step Instructions
- Prepare the balsamic reduction: In a small saucepan over medium heat, pour the balsamic vinegar and add honey if using. Stir to combine.
- Simmer gently: Allow the vinegar to come to a low boil, then reduce heat to maintain a gentle simmer. Cook until the liquid has reduced by about half and coats the back of a spoon-approximately 12-15 minutes. Watch closely to prevent burning. Tip: Swirl the pan occasionally instead of stirring to ensure an even reduction.
- Cool the glaze: Remove from heat and let it cool slightly; it will thicken as it cools, achieving a luscious, syrupy consistency.
- Select and prepare tomatoes and mozzarella: Choose firm yet fragrant ripe heirloom tomatoes, avoiding overly soft or watery ones. Slice uniformly to ensure an elegant presentation. Tear mozzarella gently by hand for rustic charm and texture.
- Plate the salad: Alternate layering slices of tomato and mozzarella on a large serving platter or individual plates. Tuck fresh basil leaves between layers to brighten the dish visually and aromatically.
- Season and drizzle: Lightly sprinkle with coarse sea salt and freshly cracked black pepper to enhance natural flavors. Drizzle extra virgin olive oil generously over the salad.
- Finish with balsamic glaze: using a spoon or a squeeze bottle, artistically drizzle the balsamic reduction over the entire salad. The glossy dark glaze adds a seductive depth and shines beautifully against the vibrant colors of the salad.
- Serve instantly: This salad is best enjoyed fresh to capture the perfect harmony of luscious tomatoes,creamy mozzarella,and the rich,tangy sweetness of the glaze.
Tips for Success: Maximizing Freshness and flavor
- Tomato selection: Choose tomatoes that are fragrant and heavy for their size with minimal blemishes. Heirlooms, cherry, or vine-ripened reds bring maximum freshness and sweetness.
- Mozzarella choice: Opt for fresh buffalo mozzarella or high-quality whole milk mozzarella for a creamy texture that contrasts beautifully with the balsamic reduction.
- Make the glaze ahead: Balsamic reduction can be prepared up to 3 days in advance and stored refrigerated in an airtight container. Warm gently before serving.
- Adjust sweetness: Use honey or maple syrup sparingly to balance the tartness of vinegar without overpowering the natural tomato flavor.
- Prevent dilution: Pat tomatoes dry with paper towels before assembling to avoid excess moisture watering down your dish.
Creative Serving Suggestions to Impress Guests and Enhance Taste
For a sophisticated twist, serve your salade caprese on a long wooden board, artfully draped with fresh basil sprigs and scattered toasted pine nuts for crunch. add a sprinkle of freshly cracked pink peppercorns or edible flower petals for pops of color. Pair the salad with a chilled glass of crisp Sauvignon Blanc or a light Italian Prosecco for an elevated dining experience.
Transform this classic into a multi-sensory delight by presenting individual servings in small glass jars or Mason jars for casual gatherings, layering the ingredients to show off the vivid colors and textures. For a more indulgent version, top with crispy prosciutto or a handful of Kalamata olives that add briny depth alongside the balsamic glaze.

| Nutrient | Per Serving (approx.) |
|---|---|
| Calories | 230 kcal |
| Protein | 12 g |
| Carbohydrates | 10 g |
| Fat | 18 g |
For a deeper dive into Italian appetizers, explore our classic bruschetta recipe that pairs beautifully with this dish.Additionally, read more about the health benefits of balsamic vinegar on Healthline.
Q&A
Q&A: Elevate Caprese Salad with a Rich Balsamic Glaze Twist
Q1: What makes the classic Caprese salad so beloved?
A1: The classic Caprese salad is a festivity of simplicity and freshness-ripe, juicy tomatoes, creamy mozzarella, fragrant basil leaves, a drizzle of pure olive oil, and a sprinkle of salt. It’s a vibrant symphony of colors and flavors that capture the essence of italian summer.
Q2: How can a balsamic glaze transform this customary dish?
A2: A rich balsamic glaze adds a luscious depth and sweet tang that beautifully complements the salad’s fresh ingredients. Its syrupy texture brings an indulgent contrast, turning a simple appetizer into a sophisticated bite bursting with more complex flavor layers.
Q3: How do you make a perfect balsamic glaze at home?
A3: Making your own balsamic glaze is surprisingly simple. Just simmer high-quality balsamic vinegar over low heat until it reduces by half and thickens into a glossy, syrupy consistency. For extra richness, a spoonful of honey or brown sugar can be added during reduction to enhance sweetness.
Q4: Are there any tips for assembling the salad with the glaze?
A4: Absolutely! Start with evenly slicing ripe tomatoes and fresh mozzarella. Arrange them artistically on a plate, tuck basil leaves between layers, then lightly season with salt and freshly cracked pepper. Finish by elegantly drizzling the balsamic glaze in a zigzag pattern-less is more, so let the glaze accentuate rather than overpower.
Q5: Can this balsamic glaze twist be paired with other variations?
A5: Yes! Try incorporating heirloom tomatoes for color diversity, or add a sprinkle of toasted pine nuts for crunch. For a smoky edge, grilled peaches or a hint of chili flakes create a surprising yet harmonious balance with the balsamic glaze. The possibilities are endless-let your palate guide the adventure!
Q6: Why is this elevated Caprese salad a great choice for entertaining?
A6: It’s visually stunning, easy to assemble, and offers a refined flavor profile that will impress guests without requiring hours in the kitchen. Plus, the balsamic glaze adds a touch of gourmet flair that transforms this humble dish into a show-stopping starter or side.
Q7: Any final words on enjoying this elevated Caprese experience?
A7: Savor each bite slowly, appreciating how the creamy mozzarella, juicy tomato, fragrant basil, and rich balsamic glaze dance together on your palate.It’s not just a salad-it’s a journey through the heart of Italy, reimagined with a deliciously sweet and tangy twist. Bon appétit!
To Wrap It Up
As you savor the bright freshness of ripe tomatoes and creamy mozzarella,the addition of a luscious balsamic glaze transforms the classic Caprese salad into an extraordinary experience. This simple yet sophisticated twist not only deepens the flavors but also elevates every bite with a delicate balance of sweetness and tang. Whether served as a vibrant appetizer or a light summer meal, the rich balsamic glaze invites you to rediscover the timeless charm of this Italian favorite in a whole new way. So next time you’re craving something fresh and flavorful, drizzle on that glossy glaze and watch your caprese salad blossom into a gourmet masterpiece.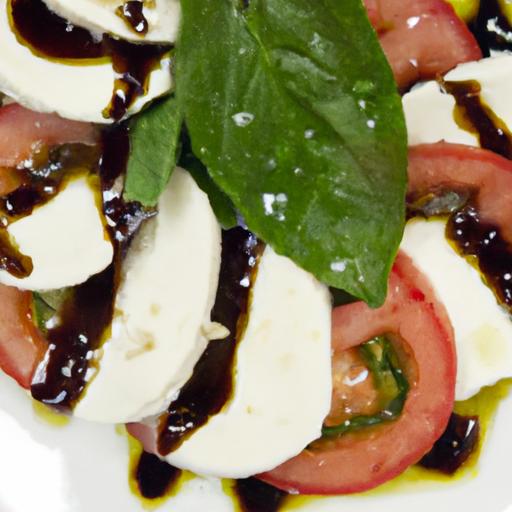
crispy Parmesan Roasted Brussels Sprouts are a festivity of texture and flavor brought to life with simple yet strategic steps. From selecting the freshest sprouts to achieving that irresistible golden crust,this recipe transforms a humble vegetable into a show-stopping side dish. Having perfected this method over countless kitchens, I find that it strikes a perfect balance between nutty Parmesan richness and the satisfying crispness every Brussels sprout lover craves.
Prep and Cook Time
Preparation: 15 minutes | Cooking: 25 minutes | Total: 40 minutes
Yield
Serves 4 as a side dish
Difficulty Level
Easy
Ingredients
- 1 ½ pounds fresh brussels sprouts, trimmed and halved
- 3 tablespoons extra-virgin olive oil
- 1 teaspoon kosher salt
- ½ teaspoon freshly ground black pepper
- 1 cup finely grated Parmesan cheese (preferably Parmigiano-Reggiano)
- 2 cloves garlic, minced
- 1 teaspoon garlic powder
- 1 tablespoon lemon juice (optional, for brightness)
- Zest of 1 lemon (for garnish)
- Red pepper flakes, a pinch (optional, for subtle heat)
Instructions
- Choosing the Perfect brussels Sprouts: Begin by selecting firm, vibrant green Brussels sprouts with tightly closed leaves. Smaller are sweeter and crisper, while medium-sized offer hearty texture. Avoid yellowing or loose leaves for optimal crunch.
- Prepare and Rinse: Rinse your Brussels sprouts under cold water, then trim the stems and halve each sprout lengthwise, which promotes even roasting and maximum surface crispiness.
- parmesan Coating Preparation: In a large bowl,combine olive oil,minced garlic,garlic powder,salt,and pepper. Toss the sprouts to coat evenly, then sprinkle in the grated Parmesan gradually, stirring gently to create a thin, flavorful crust without clumps.
- Roasting Setup: Preheat your oven to 425°F (220°C). Arrange the sprouts cut-side down in a single layer on a parchment-lined baking sheet. Spacing is key – give sprouts plenty of room so they don’t steam but roast to crisp golden perfection.
- Roast to Golden Perfection: Place the tray in the oven and roast for 20-25 minutes, turning once halfway through. Keep a close eye after 15 minutes: the Parmesan should meld and brown without burning, forming that treasured crispy crust. If you want extra crispiness, switch to broil for the last 1-2 minutes, watching carefully.
- Finish and Serve: Once roasted, toss the sprouts with a splash of fresh lemon juice and sprinkle with lemon zest and red pepper flakes for a lively finishing touch. Serve immediately for that unrivaled crispy experience.
Tips for Success
- Sprout Size Matters: Choose uniform sizes for even roasting. If some are larger, quarter them.
- Parmesan Quality: Freshly grated Parmesan (like Parmigiano-Reggiano) melts beautifully and provides complex nuttiness. Pre-grated cheese can contain anti-caking agents that affect coating texture.
- Spread Out: Don’t overcrowd the pan. Crowding traps steam and soggy sprouts are the enemy of crispiness.
- Make-Ahead: Prepare the Parmesan mixture and coat the sprouts a few hours ahead, then keep refrigerated. Roast right before serving for convenience.
- Substitutions: For a twist, swap Parmesan with Pecorino Romano or add a sprinkle of smoked paprika for smoky warmth.
- Reheating: Reheat in a hot oven or toaster oven to revive crispness. Microwaving will make them lose texture.
Serving Suggestions
These crispy Parmesan roasted Brussels sprouts shine as an elegant side at holiday tables or casual weeknight dinners. Serve alongside herb-roasted chicken or grilled salmon to complement their earthy flavor. For added indulgence, drizzle with balsamic glaze or a dollop of lemon-garlic aioli. Garnish with toasted pine nuts or crisp prosciutto pieces to elevate the dish visually and texturally. Pair with a chilled glass of dry white wine, like Sauvignon Blanc, to balance the richness and brighten your palate.

| Nutrient | Amount per Serving |
|---|---|
| Calories | 180 |
| Protein | 9g |
| Carbohydrates | 12g |
| Fat | 11g |
To learn more about perfect roasting techniques, check out our Ultimate Roasted Vegetables Guide. For nutritional insights on Brussels sprouts, visit ChooseMyPlate.gov.
Q&A
Q&A: Crispy Parmesan Roasted Brussels Sprouts – A flavorful Twist
Q1: What makes these Crispy Parmesan Roasted Brussels Sprouts different from traditional roasted Brussels sprouts?
A1: while classic roasted Brussels sprouts rely on simple olive oil and seasoning, this flavorful twist introduces a generous sprinkling of Parmesan cheese, which crisps up beautifully in the oven. The cheese creates a golden, savory crust that contrasts perfectly with the sprouts’ natural earthiness and slight bitterness, adding a new dimension of flavor and texture.
Q2: How do you achieve that perfect crispy texture on the Brussels sprouts?
A2: The secret lies in thorough drying and high-temperature roasting. After washing, make sure to pat the Brussels sprouts entirely dry. Tossing them in olive oil ensures each leaf gets coated, promoting caramelization. Roasting at around 425°F (220°C) helps create a beautifully crisp exterior while keeping the inside tender. Adding the Parmesan cheese partway through baking lets it melt and crisp without burning.
Q3: Can I customize the seasoning beyond just Parmesan?
A3: Absolutely! While Parmesan is the star, you can elevate the flavor with garlic powder, smoked paprika, or a pinch of red pepper flakes for heat. Fresh herbs like thyme or rosemary add aromatic notes, and a squeeze of lemon juice at the end can brighten the entire dish, balancing the richness of cheese and brussels sprouts.Q4: What’s the best way to prepare Brussels sprouts for roasting? Should I halve them or quarter them?
A4: Halving Brussels sprouts lengthwise is the most common and effective method-it exposes more surface area to the heat, encouraging browning and crispiness. If you want even crisper bites and faster roasting, you can quarter larger sprouts. Just keep in mind that smaller pieces roast faster, so keep an eye to prevent burning.
Q5: Can this recipe fit into different dietary preferences?
A5: Yes! It naturally fits vegetarian diets, and by opting for a vegetarian rennet Parmesan or a plant-based cheese choice, you can make it vegan-amiable. for those watching sodium, try reducing added salt and use a low-sodium Parmesan. The dish is gluten-free by nature, making it accessible for many dietary needs.
Q6: What occasions suit Crispy Parmesan Roasted Brussels Sprouts best?
A6: This dish is incredibly versatile! Whether it’s a weeknight side to jazz up dinner or a fancy addition to holiday feasts, these Brussels sprouts stand out. They pair beautifully with roasted meats, pasta dishes, or as a crispy topping on grain bowls. Their remarkable crunch and cheesy flavor make them a crowd-pleaser at any table.
Q7: Any tips for reheating leftovers without losing crispiness?
A7: Reheating roasted Brussels sprouts can be tricky since they tend to soften. The best method is to pop them back into a hot oven (around 400°F/200°C) for 5-7 minutes to crisp up again. Avoid the microwave, which makes them soggy. You can also refresh them in a hot skillet with a drizzle of olive oil for a fast re-crisp.
This Q&A unpacks the magic behind Crispy Parmesan Roasted Brussels sprouts, inspiring both novices and seasoned cooks to embrace this flavorful twist with confidence!
Final Thoughts
in the grand tapestry of vegetable dishes, Crispy Parmesan Roasted Brussels Sprouts stand out as a vibrant, flavorful thread-transforming a humble green into a culinary star. With their golden, crunchy exterior and savory cheesy embrace, these sprouts invite you to rethink what a simple side can be. Whether served alongside a hearty main or enjoyed as a guilt-free snack, this recipe proves that a little creativity, combined with quality ingredients, can turn even the most overlooked ingredients into irresistible delights. So next time you’re craving something both nutritious and delicious, let these Parmesan-kissed Brussels sprouts inspire your kitchen adventures-and savor every crunchy, flavorful bite.
Osso Buco with Gremolata is a festivity of bold flavors and tender textures that redefine classic comfort food. This iconic Italian dish, rooted in the rich culinary tradition of Milan, transforms slow-braised veal shanks into a meltingly soft masterpiece, accented perfectly by the shining, citrusy punch of freshly made gremolata. The interplay between the hearty, fragrant stew and the zesty herb topping elevates this dish into an unforgettable dining experience, perfect for both special occasions and intimate weeknight dinners.
Prep and Cook Time
- Planning: 20 minutes
- Cooking: 2 hours 30 minutes
- Total time: 2 hours 50 minutes
Yield
Serves 4 generously
Difficulty Level
Medium – perfect for home cooks looking to impress with hearty flavors and elegant presentation
Ingredients
- 4 veal shanks (about 1 ½ to 2 inches thick, each approximately 10 oz)
- 1 cup all-purpose flour, for dredging
- 4 tbsp olive oil, divided
- 1 large onion, finely chopped
- 2 medium carrots, diced
- 2 celery stalks, diced
- 4 cloves garlic, minced
- 1 cup dry white wine
- 1 ½ cups canned crushed tomatoes
- 2 cups beef or veal broth
- 2 tbsp tomato paste
- 1 tsp dried thyme
- 2 bay leaves
- Salt and freshly ground black pepper, to taste
- Zest of 1 lemon
For the Gremolata Topping:
- ¼ cup finely chopped flat-leaf parsley
- 1 tbsp lemon zest, finely grated
- 2 garlic cloves, minced
Instructions
- Prepare the veal shanks: Pat the veal shanks dry with paper towels. Season generously with salt and pepper, then dredge each shank in the all-purpose flour, shaking off any excess.
- Sear the meat: In a large heavy-bottomed pot or Dutch oven, heat 2 tablespoons of olive oil over medium-high heat. Sear the veal shanks until golden brown on all sides, about 4 minutes per side. Transfer the shanks to a plate and set aside.
- Sauté the soffritto: In the same pot, add the remaining 2 tablespoons of olive oil. Add the chopped onion, carrots, and celery. sauté for about 8 minutes until the vegetables soften and begin to caramelize, stirring often to avoid burning.
- Add garlic and deglaze: Stir in the minced garlic and cook for 1 minute until fragrant. Pour in the white wine to deglaze the pot, scraping up any browned bits stuck to the bottom. bring to a simmer and reduce by half, about 5 minutes.
- Build the braising liquid: Stir in the crushed tomatoes, tomato paste, thyme, bay leaves, and broth. Season with salt and pepper. return the veal shanks to the pot, nestling them into the liquid so they are mostly submerged.
- Slow braise: Reduce the heat to low, cover the pot, and let simmer gently for 2 to 2 ½ hours. Check occasionally to ensure the liquid is simmering gently, adding more broth if it reduces too much. The meat should be fork-tender and falling away from the bone.
- Prepare the gremolata: While the osso buco cooks, mix the chopped parsley, lemon zest, and minced garlic in a small bowl. This fresh, vibrant topping will cut through the richness of the stew beautifully.
- Finish and serve: Remove the veal shanks carefully from the pot and transfer to a warm serving platter. Spoon the tomato-vegetable sauce around the shanks. Sprinkle the gremolata generously over the meat just before serving to add brightness and texture.
Tips for Success
- Choose the right cut: Look for veal shanks with plenty of marrow in the bone, wich enriches the flavor while cooking.
- Dredging Tips: Lightly flouring the shanks helps create a delicious crust and thickens the sauce naturally.
- Low and slow: Braising slowly over low heat guarantees tender, flavorful meat without drying out.
- Make-ahead: Osso buco tastes even better the next day. Refrigerate and gently reheat for a stress-free dinner.
- Gremolata variations: For a herbaceous twist, try adding finely diced fresh basil or mint to your gremolata.
Serving Suggestions
Osso Buco with gremolata is traditionally paired with creamy saffron risotto or a delicate polenta, which absorb the sumptuous sauce brilliantly. For a rustic touch, serve alongside roasted garlic mashed potatoes or buttered egg noodles. Garnish the dish with extra fresh parsley and lemon wedges for added color and zing. A glass of full-bodied red Italian wine like Barolo or Chianti complements the complex layers of flavor perfectly.
| Nutrient | Per Serving |
|---|---|
| Calories | 680 kcal |
| Protein | 58 g |
| Carbohydrates | 18 g |
| Fat | 32 g |

For more Italian classics, explore our risotto recipes. To deepen your knowledge of traditional Italian braising techniques, visit Serious Eats’ detailed guide.
Q&A
Q&A: Osso Buco with gremolata – A Bold Twist on classic Comfort
Q: what exactly is Osso Buco, and why is it considered a comfort food classic?
A: Osso buco, which means “bone with a hole” in Italian, is a traditional Milanese dish featuring braised veal shanks cooked low and slow until meltingly tender. its rich, hearty flavors and luscious marrow-filled bone have made it a beloved comfort food-a warm hug on a plate that dates back centuries.
Q: How does adding gremolata transform this timeless dish?
A: Gremolata-an aromatic mixture of lemon zest, garlic, and parsley-cuts through the richness of the braised meat with vibrant freshness and a zingy brightness. It’s like a spark of sunshine that wakes up the rustic depths of Osso Buco, bringing balance and a bold contemporary twist to a classic comfort dish.
Q: What makes this version of Osso Buco “bold”?
A: The boldness comes from reimagining tradition without losing its soul. Alongside gremolata’s lively punch, chefs frequently enough introduce unexpected ingredients-think smoky roasted tomatoes, a hint of chili, or a splash of exotic spices. These layers add complexity while honoring the dish’s comforting heritage.
Q: Can Osso Buco with gremolata be made with meats other than veal?
A: Absolutely! While veal is classic, beef shanks, pork hocks, or even lamb can carry the slow braise beautifully. Each protein imparts its own flavor personality, and gremolata’s citrusy brightness complements them all, making the dish versatile and exciting.
Q: How should one serve Osso Buco with gremolata to maximize the experience?
A: Serve it over creamy risotto alla Milanese or buttery polenta to soak up every luscious drop of sauce. Spoon generous gremolata over the top just before serving to preserve its fresh zing. A crisp green salad or sautéed greens can add crispness to the plate, balancing richness with freshness.
Q: Is Osso Buco with gremolata challenging to prepare at home?
A: Not at all! it’s a perfect dish for home cooks who enjoy slow-cooked meals. The braise requires patience but minimal active time-just prep, then let the oven do the work. Whipping up gremolata is quick and easy, requiring just a few simple ingredients and a zest of enthusiasm.
Q: What beverage pairs best with this bold yet comforting dish?
A: A robust red wine like Barolo or Chianti Classico complements the savory depths of the Osso Buco while standing up to the bright gremolata. For non-wine drinkers, a sparkling mineral water with a twist of lemon or a well-crafted bitter spritz can echo the dish’s fresh and bold flavors beautifully.
Q: Why should modern food lovers revisit Osso Buco with gremolata today?
A: Because it’s the perfect culinary blend of nostalgia and novelty. This dish invites you to slow down, savor deep, soulful flavors, and then awaken your palate with a splash of brightness. It’s comfort food that doesn’t settle for ordinary-it dares to be bold, fresh, and utterly unforgettable.
To Wrap It Up
As the rich, tender osso buco melts on your tongue, brightened by the zesty punch of gremolata, you’re reminded that comfort food isn’t just about tradition-it’s about bold reinvention. This classic Italian dish, elevated with fresh herbs and citrus, invites you to savor every bite with renewed thankfulness. Whether enjoyed on a quiet evening or shared among friends,osso buco with gremolata promises a harmonious dance of flavors that honors the past while boldly stepping into the future of culinary delight. So next time you crave something familiar yet exciting, let this vibrant twist on a timeless favorite be your go-to comfort on a plate.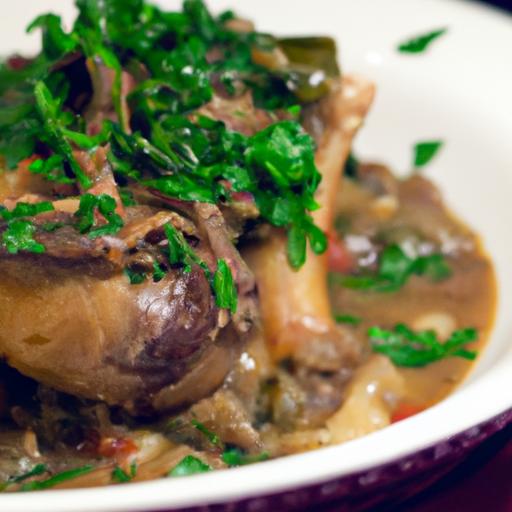
Sweet & Simple: Glazed Baby carrots with Honey Delight
Sweet & Simple: Glazed Baby Carrots with Honey Delight captures the perfect balance between effortless cooking and sublime flavor that will brighten any meal. This humble side dish has become a family favorite in my kitchen, delivering tender, buttery carrots kissed with a luxuriously smooth honey glaze. Through years of experimentation, I’ve unlocked the secret to consistently tender baby carrots, enhanced by the natural sweetness of the perfect honey choice. Whether you’re a novice or a seasoned home cook, this recipe invites you to indulge in pure comfort with minimum fuss and maximum taste.
Prep and Cook Time
- Prep Time: 10 minutes
- Cook time: 20 minutes
- Total Time: 30 minutes
Yield
Serves 4 as a flavorful side dish
Difficulty Level
Easy – perfect for everyday dinners or holiday feasts
Ingredients
- 1 lb baby carrots, peeled and washed
- 2 tbsp unsalted butter
- 3 tbsp high-quality honey (see notes below)
- 1/2 tsp kosher salt
- 1/4 tsp freshly ground black pepper
- 1 tbsp fresh lemon juice (optional, for brightness)
- 1 tsp fresh thyme leaves or finely chopped parsley (for garnish)
Choosing the Right Honey for a Naturally Sweet Finish
The secret to a truly captivating glaze lies in your honey selection. For this dish, opt for a mild, floral honey like clover or orange blossom. These varieties offer a gentle sweetness that complements the earthiness of the carrots without overpowering them.Avoid stronger honeys such as buckwheat or manuka, which can skew the balance and mask the delicate flavors. If you enjoy a nutty or caramel undertone, wildflower honey is a great choice. Using the right honey ensures the glaze remains effortlessly sweet and naturally radiant.
Step by Step Guide to Achieving the Ultimate Honey Glaze
- Prepare your baby carrots: Peel if necessary and rinse under cold water. Pat dry to remove excess moisture, which ensures a better glaze.»
- heat the butter: Place a medium skillet over medium heat. Add the unsalted butter and let it melt until foaming but not browned.
- Add the carrots: toss the carrots into the skillet, stirring to coat them evenly in butter. Sauté for about 5 minutes, letting them develop a light golden crust.
- incorporate the honey: lower the heat to medium-low, drizzle the honey evenly over the carrots, and stir gently to combine.
- Season with salt and pepper: Sprinkle kosher salt and fresh black pepper over the carrots to enhance their natural flavor.
- Simmer gently: Cover the skillet with a lid and allow the carrots to cook for 8-10 minutes, stirring onc or twice.This slow simmering tenderizes the carrots while the honey syrup thickens beautifully.
- Finish with lemon juice: Remove the lid, increase heat slightly and add the fresh lemon juice for a touch of brightness. Stir until the glaze becomes sticky and coats the carrots entirely-about 2 minutes more.
- Garnish and serve: Transfer to a serving dish, sprinkle with fresh thyme or parsley for vibrant color and aroma.
tips for Success
- Use uniformly sized baby carrots to ensure even cooking.
- If your carrots are on the thicker side, parboil them for 3 minutes before glazing to guarantee tenderness.
- To deepen flavor, add a pinch of smoked paprika or a small knob of ginger during the butter melting stage.
- Make-ahead: Prepare the glazed carrots up to step 7 and refrigerate. Reheat gently in a skillet adding a splash of water or butter to refresh the glaze.
- For vegan variation, swap the butter for coconut oil or a plant-based spread.
Creative Serving Suggestions to Elevate Your Baby Carrot Dish
To turn this sweet & simple glazed baby carrot recipe into a show-stopping accompaniment, try these inspired ideas:
- fall Feast: Serve alongside a rosemary roast chicken, garnished with toasted pecans for seasonal crunch.
- Radiant & Fresh: Toss glazed carrots into a warm grain bowl with quinoa, roasted chickpeas, and kale, finishing with a drizzle of tahini.
- Wedding-Style Delight: Pair carrots with a honey-balsamic drizzle and crumbled goat cheese for elegant plating.
- Holiday Sparkle: Add a handful of dried cranberries and chopped pistachios for festive texture and color contrast.
- Pure Simplicity: Present on a rustic wooden board with assorted artisan breads, herb butter, and a glass of chilled white wine for casual entertaining.
| Nutrient | Per Serving |
|---|---|
| Calories | 110 kcal |
| Protein | 1.2 g |
| Carbohydrates | 24 g |
| Fat | 4 g |
Discover more wholesome side dishes in our Healthy Vegetable Recipes collection or learn about the specialty of honeys at the National Honey Board.

Q&A
Q&A: Sweet & Simple – Glazed Baby Carrots with Honey Delight
Q1: What makes “Glazed Baby Carrots with Honey Delight” different from your average carrot side dish?
A1: This recipe turns humble baby carrots into a shimmering, sweet sensation. Rather of just steaming or boiling, the carrots are glazed in a luscious honey-based sauce that amplifies their natural sweetness and adds a beautiful, glossy finish. It’s simplicity elevated to a tastefully elegant level!
Q2: Why use honey as the glaze’s star ingredient?
A2: Honey doesn’t just sweeten; it brings depth and warmth. Its floral notes complement the earthiness of the carrots, creating a harmonious flavor profile. Plus, honey caramelizes beautifully, giving the carrots a delicate crunch and an irresistible sheen.Q3: Can I substitute honey with other sweeteners?
A3: Absolutely! Maple syrup or agave nectar can be excellent alternatives, each introducing a slightly unique character. Maple, for instance, lends a smoky hint, while agave offers a gentle, neutral sweetness. Just keep the glaze ratio the same for best results.
Q4: How do I ensure that my glazed carrots don’t become mushy?
A4: The secret lies in timing.Start by gently steaming the baby carrots until tender but still crisp-about 5 to 7 minutes. Then, finish them in the honey glaze over medium heat, allowing it to thicken and coat each carrot without turning them soggy.Q5: Are there any flavor boosters I can add to this glaze?
A5: Definitely! A pinch of cinnamon or a splash of fresh lemon juice can brighten the dish. For a savory twist, a dash of freshly ground black pepper or a sprinkle of fresh thyme can add complexity and balance the sweetness.
Q6: Is this recipe suitable for special diets?
A6: yes! The dish is naturally vegan (when using plant-based sweeteners), gluten-free, and low in fat. It’s a wonderful side for anyone seeking a wholesome yet delightful vegetable option.
Q7: How can I present these glazed carrots to wow my guests?
A7: Serve them warm on a pristine white platter, garnished with a scattering of chopped fresh parsley or toasted sesame seeds for a contrasting texture. The glossy honey glaze will catch the light and make your table shine just as brightly as your cooking skills!
Q8: Any tips for prepping ahead of time?
A8: You can steam the carrots a day in advance and store them covered in the fridge. When ready to serve,simply prepare the honey glaze and toss the carrots in it. This keeps the carrots fresh, preventing them from soaking up too much glaze and getting soft.
Q9: What dishes pair best with glazed baby carrots?
A9: these sweet delights pair perfectly with roasted meats like chicken or pork, hearty grain bowls, or even a simple weeknight dinner featuring grilled fish. They add a pop of color and sweet flavor balance to any plate.
Q10: Where can I find the best baby carrots for this recipe?
A10: Look for firm, bright orange baby carrots without any cracks or soft spots. Freshness is key, whether you buy pre-packaged or pick them fresh at a farmer’s market. If you prefer, you can even trim and peel regular carrots into bite-sized “baby” pieces!
Key Takeaways
these glazed baby carrots with honey delight prove that simplicity can shine brilliantly on the dinner plate. With just a few easy ingredients, you transform humble roots into a glossy, sweet, and tender side that complements any meal. Whether you’re aiming to elevate your weeknight dinner or add a touch of elegance to a holiday spread, this recipe invites you to savor the natural sweetness of carrots glazed to perfection. So next time you want a dish that’s both effortless and impressive, remember: sometimes, the simplest ingredients create the most delightful flavors.
Spin Into Health: Delicious & Nutritious Spinach Recipes unlock the vibrant potential of this leafy green powerhouse, elevating meals from ordinary to unusual. Whether fresh from the garden or nestled in your freezer, spinach offers a bounty of vitamins, minerals, and antioxidants that not only nourish your body but also inspire culinary creativity. Imagine refreshing smoothies swirling with emerald hues, crisp salads bursting with color and texture, or hearty dishes that warm the soul while fueling your day. This recipe collection invites you to savor spinach in versatile forms that celebrate its subtle earthiness and silky texture, turning every bite into a wellness boost.
Prep and Cook Time
- Preparation: 10 minutes
- Cooking: 15 minutes
- Total Time: 25 minutes
Yield
- Serves 4 generous portions
Difficulty Level
- Easy – Perfect for beginners and seasoned cooks alike
Ingredients
- 5 cups fresh baby spinach, washed and dried
- 1 cup Greek yogurt, plain and creamy
- 1 medium ripe avocado, peeled and pitted
- 1/2 cup cucumber, peeled and diced
- 1 tbsp fresh lemon juice
- 1 clove garlic, minced
- 1/4 tsp sea salt
- 1/4 tsp freshly ground black pepper
- 2 tbsp extra virgin olive oil
- 1/4 cup toasted walnuts, chopped
- 1 medium pear, cored and thinly sliced
- 1/4 cup crumbled feta cheese (optional)
Instructions
- Prepare the base: In a large bowl, combine the fresh baby spinach with the diced cucumber and sliced pear, tossing gently to mix the crisp textures.
- Whip the dressing: In a blender or food processor, add Greek yogurt, avocado, lemon juice, garlic, sea salt, black pepper, and olive oil.Blend until silky smooth. This creamy dressing adds a luscious, velvety touch with a hint of tangy freshness.
- Toss and coat: Pour the dressing over the spinach mixture. Toss delicately to ensure every leaf is coated without bruising. This careful folding preserves the vibrant green color and the leaf’s natural crunch.
- Finish with crunch and cream: Sprinkle toasted walnuts and crumbled feta cheese evenly atop the salad. These toppings introduce rich, nutty, and savory accents, balancing the creaminess of the avocado dressing.
- Serve instantly: This salad is best enjoyed fresh to keep the spinach bright and crisp. Pair it with whole-grain bread or grilled chicken for a complete, energizing meal.
Chef’s Notes
- For a vegan twist, substitute Greek yogurt with coconut or almond yogurt and omit feta cheese.
- To intensify the flavor, add a teaspoon of Dijon mustard to the dressing for a subtle kick.
- If fresh baby spinach is unavailable,thawed frozen spinach can be squeezed dry and chopped finely-just reduce the dressing slightly to prevent sogginess.
- Make-ahead tip: Prepare the dressing up to 24 hours in advance and store in an airtight container. Assemble the salad just before serving for maximum freshness.
- For additional protein, toss in roasted chickpeas or a handful of cooked quinoa.
Serving Suggestions
Present this vibrant salad in large white bowls to showcase the contrasting colors-the deep green of spinach, the creamy pale avocado dressing, and the jewel tones of pears and walnuts. Garnish with a sprig of fresh basil or dill for aromatic flair. A drizzle of aged balsamic vinegar complements the salad’s brightness beautifully. Serve alongside a chilled glass of winter white wine or sparkling water infused with cucumber slices for a refreshing balance.
| Nutrient | Per Serving |
|---|---|
| Calories | 210 kcal |
| protein | 7 g |
| Carbohydrates | 12 g |
| Fat | 16 g |

For more ways to enrich your meals, explore our healthy green smoothies guide, packed with energizing recipes. To understand spinach’s incredible health benefits in depth, visit Healthline’s complete nutritional overview.
Q&A
Q&A: Spin Into Health – Delicious & Nutritious Spinach Recipes
Q1: Why is spinach considered a superfood?
A1: Spinach isn’t just your average leafy green-it’s a powerhouse packed with vitamins A, C, and K, iron, magnesium, and antioxidants. These nutrients work together to boost your immune system, support bone health, improve eye health, and even enhance brain function. Simply put,spinach is a delicious ticket to vibrant wellness!
Q2: How can I make spinach more appealing if I’m not a fan of leafy greens?
A2: The key is in the cooking and pairings! Spinach’s mild flavor can be jazzed up with garlic,lemon,nuts,or cheeses like feta and parmesan. Try sautéing it with olive oil and garlic for a savory side, blending it into smoothies for a vibrant green boost, or layering it in cheesy lasagnas and wraps. the possibilities are endless-and tasty!
Q3: What are some quick spinach recipes perfect for busy weeknights?
A3: When time is tight, whip up a spinach and mushroom stir-fry, toss fresh spinach into pasta with cherry tomatoes and pine nuts, or scramble spinach with eggs and a sprinkle of your favorite herbs. Even a simple spinach salad topped with avocado, walnuts, and a drizzle of balsamic can turn dinner into a nutritious celebration.
Q4: Can spinach help with weight management?
A4: Absolutely! Spinach is low in calories but high in fiber, which means it helps you feel full longer without packing on the pounds. Including spinach in your meals can support healthy digestion and curb overeating, making it a smart choice for any weight management plan.
Q5: Are there any tips for storing spinach to keep it fresh and tasty?
A5: Keep spinach fresh by storing it in a breathable container or perforated bag in the refrigerator. Avoid washing it until you’re ready to use it, as excess moisture can speed up spoilage. If you have more than you can use fresh, try blanching and freezing spinach-it’s perfect for smoothies, soups, and sauces later on.
Q6: Is cooking spinach better than eating it raw?
A6: Both raw and cooked spinach have nutritional perks! Cooking spinach slightly-like sautéing or steaming-can increase the availability of certain antioxidants and reduce oxalates, which can block mineral absorption. However, raw spinach retains more vitamin C. Mixing up your spinach intake both ways is a delicious strategy to maximize its benefits!
Q7: How can I incorporate spinach into desserts or sweet dishes?
A7: Believe it or not,spinach plays well in sweets,too! Think spinach and banana smoothies,vibrant green spinach muffins,or spinach-infused pancakes. Its mild taste hides beautifully beneath natural sweeteners like honey or maple syrup, offering a sneaky nutritional boost in your favorite treats.
Q8: What’s a fun, creative recipe to get kids excited about spinach?
A8: Kids often love colorful, interactive meals! Try spinach “power balls” where spinach is blended into energy bites with oats, dates, and cocoa, or spin up a “green monster” smoothie with spinach, banana, and berries. Spinach quesadillas with melted cheese can be another hit-melty, crunchy, and packed with goodness!
Get ready to spin your way into health with recipes that delight your taste buds and nourish your body. Whether raw,cooked,sweet,or savory,spinach is the leafy star your kitchen deserves!
In Summary
As we wrap up our leafy journey through the vibrant world of spinach,it’s clear that this humble green is much more than a sidekick on your plate. Packed with nutrients and bursting with flavor, spinach effortlessly transforms everyday meals into nourishing feasts. whether you’re whipping up a refreshing salad, blending a revitalizing smoothie, or savoring a warm, comforting dish, spinach brings a perfect balance of health and taste to your table. So next time you stroll down the produce aisle, remember: spinning spinach into your diet isn’t just a culinary choice-it’s a delicious step toward a healthier you. Embrace the green, and let spinach fuel your wellness journey, bite by vibrant bite!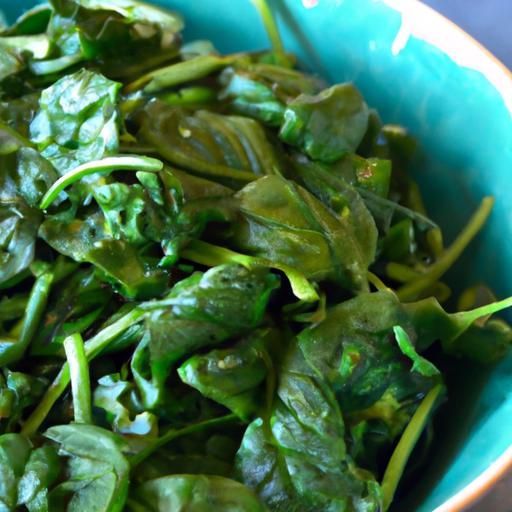
Brighten Your Breakfast: The Magic of Lemon Ricotta Pancakes begins with the perfect harmony of fluffy texture and zesty brightness, all thanks to the transformative power of ricotta and fresh lemon. These pancakes aren’t just another breakfast staple; they embody a culinary science that elevates every bite into a tender, moist, and vibrantly flavored experience. By incorporating ricotta cheese into the batter, the pancakes develop a delicate creaminess that traps steam during cooking, resulting in unparalleled fluffiness. Simultaneously occurring, fresh lemon juice and zest awaken the senses, cutting through the richness with a radiant citrus burst that refreshes the palate.
Prep and Cook Time
- Preparation: 15 minutes
- Cooking: 20 minutes
- Total Time: 35 minutes
Yield
Approximately 12 medium-sized pancakes – ideal for 3-4 servings
Difficulty Level
Easy – perfect for confident beginners and seasoned home chefs alike
Ingredients
- 1 ½ cups all-purpose flour, sifted
- 2 tablespoons granulated sugar
- 1 tablespoon baking powder
- ½ teaspoon fine sea salt
- 1 cup whole milk
- 1 cup fresh ricotta cheese
- 2 large eggs, separated
- 2 tablespoons unsalted butter, melted, plus more for cooking
- Zest of 2 medium lemons (about 2 teaspoons)
- 3 tablespoons fresh lemon juice
- 1 teaspoon pure vanilla extract
Instructions
- Mix dry ingredients: In a large bowl, whisk together the all-purpose flour, baking powder, sugar, and salt until fully combined. Set aside.
- Combine ricotta and liquids: In a separate bowl, gently beat the egg yolks, ricotta, milk, melted butter, lemon zest, lemon juice, and vanilla extract. Stir just until smooth; small lumps in ricotta add delightful texture.
- incorporate dry into wet: Pour the dry mixture into the wet ingredients, folding delicately to maintain airiness.Do not overmix; the batter should be slightly lumpy but uniform.
- Whip egg whites: In a clean bowl, beat the egg whites to soft peaks. carefully fold the whipped whites into the batter in three additions.This step is crucial – the whipped whites introduce lightness that makes these pancakes extraordinarily fluffy.
- Preheat pan and cook: Heat a non-stick skillet or griddle over medium-low heat and brush lightly with butter. For each pancake, pour about ¼ cup of batter. Cook until bubbles appear on the surface and edges are set, approximately 2-3 minutes. Flip gently and cook another 2 minutes until golden and cooked through.
- Serve warm: Keep finished pancakes warm on a baking sheet in a low oven (~200°F) while cooking the remainder.
Tips for Success
- Ricotta choice matters: Use whole milk ricotta for creaminess and mild sweetness. Avoid watery varieties to prevent soggy batter.
- Fresh lemon zest: Always zest lemons before juicing to capture the essential oils that brighten flavor without bitterness.
- Folding technique: Use gentle, sweeping motions when folding the whipped egg whites to preserve maximum airiness.
- Rest the batter: Let your batter rest for 5 minutes before cooking to allow flour hydration, which improves tenderness.
- Cook on medium-low: Pancakes need slow, even heat to rise fully without burning the exterior.
Serving Suggestions
These lemon ricotta pancakes shine beautifully with simple yet fresh toppings. A dollop of whipped cream or a spoonful of mascarpone adds rich luxury, while a drizzle of warm honey or pure maple syrup enhances their natural sweetness. Consider layering with fresh berries-blueberries, raspberries, or sliced strawberries offer contrasting textures and color. for a bright herbal note, garnish with finely chopped mint or thyme leaves. A light dusting of powdered sugar or a few thin lemon slices sets an elegant, breakfast-table-worthy presentation.
| Nutrient | Per Serving (3 pancakes) |
|---|---|
| Calories | 320 kcal |
| Protein | 12 g |
| Carbohydrates | 38 g |
| Fat | 11 g |
For deeper insights into balancing pancake textures, check our guide on Perfect pancake Batter Tips. To learn more about ricotta cheese’s nutritional benefits, visit the Academy of Nutrition and dietetics.

Q&A
Q&A: Brighten Your Breakfast – The Magic of lemon Ricotta Pancakes
Q1: What makes lemon ricotta pancakes different from regular pancakes?
A1: Unlike traditional pancakes, lemon ricotta pancakes boast a tender, fluffy texture that’s almost soufflé-like, thanks to the creamy ricotta cheese mixed into the batter. The addition of fresh lemon zest and juice adds a bright, citrusy zing that elevates the flavor, turning an ordinary breakfast into a vibrant morning celebration.Q2: Why use ricotta cheese in pancakes?
A2: ricotta cheese isn’t just about adding richness-it adds moisture and a delicate creaminess that keeps each bite light yet indulgent. Its mild flavor blends seamlessly with lemon, complementing the citrus notes without overpowering them, while also contributing to the pancakes’ airy rise.Q3: Is the lemon flavor overpowering or subtle in these pancakes?
A3: The lemon in these pancakes is perfectly balanced-enough to awaken your palate with a fresh spark, but subtle enough to let the rich creaminess of ricotta shine through. The secret lies in using freshly grated lemon zest and a splash of juice, which infuse natural brightness rather than overwhelming artificial tartness.
Q4: Can these pancakes be made ahead of time?
A4: While best enjoyed fresh and warm to savor their fluffy magic, you can prepare the batter the night before and cook them in the morning. For leftovers,gently reheat in a low oven or toaster to preserve their soft texture. Just remember, they’re happiest fresh off the griddle!
Q5: what toppings pair best with lemon ricotta pancakes?
A5: think fresh berries for a sweet-tart contrast, a drizzle of honey or maple syrup for added warmth, or a dollop of whipped cream for extra indulgence. Toasted nuts or a sprinkle of powdered sugar can add texture and a hint of elegance.The beauty is in choosing toppings that complement the citrusy creaminess without overshadowing it.
Q6: Are lemon ricotta pancakes healthy?
A6: They’re a delicious balance of indulgence and nourishment. Ricotta provides a good dose of protein and calcium, while the lemon brings fresh vitamin C. Of course, moderation is key, especially with added sugars and syrups, but these pancakes are a wonderfully wholesome way to start your day with a smile and a sunny kick.
Q7: Can I make these pancakes dairy-free or gluten-free?
A7: Absolutely! for a dairy-free version, substitute ricotta with plant-based alternatives like almond or cashew ricotta. For gluten-free pancakes, use your favorite gluten-free flour blend-just be mindful that texture may vary slightly. These tweaks let you enjoy the magic of lemon ricotta pancakes tailored to your diet without losing their bright, fluffy charm.
Q8: What’s the secret to achieving the fluffiest lemon ricotta pancakes?
A8: The trick lies in gently folding the beaten egg whites into the batter, creating pockets of air that puff up beautifully when cooked. Also, using fresh baking powder and not overmixing the batter preserves that light, airy texture.Cook them on medium heat to get a golden crust without burning, sealing in the pancake’s magic inside.
Brighten your breakfast table with this delightful recipe that marries the creamy charm of ricotta and the zesty allure of lemon-because every morning deserves a little magic.
Insights and Conclusions
As the golden drizzle of syrup meets the fluffy layers of lemon ricotta pancakes, breakfast transcends the ordinary and becomes a moment of pure delight. These bright, tangy stacks are more than just a meal-they’re a celebration of flavor and texture that awakens your senses and sets a joyful tone for the day ahead. So next time morning calls, answer with a plate full of sunshine, and let the magic of lemon ricotta pancakes brighten not just your breakfast, but your entire morning routine.
Mussels Marinière is an exquisite embodiment of coastal French cuisine,capturing the essence of briny sea flavors combined with the aromatic freshness of herbs and white wine. Originating from the bustling ports of Normandy and Brittany, this dish has transcended generations, evolving from a humble fisherman’s meal to a celebrated delicacy in gourmet kitchens worldwide. My first encounter with Mussels marinière was during a crisp autumn evening in a quaint seaside bistro, where the steam rising from the bowl promised warmth and comfort. This classic French delight reimagined invites you to savor tradition with an infusion of vibrant, fresh ingredients that elevate every bite.
Prep and Cook Time
- Planning: 15 minutes
- Cooking: 10 minutes
- Total: 25 minutes
Yield
Serves 4 people generously
Difficulty Level
Easy to medium – Perfect for home cooks seeking a quick yet remarkable dish
ingredients
- 3 lbs fresh mussels, cleaned and debearded
- 3 tablespoons unsalted butter
- 2 tablespoons extra virgin olive oil
- 4 cloves garlic, finely minced
- 1 small shallot, finely chopped
- 1 cup dry white wine (such as Muscadet or Sauvignon Blanc)
- 1 cup low-sodium chicken or vegetable broth
- 1/2 cup fresh flat-leaf parsley, chopped
- 2 tablespoons fresh thyme leaves
- Zest of 1 lemon
- Juice of 1/2 lemon
- Freshly ground black pepper, to taste
- Flaky sea salt, to taste
- Crusty French bread, for serving
Instructions
- Prepare the mussels: Rinse mussels under cold water, scrub thier shells, and remove beards. Discard any mussels that are cracked or do not close when tapped.
- Sauté aromatics: In a large, deep skillet or Dutch oven, heat butter and olive oil over medium heat. Add minced garlic and chopped shallot, sautéing until translucent and fragrant, about 3 minutes.
- Add liquids and herbs: Pour in the white wine and broth, then stir in thyme leaves, lemon zest, and a pinch of black pepper. Bring to a gentle simmer.
- Steam the mussels: Increase heat to medium-high, add the cleaned mussels to the pot, cover with a tight-fitting lid and steam for 6-8 minutes, shaking the pot halfway through. Mussels are done when shells fully open. Discard any unopened mussels.
- finish with freshness: Remove pot from heat and stir in freshly chopped parsley and lemon juice. Taste and adjust seasoning with salt and pepper.
- Serve immediately: Ladle mussels into large bowls with the aromatic broth. Serve alongside thick slices of warm, crusty French bread perfect for dipping.
Tips for Success: Elevate Your Mussels Marinière Experience
- Freshness is Key: Always select tightly closed mussels with no unpleasant odor.Soak them in cold water for 20 minutes prior to cooking to purge any sand.
- Choosing Wine: Opt for a dry, crisp white wine such as Muscadet, Sauvignon Blanc, or Pinot Grigio for an authentic and luminous flavor profile.
- Don’t overcook: Mussels cook quickly; overcooking results in rubbery texture. Remove from heat as soon as all shells open.
- Make it Your Own: Add a splash of cream or a pinch of saffron for a luxurious twist while maintaining the spirit of the classic recipe.
- Broth is Gold: The broth is the heart of this dish-save it to drizzle over steamed vegetables or use as a base for seafood soups.
- Make-Ahead: Prepare the broth and aromatics earlier in the day; steam mussels just before serving to maintain freshness.
Serving Suggestions: Bringing Mussels Marinière to the Table
To highlight the vibrant flavors of your Mussels Marinière, consider garnishing with extra sprigs of fresh parsley and a wedge of lemon on the side. A crisp green salad dressed with a light vinaigrette complements the richness beautifully. Pair this dish with a chilled glass of the white wine used in cooking for an elegant dining experience that evokes the French coast.For an indulgent variation, serve over a bed of buttery, herbed linguine or with garlic-rubbed grilled baguette slices to soak up the luscious broth.

Nutrition Facts
| Nutrient | Per Serving |
|---|---|
| calories | 280 kcal |
| protein | 38 g |
| Carbohydrates | 5 g |
| Fat | 8 g |
Discover more classic French seafood recipes to deepen your culinary journey. For further historical insights on regional French cuisine, visit Encyclopedia Britannica on French cuisine.
Q&A
Q&A: Mussels marinière: A Classic French Delight Reimagined
Q1: What exactly are Mussels Marinière?
A1: Mussels Marinière is a classic French dish hailing from the coastal regions of France.Traditionally, it features fresh mussels cooked in a flavorful broth of white wine, garlic, shallots, butter, and fresh herbs like parsley.The result is a fragrant, briny, and utterly satisfying seafood experience that captures the essence of the sea.
Q2: Why is this dish considered a French culinary icon?
A2: mussels Marinière embodies the French beliefs of elevating simple, high-quality ingredients with finesse. Its roots go deep into French coastal traditions where mussels are abundant.The dish balances the natural taste of shellfish with the aromatic complexity of its broth, showcasing classic French cooking techniques like sautéing aromatics and simmering in wine.
Q3: how can Mussels Marinière be “reimagined”?
A3: reimagining Mussels Marinière means infusing the timeless recipe with new flavors, textures, or presentations while respecting its identity.Chefs and home cooks might introduce unexpected spices like lemongrass or saffron, swap white wine for a splash of sake or cider, incorporate cream or coconut milk for richness, or serve the mussels alongside creative accompaniments such as porous bread infused with herbs or a bright fennel and orange salad.The goal is to surprise the palate without overshadowing the mussels’ fresh taste.
Q4: What are some creative twists that work well with this dish?
A4: There’s a world of options! Try adding a touch of smoked paprika or chili flakes for subtle heat, or stir in chopped tomatoes and basil for a Mediterranean vibe. For a richer texture, a dash of cream transforms the broth into a velvety sauce. Using different herbs like tarragon or cilantro can shift the flavor dimension entirely.Even plating the mussels on a bed of saffron-infused rice or crispy polenta rounds can turn this humble dish into a gourmet affair.
Q5: Can Mussels Marinière be made accessible for home cooks?
A5: Absolutely! Mussels cook quickly and require minimal prep, making this an ideal dish for a weeknight dinner with a touch of elegance. The key is sourcing fresh mussels – those that are tightly closed and smell like the ocean. Then, with just a skillet, a splash of wine, garlic, some butter, and fresh herbs, you’re minutes away from an impressive and tasty meal. Plus, the broth is perfect for dipping crusty bread, making cleanup easy and the experience all the more immersive.
Q6: What wine pairs best with Mussels Marinière?
A6: A crisp, dry white wine works beautifully here-think Sauvignon Blanc, Muscadet, or Chablis. These wines echo the brightness and minerality of the dish’s broth, highlighting its seafood essence without overpowering it. For the adventurous, a light sparkling wine or even a chilled rosé can add a refreshing contrast that livens up the meal.
Q7: Why does this dish continue to captivate modern food lovers?
A7: Mussels Marinière endures as it offers comfort and sophistication concurrently. Its a dish rooted in tradition yet endlessly adaptable, inviting cooks to honor classic flavors while exploring global influences. Its ease, freshness, and social dining experience-often shared from a steaming pot-make it perfect for today’s culinary curiosity and convivial dinner tables alike.
In the dance between sea and fire, Mussels Marinière remains a timeless classic – one continually reborn with creativity and love. whether you savor it in a Parisian bistro or reinvent it in your own kitchen, it promises a taste of France’s coastal soul, sparkling with new inspiration.
The Conclusion
As the steam rises and the rich aroma of garlic, shallots, and white wine fills the air, mussels Marinière reminds us why this classic French dish endures through time-its simplicity belies a depth of flavor that captivates the palate.Whether enjoyed in a bustling Parisian bistro or reimagined with a modern twist in your own kitchen, this iconic seafood delight continues to celebrate the art of good ingredients and thoughtful preparation. So,next time you crave a taste of the sea wrapped in the elegance of French tradition,let Mussels Marinière transport you to a world where culinary heritage and innovation meet on every plate. Bon appétit!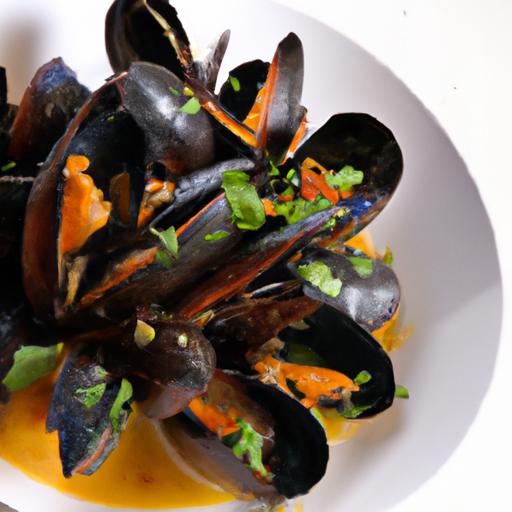
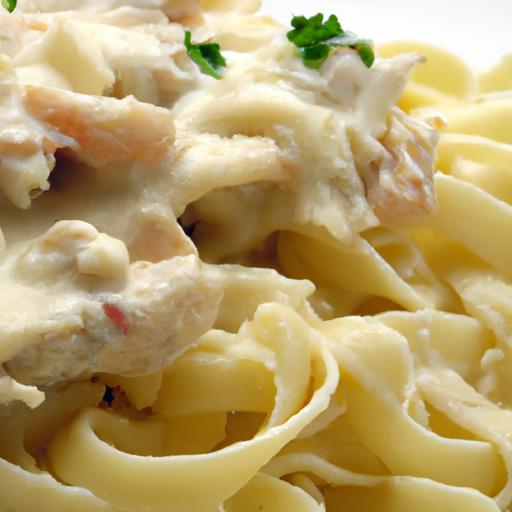
Creamy Delight: Quick & Easy Chicken Alfredo Recipe invites you to experience an indulgent, soul-satisfying classic that combines tender chicken with a luscious, velvety sauce. This dish, rooted in Italian-American tradition, transforms simple ingredients into a masterpiece of comfort and elegance. Every bite delivers the perfect harmony of rich cream, sharp Parmesan, and the savory depth of sautéed garlic, making it a go-to favorite for both weeknight dinners and special occasions. Whether you’re a seasoned home cook or just beginning your culinary journey, this recipe promises a delightful, foolproof approach to mastering the iconic Alfredo sauce paired flawlessly with juicy chicken.
Prep and Cook Time
- preparation: 10 minutes
- Cooking: 20 minutes
- Total Time: 30 minutes
Yield
Serves 4 generous portions
Difficulty Level
Easy – Perfect for cooks of all skill levels
Ingredients
- 2 large boneless, skinless chicken breasts, thinly sliced or pounded to even thickness
- 12 oz fettuccine pasta
- 4 tbsp unsalted butter
- 4 cloves garlic, minced
- 2 cups heavy cream
- 1 ½ cups freshly grated Parmesan cheese
- Salt and freshly ground black pepper, to taste
- 2 tbsp olive oil
- Fresh parsley, finely chopped for garnish
- Optional: A pinch of freshly grated nutmeg or red pepper flakes for depth and subtle heat
Choosing the Perfect Ingredients for a Rich and Flavorful Chicken Alfredo
To achieve the perfect Chicken Alfredo, start with the freshest ingredients you can find. Opt for high-quality chicken breasts that are plump and fresh for tender meat that soaks up the creamy sauce beautifully. When selecting your cream, choose heavy cream with at least 36% fat content for that signature silkiness and body. Use freshly grated Parmigiano-Reggiano cheese rather of pre-grated versions; its complexity and granular texture melt smoothly, enriching every forkful. Lastly, fresh garlic-crushed and minced-injects aromatic intensity that elevates the sauce, while fresh parsley introduces a splash of vibrant color and subtle herbaceous notes. These exceptional ingredients build the foundation for a flavorful, vibrant dish that’s anything but ordinary.
Mastering the Creamy Sauce: Tips for a Smooth and Silky Texture
Creating that iconic Creamy Delight: Quick & Easy Chicken Alfredo Recipe sauce requires attention to temperature and timing. Begin by gently melting butter before adding garlic, allowing the flavors to bloom without burning the cloves. Next,pour in chilled heavy cream slowly,stirring constantly on medium-low heat-this prevents curdling and encourages a luscious texture. Incorporate Parmesan gradually, whisking continuously to melt the cheese evenly without graininess. Adjust seasoning thoughtfully; salt enhances while freshly ground pepper and a hint of nutmeg balance the richness. Avoid boiling the sauce vigorously; rather, keep it at a gentle simmer for that perfect, clingable consistency that wraps each strand of fettuccine in creamy goodness.
Step-by-Step Guide to Quick and Easy Chicken Preparation
- Prepare the chicken: Pat the chicken breasts dry and season both sides generously with salt and pepper.
- Heat olive oil: Warm 2 tablespoons of olive oil in a large skillet over medium-high heat until shimmering.
- Sauté chicken: Place the chicken breasts in the skillet and cook undisturbed for 5 minutes or until a golden crust forms. Flip and cook another 4-5 minutes until cooked through.
- Rest and slice: Remove chicken from the pan and let rest for 5 minutes. Slice into thin strips or bite-sized pieces for easy serving.
- Cook pasta simultaneously: While the chicken cooks, boil salted water and cook fettuccine according to package instructions until al dente.Reserve ½ cup pasta water and drain.
- Combine sauce and pasta: Pour your creamy Alfredo sauce into the skillet; toss in the drained pasta and add reserved pasta water as needed to loosen and coat the noodles beautifully.
- Add chicken: Gently fold sliced chicken into the sauce-coated pasta, letting the flavors meld on low heat.
Serving Suggestions and Pairings to Elevate Your Alfredo Experience
presentation is key to elevating your Creamy Delight: Quick & Easy Chicken Alfredo Recipe. Serve the dish immediately while piping hot, plating a generous nest of fettuccine topped with the golden chicken slices.Garnish with a sprinkle of finely chopped fresh parsley for vivid contrast and a burst of freshness. For added indulgence, shave extra parmesan over the top and crack a few twists of black pepper. Pair this with a crisp Caesar salad or sautéed garlic spinach to introduce textural variety and vibrant greens. A chilled glass of dry Pinot Grigio or a bright Chardonnay perfectly complements the richness, cutting through the creamy sauce for a balanced dining experience. For bread lovers, a warm, crusty garlic bread or homemade focaccia rounds out the meal beautifully.
Chef’s Notes & Tips for success
- Chicken Variations: Substitute boneless thighs for an even juicier result. Just adjust cooking time slightly.
- Make-Ahead Tip: Prepare the sauce in advance and reheat gently,adding reserved pasta water to revive texture.
- Dairy Alternatives: For a lighter option, swap half of the heavy cream with whole milk-but avoid skim, which can curdle.
- Seasoning Balance: Taste the sauce before tossing with pasta; Parmesan adds saltiness, so season cautiously.
- Storage: Leftovers keep well for 2 days refrigerated in an airtight container. Reheat over low heat, stirring often.
Nutritional Information per Serving
| Calories | Protein | Carbohydrates | Fat |
|---|---|---|---|
| 720 kcal | 48 g | 58 g | 35 g |

For more recipes inspired by Italian classics, check out our Classic Italian Pasta Dishes. to learn about the rich history behind Alfredo sauce, visit Encyclopedia Britannica.
Q&A
Q&A: Creamy delight – Quick & Easy Chicken Alfredo Recipe
Q1: What makes this Chicken Alfredo recipe stand out from conventional versions?
A1: Our Creamy Delight recipe balances rich, velvety sauce with a surprisingly quick prep time. We ditch hours of simmering in favor of simple, fresh ingredients that come together in under 30 minutes-perfect for weeknight indulgence without the fuss.
Q2: Can I make this recipe healthier without sacrificing flavor?
A2: Absolutely! Swap heavy cream for half-and-half or a mix of milk and Greek yogurt to lighten the sauce. Use whole wheat pasta or spiralized veggies to add fiber, and lean chicken breasts ensure a protein-packed meal that’s as nourishing as it is delicious.Q3: What are the key ingredients for that irresistibly creamy Alfredo sauce?
A3: The magic trio is butter,garlic,and freshly grated parmesan. Butter creates a luscious base, garlic infuses aromatic depth, and Parmesan gives that signature cheesy punch. Adding a splash of pasta water at the end helps bind the sauce perfectly to your noodles.
Q4: Can I prepare this dish ahead of time?
A4: You can prep the chicken and sauce separately in advance. Reheat gently over low heat with a splash of milk or cream to revive the sauce’s luscious texture before tossing with freshly cooked pasta. Though, for best creaminess, cook and combine just before serving.
Q5: what side dishes pair well with Chicken Alfredo?
A5: Light, fresh sides like a crisp Caesar salad or garlic-roasted broccoli complement the richness beautifully. For a heartier spread, consider warm garlic bread or sautéed mushrooms to enhance the comforting flavors.
Q6: How do I avoid common mistakes like a grainy or separated sauce?
A6: The key is low and slow heat when melting cheese-high temperatures can cause it to clump or separate.Also, temper the sauce with reserved pasta water gradually to maintain smoothness. Stir constantly to marry all elements into a silky, dreamy sauce.
Q7: Can this recipe be customized for other proteins or dietary preferences?
A7: Definitely! Swap chicken for shrimp or tofu for a delightful twist. For gluten-free options, use rice or chickpea pasta. Herb lovers can add fresh basil or parsley for extra zing, and a pinch of red pepper flakes offers a subtle heat to awaken the palate.
Q8: What’s the best way to serve Chicken Alfredo for an impressive presentation?
A8: Twirl the pasta neatly onto plates using tongs, place juicy chicken slices elegantly on top, and drizzle with extra sauce. Garnish with freshly cracked black pepper, chopped parsley, and a few Parmesan shavings to elevate your dish visually and flavor-wise.
Enjoy your journey to creating a truly creamy delight that’s as quick as it is easy!
Key Takeaways
There you have it-a creamy delight that transforms simple ingredients into a comforting, flavorful feast. This quick and easy Chicken Alfredo recipe proves that delicious doesn’t have to mean complicated. Whether you’re cooking for a busy weeknight or impressing guests with minimal effort,this dish delivers rich,velvety satisfaction in every bite. So, grab your skillet, gather your ingredients, and let this timeless classic become your go-to comfort meal-becuase sometimes, the simplest pleasures truly are the most unforgettable.